Transcription
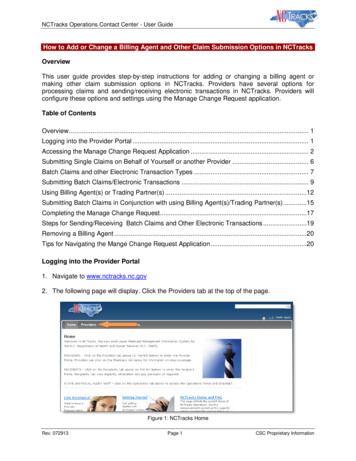
1Field Agent eApp Installationand Troubleshooting GuideContact branchhelp@torchmarkcorp.com if your questions are still unanswered after reading this guide.LNL eApp Installation GuideLNL1905 0412
2Table of ContentsINSTALLATION . 3Tips on Getting Started . 4eApp Installation Instructions – Thumb Drive . 4eApp Installation Instructions - Internet . 13Uninstalling the eApp . 25ERRORS . 2775 Error . 28438 Error . 30Sync-Update Failed . 32LNL Proposal Key File Not Updated . 34This LNL Proposal Program will deactivate in 12 days . 35Error Signing Applications . 38Incorrect Net Framework . 38.Net Framework version 3.5 Service Pack 1 (SP1) .38Malwarebytes.40CCleaner .41LNL eApp Installation GuideLNL1905 0412
3InstallationLNL eApp Installation GuideLNL1905 0412
4Tips on Getting Started1. You must have Administrative Privileges on your laptop to install the eApp properly.2. Vista Users make sure you have at least SP 1 (Service Pack 1) installed on your laptop. You canupdate this at http://update.microsoft.com3. Make sure all Firewall Applications, such as Norton Internet Security and McAfee Security Center,are disabled.Note to Vista Users: Make sure the User Account Security option is off and all Internetpop-up blockers are disabled.Note to Windows 7 Users: The User Account Security must be turned off and then restart yourlaptop to install the eApp.4. Verify the Advanced Security Windows Defender is disabled.5. You must download the eApp and Proposal System from the thumb drive provided by your BranchManager. This method takes about 20 minutes.Note: If you’re absolutely unable to obtain the thumb drive from your Branch Manager followthe instructions in the eApp Installation Instructions - Internet section to download them online.This method can take up to 2.5 hours.6. The eApp only supports Windows XP, Vista, and 7.7. Internet Explorer is the only compatible web browser for the eApp.a. Don’t use Chrome, Mozilla, Safari, etc. if it can be avoided.8. Mini PCs and Mini tablets have issues with DPI and Display requirements within the eApp and shouldnot be used.eApp Installation Instructions – Thumb DriveNote: This is the preferred method for installation. This only takes about 20 minutes.1. Before you install the eApp, you should password protect your PC by going to your User Accountsthrough the ‘Control Panel’.a. Go to the ‘Make changes for your user account’ area.b. Click ‘Create a password’.2. Insert the Thumb Drive from the Home Office and view files. (You can right click the ‘Start Menu’and click ‘Open Windows Explorer’)3. Double-click the ‘Install.bat’ file from the Thumb Drive.LNL eApp Installation GuideLNL1905 0412
54. The setup wizard appears. Click ‘Next’.5. Verify the system folder you want to save the eApp to is correct and select whether or not youwant the eApp to be available to just you or any username on your computer. Click ‘Next’.LNL eApp Installation GuideLNL1905 0412
66. Click ‘Next’.7. A DOS command window box appears showing the files being copied. Let this box run until itfinishes even when other windows pop up over it.Important: Please wait for the DOS box to finish the file copy process.LNL eApp Installation GuideLNL1905 0412
78. Depending on how recent your thumb drive is you may be prompted to press any key or it may justsay “Pre-Downloaded Content Install Complete.”A. If you get this box below, click ‘OK’ and go to Step 7.B. If you get this box below, press any key to continue. Close the other two windows that poppedup as seen in steps 5 and 6.LNL eApp Installation GuideLNL1905 0412
89. If this screen popped up close the WebTek CICS screen by clicking on the X.10. If this screen popped up close the ‘Enter Logon Screen’.11. Double-click the ‘Start LNL Proposals 28’ icon as shown below. (This is for initial install only. Youwon’t need to do this after initial installation.)LNL eApp Installation GuideLNL1905 0412
912. The CICS screen appears. Verify the host entry is www.libnat.com and the port is 3018. Type yourfive-digit LN user ID and your password. Click ‘Signon’. (This is for the proposal.) (Be sure you areconnected to the Internet now.)13. Click ‘OK’.LNL eApp Installation GuideLNL1905 0412
1014. Click ‘Quit’ on the Proposals-LNL screen.15. Double-click the ‘eApp 2010’ icon as shown below.16. The logon screen appears. Type in your Agent Number as the ‘User ID’ and your password. Click‘Sign On’.LNL eApp Installation GuideLNL1905 0412
1117. The synchronization process starts automatically after you log on. Click ‘Continue’ when the updateis complete.18. You are taken to the Landing Screen in the eApp. You can click ‘Start Presentation’ to begin a saleor you can exit the program.LNL eApp Installation GuideLNL1905 0412
1219. To verify the Proposal activated properly, close the eApp.20. Double-click on the ‘Start LNL Proposals 28’ icon.21. Enter your login Credentials on the CICS screen and click ‘Signon’. (Be sure you are connected tothe Internet.)22. Click ‘OK’.23. Click ‘Quit’ on the Proposals-LNL screen.LNL eApp Installation GuideLNL1905 0412
13eApp Installation Instructions - InternetNote: If you’re absolutely unable to obtain the thumb drive, follow these instructions. Remember, thisprocess can take up to 2.5 hours or longer if someone else is trying to download at the sametime. When downloading online, you have to download the Proposal System and the eAppseparately.1. Before you install the eApp, you should password protect your PC by going to your User Accountsthrough the ‘Control Panel’.a. Go to the ‘Make changes for your user account’ area.b. Click ‘Create a password’.2. Ensure that User Account Control (UAC) is turned off.3. Disable Pop-up blokers.a. Go to ‘Tools’.b. Click ‘Pop-up Bloker’.c. Click ‘Turn Off Pop-up Bloker’.LNL eApp Installation GuideLNL1905 0412
144. Sign on to Agent Services.5. Under eApp Software, click the ‘Download Instructions’ link.6. Click the ‘LNL Proposal System’ link.LNL eApp Installation GuideLNL1905 0412
157. Click ‘Run’.8. Click ‘Run’ on the Security Warning.9. Click the ‘Next’ button 4 times.a)LNL eApp Installation GuideLNL1905 0412
16b)c)d)LNL eApp Installation GuideLNL1905 0412
1710. The system is installing the LNL Proposal. This may take a minute.11. Click ‘Close’ once the installation is complete.12. Double-click the ‘Start LNL Proposals 28’ icon as shown below.LNL eApp Installation GuideLNL1905 0412
1813. Enter your login Credentials on the CICS screen and click ‘Signon’. (Be sure you are connected to theInternet.)14. Click ‘OK’.15. Click ‘Quit’ on the Proposals-LNL screen.LNL eApp Installation GuideLNL1905 0412
1916. Now go back to the website and click the ‘eAppInstall.msi’ link.17. Click ‘Run’.18. Click ‘Run’.LNL eApp Installation GuideLNL1905 0412
2019. The setup wizard appears. Click ‘Next’.20. Verify the system folder you want to save the eApp to is correct and select whether or not you wantthe eApp to be available to just you or any username on your computer. Click ‘Next’.LNL eApp Installation GuideLNL1905 0412
2121. Click ‘Next’.22. The eApp starts install. A warning box appears saying that the download could take several hours.Click ‘OK’.23. Click ‘Next’ when the install is complete.LNL eApp Installation GuideLNL1905 0412
2224. Enter your Agent Number (and e-mail address for first time users). Then click ‘Synchronize’ on theApplication Updater Screen.25. Enter your password and click ‘Signon’. (This is now for the eApp, which is separate from theproposal.)LNL eApp Installation GuideLNL1905 0412
2326. AppUpdater will start downloading remaining files for the new eApp. When it is finished, click‘Continue’.27. The log on screen appears. Log on with your username and password.LNL eApp Installation GuideLNL1905 0412
2428. You’ll be taken to the Landing Screen in the eApp. You can click ‘Start Presentation’ to begin a saleor you can exit the program.29. To verify that the Proposal activated properly, close the eApp. Double-click the ‘Start LNL Proposals28’ icon.30. Enter your login Credentials on the CICS screen and click ‘Signon’. (Be sure you are connected to theInternet.)LNL eApp Installation GuideLNL1905 0412
2531. Click ‘OK’.32. Click ‘Quit’ on the Proposals-LNL Screen.Uninstalling the eAppFollow these instructions if you need to permanently uninstall the eApp.1. Click ‘Start’.2. Click ‘Control Panel’.3. XP: Click ‘Add/Remove Programs’.Vista: Click ‘Uninstall a Program’ under the Programs heading.4. Select ‘LNL eApp 2010’ and ‘LNL Proposal 28’.5. XP: Click ‘Remove’.Vista: Click ‘Uninstall’.6. Click ‘Yes’ when asked to remove eApps from your computer.7. Once the eApp software is removed, it won’t appear in the currently installed programs and the iconwon’t appear on your desktop.8. Delete the following LNL and LNL Proposal 28 Directories to permanently remove eApp data. This isseparate from removing the software.C:\Program Files\LNL\C:\Program Files \LNL Proposal 28\OrC:\Program Files (x86)\LNL\C:\Program Files (x86)\LNL Proposal 28\LNL eApp Installation GuideLNL1905 0412
26a.b.c.d.e.Go to ‘My Computer’.Click ‘Local Disk (C:)’.Click on the ‘Program Files’ folder.Highlight the ‘LNL’ and ‘LNL Proposal 28’ filesRight-click and select ‘Delete’.LNL eApp Installation GuideLNL1905 0412
27ErrorsLNL eApp Installation GuideLNL1905 0412
2875 ErrorCause: The User Account Control (UAC) feature is enabled in Vista and Windows 7.Solution: Disable the User Account Control (UAC).1. Click ‘Start’.2. Click ‘Control Panel’.3. Click ‘User Accounts’.LNL eApp Installation GuideLNL1905 0412
294. Click ‘User Accounts’ a second time.5. Click ‘Turn User Account Control on or off’.6. Uncheck the box beside ‘Use User Account Control (UAC) to help protect your computer’.7. Click ‘OK’.LNL eApp Installation GuideLNL1905 0412
308. Click ‘Restart Now’. After your computer reboots itself, install the eApp software again using thesteps in either the eApp Installation Instructions – Thumb Drive section or the eApp InstallationInstructions – Internet section.438 ErrorCause: Invalid version of WebtekPipeline.ocxSolution: Download and register the latest WebtekPipeline.ocx1. Click on WebtekPipeline.ocx.2. Click ‘Save’.LNL eApp Installation GuideLNL1905 0412
313. Save “WebtekPipeline.ocx” to C:\Windows\System32” directory on your machine.Vista and XP UsersVistao Press on the Windows flag and “R” on the keyboard simultaneously.XPo Select ‘Run’. See example below.4. Enter “RegSvr32 C:\Windows\System32\WebtekPipeline.ocx” or where the program is saved onyour computer.5. Click ‘OK’.LNL eApp Installation GuideLNL1905 0412
326. You should receive this message if registered successfully.Sync-Update FailedCause: Intrusion Protection Software (AVG – Version 2011.1205, McAfee, Norton-360-Avast-Kaperskietc.) caused the update to fail.Solution: Disable the Intrusion Protection Software.1. Go to your ‘Control Panel’.2. Double-click on your security provider.LNL eApp Installation GuideLNL1905 0412
333. Click on ‘Internet Options’.4. Lower the security levels to the lowest setting.5. Click ‘Apply’ the click ‘OK’.LNL eApp Installation GuideLNL1905 0412
34LNL Proposal Key File Not UpdatedA. Runtime error “339”B. When running the proposal program after signing on, you receive this error.Cause: Some files may not have been registered properly at download.Solution: Download and run 339fix.bat (If you’re unsure how to save and run a .bat file please follow thedirections below)If you run into problems opening the proposal, first make sure that your firewalls are off, and Vista usersshould also verify that their User Account Control option is disabled. (For instructions on how todeactivate the User Account Control option go to 2869 Error – Vista Only)1. Click on ‘339fix.bat’ link above.2. Click ‘Save’.3. Save the 339fix to the desktop.LNL eApp Installation GuideLNL1905 0412
354. Click on ‘Open Folder’.5. Open the Desktop directory.6. Run the 339fix.bat filea. XP: double-click to run. See example below.b. Vista: Right click and select ‘Run as Administrator’.7. You’ll receive several message box prompts stating that certain files registered successfully. Click‘OK’ for all of these. Once the .bat file is finished, the fix is complete. Run the proposal again to testthe fix.This LNL Proposal Program will deactivate in 12 daysLNL eApp Installation GuideLNL1905 0412
361. Right click on ‘Start’.2. Click ‘Explore’.3. Click ‘Local Disk [C:]’.4. Click ‘Program Files’ folder.5. Double-click ‘LNL Proposal’ folder.LNL eApp Installation GuideLNL1905 0412
376. Right click ‘Propkey’.7. Click ‘Delete’.8. Click ‘Yes’.9. Go to the Desktop and double-click on the ‘Proposal Icon’.10. You might have to run the 339 fix.LNL eApp Installation GuideLNL1905 0412
38Error Signing ApplicationsThis error usually occurs when trying to create application images.Cause: Most likely Kodak.ocx files were not installed properlySolution:Step 1: Download Image Viewer Files here (save zip "regKodakImages.zip" file to your computer)Step 2: Right click zip fileStep 3: Select "Extract All" to extract all files to folder "C:\Windows\System32" -- see directions below1. Click ‘Next’.2. Click ‘Browse’.3. Expand ‘MyComputer’.4. Expand ‘LocalDisk(C)’.5. Expand ‘Windows’.6. Select ‘System32 Folder’.*** If it asks you to replace files answer ‘Yes to All’.Step 4: Make sure “Show Extracted Files" is checked and Select ‘Finish’.Step 5: Locate "regKodakImages.bat" and execute program by double clickingIncorrect Net FrameworkAlways load the Redistributable Package. **This requires Internet access.**.Net Framework version 3.5 Service Pack 1 (SP1)If you receive a message after trying to install the eApp software stating, “This setup requires the .NetFramework version 3.5 SP1. Please install the .Net Framework and run the setup again. The .NetFramework is available from the web. Would you like to do this now?” Follow these instructions.1. Go to ?FamilyID ab99342f-5d1a-413d-831981da479ab0d7&displaylang en if you aren’t directed to this site by the error message.2. Click ‘Download’.LNL eApp Installation GuideLNL1905 0412
393. Click ‘Run’.4. Click ‘Run’.5. In the End-User License Agreement, click the box until a check mark appears next to ‘I accept theterms of the License Agreement’.6. Click ‘Install’. This process may take between 10 and 20 minutes.LNL eApp Installation GuideLNL1905 0412
407. Once the installation is complete, click ‘Exit’.Malwarebytes.Net Framework errors are sometimes caused by a virus (usually System.dll). The eApp displays an errormessage saying that the 2.0 version of System.dll isn’t the same file as expected. This occurs because thefile is corrupted and .Net knows, but doesn’t know what caused the corruption.1. Go to http://www.malwarebytes.org2. Click on the ‘Download free version’ link.LNL eApp Installation GuideLNL1905 0412
413. Click the ‘Download Now’ button.4. Follow the prompts.CCleanerThis is a good last resort attempt to get the eApp installed when you have tried all that you can and itstill won’t load. If this doesn’t work, you need to send an e-mail to branchhelp@torchmarkcorp.comwhere either a technician or one of the programmers can resolve this issue. Make sure you providedetails about the issue and contact information.CCleaner is a system optimization and privacy tool owned by Piriform . It removes unused files fromyour system, allowing Windows to run faster and freeing up valuable hard disk space. It also cleanstraces of your online activities such as your Internet history. This software isn’t free. You have to pay todownload.1. Go to http://www.piriform.com/ccleaner2. Click ‘Download’.LNL eApp Installation GuideLNL1905 0412
423. Click ‘At Home’ or ‘At Work’.4. Click ‘Buy Online and DOWNLOAD’.5. Follow the prompts.LNL eApp Installation GuideLNL1905 0412
13 LNL eApp Installation Guide LNL1905 0412 eApp Installation Instructions - Internet Note: If youre absolutely unable to obtain the thumb drive, follow these instructions. Remember, this process can take up to 2.5 hours or longer if someone else is trying to download at the same time. When downloading onli