Transcription
TBS TANGO FPV RemoteRevision 2017-01-12All-in-one Remote Control System for FPVThe TBS TANGO FPV remote control is an all-in-one system made for FPV enthusiasts. It features built-invideo receiver and a slot for JR-compatible radio modules. Input controls are provided by quality quadball-bearing gimbals and camera operation is possible using smooth spring-loaded dials and rocker-switch. Ahuge display shows the video stream right on the remote, with an option to connect external goggles.Key features All-in-one FPV remote control with R/C radio and video receiver built-in JR-compatible slot for any R/C radio module Large 4.2-inch display for live video stream Quality ball-bearing gimbals for control and spring-loaded dials for smooth camera operation High capacity built-in Lithium-ion cells, charges via USB External port for goggles Channel mixing for flying wings1
Table of contentAttentionOverviewDetailed overviewPowering upPower upFactory modeNo-JR Module modePitModeRemote Control Channel MappingConfiguration menuMain menuDrone menuAdvanced menuRemote menuDisplay menuSetupInstalling R/C radio moduleStick modeConnecting gogglesChannel mixing and end-pointsFlying WingsUsageChanging video receiver frequencyUP-buttonSCAN-buttonDOWN-buttonRemote LED status indicatorBattery protectionAlert promptsOpening up the remoteChanging the flight stick modeAdjusting throttle ratchet strengthReplacing or upgrading batterySwapping antennaFactory modeMain menuCalibrationFrSky XJTFirmware upgradeInstalling TBS AgentGood practices2
SpecificationsType:All-in-one FPV Remote ControlRC system:JR-compatible expansion module required (not included)FPV system:5.8GHz VRX receiver, 40CHAntenna:R/C: JR-module specificVTX: 5G8 5dBi patch antenna, optional external SMA portFPV Channels:Boscam A, B, E, Fatshark, RacebandDisplay:LCD 4.2-inch, 640x480pModels:15 different models (incl. flying wings/V-tail)R/C modulecompatibility:JR-compatible RF module with CRSF, PPM or PXX (FrSky) stream (absolutemax. ratings: -0.3V to 15V), e.g. Crossfire, JR, FrSky and similar radio modulesBattery:Li-Ion 18650 (2x) 3.7V 6000mAh internal battery cells, USB-charging, approx.3 hours usage time, upgradableOperating range:Variable depending on output power and radio environmentPorts:RJ45 connector for connecting and powering video goggles, e.g. FatSharksDSC-jack for trainer connectionMicro-USB for software updates and chargingControls:2x Quad ball-bearing gimbals2x Two-position switches2x Three-position switches2x Spring-loaded dials2x Digital trims3x Video RX buttons1x Rocker switchWorking temperature:0 - 40 CSize:240 x 170 x 55 mmWeight:340 grams, without R/C radio moduleKit contents:1x TBS Tango Remote Controller1x TBS Tango Neckstrap1x RJ45 Audio/Video cable3
AttentionThese Long Range Systems are capable to use radio frequency transmissions and output power that may benot allowed in your country.Please always check your local RF legislation to set the frequency and output power according withthe regulation.A general rule for RC aircrafts is that they must be controlled always under sight of view, check your RCregulation to keep up to date with regulations.4
OverviewThe following diagrams indicates the essential input controls (green) and features (red) of the radio.5
Detailed overviewJR-module slot, DSC, micro-USB, TBS-port (forDisplay and neck-strap connectorgoggles), power button and speakerLeft gimbal for throttle and yaw, and digital pad forRight gimbal for aileron and elevator, and digitaltrimspad for trimsThree-position (A/L2), two-position (B/L1) switch,Two-position (C/R1) switch, three-position (D/R2)spring-loaded dial (SW E) and video receiver bayswitch and spring-loaded (SW F) dial6
Powering upGetting set up and ready to fly is a quick and simple task. In most cases plug&play when using TBSequipment.Power upPress and hold the Power-button for half a second to turn on the remote. The TBS TANGO screen willwelcome you and the power button starts to flash green.Factory modePress the Power-button and Down-button for 2 seconds to enter the factory mode (not factory reset), aconfirmation tone will sound. This is where you can calibrate control inputs, change test settings, read ADCand PPM values, and change LCD display settings.No-JR Module modePress the Power-button and Scan-button for 2 seconds to disable JR module power, a confirmation tone willsound. This is handy when you want to conserve battery while watching your friends fly using the display.PitModePress the Power-button and Rocker-button for 2 seconds to enter the PitMode, a confirmation tone willsound. This will set the video receiver to 5584 Mhz, which is the TBS PitMode frequency. For moreinformation about PitMode, please consult the TBS UNIFY PRO manual.USB JoystickPlug-in a micro-USB cable, and press and hold the Scan-button on power up to activate the USB joystickmode. The video receiver and screen turn off when this mode is activated. This mode will work with the mostcommon simulators available.7
Remote Control Channel MappingThe channel arrangement of the PPM output to the RF module is dependant on the kind of flight controllerthat is hooked-up on the receiver side.In the configuration menu, you can change the mapping by changing the model type to match your particularsetup.Flight control channel mapping typePPM/SerialChannelDJI Naza3DRTiny UD5Tuner L (E)3-Pos Right (D)3-Pos Right (D)3-Pos Right (D)3-Pos Right (D)6Tuner R (F)Tuner R (F)2-Pos Right (C)2-Pos Right (C)2-Pos Right (C)73-Pos Right (D)2-Pos Right (C)2-Pos Left (A)2-Pos Left (A)2-Pos Left (A)82-Pos Right (C)2-Pos Left (A)3-Pos Left (B)3-Pos Left (B)3-Pos Left (B)93-Pos Left (B)Tuner L (E)Tuner L (E)Tuner L (E)Tuner L (E)102-Pos Left (A)3-Pos Left (B)Tuner R (F)Tuner R (F)Tuner R (F)8
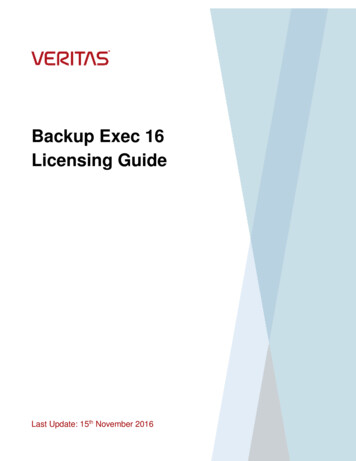
Configuration menuChanging settings on the TBS TANGO is done using the LCD display and controlled using the rocker-switchand VRX buttons.To enter and navigating the configuration menu system: Enter configuration menu - long press on the rocker-switch, 3 seconds Menu navigation - scroll back and forth using the rocker-switch Select/enter change - short press the rocker-switch Back/confirm change - long press the rocker-switchMain menuMain configuration menu when entering the system Exit - Leave menu system Drone - Models and details about the remoteflight system (name, flight control, switch map) Remote - Everything related to the remote(stick mode, RF module, idle alarm, defaultchannel) Display - Fine tune the visual parameters Turn Off Display - Save power/less distraction Battery indicator - The battery icon ispermanently shown to indicate how muchbattery capacity is left, 0 to 4 bars - see battery9
TBS TANGO Radio - Menu OverviewJan. 2017 - by ivc.no/tbsIdle Warn.Home Ch.RemoteRF ModuleTypeBackTime (min.)Alarm[05][ON]BackBandChannel[Race][1.8]5769 MHzBackΔ* AngleΔBackTime (min.)Time rn Off Display[10.5][ON]Channel 1 0 100 -100 N 0 100 -100 N 0 100 -100 N 0 100 -100 N 0 100 -100 N 0 100 -100 N 0 100 -100 N 0 100 -100 N 0 100 -100 N 0 100 -100 NΔMixerBackVoltageWarningBackSourceMid. PosMax. PosMin. PosReverseThrottle 0 100-100Normal 0 1500SourceΔTimerΔModule func.DisplaySpeedBackModule function[OFF]TimerMixerΔBackPX4/PixhawkFlying WingCustomKiss FCGraupner HoTTDJI * Beta-/CleanFlightΔDial E/FΔΔSelect modelBackEditCopyBackStick ModeIdle WarnHome CHVolumeSW SpeedΔBack* PPM 10 ChannelTBS Crossfire/CRSFFrySky D8FrySky D16PPM 8 ChannelSpektrum DM9ΔBackName TBS DISCO2RF Module [D16]Type[CF.]DIAL E[ANG]DIAL F[SPD]AdvancedSaveΔDroneΔΔBack* 1. TBS VENDETTAAdd New ModelAdd NewModelMain MenuΔExitDroneRemoteDisplayTurn Off DisplayThrottle/Aileron/Elevator/RudderSwitch A/Switch B/Switch C/Switch DDial E/Dial F/Wing L/Wing RV-Tail L/V-Tail R
protection sectionDrone menuSpecific profile for the model you are controlling Back - Return to previous menu Name - Unique name for the model profile RF Module [Standard PPM (10Ch), TBS CrossfireCRSF serial (10Ch), FrSky D8, FrySky D16, PPM 8Channel, Spektrum DM9] - Specify the radiomodule plugged into the radio, dictates thecommunication protocol and/or PPM channelsize Type [Beta-/CleanFlight, PX4/Pixhawk, FlyingWing, Custom, Kiss FC, Graupner HoTT, DJINAZA, OP/Taulabs] - Flight controller used onthe specific model, allows further switch/dialmapping and setup on supported FCs Dial E [ANG, SPD] - Specify the function mappedto the SW E dial on the remote, angle (ANG) orspeed (SPD) Dial F [ANG, SPD] - Specify the function mappedto the SW F dial on the remote, angle (ANG) orspeed (SPD) Save - Finish editing the modelAdvanced menuAdvanced settings for the module and mixing (wing) Back - Return to previous menu Module function - Set module specific settings,e.g. low battery warning level Timer - Adjust the flight timer that starts whenthe throttle is above 20% Mixer - Specify the channel mixing, e.g. min.,mid., max. position and reverse settings10
Mixer menuThe mixer settings can be used to change theinputs-to-channel arrangement. Back - Return to previous menu Channel [1 to 10] - Select the control channel toedit, changes depending on the model type youspecified in the model screen Source - Edit the channel to specific inputsource/stick Mid. Pos [-50 to 50] - Specify source mid-point Max. Pos [ 0 to 100] - Specify source max.end-point] Min. Pos - [-0 to -100] - Specify source min.end-point] Reverse [Normal/reversed] - Change sourcedirectionRemote menuSpecifics about the remote itself Back - Return to previous menu Stick Mode [1 to 4] - Stick allocation mode,maps throttle, yaw, pitch and roll to the gimbals- Mode 2 is most common Idle Warning [ON, 5 to 30min, OFF] - When theremote is left powered on without any inputafter a specific amount of time, sound an alarm Home Channel [Band, Channel (1 to 8)] Default video channel to tune into after longpressing the UP-button (VRX controls) Volume [0 to 7] - Adjust the beeper volume SW Speed [1 to 15] - Set the speed of SW E andSW F dial, if SW is set to angle (ANG)11
Display menuAdjust the video display parameters on the remote Back - Return to previous menu Contrast [055, 0 to 99] - Tune the contrast Contrast [050, 0 to 99] - Tune the brightness Hue [060, 0.99] - Tune the color hue Turn Off Display - Shut off the display whenusing goggles or just the remote control, notthe video receiver portion. Can be switchedback on by long pressing the UP-button (VRXcontrols).12
SetupInstalling R/C radio moduleA JR-compatible radio module needs to be installed in the slot of the back of the remote. The CROSSFIREtransmitter module is recommended, as it utilizes the latest CRSF-protocol, but any transmitter module withPPM or PXX (FrSky XJT) stream will work as well.Check the TBS CROSSFIRE transmitter module manual for further details on setting up and configuring it.Next, to make the radio recognizes the module (it does not auto-detect), you need to enter the configurationmenu (press and hold rocker-switch for 3 sec.) and change the model to the correct RF module type, to eitherregular PPM, TBS Crossfire or FrSky XJT.13
Stick modeWhen talking about stick modes we are referring to how the remote is configured to control the airplane i.e.which sticks operate which controls on the aircraft. You can swap the stick gimbals by opening up the remote,covered later on in the manual.By default the remote is set up with mode 2, which is the most common type used.14
Connecting gogglesIf you like to use FPV goggles, these can be connected to the remote using a special custom flat CAT5goggle-cable (provided). The cable carries both video and power to compatible Fatshark-video goggles.If you like to turn off the LCD display while using the goggles, enter the configuration menu and go to the LCDDisplay Turn Off Display option. You can turn on the display again for spectators by long pressing theUP-button (VRX controls).Pin-out of the cable, for repairs or customization:15
Channel mixing and end-pointsFor detailed channel mixing, rates, and end-point settings, it is recommended to set up these on the flightcontroller side (CleanFlight, BetaFlight, RaceFligut, APM, PX4, Pixhawk, etc.), for anything else than flyingwings.The TBS TANGO is a FPV remote and meant to be simple to set up and easy to use.Flying WingsThe TBS TANGO supports channel mixing for flying wings (normal and V-tail). The mixing, end-point, andreverse settings can be configured in the “Advanced” menu, after you have set up your new flying wingmodel.16
UsageChanging video receiver frequencyUse the “SCAN”, “UP”, or “DOWN” buttons on the left-hand side to change the video receiver frequency.UP-button Long press - Reset the video RX channel to the Home-channel (changed in the configuration menu) Short press - Jump to the next video RX channel, sequence Band A Band B Band E Airwave RaceSCAN-button Long press - Automatically scan the current video RX band for active channels Short press - Automatically scan all video RX bands for active channelsDOWN-button Long press - Bring up a menu to specifically set a MHz frequency to be on. Short press - Jump back to the previous video RX channel, sequence Race Airwave Band E Band B Band AThe receiver frequency bands are listed in the following table.Channel (MHz)BandCh1Ch2Ch3Ch4Ch5Ch6Ch7Ch8Band A (Bosecam A)58655845582558055785576557455725Band B (Bosecam B)57335752577157905809582858475866Band E ave e (Raceband)5658569557325769580658435880591717
Remote LED status indicatorWhen the remote is powered on, the LED behind the button will flash green. The built-in LiPo battery ischarged every time a 5V power source is connected to the micro-USB connector.Button LED indicatorStatus Green blinkingRemote powered on RedBackup battery is chargingBattery protectionThe battery protection in the remote is based on the nominal voltage, as follows:Battery voltageCondition3.81V and overBattery level 4, fully charged3.71VBattery level 33.61VBattery level 23.41VBattery level 1, beep tone and battery icon flashing3.38VPower on allowed, critical level, beep tone and battery icon flashing3.34VShutdown voltage, 20 seconds countdown prompt, recharge as soonas possible18
Alert promptsThe remote will raise an alert when one of the following events happen: Battery low alert - described in the previous section Telemetry data about the low RSSI, for RF module is set to XJT Telemetry data about the low battery voltage, for RF module is set to XJT Idle warn is activated and the timer is expired19
Opening up the remoteTo change the stick mode or changing the throttles tick ratchet, you will need to open up the remote control.First remove the seven (7) screws on the backside and locate the area shown in the photo below. If you can’topen up the remote control, you probably forgot the 7th screw, located inside the JR module.Changing the flight stick modeDepending on your stick preferences/flight mode, your throttle stick will be non-sprung. Modifying it is amatter of screwing in a screw on one end, and removing the screw on the other end. The hardness of thesticks and the ratchet is controlled by the silver metal piece and the two control screws, see the next section.20
Adjusting throttle ratchet strengthUse a screwdriver to adjust the right-most screw; counter-clockwise to decrease the tension and clockwise toincrease the tension. If you rather prefer a smooth sliding stick, increase the tension of the other metalbracket.Replacing or upgrading batteryThe battery in the radio uses a regular XT30-connector to make it easy to replace or upgrade the stockbattery. It uses two Lithium-Ion 18650 battery cells (Samsung ICR18650-30B 3000mAh) in parallel, one oneach side of the remote with two spare compartments. The stock batteries provide 6000mAh for approx. 3hours of usage.21
Swapping antennaThe remote comes with a 5G8 5dBi patch antenna, hidden underneath the cover on the top. You can changethe antenna or connect an external SMA connector by un-hooking the IPEX/IPX32/Hirose U.FL antennaconnector and swap to another cable.If you do not intend to swap the antenna, it is recommended to keep the cover on.22
Factory modeThe factory mode is only needed when fine-tuning or troubleshooting the remote.Main menuMain menu for the factory mode Back - Exit out of the factory mode Calibration - Calibrate the end-points of thesticks, dials and switches Test Setting - Menu display update rate anddiscard accelerated rocker-switch behaviour ADC Reading - Raw values of the input sensorsand PPM output LCD Display - Change the boot screen andcheck the display charactersCalibrationRe-calibrate the end-points for all the physical inputs onthe remote.Center all the sticks. You usually only need to center thethrottle stick. Next - To to the next step in the procedureMove both sticks to their extreme ends until the max.and min. value turns green for each input. The “TunL”and “TunR” presents the spring-dials E and F. 23Next - To the next step in the procedure
Flip all the switches to their up-position. Next - To the next step in the procedureNow, now all the switches through their range untileach one turns to green. If a few does not register, tryflipping it back to up-position and then move it downagain. 24Next - To complete the procedure
FrSky XJTDespite being one of the most popular R/C systems, FrSky’s RF modules and even receivers are notorious forinterfering with 5.8GHz receivers, video transmitters or other 2.4GHz R/C systems. When designing theTANGO we have taken every precaution possible to ensure a interference-free operation also with FrSky’sdevices, but it is all at the limits. This is a problem in the engineering and design of FrSky, and NOT a TBSproblem. We can assure the TANGO can work problem-free with the FrSky XJT module, but a few things willneed to be in place:1) The internal 5.8GHz patch antenna needs to be as far away from the RF module as possible. From thefactory, the patch antenna will have been installed and secured in the proper location. If you doexperience video issues such as vertical “flashing” lines, please open up the front antenna cover andensure that the antenna is installed properly.2) If despite proper antenna installation you are still seeing issues in the video, you can additionallycover your FrSky XJT module with copper- or aluminum-tape. Be sure to leave plenty of space aroundthe pin holes. Grounding the tape is NOT necessary, or recommended! Alternatively you can alsocover the inside of the JR module bay with copper- or aluminum-tape, instead of placing tape on theXJT module.3) Should both the mods above fail, please contact our customer support. If possible, please documentthe problem with a quick video so that we can assist you faster and better.25
Firmware upgradeUpdates to the remote is applied using our TBS AGENT software. This takes care of all the downloading of thelatest firmware, verification- and upgrade process. Plug in the remote control, start the TBS Agent, and waitfor the latest firmware to download. Then click on “UPDATE” to proceed.Installing TBS AgentDownload the installer from http://www.team-blacksheep.com/corepro/agent (Windows7/8/10, 64-bitrequired) - no drivers needed to use the application, but an Internet connection is required to download thelatest firmware versions. Press F1 if you like to include beta releases in the available updates.Turn off the radio, plug in a micro-USB cable on the radio. Power for the update is provided via USB. Thesoftware will automatically detect the device and offer you the option to upgrade the firmware if a newerversion is available.When the status indicator is green and says “Connected”, you can upgrade or downgrade the firmware.To upgrade the firmware, select the latest version from the drop-down menu and click Update. Rapid blinkingindicates that the process is working and being updated. The process will take about 1 minute. Check allsettings after the process is finished.26
Good practicesWe have compiled a list of all of practices which have been tried and tested in countless environments andsituations by the TBS crew and other experienced FPV pilots.Follow these simple rules, even if rumors on the internet suggest otherwise, and you will have success in FPV. Start with the bare essentials and add equipment one step at a time, after each new equipment wasadded to proper range- and stress tests. Do not fly with a video system that is capable of outperforming your R/C system in terms of range. Do not fly with a R/C frequency higher than the video frequency (e.g. 2.4GHz R/C, 900MHz video). Monitor the vitals of your plane (R/C link and battery). Flying with a digital R/C link without RSSI isdangerous. Do not use 2.4GHz R/C unless you fly well within its range limits, in noise-free environments andalways within LOS. Since this is most likely never the case, it is recommended to not use 2.4GHz R/Csystems for longer range FPV. Do not fly at the limits of video, if you see noise in your picture, turn around and buy a higher-gainreceiver antenna before going out further. Shielded wires or twisted cables only, anything else picks up RF noise and can cause problems. When using powerful R/C transmitters, make sure your groundstation equipment is properlyshielded. Adding Return-To-Home (RTH) to an unreliable system does not increase the chances of getting yourplane back. Work on making your system reliable without RTH first, then add RTH as an additionalsafety measure if you must. Avoid powering the VTx directly from battery, step-up or step-down the voltage and provide aconstant level of power to your VTx. Make sure your VTx runs until your battery dies. Do not power your camera directly unless it works along the complete voltage range of your battery.Step-up or step-down the voltage and provide a constant level of power to your camera. Make sureyour camera runs until your battery dies. A single battery system is safer than using two dedicated batteries for R/C and FPV. Two batteries inparallel even further mitigate sources of failure. For maximum video range and “law compatibility”, use 2.4GHz video with high-gain antennas. When flying with R/C buddies that fly on 2.4GHz, or when flying in cities, it is perfectly possible to use2.4GHz video provided you stick to the channels that do not lie in their band (CH5 to CH8 forLawmate systems, available from TBS). Do not use diversity video receivers as a replacement for pointing your antennas, diversity should beused to mitigate polarization issues.27
Improving the antenna gain on the receiver end is better than increasing the output power (except inRF-noisy areas). More tx power causes more issues with RF on your plane. 500mW is plenty of power! Try to achieve as much separation of the VTx and R/C receiver as possible to lower the RF noise floorand EMI interference. Do not buy the cheapest equipment unless it is proven to work reliably (e.g. parts falling off,multitudes of bug fix firmware updates, community hacks and mods are a good indicator of poorquality and something you do NOT want to buy for a safe system). Do due diligence and someresearch before sending your aircraft skyward.Manual written and designed by ivc.no in cooperation with TBS.28
TBS TANGO F P V Re mote Revision 2017-01-12 All-in-one Remote Cont r ol S y s tem f or FP V The TBS TANGO FPV remote control is an all-in-one system made for FPV enthusiasts. It features built-in video receiver and a slot for JR-compatible radio modules. Input controls are provided by quality quad