Transcription
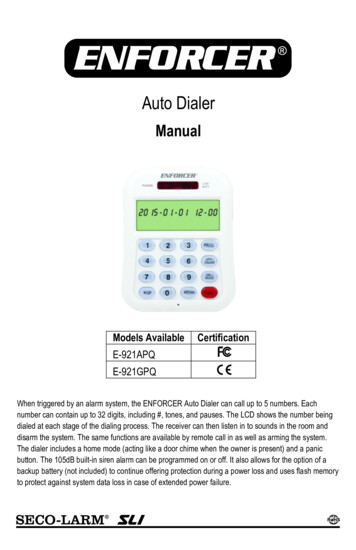
Auto DialerManualModels AvailableCertificationE-921APQE-921GPQWhen triggered by an alarm system, the ENFORCER Auto Dialer can call up to 5 numbers. Eachnumber can contain up to 32 digits, including #, tones, and pauses. The LCD shows the number beingdialed at each stage of the dialing process. The receiver can then listen in to sounds in the room anddisarm the system. The same functions are available by remote call in as well as arming the system.The dialer includes a home mode (acting like a door chime when the owner is present) and a panicbutton. The 105dB built-in siren alarm can be programmed on or off. It also allows for the option of abackup battery (not included) to continue offering protection during a power loss and uses flash memoryto protect against system data loss in case of extended power failure.
ENFORCER Auto DialerTable of Contents:Features . 2Parts List . 3Specifications . 3Wiring Diagram . 3Overview . 4LCD Screen Layout . 4Installing the Auto Dialer . 5Programming the Auto Dialer . 6 9Setting and Changing the PIN Number . 6Setting Emergency Phone Numbers . 6 7Deleting a Stored Phone Number . 7Setting the Siren Function . 7Setting the Auto Dial Function . 8Setting the Number of Auto Dial Cycles . 8Setting the Number of Call-in Rings . 8Setting the Entry Delay Time . 9Setting the Date and Time . 9Testing the Auto Dial Function . 9Resetting the Auto Dialer . 9Operating the Auto Dialer . 10 13Arming and Disarming the System . 10Panic Button Use . 10Remote Control by Telephone . 11 12Home Mode Use . 12Low-Battery Indicator . 13View Function . 13Tips . 13Also Available from SECO-LARM . 13Program Planner . 14Summary Programming/Operation Chart . 15Troubleshooting . 16Features: 216-Digit large display with date/time and function icons2 (N.C.) Triggers for multiple zone securityRemote monitoring – user can call in to listen in to room sounds and arm/disarm dialerRemotely listen in to room sounds or disarm during call backProgrammable PIN number and entry delay timing5 Programmable emergency telephone numbers (up to 32 digits each)Programmable auto-dialing cycle repeat timesHome mode function (acts as a door chime when user is at home)Panic buttonBuilt-in flash memory to protect against system data loss in case of power failureTouch-Tone dialingPhone jackLow-battery indicator for backup battery (battery not included)DC power input jack (3.5mm phone jack, not included)9V battery backup (battery not included)Wall-mountableBuilt-in 105dB alarm (with programmable alarm on/off)Built-in auxiliary output for external alarm or sirenSECO-LARM U.S.A., Inc.
ENFORCER Auto DialerParts List:1x1x2x1xAuto dialer unitRemote control instruction cardPlastic wall anchorsWall mounting template1x1x2x1xTelephone cableDual outlet telephone jack adapterWall mount screwsUser manualSpecifications:Operating voltage9 12 VDC5mA10mA180mA310mA5329VDC/ 20h 105dB2 x N.C. Trigger 500ms125mA32 104 F (0 40 C)-4 140 F (-20 60 C)6.2-oz (175g)33/8"x45/16"x17/8" (86x110x47 mm)StandbyDialingCurrent drawAlarm OnMax. (at 12VDC)TotalProgrammable emergency phone numbersMaximum digits per telephone numberBackup battery type/life (not included)Alarm sound level at 12" (30cm)Trigger inputsTrigger input timerAuxiliary output current (max)Operating temperatureStorage temperatureWeightDimensionsWiring Diagram:Telephone Wall JackBack Connection Area (Cover Removed)-External Alarm/Siren E-964-D390Q*Trigger 1 Trigger 2ResetGRDCOM.SirenDC Output 9 12VDC125mA Max.ENFORCER External PowerSupplyorPower Adapter(3.5mm Phone Plug,Not Included)SM-200Q*SM-206Q*SECO-LARM U.S.A., Inc.* E-964-D390Q Photobeam Detectors, SM-200Q MagneticSensors, and SM-206Q Concealed Magnetic Sensors shown asexamples only: For other sensors and products available fromSECO-LARM, please visit our website at www.seco-larm.com.3
ENFORCER Auto DialerOverview:FrontDC Power LEDLow Battery LEDLCD DisplayNumeric KeypadBack (Covers Removed)Mounting PointsTerminal BlockReset ButtonBattery Receptacle (Battery not included)Left SideRight SideSiren SpeakerLINE JackDC Power Jack (for 3.5mm phone plugadapter, not included)Home Mode ButtonLCD Screen Layout:Home ModeActivatedAuto DialSiren AlarmCall-Back RingsAlarm TriggeredPASSWORD MEMORY LEARN CYCLE2015-01-01TRIGGERTime/DateArmed orDisarmedENTRY 12-00HOMEARMNote: For explanation of these symbols, please see Programming the Auto Dialer on pages 6 9.4SECO-LARM U.S.A., Inc.
ENFORCER Auto DialerInstalling the Auto Dialer:Note: You can program the telephone numbers and voice messages prior to connecting thepower as long as the 9V battery is installed. The standby battery should provide about 20 hours ofoperation.Note: The Auto Dialer uses EEPROM to retain memory in the event of a power loss.1. Select a location for the dialer near a standard electricaloutlet (if user-supplied 12VDC adapter is to be used), atelephone wall jack, and the alarm control panel, but out of5 6ftsight. The dialer should not be exposed to direct sunlight or (1.5 2mrain, and must not be mounted near heat sources such as)radiators, heating ducts, or stoves.2. For wall-mount, use the wall mounting template to drillholes and attach 2 screws into the wall at the desiredlocation. For convenience, 5 6ft (1.5 2m) above the flooris recommended (Fig. 1).Fig. 1CableCover3. Remove the cable cover and battery cover from the back ofthe auto dialer (Fig. 2).4. Install a 9VDC backup battery (not included). Reattach thebattery cover.5. Connect the dialer to two detectors or groups of detectors inseries using the connection terminals as shown in the wiringdiagram (see pg. 3). The dialer can also be connected to twoseparate alarm control panel outputs of a separate alarmsystem. If an external siren/alarm is desired, connect as shownon the wiring diagram.9VDC Battery(not included)BatteryCoverFig. 26. Power:a. If the dialer is to be powered from the alarm control panel,connect the alarm power outputs to the terminal block (see pg. 3).Fig. 3b. If using a 12VDC adapter (not included), plug the adapter into the dialer’s DC power jack.7. Connect one end of the included telephone cable to an existing Touch-Tone line wall socket,and the other end to the dialer’s “LINE” jack. Optionally, use the included dual outlet telephonejack adapter to connect an extension telephone using the telephone’s cable (not included)(Fig. 3).8. For wall installation, place the unit over the heads of the screws installed in step 2 (Fig. 1) andslide down. Check that the unit is firmly attached and tighten or loosen the screws as needed.9. Once all connections are made, the dialer is ready to be programmed.SECO-LARM U.S.A., Inc.5
ENFORCER Auto DialerProgramming the Auto Dialer:The setup mode may only be accessed when the dialer is in standby mode. If no key is pressedwithin 15 seconds, the dialer will automatically exit the setup mode.Setting and Changing the PIN Number1. Enter the current PIN number (factory preset PIN number is ‘000’), and press the [PROG]button once. ‘PASSWORD’ will flash on the LCD.2. Press the [ARM/DISARM] button to accept.3. Enter a new PIN number (3-6 digits) followed by the [ARM/DISARM] button to confirm.4. Press the [#/DOWN] or [*/UP] button to select other setup categories or press the [PROG]button until the programming icons disappear to exit the setup mode.Note: If the PIN number is forgotten, press and hold the [PROG] button and use a pen orpaper clip to press the [RESET] button located under the cable cover on the back of the unitand release. The unit will return to the factory preset PIN number (000). All other userprogrammed settings except the date and time will be retained.Setting Emergency Phone Numbers1. Enter the PIN number and press the [PROG] button twice or until “MEMORY” flashes on theLCD screen.2. Press the [ARM/DISARM] button to accept.3. Press the [#/DOWN] or [*/UP] button to select one of the number locations 1-5.Note: The 5 number locations represent the order in which the numbers will be dialed in thecase of an alarm.4. Enter the number to store including any area codes or dialing prefixes if needed (up to 32digits, although only the last 16 digits can be shown on the LCD display) using the keypadfollowed by the [ARM/DISARM] button to accept and store the number.Note: If needed, add a 4-second ‘pause’ before a PBX extension number by pressing andholding the [DEL/PAUSE] button for 2 seconds until the letter ‘F’ appears on the LCD screen,and then continuing with the extension number as usual. A ‘#’ or ‘*’ can also be entered bypressing, and holding for two seconds, the [#/DOWN] or [*/UP] buttons respectively. The ‘#’sign shows as ‘ ’ and the ‘*’ sign shows as ‘ ’ on the LCD screen.Example 1 – To store a number with area code 1-214-555-2858 and an office extension 205(where the PBX requires a 2-second pause before the extension): After scrolling to the desirednumber location, enter ‘12145552858,’ press the [DEL/PAUSE] button for 2 seconds until theletter ‘F’ appears on the LCD screen, enter ‘205’ and press the [ARM/DISARM] button.6SECO-LARM U.S.A., Inc.
ENFORCER Auto DialerProgramming the Auto Dialer, continued:Example 2 – To store a number with area code 1-949-555-1234, and an office extension #200(where the PBX requires a 2-second pause before the extension): After scrolling to the desirednumber location, enter ‘19495551234,’ press the [DEL/PAUSE] button for 2 seconds until theletter ‘F’ appears on the LCD screen, press the [#/DOWN] button for 2 seconds until the ‘ ’appears on the LCD screen, enter ‘200,’ and press the [ARM/DISARM] button.Example 3 – To store a local number 555-2858: After scrolling to the desired number location,enter ‘5552858’ and press the [ARM/DISARM] button.5. Repeat for the other numbers to be stored (up to 5 total).6. Press the [#/DOWN] or [*/UP] button to select other setup categories or press the [PROG]button until the programming icons disappear to exit the setup mode.Note: If the dialer is programmed to call a voice pager service which requires operator assistance, theservice should be notified in advance regarding the meaning of the message. Consult local authoritiesconcerning the permissibility of automatically dialing their emergency numbers before programming.Deleting a Stored Phone Number1. Enter the PIN number and press the [PROG] button twice or until “MEMORY” flashes on theLCD screen.2. Press the [ARM/DISARM] button to accept.3. Press the [#/DOWN] or [*/UP] button to select the number you wish to delete.4. Press the [DEL/PAUSE] button to delete the number.5. Press the [#/DOWN] or [*/UP] button to select other setup categories or press the [PROG]button until the programming icons disappear to exit the setup mode.LearnThis function is unused.Setting the Siren FunctionThis setting allows the user to choose between an audible alarm when triggered, or a ‘silent alarm’while dialing the emergency numbers. The factory default is “ON”.1. Enter the PIN number and press the [PROG] button four times or until the alarm icon() flashes on the LCD screen.2. Press the [ARM/DISARM] button to accept. The dialer will “beep” once.3. Press the [#/DOWN] or [*/UP] button to select either “SOUND ON” or “SOUND OFF” and pressthe [ARM/DISARM] button to accept.4. Press the [#/DOWN] or [*/UP] button to select other setup categories or press the [PROG]button until the programming icons disappear to exit the setup mode.SECO-LARM U.S.A., Inc.7
ENFORCER Auto DialerProgramming the Auto Dialer, continued:Setting the Auto Dial FunctionThe user can choose whether or not the dialer will dial the emergency numbers when triggered.The factory default is “ON”.1. Enter the PIN number and press the [PROG] button five times or until the phone icon ( )flashes on the LCD screen.2. Press the [ARM/DISARM] button to accept.3. Press the [#/DOWN] or [*/UP] button to select either “ON” or “OFF” and press the[ARM/DISARM] button to accept. The dialer will “beep” once.4. Press the [#/DOWN] or [*/UP] button to select other setup categories or press the [PROG]button until the programming icons disappear to exit the setup mode.Note:1. When the dialer is in standby mode and the ( ) icon is ON, the auto dial is disabled.2. When the dialer is in standby mode and the ( ) icon is OFF, the auto dial is enabled.Setting the Number of Auto Dial CyclesThis can be set from 1 5 cycles. The factory default is 1 cycle, meaning that the auto dialer willdial each programmed number 1 time.1. Enter the PIN number and press the [PROG] button six times or until “CYCLE” flashes on theLCD screen.2. Press the [ARM/DISARM] button to accept.3. Press the [#/DOWN] or [*/UP] button to select your choice of 1-5 cycles and press the[ARM/DISARM] button to accept. The dialer will “beep” once.4. Press the [#/DOWN] or [*/UP] button to select other setup categories or press the [PROG]button until the programming icons disappear to exit the setup mode.Setting the Number of Call-in RingsThis sets the number of call-in rings after which the auto dialer will answer. The factory default is5 rings, but can be user programmed for 3, 5, 7, or 10 rings.1. Enter the PIN number and press the [PROG] button seven times or until the bell icon (flashes on the LCD screen.)2. Press the [ARM/DISARM] button to accept.3. Press the [#/DOWN] or [*/UP] button to select 3, 5, 7, or 10 and press the [ARM/DISARM]button to accept. The dialer will “beep” once.4. Press the [#/DOWN] or [*/UP] button to select other setup categories or press the [PROG]button until the programming icons disappear to exit the setup mode.8SECO-LARM U.S.A., Inc.
ENFORCER Auto DialerProgramming the Auto Dialer, continued:Setting the Entry Delay TimeThis allows the user to set the length of time before the alarm will sound, to allow time to disablethe alarm after normal entry. The factory default is 20 seconds, but can be user programmed for 0,5, 10, 15, or 20 seconds.1. Enter the PIN number and press the [PROG] button eight times or until “ENTRY” flashes onthe LCD screen.2. Press the [ARM/DISARM] button to accept.3. Press the [#/DOWN] or [*/UP] button to select 0, 5, 10, 15, or 20 seconds and press the[ARM/DISARM] button to accept. The dialer will “beep” once.4. Press the [#/DOWN] or [*/UP] button to select other setup categories or press the [PROG]button until the programming icons disappear to exit the setup mode.Setting the Date and Time1. Enter the PIN number and press the [PROG] button nine times or until the clock icon ( )flashes on the LCD screen.2. Press the [ARM/DISARM] button to accept.3. The date and time will appear on the LCD screen as 5 sets of numbers representing the year,month, date, hour, and minute respectively. The first set of numbers (year) will be flashing,indicating that this can now be changed.4. Press the [#/DOWN] or [*/UP] button to select the correct number for the year and press the[ARM/DISARM] button to accept and move to the next position. Repeat for each position untilcomplete.5. Press the [PROG] button until the programming icons disappear to exit the setup mode.Note: Time is shown using a 24 hour clock.Testing the Auto Dial Function:To test the auto dial function, while in standby mode, press and hold the [PROG] button for at leasttwo seconds. When you hear a ‘beep’ tone, enter the memory location (1 5) of the number youwish to test. The auto dialer should then dial the chosen number.Resetting the Auto Dialer:To reset the Auto Dialer, press and hold the [PROG] button and use a pen or paper clip to pressthe [RESET] button located under the cable cover on the back of the unit and release. The unit willreturn to the factory preset PIN number (000). All other user programmed settings except the dateand time will be retained.SECO-LARM U.S.A., Inc.9
ENFORCER Auto DialerOperating the Auto Dialer:Arming and Disarming the System:1. To arm the system, enter the PIN number and press the [ARM/DISARM] button.The dialer will sound three short “beeps” and the words “ARM” will appear on the LCD screen.After 60 seconds, there will be a single “beep” tone to indicate that exit delay time has passedand the alarm is now fully armed.After the delay, when the system is fully armed, if a door or window connected to the alarm isopened, the LCD screen will flash the word “TRIGGER”. After the adjustable entry delay timehas passed, the siren will begin to sound (30 seconds on and 30 seconds off) and auto dialingwill commence according to the programmed sequence and cycle times. The call receiver willhear a single “beep” to indicate a sensor has been triggered or 4 “beeps” to indicate the[PANIC] button has been pressed.Note: When the siren has been programmed to “SOUND OFF,” the siren will not soundand the dialing will commence silently after the delay time has passed. When the call isanswered, the receiver will hear single “beep” to indicate a sensor has been triggered or 4“beeps” to indicate the [PANIC] button has been pressed.Note: If the auto dialer is not connected to a working telephone line, the dialer will “beep”4 times and the siren will begin to sound without attempting to continue dialing out (thisoverrides the “SOUND OFF” setting).2. To disarm the system, enter the PIN number and press the [ARM/DISARM] button.The dialer will sound a long “beep” and the word “ARM” will disappear from the LCD screen.Panic Button Use1. When the [PANIC] button is pressed, the siren will sound immediately and auto dialing willcommence without delay. If the siren has been programmed to “SOUND OFF” the siren will notsound, but silent dialing will commence.2. To cancel the alarm and stop auto dialing, enter the PIN number and press the [ARM/DISARM]button. The dialer is now disarmed.10SECO-LARM U.S.A., Inc.
ENFORCER Auto DialerOperating the Auto Dialer, continued:Remote Control by TelephoneThe system can be remotely controlled and monitored through any Touch-Tone phone, includingmobile phones. The user may arm or disarm the system as well as listen in on the room.1. REMOTE CONTROL WHEN ALARM IS ACTIVATEDWhen an alarm has been activated and the auto dialer dials the pre-programmed emergencynumbers, the person who answers the call will hear a single “beep" for a sensor trigger or 4“beeps” for panic button activation and may press one of the following function codes at anytime to control the system remotely:FunctionPress key codeListen in1#End call3#Disarm system6#The user should hear a “beep” in response. If not, enter the function code again.2. REMOTE CONTROL BY USER CALL-IN (CALL BACK)A. Using a mobile phone or any Touch-Tone phone, dial the phone number that the autodialer is connected to. The auto dialer will answer and “beep” once after the number ofrings in the pre-programmed call-in ringer detect cycle (3, 5, 7, or 10 rings, see pg. 8).B. Enter the PIN Number on the phone’s keypad. The dialer will “beep” twice if the correctcode has been entered. If a wrong code is entered, the dialer will disconnect automaticallyand the user must dial in again.C. Press one of the following function codes to control the system remotely:FunctionListen inArm systemDisarm systemPress
ENFORCER Auto Dialer 2 SECO-LARM U.S.A., Inc. Features: 16-Digit large display with date/time and function icons 2 (N.C.) Triggers for multiple zone security R emote monitoring – user can call in to listen in to room sounds and arm/disarm dialer Remotel