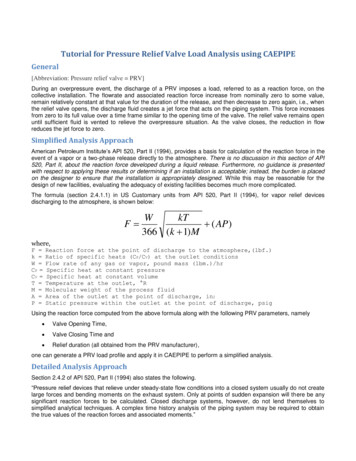
Transcription
Website Tutorial Using WixThe annual Teen Biotech Challenge is a product of the BioTech SYSTEM under theDirectorship of Dr. Denneal Jamison-McClung.Signing Up For A WebsiteTo begin using Wix, you must first sign up for a free account at: http://www.wix.com/Just click on “Login/Sign up” and fill out therequired fields and voila! You are now a Wixmember.Now that you’ve become an elitist, follow thesteps below to get started on your Teen BiotechChallenge award winning website.Be prepared for all the fanfare, website groupiesand biotech bunnies or rabbits that will beknocking down your door to get at such atalented techie!!
Website Tutorial 2Getting StartedOkay, let’s jump in - both feet first!IMPORTANT:Once you are finished with your website, you will be giving theBioTech SYSTEM’s TBC IT person your login and password information and the site thenbecomes the property of the Teen Biotech Challenge. If there are images, text orother webpage component that you’d like to use in the future, please save them in yourown local files. All passwords will be changed and thus the ability to make furtheradjustments to the websites during and after judging. Winning webpages will //teenbiotechchallenge.ucdavis.edu).By entering this contest, you giveconsent to turn over your website to the BioTech SYSTEM and acknowledge that itmay be published along with your name and school affiliation.The content of your website may not include explicit or offensive language, images ormultimedia elements. Please do not include any personal information such as yourphone number, email addresses and personal images.After becoming a member, Wix directs you to a template selection screen. Pick anytemplate (sorry, they don’t have science but under Business & Services there are someCommunity & Education ones) that is free. You will be able to adjust things a bit later.Once you’ve selected a template, you are asked if you want to view the video tutorial.Heck, yes! Dim the lights, pop up some popcorn, and settle down to a free movie!Okay, it’s just a video but hey, if it saves you some time in the future than why not giveit a go?
Website Tutorial 3To start diving in, click on thebutton so you can make the site yourown. I chose the ‘Diving School’ template (hence the corny joke above), but want tochange the title and some other things. Notice after selecting to edit your site that yousee the Wix HTML5 editor being accessed and then the site becomes fixed.If you click on the top heading of the site, a Header dialog box opens like this:You now have the opportunity to change the whole style of the header as well as thetitle. My catchy and totally original header title was substituted below.
Website Tutorial 4If you haven’t named your website yet, another dialog box will pop up asking you tosave your site with its new name. Make sure you do this at the start and remember tosave and publish your work regularly. You certainly don’t want to lose your Rembrandt!Make sure to publish your site often. This is very important because if you’ve finishedyour site but didn’t publish your latest work (even though you saved it), the judgeswon’t be able to see the final product – just one of your earlier versions!
Website Tutorial 5Have fun playing with all the different formatting and editing tools provided for yoursite. You can experiment with different menu settings to see what looks best.Once you’ve checked out some of the cool editing tools, you may want to change thetemplate photo that appears on your site. The template I chose had a picture slideshowscrolling but the photos didn’t represent what my subject was about. To substitute theimages to ones that are more appropriate, I clicked on the middle of the diving photoand right clicked on “Slidshow Gallery Settings”.
Website Tutorial 6From the “Slideshow Gallery Settings”, I selected “Organize Images” from the menu andin the next box, clicked “Add Images”.In the Image Gallery dialog box, you can upload images by selecting the “UploadImage” button.After putting a few of my own photos in the slide show, I clicked on the “Publish” buttonto make it live and updated with my latest and greatest edits.
Website Tutorial 7Adding a background to a page is easy, just open the “Design” side menu and select“Background”Here’s what those few changes mentioned above did to the appearance of my site:As you can see, it looks very different from what I started out with. There is a lot offlexibility in the Wix environment!
Website Tutorial 8To resize existing text or photo boxes on your site, you can just click on them and usethe drag handle move them or re-shape them at will. You also have the ability to deletethem and add different ones.Wix provides you with several pages for your site in the beginning and you can modifyeach one just as you did your main page. However, if you need more pages, you justhave to click the far left Pages icon.You’ll probably want to keep your same menu set up on each of the pages and that canbe done in at once and you can edit each page just as we did the first one.
Website Tutorial 9Wix provides you with several pages at once and you can edit each page just as we didthe first one. However, if you need more pages, then click on the “Add page” headingafter the template provided pages.To access the website’s menu settings, simply right-click on the menu and the dialogbox will open. If you want the same menu set up for all the pages, click the “Show on allpages” box.
Website Tutorial 10Any time you want to see how your website behaves and looks like live, you can click onthe top “Preview” button and check it out.DON’T LET THIS HAPPEN TO YOU!Publish your site NOW and Constantly!If you don’t, the judges will only seeyour old work.Page DesigningWhen you want to access your different pages, simply use the “Page:” drop down menuat the top of the screen to select which one you want.Once your pages have been created, the “Add” menu on the leftwill be a valuable tool for finishing them off.
Website Tutorial 11You can add a text box, image, multimedia, etc If you have text in a MS Word file orother word processor software file that you want to copy and paste into a Wix text box,it will work just fine. Just remember that changing the font is done through the Designmenu on the left. The toolbar at the top also includes the copy/paste, etc. functions.Making HyperlinksPutting a link in your website is easy. Highlight what you want to use as a link using thelinkicon on the formatting toolbar.The following dialog box will pop up:You are given four choices to link to, one of yourwebpages, an external website, an email address ora file. If you link to an external website, make sureto give the entire address starting with http://This and That (and maybe the other)With so many choices of fonts, backgrounds, colors, media and much more included inthe Wix environment, your website will be a stellar example of your genus-ness (sorry, alittle plant humor there).!
Website Tutorial 12Your Fans Await YouYou did it! Great job! Do you hear anyone at your door? Well, maybe it’s a bit toosoon for the fans to be coming just yet.Have fun building your website! If you run into problems with your site, you can emailMarianne Hunter at mahunter@ucdavis.edu. Please be as thorough as possibleexplaining your situation and include “TBC” in your subject line of the email so that itwill be answered quickly.
Website Tutorial 11 You can add a text box, image, multimedia, etc If you have text in a MS Word file or other word processor software file that you want to copy and paste into a Wix text box, it will work just fine. Just remember that chang





![Unreal Engine 4 Tutorial Blueprint Tutorial [1] Basic .](/img/5/ue4-blueprints-tutorial-2018.jpg)

