Transcription
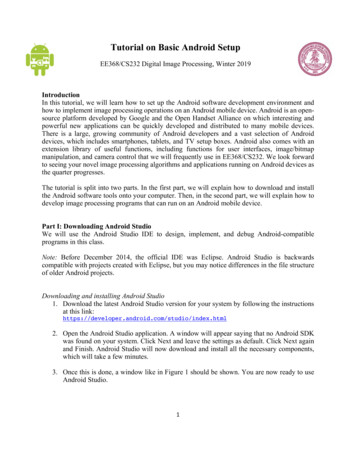
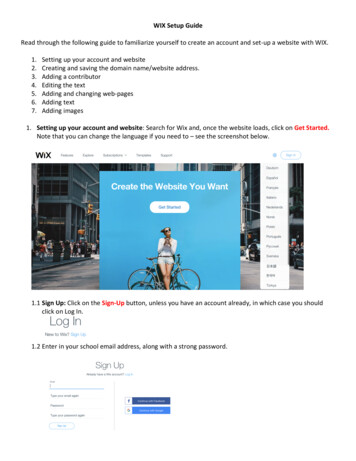
WIX Setup GuideRead through the following guide to familiarize yourself to create an account and set-up a website with WIX.1.2.3.4.5.6.7.Setting up your account and websiteCreating and saving the domain name/website address.Adding a contributorEditing the textAdding and changing web-pagesAdding textAdding images1. Setting up your account and website: Search for Wix and, once the website loads, click on Get Started.Note that you can change the language if you need to – see the screenshot below.1.1 Sign Up: Click on the Sign-Up button, unless you have an account already, in which case you shouldclick on Log In.1.2 Enter in your school email address, along with a strong password.
1.3 Select Skip when you see this screen1.4 Now select Choose a Template and from the screen that appears after that, you should select atemplate – have a look at some of these to see which one best meets the needs of your task.1.5 You can have a look at a template first before you select it – click View.1.6 If you like what you see then click Edit this site.
1.7 The Template will have some pages, images and text already in it. You will need to change theseaccording to your website plan. Follow the steps below in order to change the content and style of thewebsite.2. Creating and saving the domain name/website address: Click on the Site button at the top of the pageand in the pre-selected box add in 7elements and then click on Save & Continue.
3.1 Adding a contributor: Click on Settings and then Roles & Permissions3.2 Add in your partner’s email address, select Admin and then click on Send Invite – they will need to checktheir email to confirm that they want to a contributor.
3.3 Contributor: You will need to click on Site Actions and then Edit Site, to start editing the website.4 Text Editing: To change the text click on Edit Text and make your changes. I suggest looking at thedifferent Heading Themes, Fonts, Size and Effects. It is also recommended that you do not use more thanthree different font types for your website, as you want to make it consistent and easy to navigate.Creating a website with lots of different fonts will only confuse your audience and distract them from thecontent!5 Adding and changing web-pages: Click on the Site Menu button on the left-hand side; from the menu thatappears you will be able to add, delete and edit pages. For example, you could add one page per elementof culture OR you could add one blog post per element of culture.
6 Adding text: Click on the add button. You have several choices, but I recommend sticking to the following.Use Heading 1 or 2 for the page title, Heading 6 for sub titles and Paragraph for the main text of the page.Remember the rule about using no more than 3 font types – this means one for headings and one forparagraph.
6.1 Adding Images: Click on the Image button to upload your own image or select an image from the Wixdatabase. Anytime you add an image, you will be able to adjust its size and position. For the examplebelow, I will demonstrate how to upload an image from your computer - first, select Image and thenthen click on the beside My Image Uploads.6.2 Select the Upload Images button in the top right-hand corner. You will need to search for the imagethat you want to upload, once you have found it, select it and begin the upload. After the upload iscomplete, you can begin editing the position and size so that it fits perfectly within your website.
WIX Setup Guide Read through the following guide to familiarize yourself to create an account and set-up a website with WIX. 1. Setting up your account and website 2. Creating and saving the domain name/website address. 3. Adding a contributor 4. Editing the text 5. Adding