Transcription
Lyris ListManager10.0Getting Started1
Table of ContentsGetting Started . 31. Members . 102. Content . 163. Segments . 254. Mailings . 305. Reports . 36Subscriptions . 41Tracking . 44EmailAdvisor . 52Discussion Lists . 54Index . 552
Getting StartedStarting ListManager for the First TimeThese instructions are for administrators starting ListManager for the first time. WeSTRONGLY recommend you read the readme.txt file included in your ListManagerinstallation for more information.Starting and Logging into ListManager - Windows1. Click Start, then Programs.2. Select Lyris ListManager.3. Select Run ListManager Now.4. From the Start menu, select Run ListManager Web Server Now.5. From the Start menu, select ListManager Web Interface. Or, open a web browserand go to the ListManager URL directly. For example, if the hostname is"lists.example.com", point your web browser to http://lists.example.com.6. A screen will prompt you for your admin name and password. Enter the name adminand password you selected when installing ListManager.Starting and Logging into ListManager - Unix1. Log on as root.2. Change to the ListManager directory. E.g: /usr/local/lm/bin3. Run ./S96lm start to start ListManager.4. Run ./S96httpd-lm start to start the ListManager Web Server.5. Open a web browser, and go to the ListManager URL. For example, if the hostnameis "lists.example.com", point your web browser to http://lists.example.com.6. A screen will prompt you for your admin name and password. Enter the name adminand password you selected when installing ListManager.Logging In and Logging OutIn order to access the ListManager administrator interface, you'll need to open a webbrowser and point it to your ListManager URL.3
If you're wondering if you have the right URL, it will look something like this:http://domain.example.com/This URL will take you to a screen that asks you log in with your user name andpassword.Once you have done so, you will be taken to the homepage of your list.If you are starting ListManager for the first time, you will be prompted to create your firstlist after logging in.Forgotten PasswordIf you fail to log in to the administrator's interface, you will be prompted to click a link tohave your password emailed to you.Logging OutYour login information is in the upper right hand corner of your screen. Click on youremail address or name to log out.Changing Your ListYou are always logged into a single list. If you have more than one list, and you'd like tochange to that list, click on the list name in the upper right hand corner of the screen.You will be taken to a menu that will allow you to select another list.4
Your First ListIf you are logging in for the very first time, you must create your first list. You will beautomatically taken to the Your First List Page when you log into ListManager the firsttime. You will not be able to proceed if you do not create and save this initial list.To create a new list, follow these steps:1. In the left Navigation bar, click Utilities.2. Point to Administration, and then click Lists.3. Click the Create New List button.4. Click the Purpose of List box, and then select the option you want. Email Marketingand Announcements are one-way lists from the administrator to the list members;Moderated and Unmoderated Discussion lists are two-way conversations among listmembers.5
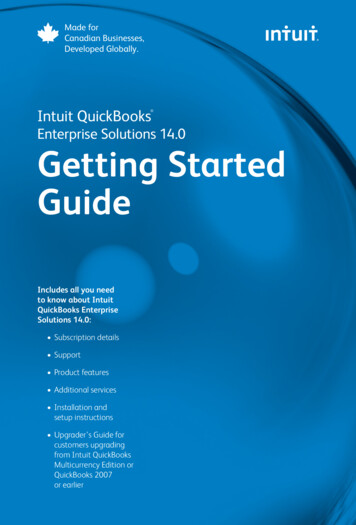
5. Type the List Name and List Description. (Note: You will not be able to change thelist name later!).6. Edit the Admin Name, Email Address and Password.7. Leave the Mail Stream setting at default.8. Click Save.HomepageThe ListManager Homepage will be the first page you see when you log in. It provideslinks to commonly performed tasks.6
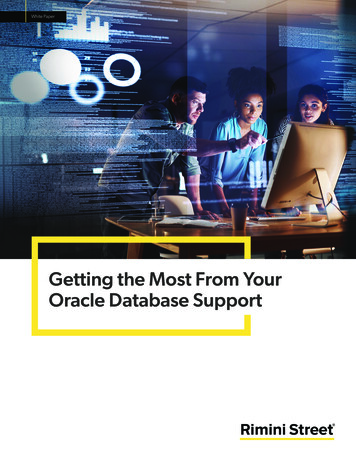
1. Login InformationThe upper right hand corner displays the list you are logged into, the current languageyou are using, and who you are logged in as. If you are running a ListManager cluster,the node name will appear as well if you are a server administrator. Click on the listname to change your list. Click on your name or email address to log out.2. Left Navigation BarYou can access the features in ListManager by clicking an item in the left navigationbar, then navigating to the feature you want.HomeReturns you to the homepage.MembersAdd, import, find, edit, or delete members. Members are the email addressesListManager sends mailings to.ContentCreate a message from a template, or create new content that uses many ofListManager's customization and tracking features.7
SegmentsSegments are subsets or target audiences of a larger list. For example, you cancreate a segment consisting of everyone who lives in New York, or everyone whoclicked on a particular link.MailingsCombine content and segments, then email the result to members. You can alsocreate one-off mailings without first creating content or segments.ReportsTrack the progress of your mailing. Reports show all statistics about your mailingsand members.UtilitiesManage your settings; set up autoresponders, create web forms, manage theserver, and create documents to be sent automatically when people confirm orsubscribe.3. Mailing StatusProvides feedback about your mailing (for example, letting you know there were nodelayed or failed mailings).4. New Mailing ButtonClick here to begin creating a new mailing.5. Recent MailingsDisplays information about your most recent mailings, including the send, the currentstatus, and date sent.6. ShortcutsThis bar displays links to commonly performed tasks. The links available here will varyaccording to your administrative permissions. For example, the link to create a new listonly appears for site and server administrators.7. PreviewDisplay a preview of the mailing selected in the area above.8. Mailing StatisticsUnsubscribes# - The number of unsubscribes attributable to this mailing. ListManager is able toattribute unsubscribes to a particular mailing if the mailing uses the%%email.unsub%% or %%url.unsub%% tags to unsubscribe members. Click thisnumber to be taken to a chart comparing recent unsubscribe counts.% - The number of unsubscribes as a percentage of the number of successfuldeliveries.ForwardsThe number of forwards recorded for this mailing. A forward is a message thathas been opened on computers with different IP addresses. Forwards tracking8
requires that you have opens tracking enabled. Click this number to be taken to achart comparing forwards for recent mailings.ReferralsThe number of referrals recorded for this mailing. Referral tracking requires thatyou have refer a friend tracking in your mailing. Click this number to be taken toReports: Mailings: Referral Statistics.Unique Opens# - The number of unique opens detected for this mailing. Opens tracking must beenabled for unique opens to be displayed. Click this number to be taken to a chartcomparing recent unique open rates.% - The number of unique opens as a percentage of the number of successfuldeliveries.Total Clicks# - The total number of clickthroughs for this mailing on all links. At least one URLmust have been a tracking URL for clickthrough rates to be counted. Click thisnumber to be taken to a chart comparing recent total clickthrough rates.Unique Clicks# - The number of recipients who have clicked at least one link in the mailing.Click this number to be taken to a chart comparing recent unique clickthroughrates.% - The number of recipients who have clicked at least one link in the mailing as apercentage of the number of successful deliveries.Transactions# - The number of purchases recorded for this mailing. Purchase tracking must beenabled for transactions to be counted. Click this number to be taken to a chart ofcumulative purchase over time. - The amount purchased as a result of this mailing.Conversion% - The number of recipients who made a purchase as a percentage of thenumber of successful deliveries.Where Mails SentOpens the Map Report, which displays a breakdown of results according to stateor province.9
1. MembersAdd Test MembersIt's helpful to add a few addresses to your list while you try out your list. We recommendhaving an email account at one of the many free web-based email providers so you cantest message delivery outside your own domain and get a better idea of how messagesare going to look to the people to whom you are sending.DO NOT add all of your members now! You don't want your members to see yourmessages until your list is 100% tested and ready.Creating Test Members1. On the left Navigation bar, click Members, point to Add Members, and then clickAdd Member.2. Enter the email address and name of a test member.3. Click Save.Repeat the steps above until you have added the members you want. For testingpurposes, two or three are enough.You can also add multiple members at the same time. Instead of clicking Add Member,select the next command on the menu, Add Many Members.10
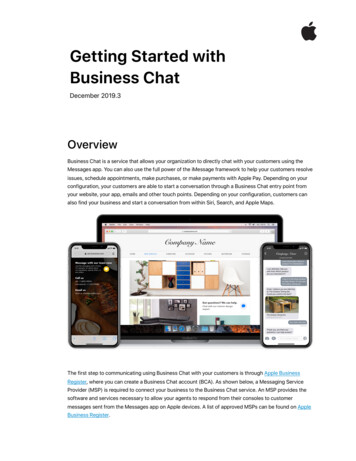
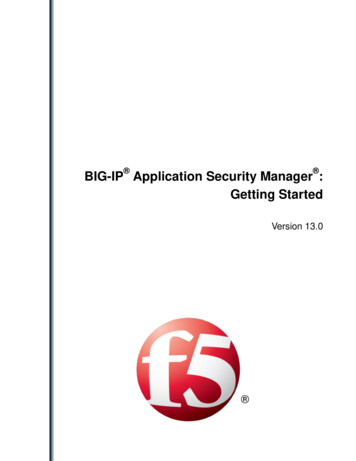
View or Find MembersTo view the members you created, in the left Navigation bar, click Members, and thenclick View Members. The View Members table displays:1. Filter ListBy default, the entire list is displayed. To filter the view in order to display only thosemembers with a particular membership status, select it from this dropdown box andclick Go.To find a particular member, click Find Members.2. Members TableThis table displays the email addresses and names of your list's members--the peoplewho may receive mail from this list. Click on an address to see more information aboutthe member.Ten addresses are listed at a time. You may view more members at a time by clickingshow more, but it's a good idea to click find members if you are looking for a particularperson.3. StatusMembers with a status of normal are active and may receive mail you send through thelist; all other statuses are inactive. Some common inactive statuses you may see are:confirmThe list requires new members confirm their subscription, and this member hasnot yet done so.unsubThe member has unsubscribed, or opted out.heldListManager has repeatedly failed to deliver to this member, so it is put on hold.You may see the delivery history by clicking history for the member.11
4. DownloadClick the spreadsheet buttonto download your members.Importing Your MembersIf you already have a list of members, you can import them into ListManager usingMembers: Add Members. You may import members from a text file, or with additionaldemographic information using a CSV (comma separated values) file.Importing Your Members from a Text File1. On the left Navigation bar, click Members, point to Add Members, and then clickImport from Text File.2. To import members without notification, in the Action section, select the ImportQuietly as Regular Members option.3. In the Select file box, type the name of the file you want to import, or clickBrowseand navigate to the file you want.Each email address and name must be on a separate line, and must be in one of thefollowing formats:bob@example.combob@example.com Bob Shelbybob@example.com (Bob Shelby)Bob Shelby bob@example.com 4. Click Import. The next screen gives you information about your import.Importing Your Members with Additional Demographic Information1. On the left Navigation bar, click Members, point to Add Members, and then clickImport from CVS File.12
2. To import members without notification, in the Action section, select the ImportQuietly as Regular Members option.3. Do one of the following:To update ListManager with demographic data from a separate databaseNext to Update existing members?, select yes.If you use member profile forms to allow your members to update their data inListManager-orIf the file you are uploading does not contain any existing membersNext to Update existing members?, select no.Note: ListManager will not resubscribe members if you update them.4. Select the CSV file to upload. A CSV file has the information you would like importedin a CSV (comma separated values) format. The first row of the file tells ListManagerwhich field the data in each column should be imported into. For example:EmailAddr ,FullName ,Company,Phonebob@example.com,Bob Shelby,Shelby Corp.,555-555-5555In this example, EmailAddr and FullName correspond to the default database fieldsin for email addresses and full names. Additional fields called "Company" and "Phone"have been added to this members table, so this information can also be imported intoeach member's record.13
5. Click Import. You will be taken to a screen which will give you a report of the statusof your import.Creating List AdministratorsWhen you create a list, a list administrator is automatically created (most likelyyourself). You can alter the list admin's settings, as well as create new and additionalList Administrators.We recommend you create a login for each person who will be using ListManager as anadministrator.Creating New List Administrators1. In the left Navigation bar, click Utilities, point to Administration, then point toAdministrators, and then click List Administrators.2. Click Create New Administrator.3. Enter the Email Address, Name and Password of the new admin.4. Click Save.Changing the List Administrator's Email Address or Password1. In the left Navigation bar, click Utilities, point to Administration, then point toAdministrators, and then click List Administrators.2. Click the name of the administrator you want to edit.14
3. Change the address in the Email address box, and then enter and verify a newpassword.4. Click Save.15
2. ContentWhat is Content?A mailing has two parts: the content, or message you want to send, and a segment, orgroup of recipients who should receive the message. When you create a new mailing,you can either type the content you'd like to send directly into the mailing, or insertcontent you've already created.Creating content instead of entering your message into every mailing has manyadvantages. You can:Create a sample of content once, then use it in multiple mailings as a template.Use ListManager's pre-built templates to assist you in creating content.Personalize your message by inserting mail merge fields and conditional text.Add clickthrough tracking URLs, and track how often they've been clicked.If you are sending out a message only once, and don't want or need to use thesefeatures, you may find it easier to skip this step and go to the Mailingssection.The View Content pageThe View Content page shows you all of the content you've created for a particular list.You can save, edit or reuse content on this page. Think of it as your personal content"library."On the left Navigation bar, click Content, and then click View Content.Unsubscribe DirectionsTo have unsubscribe directions inserted into your message, you may either configureyour list to include them automaticaly, or add them manually to your messages.16
Automatic Email Unsubscribe InstructionsTo have ListManager always include unsubscribe instructions, follow these steps:1. In the left Navigation bar, click Utilities, point to List Settings, and then click WebCreated Content.2. For Insert Headers and Footers, select "Automatically insert headers and footers"(always includes the headers and footers) or "Insert headers and footers into newcontent and mailings" (includes the headers and footers in the message bodies, whichthen may be edited by the user).3. Click Save.To edit headers and footers, in the side Navigation bar, click Utilities, point to ListSettings, and then click Email Submitted Content.Email Unsubscribe Instructions1. On the New Content (Content : View Content : Create New) or Edit Content page,click Text message.17
2. Click Insert Field.3. Click the Unsubscribe tab.4. Click the box next to Unsubscribe email addresses, and then select unsubscribefrom this list.5. Click Insert. The unsubscribe directions will be inserted at the bottom of yourcontent.--To unsubscribe from this list, send a blank email to%%email.unsub%%When mailed, the %%email.unsub%% tag merges in a unique unsubscribe emailaddress for each recipient.6. Repeat for the HTML Message, if applicable.To Insert an Unsubscribe URL:1. Create new content, or edit existing content (see instructions above).18
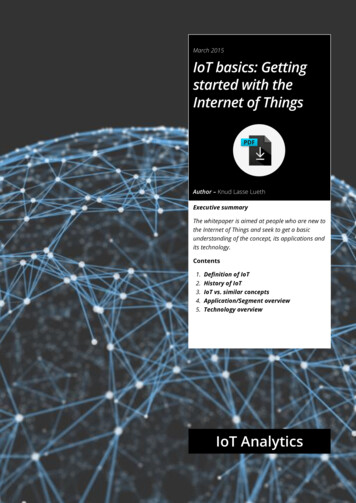
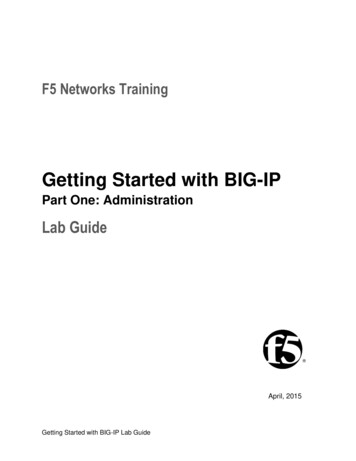
2. Select the Text Message tab.3. Click Insert URL.4. Click the Unsubscribe tab. You will be taken to the following screen:5. Specify whether you want members to receive Email Notification that they haveunsubscribed from your list.6. Enter an optional Destination URL where unsubscribing members will be taken toafter unsubscribing from your list.7. Click Insert. The unsubscribe URL will be inserted at the bottom of your content.http://example.com/u?id %%memberidchar%%&n T&c F&l your listWhen mailed, this tag will merge in a unique unsubscribe URL for each recipient.8. Repeat for the HTML Message, if applicable.19
Creating Content1. In the left Navigation Bar, click Content, then click View Content, and then click theCreate New button.2. Enter the Content Name and Description to identify the content. These aredescriptive, to help you find the content later; they will not be displayed to recipients.3. Enter the email address of who the message should appear to be From:. By default,your email address will appear there. Here are some examples of valid entries for theFrom: field:bob@example.comBob Smith bob@example.com bob@example.com (Bob Smith)"Bob Smith" bob@example.com 4. Enter the To: email address. By default, the To: field is set to %%nameemail%%,which will merge in the name and email address of each recipient. We recommend youdon't change the default To.The To: field does not actually select the message's recipients. When building yourmailing, you'll specify the segment or lists to which you'd like to send the message.5. Enter the Subject: of the message. Recipients will see this line as the subject of themessage they receive.6. Click the Text Message or HTML Message tab, and then type the message youwant or paste it from another source.You may create just a text or HTML body, and that is what will be sent to yourrecipients. Or, you can create both, and send a message that has both text and HTML.This format is called multipart-alternative, and ListManager will create the correctheaders and boundaries automatically. Recipients who can see HTML will only seeyour HTML message; those who can't, will see the text.20
You can customize your message for every recipient by selecting Insert Field or InsertCondition. To track which URLs recipients select, click Insert URL.7. To add attachments or headers, click the Advanced tab.8. To create content using a particular character set, click the Internationalization tab.9. To preview your message, click Save and Test. Or, click Save. This returns you tothe View Content page, where you can edit, test, copy, or delete the content you justcreated.Personalizing ContentThe Content Insert Field Wizard allows you to quickly and easily personalize messagesfor every recipient.It also allows you to insert frequently used email addresses, such as the unsu
name to change your list. Click on your name or email address to log out. 2. Left Navigation Bar . You can access the features in ListManager by clicking an item in the left navigation bar, then navigating to the feature you want. Home. Returns you to the homepage. Members. Add, import, find,