Transcription
CWBench(Release Version 2.0, December 2004)John M. Sullivan, Jr., D.E., Director of Bioinformatics, sullivan@wpi.eduJames Q. Zhang, Ph.D., Research Assistant Professor, zqy@wpi.eduCenter for Comparative NeuroImaging (CCNI)Bioengineering Institute, WPI, 100 Institute Road, Worcester, MA
Table of Contents:Acknowledgements:. 4CNI Workbench Manual . 5Getting Started/ Introduction: . 5Installation: . 6 Notes for CWBench Version 2.0.X.X installation for WINDOWS . 6 Note for CWBench20 installation for LINUX . 7Program Start & Exit: . 9Finding Help: . 9Menu Bar: . 10File . 11Open CNI File . 11Save XML File . 11Save CNI As . 11Import. 11Export. 11Close . 11Exit. 11Edit. 12ROI & VOI . 12Domain . 12Filters . 12Operate . 12View. 13Image Data . 13Geometries . 13Viewports. 13Orientation . 13Background . 14AutoCenter. 14Magnifier. 14Applications . 14sullivan@wpi.eduCWBench Instruction Manual: November 2004 VersionCenter for Comparative NeuroImaging, Bioengineering Institute, WPIzqy@wpi.edu2
Registration . 14Mesh Generation. 14fMRI Module . 14Analysis. 15Histogram. 15Tools . 15Marker. 15Slice Control . 16View Setting. 17Movie Recordings. 18Annotation. 18Help. 18Working with Files . 19View. 21Images . 22Geometry. 24Applications . 26Registration . 26Mesh Generation. 27fMRI Module . 30Basic Tutorial with Examples:. 44Importing images to create a CNI file. 51Troubleshooting: . 54Application Function Tree: . 55IMAGES . 55GEOMETRY . 57SLICE CONTROL. 58REGISTRATION . 59MESH GENERATION. 60sullivan@wpi.eduCWBench Instruction Manual: November 2004 VersionCenter for Comparative NeuroImaging, Bioengineering Institute, WPIzqy@wpi.edu3
Acknowledgements:The authors add their thanks to the support staff and students that have made contributions to this work.Specifically:Udo Benz - MS/Dipl. Ing., Research Engineer, Expertise: Image Registration, Web Development, SystemAdministrationHamid Ghadyani - Ph.D. Candidate, Mechanical Engineering Department at WPI, Expertise: Automaticconversion of atlases into three-dimensional segmented atlases suitable for numerical computation,automatic mesh generation.Wei Huang - Ph.D. Candidate, Mechanical Engineering Department at WPI, Expertise: Marching cubesurface generation and linearization algorithms. Multiple material marching cube routine developmentsand enhancements.Praveen K. Kulkarni - Ph.D. Candidate, Mechanical Engineering Department at WPI, Expertise: Statisticalanalysis of functional MRI datasetsMurali Murugavel M S - Ph.D. Candidate, Mechanical Engineering Department at WPI, Expertise: Meshgeneration, segmentationHongliang (Victor) Yu - Ph.D. Candidate, Mechanical Engineering Department at WPI, Expertise: Linearand non-linear image registration algorithms.Shilpa Kinkar – M.S. Graduate Student, Computer Science Department at WPI, Expertise: Imagesegmentation and ITK utilization.Miao Lu – M.S., Computer Science Department, WPI, Expertise: Web development.Qiu (Autumn) Xia – M.S., Computer Science Department, WPI, Expertise: DICOM interface development,file utility routine.Yingxin (Lucy) Zhang – Undergraduate research assistant.sullivan@wpi.eduCWBench Instruction Manual: November 2004 VersionCenter for Comparative NeuroImaging, Bioengineering Institute, WPIzqy@wpi.edu4
CNI Workbench ManualUpdated: December 2004Getting Started/ Introduction:This software provides an intuitive graphical interface to view and analyze both image and geometry based data. The major target isMRI imaging and geometry (surface & volume) models constructed from such medical images. CWBench can import image andgeometry data from a variety of format sources. It can translate them to other formats as well as our XML driven (Filename.cni)format. The CNI file extension is our acronym for Comparative NeuroImaging.sullivan@wpi.edu-Image, data are generally bitmap (pixel) data – B&W, Grayscale, Color, and other modes. It canexist as an individual file containing a single or sequence of image(s). Alternately, it can bemultiple files of 2D image slices, which when stacked sequentially represent a 3D image set.-Geometry, data are comprised of nodes or vertices (floats, etc.), the node connectivity such as 2Dand 3D finite element meshes, polygons, etc., and scalar or vector attributes associated with thegeometry.-A combination of these data types can be supported simultaneously. (See Basic Tutorial withExamples for more details on how to create these files).CWBench Instruction Manual: November 2004 VersionCenter for Comparative NeuroImaging, Bioengineering Institute, WPIzqy@wpi.edu5
Installation: Notes for CWBench Version 2.0.X.X installation for WINDOWS System requirements:Windows 2000 or XPAt least 256Mb RAMTo run SPM, MATLAB 5.2 or higher is required.All CWBench software is stored within the CWBench folder. It does not write anything to system folders.1) CWBench uses Tcl8.3.42) Unzip all files: CWB20BCxxxxxx.zip These zip files are 50MB or less in size.Each file should be unzipped into the same user-specified root directory, Ex: C:\Do NOT specify a root directory or path that contains spaces within its path and/or name.(An invalid example would be: "C:\Documents and Settings\John Sullivan\My Documents"Some 3rd party links, ex AIR, require this constraint.)3) Add a Shortcut onto Windows Desktop for CWBench:a) On a blank region of desktop Right click -- New -- Shortcutb) Paste the following line into the location of the shortcut target: "User-specified root directory" \CWBench\CWBench20bc83\bin\wish83.exe CWBench.tclwhere "User-specified root directory" is that selected by the user such as "C:\"c) Click on Next button and then rename the shortcut from "wish83.exe" to "CWBench"d) Click on Finishe) Right-click on shortcut and select "Properties" change "Start in" field to: "User-specified root directory" \CWBench\CWBench20bc83\bcodef) Select "Change Icon." and Browse to:sullivan@wpi.eduCWBench Instruction Manual: November 2004 VersionCenter for Comparative NeuroImaging, Bioengineering Institute, WPIzqy@wpi.edu6
"User-specified root directory" \CWBench\CWBench20bc83\bcode\res\CWB Icon.icog) Select "OK"4) Get a license key (cwb.ecl):Connect tohttp://ccni.wpi.eduFollow CWBench -- LicenseEnter required registration informationLicense will be sent as an email attachment.Store the license key (attachment file) within: "User-specified root directory" \CWBench\CWBench20bc83\bcode5) Launch CWBench by a double-click of the Desktop Icon.System requirements:Windows 2000 or XP, Linux (Redhat V9 and SuSe V9 tested), SGIMore than 256Mb RAMMinimum display resolution 1024 x 7686) Launch CWBench from the Desktop Icon.Files with the extension ".cni" (and format) can be opened directly from the ‘File’ pull-down menu. Several of these files alreadyexist in the CW-Examples folder. Alternate format files need to be ‘Import’ via the ‘File’ pull-down menu. Note for CWBench20 installation for LINUX System requirement:Redhat Linux 9, Suse Linux 9 (other Linux platforms might work as well)More than 128Mb RAM1) Untar file: CWB20BCodexxxxxx.tar.gztar xvfz CWBench-linux.tar.gz2) copy examples to local drive.3) Create a Launcher on Desktop for CWBench:right-click on desktopselect New Launchersullivan@wpi.eduCWBench Instruction Manual: November 2004 VersionCenter for Comparative NeuroImaging, Bioengineering Institute, WPIzqy@wpi.edu7
Name: CWBenchCommand CWBench/cwbenchIcon: CWBench/cwb2 83/res/Ccni2.ico4) Get a license key (cwb.ecl) from http://ccni.wpi.edu ,put the license key under the main directory: CWBench/cwb2 835) Launching CWBench by click the Icon. Open the fileswith extension ".cni" under example directories.6) To run SPM, you need MATLAB 5.2 or higher.7) To have native AIR package working properly, you should add working pathto the AIR directory under CWBench.sullivan@wpi.eduCWBench Instruction Manual: November 2004 VersionCenter for Comparative NeuroImaging, Bioengineering Institute, WPIzqy@wpi.edu8
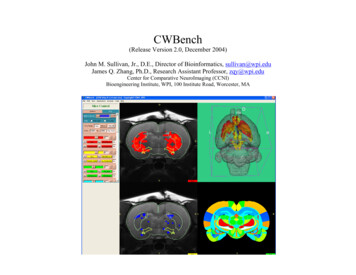
Program Start & Exit:With CWBench installed and the display drivers functioning correctly, CWBench should startby double clicking on the CWBench desktop icon. If the program does not start, pleasecontact the support staff at http://ccni.wpi.edu/The program displays a credits screen which can be closed at any time. The default programscreen contains a left panel identifying the View status to be ‘Images’ and the sub-tab categoryof ‘Display’. To the right of the panel are 6 graphic viewing windows: a large (256x256)window with a green background for 3D data display. Five smaller (128x128) image windowshave a black background. They are for display of 2D data. Background colors and viewlayouts can be changed without difficulty.To Exit CWBench select ‘Exit’ in the ‘File’ pull-down menu ormouse-click on the ‘X’ in the upper right hand corner of theprogram window.Finding Help:In CWBench, the ‘Help’ menu is located at the top of theprogram menu bar. It provides remote access to the ccni.wpi.eduwebsite for interactive help. This facility is still being developed.A PDF file of the manual is available.About CWBench – Software logo and release information.Help tabs are located within
sullivan@wpi.edu CWBench Instruction Manual: November 2004 Version zqy@wpi.edu . Add a Shortcut onto Windows Desktop for CWBench: a) On a blank region of desktop Right_click -- New -- Shortcut . It provides remote access to the ccni.wpi.edu website for interactive help. This facility is still being developed.