Transcription
Scan to E-mail White PaperRicoh Americas CorporationMay 2007Copyright 2007 – Ricoh Americas Corporation
Scan to E-mail White PaperTABLE OF CONTENTS11.2INTRODUCTION.4Target Audience .42MODEL CROSS REFERENCE .53SETTING/SPECS .74SETTING UP SCAN TO E-MAIL VIA WEB IMAGE MONITOR .74.1Web Image Monitor Administrator Login Process.74.2Network Settings via WIM.94.3SMTP Authentication via WIM .104.4POP before SMTP Configuration via WIM. 114.5LDAP Settings in WIM . 114.6Address Book Settings in WIM .134.7Address Book Settings from the Operation Panel .155SETTING SENDER OPTIONS VIA THE MFP OPERATION PANEL.165.1Secure Devices.165.2Non-Secure Devices.166SCAN TO E-MAIL OPERATION.176.1Additional Scan to E-mail Settings.176.2Scanned Files Status .186.3Additional MFP User Tool Options .187SCAN TO E-MAIL IN WINDOWS SERVER 2000 OR 2003.197.1Enabling SMTP Relay for Windows Server with MS Exchange .197.2Device Relays through Exchange 5.5 on Windows 2000 Server .2188.1SCAN TO E-MAIL FAILURE USING WINDOWS AUTHENTICATION .22Tracing the Authentication Error .22Copyright 2007 – Ricoh Americas CorporationPage 2 of 31
Scan to E-mail White Paper8.29Authentication Error Resolution .23FILE SIZE LIMITS.249.1Accessing the File Size Limits .249.2Setting File Size Limits on the MFP.259.3Decode Shell Extension.2710 ARGOSOFT FOR E-MAIL RELAY .2810.1 Creating ArGoSoft User Profiles .2910.2 ArGoSoft Setup in Web Image Monitor .3010.3 ArGoSoft Relay Monitor.3110.4 ArGoSoft Limitations.3111 SUMMARY.31Copyright 2007 – Ricoh Americas CorporationPage 3 of 31
Scan to E-mail White Paper1IntroductionRicoh Corporation developed Scan to E-mail to allow users the ease of sending scan files directlyfrom the MFP to an entered destination.The MFP can be configured to use Scan to E-mail via any of the three interfaces below. Op-Panel Web Image Monitor Smart Device MonitorThis can be used on mixed network environments. In addition to Windows, LINIX, UNIX and Mac OS can send/receive data to/from theFTP server.1.2Target AudienceThe target audience for this White Paper is: IT Administrators. All end-users - The information contained in the document can be distributed to end-usersas long as the restrictions outlined on the cover page are followed. The support and marketing staff of Ricoh Sales companies, including Ricoh family groupcompanies and their subsidiaries. Technical support personnel (CEs) of dealers.Copyright 2007 – Ricoh Americas CorporationPage 4 of 31
Scan to E-mail White Paper2Model Cross ReferenceThe tables below covers all models referenced in this document.Product CodeRicoh CorpModel NameSavin (USA)Model NameGestetnerModel NameLanierModel NameB051Aficio 1224CC2408DSc224LD024CB052Aficio 1232CC3210DSc232LD032CB064Aficio 106025606002LD060B065Aficio 107525757502LD075B070Aficio 209040909002LD090B071Aficio 2105410510512LD0105B079Aficio 203540353532LD035B082Aficio 204540454532LD045B089Aficio 20224022DSm622LD122B093Aficio 20274027DSm627LD127B121Aficio 20154015DSM615LD115B122Aficio 20184018DSM618LD118B123Aficio 2018D4018DDSM618dLD118DB129Aficio 15153515DSm415LD015B130Aficio 1515MF3515MFDSm415pfLD015spfB132Aficio 3260cC6045DSc460LD160cB135Aficio 2035e4035eDSm635LD135B138Aficio 2045e4045EDSm645LD145B140Aficio 20604060DSm660LD160B141Aficio 20754075DSm675LD175B142Aficio 2060SP4060spDSm660spLD160 SPB143Aficio 2075SP4075spDSm675spLD175 SPB147Aficio 2232cC3224DSc332LD232cB149Aficio 2238cC3828DSc338LD238cB156Aficio 3224cC2410DSC424LD124CB163Aficio 20514051DSm651LD151B168Aficio 1515F3515FDSm415fLD015fB169Aficio 2013PSDSm415pLD015spB178Aficio 3235CC3528DSc435LD335cB180Aficio 3245CC4535DSc445LD345cB182Aficio 2035eSP4035EspDSm635spLD135B183Aficio 2045eSP4045EspDSm645spLD145B188Aficio 480W4800WDA080LW411B190Aficio 2228cC2820DSc328LD228cB200Aficio 5560SDC555CS555LC155B202Aficio 3228CC2824DSC428LD328cCopyright 2007 – Ricoh Americas CorporationPage 5 of 31
Scan to E-mail White PaperProduct CodeRicoh CorpModel NameSavin (USA)Model NameGestetnerModel NameLanierModel NameB205Aficio 3025 SP/SPF/SPi/P8025 SP/SPF/Spi/GDSm725 SP/SPF/Spi/GLD225/SPB209Aficio 3030 SP/SPF/SPi/P8030 SP/SPF/Spi/GDSm730 SP/SPF/Spi/GLD230B222MP C3500C3535DSc535LD435cB224MP C4500C4540DSc545LD445cB228Aficio 2051SP4051spDSm651spLD151 SPB229Aficio 615cSGC 1506GS 106LD215cgB230Aficio MP C2500C2525DSc525LD425cB234Aficio MP90008090DSm790LD190B235Aficio MP11008110DSm7110LD1110B236Aficio MP13508135DSm7135LD1135B237Aficio MP C3000C3030DSc530LD430cB245Aficio MP 1500-DSm715LD315B246Aficio MP 55008055DSm755LD255B248Aficio MP 65008065DSm765LD265B249Aficio MP 75008075DSm775LD275B250Aficio MP 5500 SP8055 SPDSm755 SPLD255 SPB252Aficio MP 6500 SP8065 SPDSm765 SPLD265 SPB253Aficio MP 7500 SP8075 SPDSm775 SPLD275 SPB259Aficio 20168016DSm616LD116B260Aficio 20208020DSm620LD120B261Aficio 2020D8020dDSm620dLD120dB262 / B292Aficio MP 161816DSm416LD016B264Aficio 3035 SP/SPF/Spi/G8035 SP/SPF/Spi/GDSm735 SP/SPF/Spi/GLD235B265Aficio 3045 SP/SPF/Spi/G8045 SP/SPF/Spi/GDSm745 SP/SPF/Spi/GLD245B276Aficio MP 16009016DSm716LD316B277Aficio MP 20009021dDSm721dLD320B284Aficio MP 161F816fDSm416fLD016fB288Aficio MP 161SPF816mfDSm416pfLD016SPFB291Aficio MP 3500G8035egDSm735eg-B295Aficio 4500G8045egDSm745eg-B296Aficio MP 35008035eDSm735eLD335B297Aficio MP 45008045eDSm 745eLD345D007Aficio MP 25108025eDSm725eLD325D008Aficio MP 30108030eDSm730eLD330Copyright 2007 – Ricoh Americas CorporationPage 6 of 31
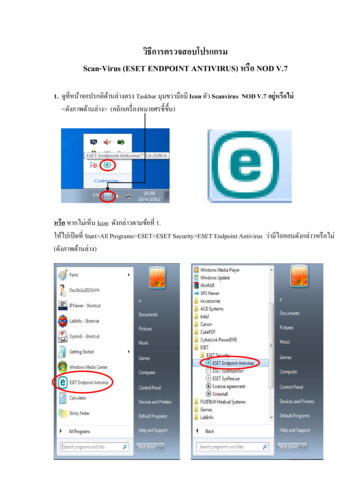
Scan to E-mail White Paper3 Setting/SpecsEmail client such as MS Outlook 2000, Lotus Notes R5, or Outlook ExpressEmail server such as Exchange, Lotus Notes4Setting up Scan to E-mail via Web Image MonitorMany of the Scan to E-mail settings can be configured via Web Image Monitor (WIM). This sectioncovers the steps used to configure the necessary settings. These settings can only be changed by anAdministrator, and the process used to login as an Administrator is outlined in the following section.4.1Web Image Monitor Administrator Login ProcessIn order to access, and change, the necessary settings, it is necessary to login to WIM as anAdministrator. The Administrator login process is outlined below.1.Enter the IP address in the address field using the following form: http://printer host name orIP address (e.g. http://172.16.121.40) and click on Go or press Enter. This opens the pageshown in Figure 4.1 below.2.In the upper right-hand corner, click Login, which opens a login page (Figure 2).Figure 1: Web Image Monitor Main ScreenCopyright 2007 – Ricoh Americas CorporationPage 7 of 31
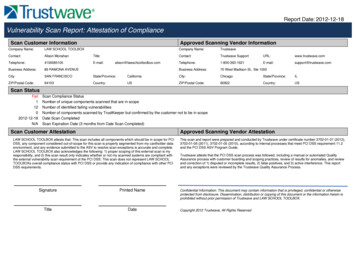
Scan to E-mail White PaperFigure 2: Web Image Monitor Login Page1. Access to Administrator mode requires a password. Login to enter Administrator mode.2. If the login was successful, the word Administrator in the upper right-hand corner. See Figure3.NOTEThe login process may differ slightlydepending on the machine in use.Figure 3: Administrator Main ScreenCopyright 2007 – Ricoh Americas CorporationPage 8 of 31
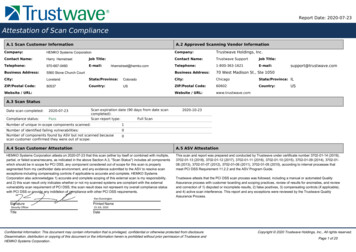
Scan to E-mail White Paper4.2Network Settings via WIMAll of the necessary Network Settings can be configured via Web Image Monitor. This sectioncovers how to access, and edit, the necessary settings.1. Login to WIM as an Administrator (see section 4.1 – page 7 for more information).2. From the left-hand toolbar, select Configuration.3. Under the Network heading, click IPv4.4. Enter Domain Name and WINSserver, if applicable.5. Enter Default Gateway and DNSservers.Copyright 2007 – Ricoh Americas CorporationPage 9 of 31
Scan to E-mail White Paper4.3SMTP Authentication via WIMAfter entering Administrator mode via the steps outlined in section 4.1 (page 7), the necessarySMTP Authentication settings can be entered from the E-mail settings page. Follow the steps belowto access and configure the SMTP settings.1. On the left hand toolbar, clickConfiguration.2. Under the Device Settings heading, selectE-mail to access the e-mail settings.NOTEThe navigation may vary slightly, basedon the version of WIM in use.3. On the E-mail settings screen, enterthe Administrator’s E-mail address.NOTE: Be sure and use a valid e-mailaddress. Never use admin or administrator asthe e-mail address.4. Under the SMTP heading, enter theSMTP IP address or name.NOTES: If DNS is not working properly,using the server name may cause email delivery failure. Use the PING command to findthe server’s IP address (e.g. pingricoh.com to find its IP address).5. If required, enable SMTPAuthentication by selecting On in theSMTP Authentication field.6. Enter the SMTP Port number. The entry range is 1 to 65535 (default is 25).7. If enabling SMTP Authentication, enter the necessary information (E-mail address,password – up to 63 alphanumeric characters, and User Name – up to 191 alphanumericcharacters).8. Click OK to save the settings and return to the MFP Configuration page (Some versions ofWIM may have an Apply button).Copyright 2007 – Ricoh Americas CorporationPage 10 of 31
Scan to E-mail White Paper4.4POP before SMTP Configuration via WIMPOP before SMTP is an authorization method used by mail servers in which a user must prove theycan receive e-mail before being allowed to send e-mail. POP before SMTP is generally transparentto the users that connect to the mail server, since most users receive/check e-mail before attemptingto send e-mail. The goal is to prevent unauthorized users from sending e-mails through the server.Below is the process used to set up POP before SMTP.1. From the Administrator Configurationscreen (page 8), select E-mail under theDevice Settings heading.2. Scroll down to POP before SMTP.3. In the POP before SMTP field, selectON to enable the service.4. Enter the necessary information in allother fields (E-mail, User Name, andpassword).5. Click OK to save the settings andreturn to the MFP Configuration page.4.5LDAP Settings in WIMLightweight Directory Address Protocol (LDAP) is a protocol used to query and/or modifydirectory services running over TCP/IP.1. Login to WIM as an Administrator(section 4.1 – page 7).2. From the Configuration page, selectLDAP Server (under Device Settings).3. In the LDAP Search field, make sureON is selected.4. From the Program/Change/Deletemenu, select LDAP Server 1, and clickChange.Copyright 2007 – Ricoh Americas CorporationPage 11 of 31
Scan to E-mail White Paper5. Enter the server information in the properfields (name, search base, etc.).NOTE: To avoid potential DNS problems,enter the IP address as the server name.6. To test the LDAP server connection, clickStart next to the Connection Test field.7. Under the Search Conditions heading,enter the desired search criteria (e.g. e-mail,department name).8. Click OK to save the changes and returnto the Configuration page.4.5.1 Configuring LDAP on Non-Secure Devices at the MFPTo access the LDAP server settings on non-secure devices, follow this click path at the MFPoperation panel: User Tools Æ System Settings Æ Key Operator Tools Æ Program/ChangeLDAP. From here all of the LDAP settings can be added and/or altered (e.g. server name, Portnumber, attribute, search base, etc.).Copyright 2007 – Ricoh Americas CorporationPage 12 of 31
Scan to E-mail White Paper4.6Address Book Settings in WIMUsing Web Image Monitor, user data can be added, deleted, and/or modified to ensure it is up todate. It also provides a faster, more efficient manner in which to update the address book than dataentry from the MFP Operation Panel. This section outlines the steps to modify the MFP addressbook.1. Login to Web Image Monitor as an Administrator (see section 4.1 – page 7).2. From the left-hand toolbar, select Address Book.3. The Address Book main screen will open. It displays the existing user list, including theRegistration number, E-mail address, Name of each user (Figure 5.1).4. From the Address Book main screen, click Change to edit an existing user or Add User tocreate a new user account.Figure 5.1: Address Book Main Screen1. From the main address list, click onthe radio button next to the name ofthe desired user.2. Click the Change button to open theuser edit screen.Copyright 2007 – Ricoh Americas CorporationPage 13 of 31
Scan to E-mail White Paper3. For new users, a Registration numberwill be auto-populated.4. Enter a Name and Key Display (whatwill appear on the MFP Op panel).NOTE: If no Key Display is entered, theuser will not appear on the MFP operationpanel.5. From the drop down boxes, select theuser’s title(s).6. If desired, select On in the Add to Freq.Radio button to have the user appear inthe Frequent tab on the MFP.7. Under the Authentication Information heading, specify the necessary information (UserCode, SMTP, Folder, LDAP, etc). The Specify Other Auth. below radio must be selectedto edit the Authentication information.NOTEAuthentication data (LDAP,SMTP) may have to be set in theSMTP or LDAP Authenticationpages. Check with the customerfor the settings in use.ProtectionProtecting the Sender with a passwordprovides added security by preventing othersfrom sending e-mails with the user’s name.NOTES: The Password must be numeric. Folder destination can also beprotected with the same password.Copyright 2007 – Ricoh Americas CorporationPage 14 of 31
Scan to E-mail White PaperAdditional InformationIf the user has a foldersetup for scanning enterthat information here.To add the user to a group, selectChange and select the appropriategroup.IMPORTANTAll FAX and E-mail information can also be added/edited from this page.4.7Address Book Settings from the Operation PanelTo enter/edit user information in the Address Book from the MFP operation panel, follow thesteps below.4.7.1 Operation Panel NavigationSecure Devices: User Tools Æ System Settings Æ Administrator ToolsNon-Secure Devices: User Tools Æ System settings Æ Key Operator Tools Æ Address BookManagement4.7.2 Adding/Editing Address Book InformationSelect New Program to add a user, or select an existing user to edit user settings. The same settingsavailable via WIM are available at the operation panel (e.g. E-mail address, folder options,authentication options, etc.). User Codeso Maximum account number of User code is 500. Total (e-mail account and user code)account number is 2000. Group Managemento If using Groups, add them in Address Book: Program/Change/Delete Groupunder Key Operator Toolso The group must be created before adding any users.Copyright 2007 – Ricoh Americas CorporationPage 15 of 31
Scan to E-mail White Paper5Setting Sender Options via the MFP Operation Panel5.1Secure DevicesBy default a sender’s name is required in order to use the Scan to E-mail function. The KeyOperator’s e-mail address can be used as the default sender by enabling Auto Specify Sender’sName.Before enabling Auto Specify Sender’s Name feature, check to ensure there is a Key Operator’s Email address entered in the MFP. To check and/or enter one, follow this click path at the op panel:User Tools Æ Systems Settings Æ File Transfer Æ Administrator E-mail Address.To enable Auto Specify Sender’s Name, follow this click path: User Tools Æ System Settings Æ FileTransfer Æ Auto Specify Sender’s Name (Choose On).5.2Non-Secure DevicesJust as for secure devices, a sender’s name is required in order to use the Scan to E-mail function.Any registered user email address shown in the operation panel can be used as a sender.NOTETo protect the senders name from being used by another person makesure to add a password for the user in the Address Book settings.To use the key operator email address as the default sender (does not require a sender’s name) firstcheck to ensure there is an e-mail address for the Key Operator (and add an address if one does notexist).To check/add a Key Operator E-mail address, follow this click path: User Tools Æ System SettingsÆ Key Operator Tools Æ Key Operator Email Address. Enter addressTo enable Sender’s Name Default, follow this click path: User Tools Æ Scanner Settings Æ FileTransfer Æ Sender’s Name Default (Choose Yes).Copyright 2007 – Ricoh Americas CorporationPage 16 of 31
Scan to E-mail White Paper6Scan to E-mail OperationNow that all of the necessary settings are in place, the Scan to E-mail function should operatecorrectly. This section details the steps involved in using Scan to E-mail.1. Set the document to scan in the MFP.2. From the Scanner menu on the MFP operation panel, select the e-mail destination viaManual Input (keyed e-mail address) or Search (existing e-mail address).3. Set any additional Scan criteria (configuration, subject.message) as needed.4. Set Sender (unless using Auto Specify Sender’s Name feature).5. Press Start Key to complete the Scan to E-mail process.6.1Additional Scan to E-mail SettingsDestination Address: TO: CC: BCCo The destination address can search from LDAP serverSender Addresso When the mail cannot be delivered to the destination address, a mail notification will besent to the senders addresso Sender address will be set in the “from” field of the emailSubject/Messageo The customer can attach the subject/message in the mail.Notification settingo When using this function, the client mailer software s
Email server such as Exchange, Lotus Notes 4 Setting up Scan to E-mail via Web Image Monitor Many of the Scan to E-mail settings can be configured via Web Image Monitor (WIM). This section covers the steps used to configure the nec