Transcription
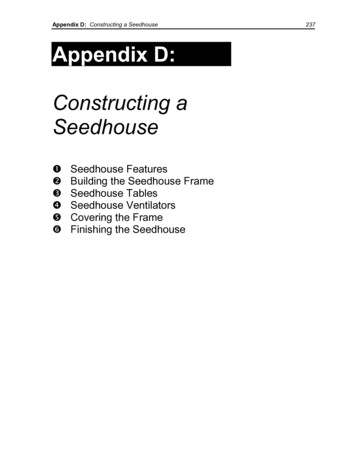
Appendix D: Constructing a SeedhouseAppendix D:Constructing aSeedhouse!"# %&Seedhouse FeaturesBuilding the Seedhouse FrameSeedhouse TablesSeedhouse VentilatorsCovering the FrameFinishing the Seedhouse237
238The Mittleider Gardening Course
Appendix D: Constructing a SeedhouseSeedhouse FeaturesGrowing plants from seed ahead of the normal planting seasonhas a number of advantages, including stronger and morevigorous plants, earlier maturation, larger yields, and reducedcosts on weed and insect control.There are many types, sizes, and shapes of greenhouses, but notevery design or shape or structure is best suited to grow qualityseedlings.This appendix provides instructions for constructing aseedhouse which is simple in design, easy and quick toconstruct, inexpensive, and highly functional. This seedhousedesign simplifies growing procedures, produces strong, healthyseedlings, and minimizes effort and care.Features of this seedhouse include: A seedhouse frame made with 4 x 4 posts and 4 x 4stringers. Plastic covering. Three rows of tables inside the greenhouse for growingseedlings. The same types of tables outside the seedhouse forhardening plants off before transplanting. Ventilators along the length and south side of the seedhousefor adequate circulation.239
240The Mittleider Gardening CourseBuilding the SeedhouseFrameStep 1: Select a Building SiteSelect a level area large enough to accommodate the seedhousewith additional space for expansion, should the need arise.Avoid shadows from trees and buildings. Full sunlight isessential to produce healthy plants.In the Northern Hemisphere, face the length of the structureeast and west. This gives the broadside a southern exposure andcaptivates more of the sun’s heat during the winter season.Step 2: Purchase MaterialsPurchase your materials. The size of the seedhouse depends onyour needs. We will illustrate with a seedhouse 20’ wide, 40’long, and 8 ½ feet high at the peak.The table on the following page shows the materials you willneed to build either a 20’x 40’ or 15’ x 30’ seedhouse.TipIf you plan to paint your seedhouse, it will be easier,faster, and you won’t get paint on the clear plastic cover ifyou paint it now!
Appendix D: Constructing a Seedhouse241Seedhouse Materials ListMaterial DescriptionSeedhouse Size20’ x 40’15’ x 30’4” x 4” - 8’ Side Posts(cedar preferred)4” x 4” - 10’ Center Posts(cedar preferred)4” x 4” - 20’ Stringer20854862” x 3” - 10’ Rafters &End Studs2” x 3” - 6’ Wall Studs &Doors2” x 3” - 3’ Table Legs(incl. Outside Tables)6046-8’, 4-10’40302001802” x 4” -16’ Table Base25201” x 8” -10’ Skirting1291” x 4” - 10’ So. Side Vent.Base1” x 4” - 6’ Table Tops1” x 4” - 4’ Cross Braces4332017300121” x 2” - 10’ Ventilators16124” D Hinges4420’ x 42’ Plastic SideCovering(6 mil or better)20’ x 42’ Plastic EndCovering3” Box Nails5” Box Nails1 ¼ “ Lathe Nails22( 15’ x 32’)11 (15’ x 32’)15#15#10#12#12#8#Black Roofing Paper (3’)120’90’1 ¾” x 48” Lathe3252003 gallons2 ½ gallonsWhite Exterior Paint
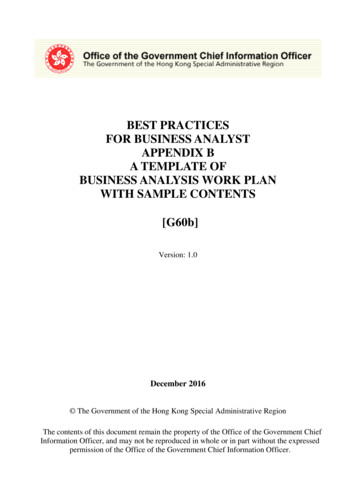
242The Mittleider Gardening CourseStep 3: Measure and Stake the StructureAfter clearing and leveling the site, measure and stake the sizeof the structure.Step 4: Mark Spots for PostsMark the spots for the 4 x 4 posts used to frame the building.The space between the posts is 10’ each way.Step 5: Dig Post Holes and Install PostsDig the holes and install the 4 x 4 side posts along the sides ofthe seedhouse. Set the 8’ long posts in the holes 18” below thelevel of the floor (soil) surface. The top of the posts on thesides of the structure are 6 ½ feet above the floor level.Side PostsStep 6: Nail Stringers on Top of PostsAfter the side-posts are secure, nail 4 x 4 stringers 20 feet longon top of the posts.
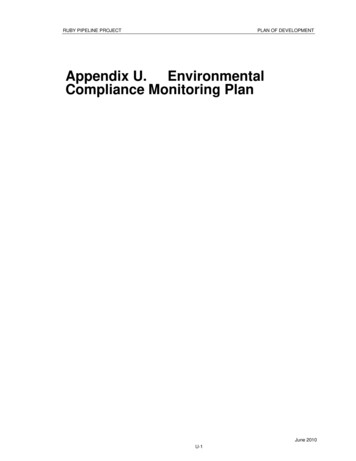
Appendix D: Constructing a SeedhouseStep 7: Prepare Center PostsPrepare the center posts. Before the center posts are lowered inthe holes, they need to be notched. Measure 18” from one endof the posts on one side of the 4 x 4’s and cut a notch 1 ¼ inchdeep x 3 ¾ inches wide above the 18” mark. Do this on oneside only of all center 4 x 4 posts.Center post with notchStep 8: Place Center Row of PostsPlace the row of posts in the center of the structure. When theposts are set in place, the notches should face south. The postsare 10’ long set 18” deep in the ground. They are 8 ½ feet highabove the floor level.Step 9: Nail Stringers to Tops of Center PostsAfter the posts are secure, nail one row of 4 x 4 stringers 20’long on top of the posts.243
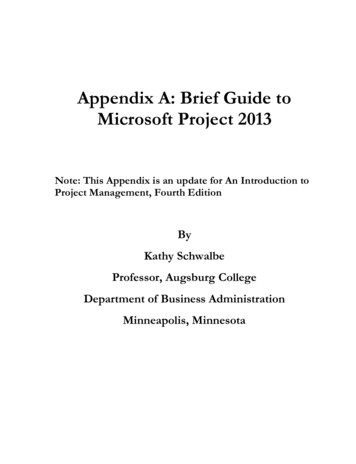
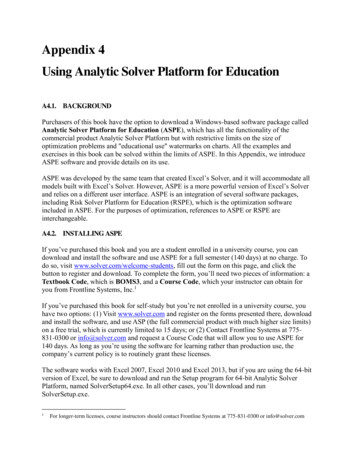
244The Mittleider Gardening CourseStep 10: Nail Second Row of StringersNail a second row of stringers 18 inches below the first row ofstringers. Before nailing the second row of stringers to theposts, notch one side of the stringers to match the notches madeon the posts. Match the notches to fit into each other and nailsecurely.Center posts and stringer assembly.Step 11: Make the RoofMake the roof of the building of 2 x 3 wood rafters 10’ long.The space between the rafters is 24”.Make the roof support for the north slope. Cut the rafters forthe north slope to fit and toe-nail one end into the 4 x 4 stringerat the peak, flush with the top edge. Nail the lower end on topof the 4 x 4 stringer flush with the outside edge.
Appendix D: Constructing a SeedhouseRoof assemby.Step 12: Nail Side Studs to FrameThe studs along the sides of the frame are 2 x 3’s that are 6’long. Space them 24” apart to match the roof rafters.Nail the top end of the stud to the underside of the 4 x 4stringer and flush with the outside edge. Nail the lower end ofthe studs to a 1 x 12 board 20’ long nailed near the floor levelto the 4 x 4 posts on the outside of the frame.Step 13: Make Roof Support for South SlopeMake the roof support for the south slope by nailing both endsof the 2 x 3 rafters on top of the 4 x 4 stringers. Nail the raftersfor the south-sloped roof to the second (lower) row of 4 x 4stringers. Nail the ends flush with the outside edges of bothstringers.245
246The Mittleider Gardening CourseStep 14: Frame the Ends of the BuildingFrame the ends of the building with 2 x 3 studs. Cut to fit andnail the studs in place. The space between the studs is 24inches, except for the doors.Studs are 24 inches apart on center.
Appendix D: Constructing a SeedhouseStep 15: Install DoorsDoors should be 30” wide x 6’ high. Construct the outer framefrom 2 x 4’s. Then notch 1 x 4 diagonal braces into the back ofthe door.Cold winds blow from the northwest or north. Therefore, thedoor hinges should be installed on the north side of the doorframe. When the doors are opened, they will tend to block thewind from blowing on the plants in the greenhouse.Door assembly.You have now completed the frame of the seedhouse.247
248The Mittleider Gardening CourseSeedhouse TablesConstructing a seedhouse without tables would be a mistake.Seedlings should never be placed on the ground, even whengrowing in full sun.Here is how the tables should be configured when completed: The tables are 30” highThere are two side tables 36” wideThere is one center table 72” wideThe aisles between tables are 44” wideFollow these steps to construct the tables:Step 1: Stretch a Chalk Line for TablesMeasure 30” from the inside edge of the 4 x 4 side posts.Stretch a chalk line tight the length of the seedhouse.Step 2: Drive Studs into Ground for Table LegsPoint one end of the 2 x 3 studs which are 36” long. Drive thestuds 10” into the ground in line with the chalk line. Drive astake every 28 inches.Step 3: Level the Table Leg StudsCheck the top of the table legs. They must be level. Each tablealong the sides of the seedhouse has two rows of table legs.The center table has three rows of table legs.Step 4: Nail 2 x 4’s to Table LegsWith the table legs in place and level, nail 2 x 4’s standing onedge to the top of the table legs.Step 5: Nail Top Boards on Side TablesNail 1 x 4’s that are 36” long across the two rows of 2 x 4’s.Put a space of 1” between the 1 x 4 boards.Step 6: Construct Center Table Legs
Appendix D: Constructing a SeedhouseConstruct the center table the same way, except use only onerow of table legs along the center row of 4 x 4 posts.Step 7: Nail on Center Table TopsNail 1 x 4 boards 72” long across the three rows of table legs.Put a space of 1” between the boards. There will be a 6”overhang along each side of the table.Center table assembly.You have now completed building seedhouse tables249
250The Mittleider Gardening CourseSeedhouse VentilatorsUniform, adequate, and even ventilation throughout theseedhouse is essential to uniform growth of seedlings.The ventilators are located at two openings along the full lengthof the seedhouse: one just below the peak and another along thesouth side of the seedhouse.The 18” opening along the length and ridge of the building, justabove the south-slope roof is a continuous ventilator. Thissimple ventilator eliminates fans and cooling pads, yeteffectively controls the temperature throughout the seedhouse.To Make the Ventilator at the PeakStep 1: Get Sheet of PlasticTake a sheet of clear 6 mil plastic 24” wide x 40’ long.Step 2: Nail 1 x 2’s to PlasticLay 1 x 2’s of random length in a straight line on and along thelength of the center table. Place one edge of the plastic sheet onthe 1 x 2’s. Place another row of 1 x 2’s on top of the plasticand on top of the first row of 1 x 2’s. Nail the two 1 x 2’stogether securely with the plastic between.Step 3: Attach Other Edge of Plastic to StringersTake the other edge of the plastic and, using lath, nail theplastic to the 4 x 4 stringers at the peak. The ventilator is inplace.
Appendix D: Constructing a SeedhouseTo Open and Close the VentilatorStep 1: Fasten Metal Pulleys on North-Slope RaftersFasten a metal pulley on each north-slope rafter in line witheach center 4 x 4 post. Fasten the pulley 24” down from thepeak.Step 2: Fasten Hooks on Center PostsApproximately 14” above the table top fasten a hook or nail oneach center 4 x 4 post.Step 3: Attach Clothesline RopeTake a length of clothesline rope and fasten one end securely tothe 1 x 2 strip holding the plastic sheet (ventilator). Thread therope through the pulley on the rafter and bring the end down tothe hook on the post. Give the rope 18” extra length and cut itoff.Step 4: Tie Loops in RopeTie three loops on the rope; one on the end and the other two12” apart from the end.Use the ropes to regulate the amount of ventilation desired inthe seedhouse.To provide full ventilation, pull the ventilator to the fullopening and anchor the ropes to the hooks on the posts.To close the ventilator, simply unhook the ropes. The ventilatorcloses automatically. Because it is on the inside of theseedhouse, it is not affected by the wind.251
252The Mittleider Gardening CourseTo Make the Side VentilatorFollow these steps to build the 18” ventilator along the southside of the seedhouse.Step 1: Attach 1 x 8 BoardsBefore you pull the cover over the seedhouse frame, nail 1 x 8boards 20’ long in a straight line 18” below the top of the studs.Step 2: Tack 1 x 2 Boards in PlaceOn the top edge of the 1 x 8’s place 1 x 2’s running the fulllength. Tack the 1 x 2’s only enough to stay in place.This ventilator is not yet completed until after the seedhousecover is installed.
Appendix D: Constructing a SeedhouseCovering the FrameOnly two operations remain to complete the seedhouse. Youwill need cross bracing to strengthen the frame structure, andyou will need to cover the frames with clear plastic film.For added strength and stability, use 1 x 4’s that are 48” to 60”long for cross-bracing in the building. Nail these to the posts,rafters, and stringers.Special formulated transparent plastic at least 6 mil thickness issold in rolls of varying widths and lengths. The best materialshave a life span of 6 to 9 years. To cover the sides and roof of a20’ x 40’ seedhouse will require two sheets 18’ wide x 40’long. To cover the ends of the seedhouse will take two sheets9’ wide and 20’ long.Covering a structure with plastic film is fast and easy—providing some precautions are used.IMPORTANT:Cover the north side and north roof with one sheet first.Attempt this only during the part of the day when the airis very still.Step 1: Pull the Plastic Sheet over the FramePull the sheet over the frame. Have the lath ready and veryquickly lath the plastic to the rafters.Step 2: Nail Plastic Sheet in PlaceUse 1 ¼” lath nails and nail a lath to every 3rd or 4th rafter andupright stud as quickly as possible. This is a precautionarymeasure to hold the plastic in place in case of wind.Step 3: Secure Plastic on Every RafterNail lath on every rafter and stud. The plastic must be securedwith lath on every rafter and stud.Nails on the lath should be 8 to 12 inches apart. When nailed tothe rafters, the lath should be tight to hold the plastic secure253
254The Mittleider Gardening Courseagainst flexing between the lath and the rafter or stud. Whenlathed to the rafters and studs as recommended, the plastic willnot flex or tear and will weather strong winds for many years.Step 4: Secure Plastic to South SideAfter securing the plastic on the north side, pull a sheet ofplastic over the south roof and side.Follow the same procedure in fastening it securely as outlinedfor the north side.Step 5: Secure Plastic to Ends of StructureAfter completing the south side, take a sheet of plastic 9’ widex 20’ long and cover each end of the building. Nail lath toevery upright stud. Before covering the end, hang the doors inplace. The plastic covers the end including the doors.Use lath to secure the plastic to the doors. After lathing the endand doors, cut the plastic along the door frames. The doors arefree to move open and shut on their hinges.Inspect to be sure the plastic is securely lathed to every rafterand stud.You have now completed the seedhouse frame with plastic.To Complete the South-Side VentilatorStep 1: Nail 1 x 2 Strip and Cut PlasticPreviously, you placed a 1 x 2 strip of lumber
240 The Mittleider Gardening Course Building the Seedhouse Frame Step 1: Select a Building Site Select a level area large enough to accommodate the seedhouse with additional space for expansion, should the need arise. Avoid shadows from trees and buildings. Full sunlight is