Transcription
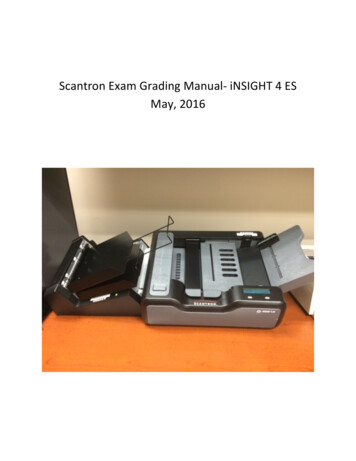
Scantron Exam Grading Manual- iNSIGHT 4 ESMay, 2016
Page 2 of 19Scantron Exam Grading Instructions- Table of Contents1. Before you Begin . 32. Answer Key Options (IMPORTANT) . 33. Preparing the Scantron Machine and Scantrons . 54. Setting up the Scoring Session . 65. Scanning the Forms . 8Errors that may occur while scanning the forms. 8What to do in the case of a paper jam . 86. Editing the Answer Keys and Test Properties . 9Using Multiple Answer Keys (6.1). 9Using a Single Answer Key (6.2) . 107. Remark Quick Stats and Exporting Score Reports . 12The Report Tab . 12The Data Tab . 138. Saving the Session and Turning off the machine . 149. Appendix of Report Options . 15
Page 3 of 191. Before you begin1.1. This machine only reads Scantron Form F-288 (red, 200 questions, 2 sided)1.1.1 This form has two requiredfields and two optional fields.- Students are required to fill outtheir ID number and their firstand last names (on the front ofthe scantron form only)- Students have the option to fillout their phone number (on thefront) and the Test Form (on theback) if the teacher would likethem to1.2 There is no internet or printer connected to this computer. This computer is only intended forscoring Scantron forms; once processed you can print, review, and post the reports/scores using the SE Ior SBSG computer labs.1.3 You will need to bring a USB flash drive with you to save the scoring session/report. Do not save anyfiles on the computer connected to the Scantron Machine. Save all results/reports and scoring sessionson your USB drive and bring it with you. This is your only record of the scores so save it and guard it.1.4 The Answer Key can be entered in any of four ways (see section 2 for more details BEFORE you beginscanning):A. Answer Key scanned as the first scantron (with all student scantrons; 2A)B. Answer Key scanned WITH student scantrons (not necessarily first; 2B)C. Answer Key scanned AFTER all student scantrons have been scanned (2C)D. Answer Key entered manually AFTER student scantrons have been scanned (2D)1.5 The Scantron iNSIGHT 4 ES machine reads both sides of the scantron. It also has the ability to scaneach scantron and save the scan as an image. This uses lots of space, so if you decide to save images ofthe scantrons be sure your USB drive has lots of room.1.6 The Remark Classic OMR program does not store “default” options. Therefore when you load theprogram, it will automatically load the options selected from the previous scanning session. Thishandbook provides the recommended default selections. Be sure to pay careful attention to theserecommended defaults in order to avoid selecting options that may not be applicable to your test.
Page 4 of 192. Answer Key Options (IMPORTANT)There are FOUR different methods (A, B, C, or D below) you can use to enter the answers to your test. Itis important to decide which method you will use BEFORE you begin scanning student scantrons.First, be aware of whether your test has multiple versions or just one. If it has multiple versions and youplan on scoring all versions in one session, in step 4 you should NOT use “Quick Grade” and you shouldNOT use the “print” option! Instead use “Advanced Grade” when you have multiple versions.A.--B.C.-Answer Key scanned as the FIRST scantron- You can choose to scan your answer key at the topof pile, along with all the other student scantrons. (More info in section 6.4.1)If you decide on this option and have a SINGLE ANSWER KEY o In step 4, you can choose to scan using “Quick Grade” instead of “Advanced Grade”.This will allow you to streamline the grading process and use the settings that were lastused on the program.§ Important: The Remark Classic OMR program saves the options from theprevious scanning session, not necessarily the defaults we recommend. If youuse “Quick Grade”, you may be using someone else’s complicated options whichmay not be applicable to your test.o You will be able to “print” student scores directly onto the scantron. More aboutprinting is explained in section 4.7.If you decide on this option and have MULTIPLE ANSWER KEYS o In step 4, you should choose to use “Advanced Grade”.o You should not select “print” options in step 4.7, as you will be printing incorrect scoresonto your students’ scantronso You will be able to designate which scantron scanned was the key (see section 6.4.1)Answer key scanned WITH student scantrons (not necessarily first)- You can shuffle youranswer key in with all the student scantrons (not recommended) and LATER designate whichscantron is the key. (More info in section 6.4.1)You SHOULD choose to use “Advanced Grade” instead of “Quick Grade” in step 4.If you decide on this option you SHOULD NOT select print options in step 4.7.Answer Key scanned AFTER all student scantrons have been scanned- You can first scan yourstudent scantrons into the system. Then, as explained in section 6.4.2, you can scan in youranswer key separately. (More info in section 6.4.2)You SHOULD choose to use “Advanced Grade” instead of “Quick Grade” in step 4.If you decide on this option you SHOULD NOT select print options in step 4.7.D. Answer Key entered manually AFTER student scantrons have been scanned (More info insection 6.4.3)- You SHOULD choose to use “Advanced Grade” instead of “Quick Grade” in step 4.- If you decide on this option you SHOULD NOT select print options in step 4.7.
Page 5 of 193. Preparing the Scantron Machine and Scantrons3.1 If you have multiple test versions, all versions can be loadedtogether. There is no need to separate versions as long as the TestForm bubble is filled out by the student.- Note: After scanning scantron forms, if you use “Quick Grade”instead of “Advanced Survey” the software will automaticallyassume that the first scantron scanned is the answer key (evenif this is not the case). Using “Quick Grade” will only allow youto use one version of an answer key. More on “Quick Survey” and “Advanced Survey” ispresented in Section 5.3.2 Turn the scanner on by pushing the left button below thescantron’s display window3.3 Push tray down by pushing the black tab that says “press to load” down. While holding the press toload button down, press the “lock” button as well to lock the loading tray.3.4 Load the scantrons; only load about 20-30 scantrons in the tray at a time. Anything more than thismay cause a jam. Make sure all scantrons are facing the same direction.3.5 Push the “press to load” button AGAIN so it unlocks and raises the scantron tray.
Page 6 of 194. Setting up the Scoring Session on the Computer4.1 Make sure computer is logged on to user “Scantron” (no password needed).4.2 Connect your USB to the computer and note its folder location.4.2 Click “Remark Classic OMR” icon on desktop.4.3. There are three tabs that appear above the blue toolbaron the left of the window: Templates, Data, and Analysis.4.4 Under the Templates tab, select the template“Form288.rst”- You can select this form under “Recent”- Or by clicking “File” à “Open Form Template” à“Form F288.rst”- Or by clicking “Open Other Templates” à “FormF288.rst”4.4 The window will now shift to the Data tab. You caneither select the “Quick Grade” option on the top toolbar, oryou can scan the scantrons using the option “Read ”, whichwill give you more specific options for your scoring session.4.5 If you’d like to print onto your scantron, enable imaging, or review data while the scantrons arebeing graded, select “Read ” under “Data Options”- The “Classic Read” box will pop up.
Page 7 of 194.6 Under Scanner Source, “iNSIGHT 4 (IMAGE)” should be visible.- If it is not, select “Scanner Properties ”- Under Scanner Configuration, choose “iNSIGHT 4 (IMAGE)” as the Model and “USB” as the port- Once these are selected, press “Ok”4.7 Note the box “Enable imaging”- Checking this box will allow you to scan each scantron and save as an image file. This can beused to document the physical scantron form without having to save the paper version. Notethat this will result in a very large data file, so be sure to have lots of space on your USB drive.4.8 Print Options (on the right side of the Classic Read Box, see image on page 6) will allow you to“print” a score or other information on the physical scantron form.- **Print on scantron ONLY if you are scanning the test key FIRST and ONLY if you have a SINGLEversion of the test answer key. Otherwise the grade printed on each student’s scantron will becompared to another student (not the answerkey) or the wrong version of the test.- If you have more than one answer key OR youhaven’t scanned your answer key as the firstscantron, use the default print settings (see theright side of the Classic Read box on pg. 6).- Click the dropdown menu and select what youwish to be printed on each scantron form. Youcan select the percentage a student got corrector the raw score among other options.- You can select multiple items to be printed onthe form. Items won’t be separated by a space, comma, or other symbol. Instead items will beprinted one after the other.- Click Insert to add the item to be printed- There should be a green box that says “ScannerPrinting is Activated” if your selection is correct.4.9 Click Next. The Clean Your Data Option will be next.Click “Enable Review Exceptions”.- This allows you to check mistakes on the scantronform as they are being scanned (e.g., multipleresponses to a single question, empty ID section).- To the right are the default selections for thisoperation. Use these default selections for the bestresults. Otherwise the program may pause for yourapproval after EACH scantron.Now you are ready to begin scanning the forms.
Page 8 of 195. Scanning the forms(Step 3.5) Be sure you have pushed the “press to load” button a second time so it unlocks and raises thescantron tray. If this has not been done, you may get a warning that says “scanner not ready”.5.1 Return to the scanner and click the right button below the display screen marked “Start”.5.2 On the computer screen, click “Read” in the Classic Read box to begin scanning the scantrons. Thisbox should pop up on the screen, indicating that the scantrons are now scanning:5.3 Once a batch of scantrons has been read, re-load the machine with another batch. Press “ResumeScan” on the computer to start scanning the next batch.5.4 Once you have finished scanning all scantrons, select “End Scan” on the computer screen.5.5 There are a number of messages and errors that may pop up, described below.- Clear paper path: This message appears when a sheet remains in an area of the scanner toolong, resulting in a jam. Clear all sheets from the scanner and place the sheets not scannedsuccessful back in the input tray. Press “Start” to resume scanning.- Double Sheet: This message appears when the scanner detected more than one paper enteringthe paper path. Remove all sheets from the transport bed and place back in the input tray.- End of Batch: Appears when you have finished scanning a batch of scantrons.- Feed Form: Appears when the scanner received a “Read” command from the computer,indicating it is ready to read a form. Either press “Start” to scan forms, or “End” if you arefinished scanning.- Processing Sheet: Appears when the scanner is scanning a sheet and transmitting data to thecomputer.- Scanner not Ready: Appears when the scantron tray has not be “unlocked”. Push the “press toload” button on the scanner to raise the scantron tray to the reading level.- Sheet did not feed: The scanner cannot detect a sheet to be read. Try pushing the tray downfully with the scantrons slid all the way forward.- Sheet skewed: Appears when a scantron is fed at anangle. Make sure it is laying straight.5.6 If a jam occurs, there are three plastic scanner coversthat can be lifted to clear the jam. Please use care inopening these. Be sure they are replaced completely;otherwise the machine may not run.
Page 9 of 19IMPORTANT:If forms are unable to be read please make sure that bubbles are filled correctly and the rightform is being used. In some cases/batches the form itself maybe bad. Scantron recommends carryingextra blank forms to use has replacement if forms are not readable by machine.Please contact SE Computing if there is a considerable amount of forms that are not being read.Also, make sure the scanner covers are placed properly. Refer to section 5.5 and 5.6 of this manual forinstruction.
Page 10 of 196. Editing the Answer Keys and Test PropertiesThere are two grading options. The first is “Quick Grade” and the Second is “Advanced Grade”.-
scantron, use the default print settings (see the right side of the Classic Read box on pg. 6). - Click the dropdown menu and select what you wish to be printed on each scantron form. You can select the percentage a student got correct or the raw score among other options. - You can select multiple items to be printed on the form. Items won’t be separated by a space, comma, or other symbol .
