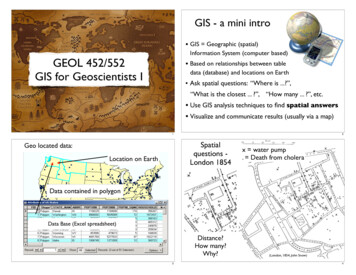
Transcription
Page 1 of 16HUNSAKER& ASSOCIATESI R V I N E ,I N C .Importing GIS / USGS Data into AutoCAD (Rev. 1)GIS data is information that is tied to coordinates. It may be formatted in several differentformats. Fortunately, AutoCAD Map has the ability to import and beautify most formatsyou will encounter.Learning the concepts involved will allow you to look for ways to use the availableinformation on the web and from clients. Consultants such as us need to be as sharp aspossible when it comes to finding and using information.In general, the steps to importing GIS linework data are simple: Import using Map- Tools- Import Flag import to use data available Flag import to translate coordinates Query as needed to new drawing to modify properties based on dataTo import a raster image, use Map- Image- Insert. The tool will detect the positioninginformation for you.The following sections will walk you through the steps involved.Data available on the webIt is not difficult to find GIS data on the internet. A few sites that are useful are: s/us.asphttp://gis.ca.gov/data.eplThe first site, Geo Community, is excellent for obtaining: USGS quad images (DRG’s – Digital Raster Graphics)Aerial photos by quad area (DOQQ’s)Digital Line Graphics of contours, street, and hydrologic features (DLG’s)Digital Elevation Models (DEM’s)You can get some of the items free, and some you have to pay for. It is 25 for 150mb ofdownload. Each USGS quad is about 5 meg so you can get quite a lot for a moderateprice.C:\CAD SUPPORT\H&A Help Project\Help Documents Origs\Importing GIS-USGS Data into AutoCAD Rev1.docCreated on 2/7/2005 8:55:00 AM
Page 2 of 16The Geo Community site looks like this:You can see the USGS items on the left. Those are the links to get quad images, aerialimages, and various line graphics.C:\CAD SUPPORT\H&A Help Project\Help Documents Origs\Importing GIS-USGS Data into AutoCAD Rev1.docCreated on 2/7/2005 8:55:00 AM
Page 3 of 16Data from outside consultantsThe only data you should expect to see is from the ERSI products – ArcView/ArcInfo.Those programs will usually produce: .e00 – ArcInfo Coverage file .shp – shape fileThe interesting thing is that you will usually get three or four files for each shape file.Those extra files are databases of information about the linework in the shp file and are thekey to making things look pretty and easy to use.You use the same import methods for these types of files as for downloaded files.Data available from programs H&A hasWe have a couple programs that provide information somewhat easier and cleaner thandownloading from the web, they are: Aerials Express – this program brings up aerial photos for the LA area and lets youpick the area you want. It produces a world file for your coordinate system so youcan bring the images created right into your drawing. Its images are very recent.Only downside is we have not purchased coverage for everywhere. So far awayplaces will not be available. We have limited seats so ask out IT dept if you canhave it installed if you need it. Otherwise, use someone leses computer to do it. Quads USA – this will create seamless USGS raster images with world files. This iseasier than using downloaded maps, but again coverage is limited. This runs offthe network so anyone can have this at their computer. Thomas Guide linework – we have the ability to create linework and text veryquickly from Thomas Guide maps we have. This is somewhat new but eventuallywe will import everything and have a folder with maps ready to go. For now, youmust request an area to be done. County parcel linework – we have figured out how to create linework of a fewmain counties easily. Again, this is a bit new so request the area needed. Keyhole software – this program is fun and amazing. You start with a globe and“fly” in with controls. It shows 3D terrain with aerial photos draped over. Wehave limited seats so you will have to ask who has this installed. The image qualityproduced is not as exact as other methods, but it is useful for getting an idea of theland around your project.C:\CAD SUPPORT\H&A Help Project\Help Documents Origs\Importing GIS-USGS Data into AutoCAD Rev1.docCreated on 2/7/2005 8:55:00 AM
Page 4 of 16Downloading and importing dataTo focus on real data available, I have tabulated several sources of data and theinformation needed to import or use it.Data TypeWhere to get itFormat of Fileshttp://data.geocomm.com.zip with .tif and.tfwUTM NAD27USGS DigitalElevation Model(DEM)http://data.geocomm.com.GZ - unziptwo times to get.DDF files7.5 min – UTM NAD 27 or 8330 min – Lat/Long NAD 27 or 831 deg - Lat/Long NAD 27 or 83Elev units are meters.USGS AerialPhotos (DOQQ)http://data.geocomm.com.zip with .sidand .sdwUTM NAD 27 or 83USGS rg/index.htmlBrowse to County, thenpick Digital LineGraphics 24k.GZ - unziptwo times to get.DDF filesUTM NAD 27 or 83Aerial PhotosAerials Express program.jpg with .jpwWhatever you specifiedSeamless USGSQuads RasterQuads USA program.tif with .tfwWhatever you specifiedShape FilesMany places, even makeyour own from AutoCAD.shp(and usually afew other fileswith it)Must guess by who is providing it.Geo Community items willgenerally be UTM NAD 27 or 83USGS QuadRaster (DRG)Coord SystemRaster images – DRG’s and DOQQ’sFor raster images, they will not need to be modified. AutoCad can bring in most any imagetype. Tif, Jpg, and Sid files are the most common.You must have either some kind of world file, which is a text file named .tfw or .jpw, or theimage must contain the information telling the computer where it sits within a coordinatesystem.If you do not have a world file, bring up the image in a text editor other than notepad. Iuse Textpad because it is ten times faster than notepad. Do a search for the words “zone”,“datum”, and “utm”. That will typically find any georeferencing information.If you don’t find it, you will have to align an image by hand. Hand aligning images is goodfor exhibits but be careful, other people might not know you did not use officialinformation for setting the image.C:\CAD SUPPORT\H&A Help Project\Help Documents Origs\Importing GIS-USGS Data into AutoCAD Rev1.docCreated on 2/7/2005 8:55:00 AM
Page 5 of 16Once you have downloaded and image and the associated coordinate information, useMap to bring in the images.Map- Image- Insert It will automatically look for the world file information and use it so you just pick theimage.The following dialog is the insert dialog.Be sure to check the Modify Correlation box. Pick Open and zoom extents.C:\CAD SUPPORT\H&A Help Project\Help Documents Origs\Importing GIS-USGS Data into AutoCAD Rev1.docCreated on 2/7/2005 8:55:00 AM
Page 6 of 16Line DataWhile raster data is brought straight into AutoCad, line data starts out as several differentfile formats. The sequence to importing is as follows:1. Download and unzip the data to a folder2. Import the data into a blank drawing with the Map- Tools- Import command3. Query that information to the final drawing in order to get it to the right coordinatesand displayed how you want.Download and unzip the data to a folderPick on a link for the DLG files. Eventually, you will find download links for various kindsof information.For this example, I downloaded hyspograpghy or contour line data.You will typically get a .gz or .zip file from most web sites. Both are just compressed fileformats. Right click on either kind of file and pick “extract here”.You may get another file such as a .tar. Just keep “extracting here” until you get a bunch offiles instead of just one.C:\CAD SUPPORT\H&A Help Project\Help Documents Origs\Importing GIS-USGS Data into AutoCAD Rev1.docCreated on 2/7/2005 8:55:00 AM
Page 7 of 16This is a list of the files obtained after unzipping:At first, you may not know what to do with the files. The way to figure this out is to run theMap- Tools- Import command and see what it allows you to import.In this case, notice that it allows DDF files, and in particular, it wants the one ending inCATD.DDF. This is the “catalog” file for the many files we obtained.This is typical for contour data, but also note that .e00 and .shp data is an option. Thoseare also very common.C:\CAD SUPPORT\H&A Help Project\Help Documents Origs\Importing GIS-USGS Data into AutoCAD Rev1.docCreated on 2/7/2005 8:55:00 AM
Page 8 of 16When you ppick the STDS option, it shows only the HP01CATD.DDF file. Pick it and pickopen. You will then get the following dialog:C:\CAD SUPPORT\H&A Help Project\Help Documents Origs\Importing GIS-USGS Data into AutoCAD Rev1.docCreated on 2/7/2005 8:55:00 AM
Page 9 of 16Note the Data column. In the past, you may not have done anything with it but now youwill. Pick on the first item and pick the button.Pick the Create Object Data optionPick ok. Do the same for every row in the Import dialog.C:\CAD SUPPORT\H&A Help Project\Help Documents Origs\Importing GIS-USGS Data into AutoCAD Rev1.docCreated on 2/7/2005 8:55:00 AM
Page 10 of 16Pick the Import polygons as closed polylines option.Pick ok and wait for the data to be imported. Zoom extents.The open spot above is South Lake. It is an excellent fishing lake at about 9,000 feetelevation in the Sierra Mountains near Bishop.The linework will be 2D polylines. It will have object data attached to it. Check what isavailable with the Map- Object Data- Edit Object Data command.Pick a contour and you will see this:C:\CAD SUPPORT\H&A Help Project\Help Documents Origs\Importing GIS-USGS Data into AutoCAD Rev1.docCreated on 2/7/2005 8:55:00 AM
Page 11 of 16Note that we are in luck, there is data available for the elevation of the polyline, eventhough the polylines themselves are at 0.0 z value. We will use this to make 3D contours!Save the drawing with the freshly imported contours to your C drive and close it.Open a new drawing and display the Map workspace with Map- Utilities- Workspace.Attach the previous drawing by right clicking on the Drawings item, pick Attach Then select your drawing.C:\CAD SUPPORT\H&A Help Project\Help Documents Origs\Importing GIS-USGS Data into AutoCAD Rev1.docCreated on 2/7/2005 8:55:00 AM
Page 12 of 16You will see it attached.Right click on Current Query item and pick Define What we are going to do is import in the contours and use the object information tomodify the Z value of them in the process.C:\CAD SUPPORT\H&A Help Project\Help Documents Origs\Importing GIS-USGS Data into AutoCAD Rev1.docCreated on 2/7/2005 8:55:00 AM
Page 13 of 16Pick the Location button and select All.Pick the Alter Properties button and pick ElevationC:\CAD SUPPORT\H&A Help Project\Help Documents Origs\Importing GIS-USGS Data into AutoCAD Rev1.docCreated on 2/7/2005 8:55:00 AM
Page 14 of 16Then pick the Expression button and select the item as follows.Then pick OK and Add.You should see this:C:\CAD SUPPORT\H&A Help Project\Help Documents Origs\Importing GIS-USGS Data into AutoCAD Rev1.docCreated on 2/7/2005 8:55:00 AM
Page 15 of 16Then pick the draw option and Execute Query button.Zoom extents and use 3D orbit to view the 3D results:You could use the polylines to make a surface if desired.C:\CAD SUPPORT\H&A Help Project\Help Documents Origs\Importing GIS-USGS Data into AutoCAD Rev1.docCreated on 2/7/2005 8:55:00 AM
Page 16 of 16The important thing to understand is that you need to import the object data with anythingyou are importing. Then use that data during a query to modify properties.One common situation is to get a shape file of vegetation types. In that case, you wouldimport the data, then use the vegetation type field to set the layer of the imported items.You can also use the Text button to create text at the centroids of the areas. Use theExpression button to tell it what data to use for the text value and run the query.The idea is to know how to look for provided data and use it somehow in the import.You have to try it a few times to get comfortable with it.C:\CAD SUPPORT\H&A Help Project\Help Documents Origs\Importing GIS-USGS Data into AutoCAD Rev1.docCreated on 2/7/2005 8:55:00 AM
C:\CAD_SUPPORT\H&A Help Project\Help Documents Origs\Importing GIS-USGS Data into AutoCAD Rev1.docCreated on 2/7/2005 8:55:00 AM Line Data While raster data is brought straight into AutoCad, line data starts out as several different file formats. The sequence to importing is as follows: 1. Download and unzip the data to a folder 2.