Transcription
The Strongest Aboveground Poolon the Market TodayThe UltimateAboveground PoolInstallationAndOwner’s ManualRev: 04/15
IntroductionCongratulations on your decision to purchase thetruly unique and superior Ultimate Abovegroundpool. The 14- Gauge powder coated steel wallsystem is the strongest aboveground pool on themarket today.As you read through this manual you will noticethat we stress the importance of properinstallation to ensure a long lasting and safeinvestment for your family. This pool is designedto be installed by the do-it-yourself homeowner ora professional pool installer. Provided 24” rebarstakes must be installed in every hole at the baseof the pool wall or the manufactures warranty isvoid.The Ultimate Aboveground pool carries a lifetimewarranty against rust on the steel panel systemas well as a pro rated warranty on the liner. Toprotect your investment, please fill out and sendback your warranty cards when this pool isconstructed.2
Table of ContentsCONTENTSPAGE INTRODUCTION2 SAFETY INFORMATION4 TOOLS AND MATERIALS NEEDED5 SITE LOCATION AND PREPARATION6-7 POOL AND WALL LAYOUT7-9 SETTING THE WALLS9-10 OPTIONAL WALK –IN STAIR11 INSTALLING THE TOP SEAT AND COPING12-15 MOUNTING THE SKIMMER AND RETURN FITTINGS15-16 INSTALLING THE POOL BOTTOM16-17 INSTALLING THE LINER17-18 CUTTING IN THE SKIMMER AND RETURN FITTINGS19-20 INSTALLING THE FILTRATION EQUIPMENT21 INSTALLING THE SIDING21-23 POOL LAYOUT DRAWINGS24-383
SafetyA pool is a wonderful investment for years of fun andrelaxation for you and your family. Proper safetymeasures should always be followed to ensure a safeand fun environment in your backyard.Every Ultimate Aboveground Pool kit is supplied withsafety packet including information about theswimming pool safety and a no-diving/no jumping signto be placed on top rail of the pool near the ladderentry/exit.The Ultimate Aboveground pool is not safe for diving orjumping of any kind. For your safety and the safety ofyour family and friends, please read the safetyinformation thoroughly.Also supplied in the pool kit is a locking/removableladder that should always be locked or removed whenthe pool is not in use.4
Tools & Material Needed Site Prep Transit or similar leveling deviceEarth moving tools; Shovel, rake, wheelbarrow String lineHammerSpray paint or similar ground marking productTwo tape measures Pool Assembly (2) 9/16” wrenches/ratchet sockets2’ or 4’ levelDrill with 5/16 nut driver head#2 & #3 Phillips screw driverDuct tapeHammerSharp razor knifeShop vacuumRounded (Bottom) trowelSand Bottom Mix (see chart below)(1) 36” flat board 1X3 Pool Bottom Base 15ft pool .7518ft pool 1.2521ft pool 1.5524ft pool 2.528ft pool 3.0cubic yardscubic yardscubic yardscubic yardscubic yards5
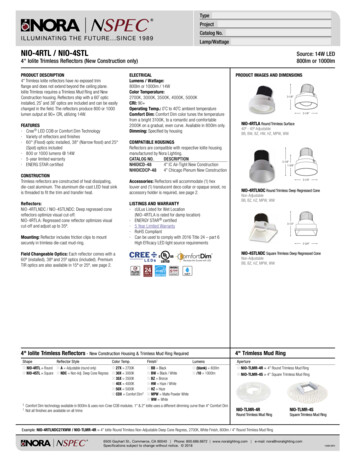
Site Location and PreparationSite location in the yard is a very important part of building aswimming pool. It is vital to locate the pool within the currentbuilding code requirements for your local municipality. Abuilding permit maybe required for the installation of yourswimming pool and it is important to follow all guidelinesassociated with the local municipality.The location selected should be virgin or compacted groundfree of overhead power lines and other dangerousobstructions. If the pool is placed at the bottom of a largeslope, a surface water management system may need to beadded when landscaping around the pool.Unlike other aboveground pools, the Ultimate pool can be setinto a hill or slope, and the ground can be backfilled againstthe pool wall.Once the location of your pool is determined begin the layoutprocess by locating the center point of your pool as shown inthe illustration below:Mark a circle on the groundwhich represents the overdig area of the pool. Thisover-dig is located 12”outside the diameter of thepool.With the ground markedfor the outline of the overdig begin removal of thetopsoil, it is important thatthe pool is built on6
undisturbed earth not fill dirt.Fill dirt will settle over time causing your pool to sink andbecome unleveled.Remove the dirt until the ground is level and free of debris orsharp objects. A transit or laser level is the best tool for thisjob. These items can be rented at any tool rental store or massmerchant rental department.Pool and Wall LayoutNow that the dirt is removed and the ground is level it is timeto begin laying out the pool and wall system. First you mustlocate the center of the pool and place a supplied layout stakein this location. Next you will find that one panel is differentfrom all the rest, this is the skimmer panel and should beplace so the prevailing wind will push the water into theopening. Another suggestion is that the skimmer panel beplaced out of sight toward the back of the pool because this iswhere the filtration system will set.7
With the skimmer panel position identified, begin setting yourlayout stakes at the end of each wall panel joint location asshown in the previous drawing. This pin placement will markthe inside location of each panel joint.Example:Center pin to panel joint 10’ 5’18’ 9’ 2”21’ 10’6½”24’ 12’2 ¼”28’ 14’Distance between pins 810’ 2’18’ 3’ 10”21’ 3’ 10”24’ 3’ 10”28’ 3’ 10”
There are several stepsthat need to befollowed before placingthe panels intoposition. Each panelmust be marked on theinside face with a line1 ½” up from thebottom. This line willmark the finished levelfor the pool bottomunder the liner. (The darker the line the better)Setting the WallsBegin moving your wall panels intoplace. Make sure you place theskimmer panel in the proper location.Remember that the filtrationequipment will be placed behind thiswall section. That said, it will be visibleand an electric service will be requiredto operate the pump. All the otherpanels are uniform and can be placedanywhere on the pool.After all of the wall panels are placed around the site, it istime to begin the wall erection. Starting with the skimmerpanel, align the front edge of the panel with the layout stakesin the location of your choice.9
Secure the panels by using the 9/16”Galvanized nuts and bolts that weresupplied with this package. Beginbolting the panels together usingonly the top two and the bottom bolton each seam, until you have closedthe circle. NOTE: Keep the panelconnection on the outside of thelayout stakes. We suggest that youhand tighten the panel bolts until theentire pool wall is erected.After the wall is assembled double check the position of thewall matching the wall seam to the perimeter layout pins.As you tighten the bolts make sure the panels are flush on theinside and the top seat joints are together. This will ensure asmooth liner installation and a flush top seat fit. Use a level tomake sure that the pool walls are both plumb and level. Finishby driving the 24” rebar into the ground through the holes atthe bottom flange on the back of panel.Do not remove the inside perimeter pins. They will be neededto attach string lines for the pool bottom.If sections of the pool wall are going to be buried into theground, we highly recommend a concrete bonding collar beplaces behind those panels.10
Optional Walk-In stairThere is an option to install aneight foot radius 5-tread walk-instair in the Ultimate pool. Thisstair must be installed in theradius end of the pool. Note: Aspecial liner must be orderedwhen using this stair option.BAFirst locate the stair placementat the site. Align the appropriatepanels to either side of the stairand clamp them to the stairflange. When using the“synthetic wood” top seat or the“PVC coping”, the coping mustbe flush with the top of the stairas shown in photo B. see pages12-15 for coping instructionsWhen using the BendableAluminum Coping, you shouldbring the elevation up to or nearthe top of the stair as shown inphoto C. As you can see inphoto A, there will be a voidbelow the stair shell that mustbe framed out to hold back theconcrete bond beam that willCbe poured behind and underthe stair shell. After thefinished elevation is established, drill through the stair flangeat each panel hole location using a 5/16” drill bit and bolt thepanel to the stair.11
Installing the Top Seats and CopingThere are three top seat/coping options for the Ultimate pool.There is the (A) brown “synthetic wood” with the aluminumside mount bead receiver, the (B) tan PVC plastic coping andthe (C) white bendable aluminum coping. Each option will becovered in the following pages.ABC“Synthetic Wood”The top seat is a brown “synthetic wood” with mountingbrackets on the underside. Center the top seat on top of eachpool wall panel. The 90º angledbracket hooks under the outsideof the panel top as shown in thisphoto.In your pool kit you will findsections of “dual track” whitealuminum coping. To install thecoping you will need your powerdrill and a 5/16 hex head socket bit. Each section of copingshould be positioned tight against underside of the top seatand attached to the pool wall using the self drilling selftapping hex head screws. These screws should pass throughboth the coping and the top seat bracket.12
It is very important to makesure the top seat is pressedagainst the top of the panel andboth the coping and top seatare centered on the panel andbefore mounting. Place twoadditional screwsapproximately 15” in from thepanel joints for a total of fourscrews on each section. Thesescrew heads will be hidden after the liner is installed.Locate the top cap joint covers andposition them over each miter joint.Each cap hooks in the front first andsecured to the top seat with colorcoated nails as shown.“PVC Top Seat”The PVC top seat is a one piecemitered part that includes the top seatand the vinyl tracks for the liner andcover all in one. Each section is sizedto fit the appropriate panel. This topseat in mounted to the panel usingthe self drilling 5/16 hex head self taping screws included inyour pool hardware kit. These screws should be places nomore that 12” apart on both the front and back side of thecoping.13
The PVC top seat also has a cap tocover the seams at each joint. Thisjoint cap just snaps into place.Hook the back of the cap first thenthe front.Bendable Aluminum CopingThe bendable aluminum coping is primarily used when apouring a concrete deck. This coping comes in 10ft sectionsthat are pre notched forbending and pre drilledfor mounting to the topof the pool panel. Whenmounting this coping tothe pool, you MUSTstart in the middle of apanel not at a paneljoint. This is donebecause the cap thatcovers the butt joints onthe face of this coping is flat and will only work on a straightsection. Keep this in mind as you continue the installation.Begin by screwing the end of the coping to the top of thepanel. Place each screw approximately 8” from the next.When you come to an angle in the pool, carefully bend thecoping to meet the angle. Note: To assist in getting a goodbend, place someone in the pool with a 4’ 2X4. Align a cornerof the 2X4 with the panel seam and extend the board abovethe coping. Slowly bend the coping around the board until theangle is met.14
After the coping is mounted, placea support bracket, on the backside, in the middle of each paneland behind each coping joint. Lockthe bracket into the back of thecoping and fasten it to the top ofthe panel using one of the selfdrilling screws.Finish the installation bysnapping a coping cap overeach butt joint.Mounting the Skimmer and Return fittingsEvery Ultimate Above Groundpool is supplied with a prepunched wall panel to mountthe skimmer and returnplumbing fittings. To mountthe skimmer, simply insertthe face of the skimmerthrough the rectangleopening in the wall andsecure it using the two set screws supplied with the skimmer.If you have any questions, please refer to the manufacturesinstallation instruction in the skimmer package.15
To install the return fitting,you need to un-thread theretaining nut from thefitting. Insert the threadsthrough the pre-punchedhole from the inside of thepool and tighten theretaining nut to the backof the fitting. Do not overtighten this nut.Installing the Pool BottomSee sizing chart list on page #5 for bottom mix infoThe first thing you need to do is to remove any loose rocksfrom inside the pool and level the ground as flat as possible.Make sure the pool walls are clean then run a piece of ducttape down the face of each panel joint to cover the entireseam.Remember that pencil line we drew on the bottom of thepanels? Now you need to tie a string line to the perimeter pinsinside the pool at the level of the pencil mark or 1½” up fromthe bottom of the panel. Now run a series of string lines acrossthe pool to another pin. Continue doing this so you haveseveral pie sections of string lines. The lines need to be taughtso they will hold the level height of the finished bottom. Thegoal is to have at least 1½” of space between the string lineand the virgin ground. Begin to transfer the bottom materialinto the pool.The bottom mix should be damp but not wet. There areseveral materials that can be used to make up the pool16
bottom. Mason sand is the easiest but you can also mix a7 to1 sand to Portland cement mixture to create a harder bottomthat will not shift with foot traffic during the swim season. Ifthe sand is damp, don’t add water; just mix them together.See your pool dealer for additional pool base options.Spread the bottom material around the floor of the pool andcompact it to just cover the string lines as you go. Use theedge of a flat board (about 36” long) to scrape the excessbottom material to expose the string lines. Run a trowelacross the surface to smooth it out. A rounded bottom trowelworks best. Remember to pull your pins and fill in their divotsas you progress. “The last one out has to cover their tracks.”Installing the linerRemove the liner from the box and if possible, unroll it (end toend) in a clean, safe area near the pool. This will allow thevinyl to relax and the sun to soften the material as well. DoNot Unfold the liner at this time. A warm flexible liner will beeaser to install than a cold stiff one. Also be sure to save thesafety/warranty packet forlater. Before installing the liner,double check the pool walls andthe pool bottom for any dirt orsharp objects that coulddamage the vinyl material. Lastbut not least, make sure theskimmer and return gaskets arein place.17
Find the seam in the side wall of the liner and position theliner so it will align over the skimmer opening inside the pool.We do this incase the linerpattern at the seam does notmatch well. This tile section willbe cut out after installing theskimmer faceplate. With severalpeople in place, pick up theunrolled liner and rest it on thetop seat of the pool. The liner isfolded so that it can be pulled across the pool area as itunfolds. Try not to drag the liner across the pool bottom anymore that you have to.The top of the liner has a vinyl bead welded to it. Install theliner by inserting the liner bead into the bottom track of thewhite aluminum coping.The weight of the vinyl pulling down will keep the bead in thecoping. Make sure that the points around the perimeter of theliner floor match up with the panel joints of the pool wall. Allwrinkles must be removed before filling with water.If you have a soft “push broom” you can tap the bristle endagainst the base of the liner wall to help move the bottommaterial and remove any wrinkles.Another trick is to insert a shop-vac hose through the top ofthe skimmer and down the pool wall through the rectangleopening behind the liner. Keep the vacuum hose at least 15.inup from the floor. Turn on the vacuum and suck the liner backagainst the wall. If your suction is poor, you may need to tapethe skimmer lid closed where the vacuum hose was inserted.If you are satisfied with the fit of the liner, start filling it withwater. After you have between 6” and 8” of water in the pool,18
you can remove the vacuum hose and prepare cut in theskimmer and return fittings.Cutting in the Skimmer and Return openingsNow that the water level in the pool is at least six inches deep,the side wall vinyl should be stretched tight enough to installthe skimmer and return face plates. You will need a #3Phillips head screwdriver and a good razor edge to installthese plates. Note: Do not use a power screwdriver to installthese screws. Over tightening can cause the holes to strip orthe face plate to crack. If you have any questions, please referto the installation instructions supplied with each fitting.Find the twelve flat head skimmer screws that came with theskimmer along with the rectangle face plate and gasket.To start the mounting of the skimmer face plate, you mustfirst find the four corner holes. Push your finger against theliner to find the round depression of the screw sockets foreach corner screw. Push the tip of the #3 Phillips screw driveragainst the depression and turn the screwdriver to mark thevinyl. Insert one of the top corner screws through the faceplate and drive it through the vinyl liner into the skimmer.Make sure the gasket is attached to face plate beforemounting. Continue installing the other corner screws and fillin the blanks to complete. Do not over tighten.After the plate is mounted insertthe razor edge through the vinylat the inside edge of the faceplate. Slowly run the bladearound the inside perimeter andremove the section of material.You may want to keep thissection of liner for future patchmaterial.19
The return fitting face plateis installed in somewhat themanner as the skimmer.First find the round faceplate and the pack of fourfaceplate screws suppliedwith the fitting. Note: thereis no gasket installedbetween the liner and thereturn face plate. Press yourfinger against the liner to locate and mark the (4) holes. Screwdown the faceplate with the #3 Phillips screw driver and cutout the center section of vinyl with the razor edge. Caution:over tightening the screws can crack the plastic face plateTo finish, snap on the face plate escutcheon to hide the screwheads. The return fitting has a directionaleye ball that threads into the fitting. Thedirectional eye should be positioned in anupward position away from the skimmer.The purpose of this fitting is to move thesurface water around the pool and backto the skimmer. This fitting should not betightened completely, only positioned for easy adjustment.20
Installing the Filtration EquipmentThere are many types of equipment designed to filter theswimming pool water. Please check with your local pooldealer for the proper sizing and filter media to meet yourneeds. The Ultimate pool comes with 1 ½” PVC threadedorifices on the skimmer and pool water return.When installing the plumbing lines, make sure that theskimmer is connected tothe front (suction) of thepump and the returnfitting is connected to thedischarge side of the filter.Shut off valves arerecommended for serviceand maintenance on thisequipment.Installing Vertical SidingWith the Ultimate Above Ground pool, you have the option toskirt the outside walls with a vertical vinyl siding. The vinylsiding kit comes complete with a hardware packet, pre cut “J”channels and vinyl siding to cover the outside perimeter of thepool wall.To start this installation, attachthe first section of “J” channelto the pool panel next to theskimmer panel. The “J”channel is placed upside downso that it is seated under thetop seat and against the poolwall flange as shown. Each21
section of “J” channel is held on by four (4) of the self drillingself tapping hex read screws. Note: The slotted holes in the “J”channel are not used for this application.To get the screws started, you need to hold back the frontedge of the “J” channel so that the screws can have the angleto penetrate into the steel. Continue installing the “J” channelto the top of each pool panel. Do not install a “J” channel ontothe top or bottom of the skimmer panel.Install a section of “J”channel to the bottom ofeach panel following thesame steps as the topinstallation.There is a wind stability plate for each panel. To install thisplate you must remove the adjacent panel bolts from wallassembly, insert the plate over the holes and re-install thebolts. The plate should be staggered from one panel to thenext using the third and/or forth bolt hole from top andbottom.After the stability plates are installed, insert the clear, selfadhesive rubber bumperbetween the plate and thecenter wall stiffener asshown. The final phase isto install the vinyl siding.The vinyl siding is pre-cutto fit between the “J”channels we installedearlier on the top andbottom of the panels.22
To install the siding simplyinsert the bottom of the sidingpanel into the bottom “J”channel, then gently flex thesiding in the middle and insertit into the upper “J” channel.Insert the second siding panelnext to the first and lock themtogether. Continue this processaround the pool to the oppositeside of the skimmer panel. Secure the end pieces of siding tothe stability plates using a hex headed self drilling self tapingscrew at each plate. This procedure will help prevent winddamage to the siding.23
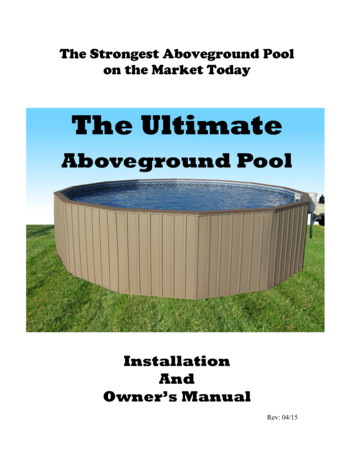
15 FT ROUND Bendable Alum Bullnose24
18 FT ROUND Bendable Alum Bullnose25
21 ft ROUND Bendable Alum Bullnose26
24 FT ROUND ULTIMATE27
28 FT ROUND ULTIMATE28
15 ft Round PVC Top Rail29
18 ft Round PVC Top Rail30
21 ft Round PVC Top Rail31
24 ft Round PVC Top Rail32
28 ft Round PVC Top Rail33
15 ft Round Syntehic Wood34
18 ft Round Syntehic Wood35
21 ft Round Syntehic Wood36
24 ft Round Syntehic Wood37
28 ft Round Syntehic Wood38
If the pool is placed at the bottom of a large slope, a surface water management system may need to be added when landscaping around the pool. Unlike other aboveground pools, the Ultimate pool can be set into a hill or slope, and the ground can be backfilled against the pool wall. Once the location of your pool is determined begin the layout