Transcription
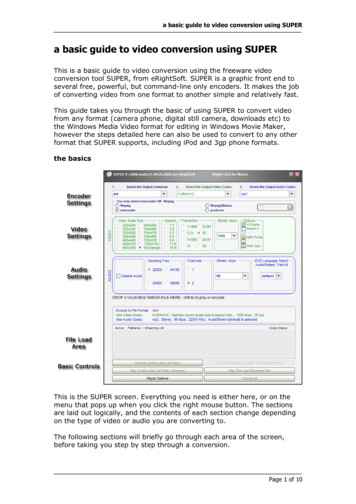
a basic guide to video conversion using SUPERa basic guide to video conversion using SUPERThis is a basic guide to video conversion using the freeware videoconversion tool SUPER, from eRightSoft. SUPER is a graphic front end toseveral free, powerful, but command-line only encoders. It makes the jobof converting video from one format to another simple and relatively fast.This guide takes you through the basic of using SUPER to convert videofrom any format (camera phone, digital still camera, downloads etc) tothe Windows Media Video format for editing in Windows Movie Maker,however the steps detailed here can also be used to convert to any otherformat that SUPER supports, including iPod and 3gp phone formats.the basicsThis is the SUPER screen. Everything you need is either here, or on themenu that pops up when you click the right mouse button. The sectionsare laid out logically, and the contents of each section change dependingon the type of video or audio you are converting to.The following sections will briefly go through each area of the screen,before taking you step by step through a conversion.Page 1 of 10
a basic guide to video conversion using SUPERthe right-click menuThe right-click menu is where some of the basic preferences for SUPERcan bet set, and an alternate method for loading files can be found.Right-click the mouse anywhere on the SUPER screen, and you will bepresented with this;From this menu you can Add Multimedia Files : Add files to be converted by browsing yourlocal or network disk drivesAdd Playlist Files : Convert lists of files using playlists fromWinamp and WMPAdd Streaming Links : Convert directly from streaming medialocationsSpecify The Output Folder Destination : sets the folder forconverted files. Make sure you click Save Changes to make thispermanentImport and Export SUPER ProfilesChange the SUPER SkinTurn basic settings on and off (Analysis Engine, Tool Tipsetc)Go to the SUPER websiteCheck for updatesDonate to the author11SUPER is freeware, which means that there is no licensing charge for it’s use. Payment is optional,hence the option to donate to the author. Whether or not you choose to do this is up to you.Page 2 of 10
a basic guide to video conversion using SUPERencoder settingsDigital video is stored in a container, or file. The video and audio data arecompressed within that file using a codec (Compressor DeCompressor).Different containers allow for different codecs to be used. SUPER knowswhich codecs you can use in which containers, and will guide you bychanging the content of the drop down lists accordingly.The output container determines the type of file to be created, and mayaffect the type of player that your computer uses to playback theconverted file.As you can see from the image above, SUPER supports a lot of containertypes.The video and audio codecs will be determined by the container typeselected. Some containers, such as .avi, support many different types ofvideo and audio codecs. Others, such as .wmv, support a much smallerrange.Page 3 of 10
a basic guide to video conversion using SUPERvideo settingsThe video settings affect the frame size, pixel aspect ratio, framerate andbitrate that the video codec uses to encode the video. If these are setincorrectly, the converted video may be distorted, play too fast or tooslow, or in a jerky manner, the quality may be very low, or the file sizevery large. You can use the built in video/audio analysis tool to help youdetermine what you need to set these to (more on that soon).The contents of this section will vary depending on the video codecselected.audio settingsAs with the video settings, the audio settings are important in ensuringthat the sound you get in your converted file is of high enough quality.The contents of this section will vary depending on the audio codecselected.Page 4 of 10
a basic guide to video conversion using SUPERfile load and encodingThe final area of the SUPER screen is the file load and encoding area. Youcan load files for conversion I two ways. You can use the Add MultimediaFiles option on the right-click menu, or you can simply drag and drop thefiles onto the panel shown in the image above.Once you have your files loaded and your settings configured, click on theEncode (Active Job-List Files) button to start the encoding process.Progress is displayed using a green progress bar, as in the image below.Note : unlike other progress bars, the SUPER progress bar does notcurrently represent the file encoding progress from 0 to 100%. Dependingon the length (running time) of the original file, and the amount of workrequired to encode it, the progress bar may go from to empty to fullseveral times for a single file.Page 5 of 10
a basic guide to video conversion using SUPERmultimedia analysis toolThis is a handy tool to see what properties your source file has beforesetting up the encoder. After you have loaded your source file, doubleclick on it in the file load area, and the multimedia analysis tool widnowwill openUse this tool to see details of the source file, including resolution,framerate, bitrate and codecs. This information becomes import when youset up the encoder details later, as the example will show. The imageabove shows the simple view. There is a detailed few, however the simpleview generally shows enough information for our needs.Page 6 of 10
a basic guide to video conversion using SUPERencoding to Windows Media VideoThis section of the guide will take you through the steps of encoding asample file (in the case a quicktime HD teaser trailer) to WMV format forediting in Windows Movie Maker. The same process can be followed toconvert the various mobile phone and digital still camera formats (usually.3gp, .mov or .mp4) to WMV.Step one, load the video by drag and drop from Windows Explorer, or byusing the right-click menu and selecting Add Multimedia Files option.Your file should be in the list, with a tick next to it, as in the image above.At this time, depending on the source video format, SUPER may chose touse a DirectShow filter for reading. While an explanation of DirectShowfilters is outside the scope of this guide, if you do see a tick in the UseDirectShow box, leave it as-is.Set the Container Type by selecting it from the drop down listPage 7 of 10
a basic guide to video conversion using SUPERThe container Type list contains most of the possible containers for digitalvideo, showing just how versatile SUPER (or the encoders that it uses) is.From the drop down list, select WMV.Note : SUPER currently refers to wmv support as being “stillexperimental”. If the standard codecs are used, SUPER will produceuseful, compliant output.Set the Video Codec by selecting it from the Output Video Codec dropdown list. Note how the list has changed with the container type, and nowonly contains codecs valid for the WMV container type (note also thatSUPER does not encode to WMV HD at this time)Page 8 of 10
a basic guide to video conversion using SUPERSet the Audio Codec by selecting it from the Output Audio Codec dropdown list. In the case of WMV, SUPER only supports mp3 format audio.Confirm the source details. At this time it is a good idea to check thesource details using the analysis tool. Double click the source file name,and note down the framerate, resolution (width and height) and bitrate ofthe source video, and the sample rate and bitrate of the source audio.Configure the video settings. As the output from this conversion is forediting in Windows Movie Maker, the output should be as close to theoriginal as possible.Set Video Scale Size to No Change, to preserve the resolution of theoriginal. Aspect Ratio does not need to be set in this instance. Frame/Secshould be set to match the original frame rate. In this example that is23.976 fps (SUPER represents this as 23.98). Set the bitrate approx. thesame bitrate as the original for this example. The bitrate determines thesize of the output video, and has a large impact on the visual quality ofthe video as well. The lower the bitrate, the lower quality. (Note :different codecs require different bitrates to produce the same quality. Forexample, most mpeg4 codecs (Xvid/Divx/x264) will produce similarquality to mpeg2 codecs, but use only half the bitrate of mpeg2 to do so.You may need to experiment a little to find what works best for eachvideo you encode)Configure the Audio Settings.Page 9 of 10
a basic guide to video conversion using SUPERThe example source has 6 channels of audio at a high bitrate. Basic WMVand Windows Movie Maker only supports 2 channels. The bitrate also doesnot need to be as high as the source. The DVD Language setting also hasno meaning in this example.Click on the Encode button and wait for SUPER to finish encoding.SUPER is relatively fast, as encoders go, however if the file is a long file,or SUPER has to resize the image a lot, the encoding process may takesome time.finishing upThis is a simple guide, and introduces only the basic of SUPER, and walksyou through one simple example. SUPER has many skills, includingconverting streaming media from it’s source, processing avisynth scripts,and even producing DVD compliant video object files (although notauthored, ready-to-burn DVD structures). While SUPER does not havetraditional help files at this time, it does have extended tool tips. Hoverthe mouse pointer over the various fields and buttons, and text balloonswill appear that often have extensive descriptions of the function itperforms and sometimes tips and other useful information.Finally, experiment. It is pretty much impossible to actually breakanything by using SUPER. Encode some short clips using a variety ofoutput containers and codecs, so you can get a feel for what settings areright for you.SUPER is copyright 2006 eRightSoft.This guide is copyright 2006 Reality FX. All Rights Reserved.This guide may not be reproduced without permission.Page 10 of 10
a basic guide to video conversion using SUPER Page 1 of 10 a basic guide to video conversion using SUPER This is a basic guide to video conversion using the freeware video conversion tool SUPER, from eRightSoft. SUPER is a graphic front end to several free, powerful, but command-line only encoders. It makes the job

