Transcription
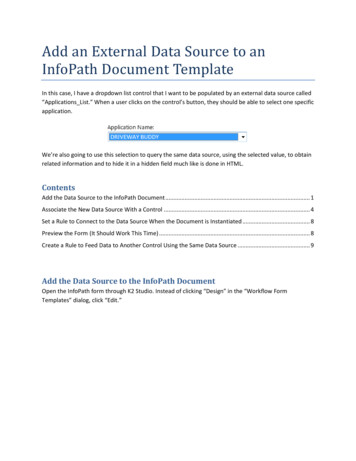
Add an External Data Source to anInfoPath Document TemplateIn this case, I have a dropdown list control that I want to be populated by an external data source called“Applications List.” When a user clicks on the control’s button, they should be able to select one specificapplication.We’re also going to use this selection to query the same data source, using the selected value, to obtainrelated information and to hide it in a hidden field much like is done in HTML.ContentsAdd the Data Source to the InfoPath Document . 1Associate the New Data Source With a Control . 4Set a Rule to Connect to the Data Source When the Document is Instantiated . 8Preview the Form (It Should Work This Time) . 8Create a Rule to Feed Data to Another Control Using the Same Data Source . 9Add the Data Source to the InfoPath DocumentOpen the InfoPath form through K2 Studio. Instead of clicking “Design” in the “Workflow FormTemplates” dialog, click “Edit.”
On the “InfoPath Form Deployment Location” form, just click “Next .”The next form is titled “SmartObject Integration.”We want to add our new SmartObject here. Click “Add” to bring up the “Add a SmartObject Method”form. Use the ellipses button to navigate the Context Browser to the SmartObject Server.
In the Context Browser, look on the top tab. You should see a tree listing starting with “CategoryServer(s). Down further is a tree node for “SmartObject Server(s).”Expand the node until you find the method you’re going to use. In this case, we’re going to use the “List”method of the [dbo].[Applications] SmartObject on the database.Once you close the Context Browser and click “OK” on the “Add a SmartObject Method” dialog, youshould see the new SmartObject appear in the list on the “SmartObject Integration” form.
Click “Next ” and “Finish”, then “Finish” once more to close.Associate the New Data Source with a ControlIn this example, The “Application Name” dropdown list will use the new database data source. Open theInfoPath form back up (through K2 Studio). On the K2 “Workflow Form Templates” dialog, click “Design”this time.Once the InfoPath form opens, right-click on the “Application Name” dropdown list control and select itsproperties.
The properties form features five tabs. The first is “Data.” The region that takes up the majority of theData form is called “List box entries.”The region gives the author the ability to assign an external data source to the control. In the radiobutton group at the top of the region, select “Look up values from an external data source.”Selecting the option should change the layout of the remainder of the form.If you have any values in the textarea as pictured above, remove them before you changethe radio button value to “Look up values from an external data source.” Otherwise, thevalue and display name will be converted to an option in the dropdown list!
becomesIf you’ve already associated the new data source to the InfoPath document, you should be able to selectit from the Data source dropdown list.If you don’t have your desired data source associated with the InfoPath document, use the “Add ”button to the right of the list. Otherwise, leave the button alone. It is not a select button.Think of the next group of controls in terms of HTML. The Entries textbox is meant to point the controlto exactly where the data values are – sort of like the option s in a select control.Use thebutton to navigate to that location.You want to find the repeating folder called “ReturnProperties” under the response and result folders.(Repeating controls have a shortcut overlay that resembles a blue box with a white down arrow inside it,somewhat resembling the button in a dropdown list control.)
After the “Entries” textbox is a pair of indented boxes for “Value” and “Display name”. Think of these asyour value-text pair in each option : select option value ”1” Text A /option option value ”2” Text B /option option value ”3” Text C /option /select If you were mirroring the fictitious dropdown above, where each option value was called “ID” and eachtext value was called “Text”, your values on the form would be:In this case, I want the value of “AppName” in both the Value and Display name.Click “Apply” and “OK” on the properties form to return to the InfoPath template, then save andpreview the form.It won’t work yet.
Set a Rule to Connect to the Data Source When the Document isInstantiatedIn order for the InfoPath document to connect to the new data source when a new copy of the form isinstantiated, we have to set a rule to create the connection once the form is instantiated.Open InfoPath (through K2 Studio) and select Tools Form Options . Select the category “Open andSave. ” In the region called “Open behavior”, click the “Rules” button.Click the “Add ” button to add a new rule. Name the rule something meaningful. In this case, we’recalling the SmartObject that will connect us to the database. A name like “Call DB SmO” is appropriate.Click “Add Action ” and select the option “Query using a data connection.” (It’s set to “Set a field’svalue” by default.)Once selected, another dropdown list will appear which reveals the available data connections. Selectthe one you created and click “OK” until you return to the InfoPath template. SaveNow when a new instance of the InfoPath form is created, the connection will be made to the new datasource, and data will populate the “Application Name” dropdown list.Preview the Form (It Should Work This Time)Preview your modified InfoPath template. The data from the Application List data source shouldpopulate the “Application Name” dropdown list control. Congratulations!Close the form, finish the K2 wizard, and deploy it.
Now when you consider the early screenshot of the completed dropdown list control,You can imagine that an HTML equivalent might look like this: select . . . option value ”DRIVEWAY BUDDY” selected DRIVEWAY BUDDY /option . . . /select Here’s how the process instance XML data looks in the K2 Workspace when you launch the form.(Process Overview {Process name} {Process Folio} Activity Instances Process Instance XML Data):Create a Rule to Feed Data to Another Control Using the Same DataSourceI want to get the name of the team leader for the DRIVEWAY BUDDY app and stick that value in a hiddenfield on the form to be used later. In other words, I want the name of the team leader of whateverapplication is chosen using that dropdown list control.We can accomplish that by setting a rule on the hidden text box.Open the InfoPath template back up again (“Design” it through K2 Studio). Right-click on the textboxthat will store the value, and bring up its properties form.
On the Data tab of the properties form, there is a “Default Value” region which contains a “Value:”textbox and a function button.Click that function button to bring up the “Insert Formula” dialog.We’re going to start by clicking that “Insert Field or Group ” button. We’ll use it to identify the value wewant posted to the form.By default, the “Select a Field or Group” form will show fields from the Main data source. Use thedropdown list control to change the data source to the Applications List.
With the data source changed, navigate the tree down the dataFields branch to the return property“AppTeamLeader.”At this point, you’ve identified the value for AppTeamLeader as the default value for your textbox.Now we need to construct the filter which will make sure we get the value associated with theapplication named by the selected value in the “Application Name” dropdown list.Click “Filter Data ” to bring up the Filter Data form.
There should be no filters already in place. Click “Add ” to bring up the “Specify Filter Conditions” form.The form is constructed of a series of dropdown list controls that, when completed, spell out anequation akin to “X Y”: A left argument, an operator, and a right argument.Find X by opening the left dropdown control. Select “Select a field or group ”.This is going to bring us back to the “Select a Field or Group” form. It may still point to theApplications List data source from the last time we used it. Use the dropdown list to point the formback to Main.With the data source back to Main, we want to specify the ApplicationName field, because that fieldholds the value that gets selected by the “Application Name” dropdown list control.
Click “OK” to return to the “Specify Filter Conditions” form.In our “X Y” statement, you’ve selected our “X”, and our operator has been selected for us in this case.Use the dropdown list control on the right to select our “Y.” Select the “Select a field or group ” optionagain.In our familiar “Select a Field or Group” form, point the data source back to Applications List, andtraverse the tree down the dataFields branch to find the “AppName” value.Now we have our “X Y” statement.
Click “OK” to return to the “Filter Data” form.Click “OK” to return to our first “Select a Field or Group” form. Remember, you’ve been in “Filter Data ”this whole time.
Click “OK” to return to the “Insert Formula” form.Our formula is complete – we’ve selected the AppTeamLeader value where AppName equals the valueselected in our “Application Name” dropdown list.Click “OK” to return to our properties form.Click “OK” to return to the InfoPath template. Save it, close it, let K2 work it’s mojo, then deploy theform and run it. Check your XML again in K2 Workspace to verify you’ve captured a value in your hiddentextbox.
the one you created and click "OK" until you return to the InfoPath template. Save Now when a new instance of the InfoPath form is created, the connection will be made to the new data source, and data will populate the "Application Name" dropdown list. Preview the Form (It Should Work This Time) Preview your modified InfoPath template.