Transcription
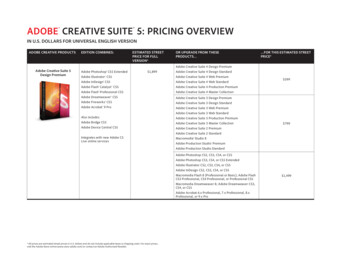
Adobe Premiere Pro CS6 and Adobe Media Encoder CS6Project 3 guideHow to use Adobe Media Encoder CS6Adobe Media Encoder CS6 converts sequences and clips into media suited for distribution on the web or on DVDs,iPods, tablets, cell phones, and other mobile devices.You can encode files by using the Adobe Media Encoder workspace, or by exporting a sequence or clip directly fromAdobe Premiere Pro CS6. Both methods include several presets so that you can prepare files for multiscreen delivery.When you export media from Adobe Premiere Pro, Adobe Media Encoder runs in the background. When you encodefiles in the Adobe Media Encoder workspace, you have the option of batch-processing several files at once. Forexample, you can process several video clips using the same settings. You can also encode multiple copies of thesame video for viewing on different screens or devices. Either way, batch encoding takes place in the background soyou can continue working. Audible alerts let you know when your encoding jobs are complete.In this guide, you export a sequence in Adobe Premiere Pro and you batch-process files in Adobe Media Encoder.Exporting media from Adobe Premiere ProIn this task, you open the Export Settings dialog box (Figure 1) from within Adobe Premiere Pro and explore somecommon export file formats and settings.Figure 1 Adobe Premiere Pro Export Settings dialog box 2012 Adobe Systems IncorporatedHow to use Adobe Media Encoder CS61
Project 3 guideAdobe Premiere Pro CS6 and Adobe MediaHere is an overview of the format options when exporting from Adobe Premiere Pro:2 Advanced Audio Encoding (AAC): A standardized audio compression and encoding for digital audio. Designedto be the successor of the MP3 format, AAC generally achieves better sound quality at similar bit rates. Audio Interchange File Format (AIFF): An audio file container format developed by Apple Computer, which isthe standard audio file format used for storing sound data for Apple Macintosh and other electronic audiodevices. Animated GIF: A small animation based on successively displayed GIF images. Animated GIFs are the simplestform of animation and are supported natively by most browsers. Looping and minimal timing information can beset in an animated GIF, but complex animation is beyond this format's capabilities. Microsoft AVI (AVI): Audio Video Interleave is a multimedia file format developed by Microsoft. AVI files cancontain both audio and video data in a container that allows synchronous playback. AVI files are easily playedback on personal computers with Windows operating systems by using the Windows Media Player. Uncompressed Microsoft AVI: See Microsoft AVI above. Exporting as uncompressed AVI will export the clip orsequence without applying additional compression to the output file. Windows Bitmap (BMP): The BMP file format, sometimes called bitmap or DIB file format (for deviceindependent bitmap), is an image file format used to store bitmap digital images, especially on MicrosoftWindows and OS/2 operating systems. The simplicity of the BMP file format and its widespread familiarity inWindows makes it a very common format for graphics programs that operating systems can read and write. DPX: Digital Picture Exchange is a common file format for digital intermediate and visual effects work and is anSociety of Motion Picture and Television Engineers (SMPTE) standard. DPX provides a great deal of flexibilityin storing color and other information for exchange between production facilities. FLV F4V (H.264): Adobe Flash Video, the format for delivering audio and video over the web and othernetworks. Adobe Flash Video will play on any computer with a Flash-enabled browser. GIF: Graphics Interchange Format is a graphic image file format suitable for sharp-edged line art (such as logos)with a limited number of colors. This takes advantage of the format's lossless compression which preserves verysharp edges (in contrast to JPEG). H.264: An MPEG-4-based standard for encoding for web delivery specifically and for a variety of devices,including HD video, 3GPP cell phones, video iPods, and PlayStation Portable (PSP) devices. Adobe MediaEncoder has H.264 format presets specifically for Google Video, MySpace, Yahoo! Video, and YouTube. H.264 Blu-ray: An MPEG-4-based standard for encoding in HDTV for Blu-ray disc media. JPEG: Joint Photographic Experts Group is a commonly used method of lossy compression for photographicimages. The degree of compression can be adjusted, allowing a selectable tradeoff between storage size andimage quality. MP3: MPEG1 Audio Layer 3 is an audio file compression format with CD quality. MP3 is a standard file formaton the Internet and many portable digital audio players. MPEG2: Delivers high-quality, full-screen, full-motion video at bit rates around 15 Mbps or about 10–30 timesthe data rate of MPEG1 or MPEG1-VCD. MPEG2 Blu-ray: A subset of the MPEG-2 standard designed for encoding for high-definition (HD) Blu-ray Discmedia. MPEG2-DVD: A subset of the MPEG-2 standard designed for DVDs with a data rate up to 9 Mbps. An MPEG2DVD file can be encoded directly onto a DVD to create a movie that plays automatically (known as an autoplaydisc), or it can be used in an authoring program (such as Adobe Encore) to create a disc with navigational menusand other features. MPEG4: MPEG-4 absorbs many of the features of MPEG-1 and MPEG-2 and other related standards, addingnew features such as extended support for 3D rendering, object-oriented composite files (including audio, videoHow to use Adobe Media Encoder CS6 2012 Adobe Systems Incorporated
Adobe Premiere Pro CS6 and Adobe Media Encoder CS6Project 3 guideand VRML objects), support for externally-specified Digital Rights Management and various types ofinteractivity. Material Exchange Format (MXF OP1a): MXF OP1a is a container for professional digital video and audiodesigned by a set of SMPTE standards. It is used in workflows between Sony eVTR and non-linear editingsystems, such as Adobe Premiere Pro. P2 Movie: DVCPRO P2 (P2 is short form for "Professional Plug-In") is a professional digital video storagemedia format introduced by Panasonic. P2 is basically a professional video file format used for storing media ona data card for compatible tapeless recording devices. PNG: Portable Network Graphics is a bitmapped image format that employs lossless data compression. PNG wascreated to improve upon and replace GIF (Graphics Interchange Format) as an image-file format. QuickTime (MOV): QuickTime is a format developed by Apple Computer and is used for storing digital video,media clips, sound, text, animation, and music. QuickTime is the Apple multimedia architecture for HDTV andfor web delivery as streaming media or for download. Targa: TGA File Format, often referred to as TARGA File Format, is a raster graphics file format. The Targaformat is used to create images in some video game programs. TARGA and VISTA boards were the first graphiccards for IBM-compatible PCs to support high color/true color display. This family of graphic cards wasintended for professional computer image synthesis and video editing with PCs. For this reason, usualresolutions of TGA image files match those of the NTSC and PAL video formats. TIFF: Tagged Image File Format is a file format for storing images, including photographs and line art. It is nowunder the control of Adobe Systems. Originally created by the company Aldus for use with what was then called"desktop publishing", the TIFF format is widely supported by image-manipulation applications, by publishingand page layout applications, by scanning, faxing, word processing, optical character recognition and otherapplications. Windows Waveform (WAV): WAV (or WAVE), short for Waveform audio format, is a Microsoft and IBM audiofile format standard. Uncompressed WAV files are quite large in size, so, as file sharing over the Internet hasbecome popular, the WAV format has declined in popularity. However, it is still a commonly used, relatively“pure”, i.e. lossless, file type, suitable for retaining “first generation” archived files of high quality, or use on asystem where high fidelity sound is required and disk space is not restricted. Windows Media (Windows only): A Microsoft multimedia architecture for HDTV, web delivery, and Palmdevices.Each of these formats has many presets, so most editors will not need to adjust any parameters. However, there arenumerous customizable options. You can begin with a preset that most closely matches your specifications. You canthen apply the necessary custom settings by opening the Adobe Premiere Pro Export Settings dialog box (Figure 1)and selecting custom settings. Once you define the custom settings for a specific device, save these settings as acustom preset. To explain each format’s unique characteristics would go well beyond the scope of this guide. 2012 Adobe Systems IncorporatedHow to use Adobe Media Encoder CS63
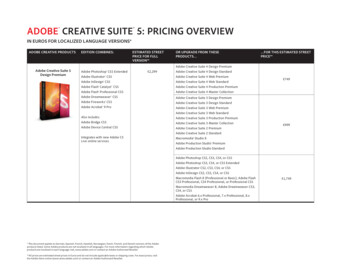
Project 3 guideAdobe Premiere Pro CS6 and Adobe MediaExporting media from the Project panel in Adobe Premiere ProIn this activity, you export a sequence in the Adobe Premiere Pro Project panel.To export media from Adobe Premiere Pro:1. Start Adobe Premiere Pro and open a project with asequence or clip you want to export.2. Select the sequence or clip in the Project panel, and thenselect File Export Media.The Export Settings dialog box appears (Figure 2).The export settings include a preview display on the leftand export settings on the right. The dialog box displaysthe settings that were used most recently.3. In the Export Settings area, select H.264 in the Formatmenu (Figure 2).Note: H.264 delivers video more efficiently thanprevious standards.4. Click the Output tab in the upper-left corner of the dialogbox.Figure 2 Export Settings area menusThe Output tab shows a preview of the encoded file.5. In the Preset menu (Export Settings area), select 3GPP176 x 144 15fps. The image quality in the Output preview screenbecomes blurry due to the small frame size of thispreset. The estimated file size is shown at the bottom of thedialog box (Figure 3). You will compare it to the filesize of another format in the next step.Figure 3 Estimated File Size6. In the Format menu, select MPEG2-DVD.Note: The output image quality becomes very sharp andthe estimated file size jumps to about 15 times the size ofthe low-resolution H.264 format.7. In the Format menu, select FLV.8. Open the Preset menu and look at the many presets(Figure 4).9. Select Match Source Attributes (Medium Quality).Figure 4 Adobe Flash Video Preset menu10. In the Export Settings area, view the Summaryinformation (Figure 5).This lists frame size and frame rate as well as audio andvideo encoder information.Figure 5 Export Settings Summary area4How to use Adobe Media Encoder CS6 2012 Adobe Systems Incorporated
Adobe Premiere Pro CS6 and Adobe Media Encoder CS6Project 3 guide11. In the Format menu, select MPEG2-DVD and change thePreset to NTSC High Quality.12. In the Video tab, note the Quality slider (Figure 6).Note: A high quality setting means the MPEG encoderwill take longer to analyze the video before converting itto an MPEG-2 file. It does not affect the file size.Figure 6 MPEG2-DVD Quality setting13. Use the scroll bar in the Video tab to view the BitrateSettings area. Increase the Target Bitrate setting and notethat the estimated file size increases (Figure 7).Note: Doubling the bit rate generally increases theMPEG-2 file size by about 50%.14. Click the Audio tab.Note: PCM (Pulse Code Modulation) is the standardaudio format for the Adobe Media Encoder MPEG2DVD format. It is a lossless format—it retains full audioquality.15. In the Audio Format menu, select MPEG.Figure 7 MPEG2-DVD Bitrate SettingsFigure 8 MPEG Audio Bitrate Settings area16. Scroll down to the Bitrate Settings area and select 128Kbps from the Bitrate menu (Figure 8).Save Preset buttonThe estimated file size drops considerably. Using MPEGaudio encoding can lead to a slight audio quality loss, butyou can increase the video bit-rate setting withoutexceeding the storage capacity of a DVD or the 9 MbpsDVD playback limit.17. To save a customized preset, click the Save Preset buttonlocated next to the Preset menu (Figure 9).Figure 9 Save Preset button18. Click Cancel to close the Choose Name dialog boxwithout saving the custom preset.19. Click the Metadata button at the bottom of the ExportSettings dialog box.The Metadata Export dialog box opens (Figure 10).Adding metadata to your encoded movie can make thefile more searchable or “discoverable” when published tothe web.20. Click Cancel to close the dialog box.21. Click the Output Name link to set a name and location forthe output file (Figure 11).The Save As dialog box appears.22. In the Save As dialog box, navigate to a file folder, namethe file, and click Save.Figure 10 Metadata Export dialog box23. Click Export in the Export Settings dialog box.The file is encoded and saved to the location youselected. 2012 Adobe Systems IncorporatedFigure 11 Output Name linkHow to use Adobe Media Encoder CS65
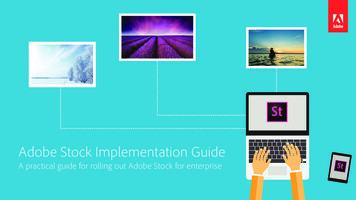
Project 3 guideAdobe Premiere Pro CS6 and Adobe MediaBatch-processing media with Adobe Media Encoder CS6Adobe Media Encoder includes several presets for sharing your media on multiple screens, such as YouTube,iPhones/iPads, Android devices, and your television. When preparing video for multiple screens, you can save timeby using Adobe Media Encoder presets, the Preset Browser panel, and batch processing.Overview of Adobe Media EncoderAdobe Media Encoder CS6 can be launched from within Adobe Premiere Pro CS6, Adobe After Effects CS6, or onits own. When you export media from Adobe Premiere Pro the media is encoded without opening the Media Encoderworkspace. Adobe Media Encoder runs in the background. If you select Export Settings in Adobe Premier Pro andthen click Queue in the Export Settings dialog box (Figure 1), the file opens in the Adobe Media Encoder workspace(Figure 12). You can send multiple files to the Queue and then batch-process them as a group.If you want to encode or process a batch or group of files, you need to start Adobe Media Encoder and select the filesyou want to process.Main MenuQueue panelEncodingpanelPreset BrowserpanelWatch FolderspanelFigure 12 Adobe Media Encoder CS6 workspace6How to use Adobe Media Encoder CS6 2012 Adobe Systems Incorporated
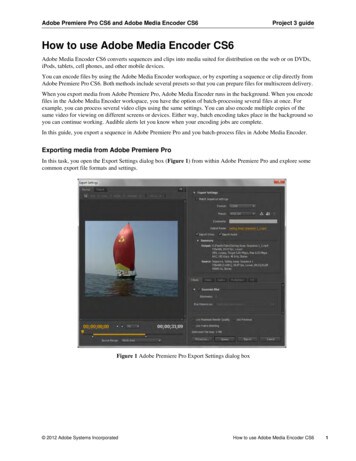
Adobe Premiere Pro CS6 and Adobe Media Encoder CS6Project 3 guideBatch-processing mediaIn this activity, you encode several video clips at the same time by using batch-processing in Adobe Media Encoder.To batch-process multiple files with the same preset:1. Start Adobe Media Encoder.The Adobe Media Encoder workspace opens(Figure 12).Add Source button2. In the Queue panel, click the Add Source button(Figure 13).The Open dialog box appears (Figure 14).3. Navigate to the files you want to process. Select them,and click Open.To select more than one file, hold down Ctrl (Windows)or Command (Mac OS) as you select the files.Figure 13 Queue panelNote: You can also drag files from an open windowdirectly into the Queue panel.Notice that the files you added are shown in the Queuepanel (Figure 15).Figure 14 Open dialog boxFigure 15 A batch of files ready to process in theQueue panel 2012 Adobe Systems IncorporatedHow to use Adobe Media Encoder CS67
Project 3 guideAdobe Premiere Pro CS6 and Adobe Media4. Click the name of the first file, hold down Shift and clickthe last file in the Queue panel to select the entire batch.Note: You can also Ctrl click (Windows) orCommand click (Mac OS) to select a range of noncontiguous files.5. Open the Format menu for the first file in the list andselect a format to use for encoding (Figure 16).The format you choose applies to all selected filesautomatically.6. Open the Preset menu for the first file and select a preset.Note: To apply different settings to each file, select themindividually and set the format and presets one file at atime.7. Hover the pointer over the Preset settings link to view atool tip with a summary of the settings for the selectedpreset (Figure 17).Note: You can click the Preset settings link to open theExport Settings dialog box and modify the settings forany preset.Note: By default, exported files are placed in the samefolders as the source file. You can change this location orrename the output files by clicking the links in the OutputFile column.Figure 16 Format menuFigure 17 Preset settings link and tool tip summary8How to use Adobe Media Encoder CS6 2012 Adobe Systems Incorporated
Adobe Premiere Pro CS6 and Adobe Media Encoder CS68. Make sure that all the files in the batch are selected andclick Start Queue in the upper-right corner of the Queuepanel (Figure 18).The encoding process begins. The Encoding panel showsthe progress of each file as it is encoded (Figure 19).While the encoding is taking place, you can continueediting in Premiere Pro or working in anotherapplication.Project 3 guideStart Queue buttonFigure 18 Queue panelAn audible alert lets you know when the process iscomplete.The status column displays “Done” and a greencheck mark beside each processed file (Figure 20). Youmay need to scroll the Queue panel to see the Statuscolumn.9. When the files are encoded, close Adobe Media Encoder.Note: In addition to adding files in the Queue panel, youcan add batches of related files to a folder and then dragthe entire folder (or folders) to the Watch Folders panel inthe Adobe Media Encoder workspace (Figure 21). Thenyou can apply presets to each Watch Folder as a group.Figure 19 Encoding panelBy default, Adobe Media Encoder processes all files inthe Queue panel and the Watch Folders panel when youclick the Start Queue button. If you do not want toprocess files in the Watch Folders panel, deselect theoption Auto-Encode Watch Folders in the Queue panel(Figure 18).Figure 20 Encoding statusFigure 21 Watch Folders panel 2012 Adobe Systems IncorporatedHow to use Adobe Media Encoder CS69
Project 3 guideAdobe Premiere Pro CS6 and Adobe MediaEncoding a project for multiscreen deliveryIn this activity, you use the Preset Browser panel in Adobe Media Encoder and batch-processing to create multipleversions of a project for viewing on different screens.To batch-process for multiscreen delivery:1. Add a file, Adobe Premiere Pro sequence, or AdobeAfter Effects composition to the Queue panel in AdobeMedia Encoder.Note: You can add a sequence or composition to thequeue from the File menu in the Adobe Media Encoderworkspace by using the Add Source button in the Queuepanel, or by exporting from Adobe Premiere Pro or AfterEffects.Start Queue buttonRemove buttonFigure 22 Queue panel in Adobe Media EncoderThe sequence, composition, or file you added appears inthe Queue panel (Figure 22).You can apply preset compression settings based on howyou want to share the file or project. Presets areorganized in the Preset Browser panel (Figure 23). ThePreset Browser panel includes encoding presets forsharing your projects to broadcast TV, digital cameras,desktop computers, mobile devices, DVD, Blu-ray, andweb browsers.2. In the Preset Browser panel, expand a preset group, selecta preset, and click Apply Preset (Figure 24).3. The preset is added below the file, sequence, orcomposition in the Queue panel.You’re not limited to just one preset. To create a secondversion of the same file, add another preset.4. In the Preset Browser panel, select a different preset andclick Apply Preset.Figure 23 Preset groups in the Preset Browserpanel5. Repeat step 3 to add additional presets.Each preset appears in the Queue panel (Figure 25).Note: You can also remove files or presets in the Queuepanel by selecting them and clicking the Remove button(Figure 22).Figure 24 Preset Browser panelFigure 25 Queue panel10How to use Adobe Media Encoder CS6 2012 Adobe Systems Incorporated
Adobe Premiere Pro CS6 and Adobe Media Encoder CS6Project 3 guide6. Click the Start Queue button (Figure 22) to process thefile or project for multiscreen delivery.The progress of the batch-processing displays in theEncoding panel(Figure 26).An audible alert lets you know when the process iscomplete.The status column displays “Done” and a greencheck mark beside each processed file (Figure 27). Youmay need to scroll the Queue panel to see the Statuscolumn.Figure 26 Encoding panelFigure 27 Encoding status in the Queue panel 2012 Adobe Systems IncorporatedHow to use Adobe Media Encoder CS611
When you export media from Adobe Premiere Pro, Adobe Media Encoder runs in the background. When you encode files in the Adobe Media Encoder workspace, you have the option of batch-processing several files at once.