Transcription
-1Veriton Desktop ComputerUser’s Manual
2- 2017. All Rights Reserved.Veriton Desktop ComputerCovers: Tower modelsThis revision: October 2017Sign up for an Acer ID and enable Acer Remote Files1.2.3.4.Ensure you are connected to the Internet.Open www.acer.com and select your country.Click REGISTER A PRODUCT.Sign up for an Acer ID or sign in if you already have an Acer ID.Register your Acer productAfter we receive your product registration, you will be sent a confirmation email withimportant data. Keep this email in a safe place.Manage your registered productsOnce you have completed the registration process, you can log onto account.acer.comusing your Acer ID and password to see and manage all your registered products.Note: It may take a few days for your information to be updated to the database.ImportantThis manual contains proprietary information that is protected bycopyright laws. The information contained in this manual is subject tochange without notice. Images provided herein are for reference onlyand may contain information or features that do not apply to yourcomputer. Acer Group shall not be liable for technical or editorial errorsor omissions contained in this manual.Model number:Serial number:Date of purchase:Place of purchase:
Table of contents - 3TABLEOF CONTENTSRegister your Acer product . 2Manage your registered products . 2First things first5Your guides . 5Basic care and tips for using yourcomputer. 5Turning your computer off. 5Taking care of your computer . 6Power cord information . 6Cleaning and servicing. 7Connecting to the Internet8Connecting to a wireless network. 8Connecting to a wireless LAN. 8Connecting with a cable . 12Built-in network feature . 12Acer ProShield14Overview. 14Setting up Acer ProShield . 14Personal Secure Drive . 16Credential Manager . 16Data Protection. 17Data Removal. 17Ports and connectors25Information on USB 3.0. 26Rear panel audio ports. 26Micro USB27Memory card reader28Connectivity options. 28Video and audio connectors30HDMI31HDMI Micro32Universal Serial Bus (USB)33Frequently asked questions35Requesting service . 37Tips and hints for using Windows 10 . 39How do I get to Start? . 39How do I turn off my computer?. 39How do I unlock my computer?. 39How do I set the alarm? . 41Where are my apps?. 42What is a Microsoft ID (account)?. 42How do I check for Windows updates?. 43Where can I get more information?. 43BIOS utility19Boot sequence. 19Setting passwords . 19Troubleshooting . 44Securing your computer20Using passwords . 20Internet and online security46First steps on the net . 46Entering passwords . 20Power management22Saving power. 22Troubleshooting tips. 44Error messages. 44Protecting your computer. 46Choose an Internet Service Provider . 46Network connections. 48Surf the Net!. 49Internet security software. 50Playing Blu-Ray or DVD movies54
4-Getting started.In this section you will find: Useful information on caring for your computer and your healthHow to create recovery backupsGuidelines for connecting to a networkInformation on using Acer’s bundled software
First things first - 5FIRSTTHINGS FIRSTWe would like to thank you for making this Acer desktop computeryour choice for meeting your computing needs.Your guidesTo help you use your Acer desktop computer, we have designed a setof guides:First off, the Setup Guide (or Setup Poster) helps you get startedwith setting up your computer.The Quick Guide introduces you to the basic features and functionsof your new computer. For more on how your computer can help youto be more productive, please refer to the User’s Manual. This guidecontains detailed information on such subjects as system utilities, datarecovery, expansion options and troubleshooting.To download the User’s Manual, you must first be connected to theinternet. Open Acer Care Center from the desktop and click on thelink under Support. The link will open the Acer Service & Supportwebpage. Scroll down to Drivers and Manuals and search for yourmodel by entering the serial number, SNID, or product model. Youmay also download and install the Acer identification tool that willautomatically detect this information and allow you to copy it to theclipboard. Once you have found your product model, selectDocuments and select your language to download the User’sManual.Basic care and tips for using your computerTurning your computer offTo turn the power off, do any of the following: Use the Windows shutdown command: Press the Windows key orselect the Windows Start button, select Power Shut down. Right-click the Windows Start button Shut down or sign out Shut down.
6 - First things firstIf you need to power down the computer for a short while, but don’twant to completely shut it down, you can put it to Sleep by doing anyof the following: Press the power button. Press the sleep hotkey cross-ref to keyboard section . Press the Windows key or select the Windows Start button, selectPower Sleep. Right-click the Windows Start button Shut down or sign out Sleep.NoteIf you cannot power off the computer normally, press and hold the powerbutton for more than four seconds to shut down the computer. If you turn offthe computer and want to turn it on again, wait at least two seconds beforepowering up.Taking care of your computerYour computer will serve you well if you take care of it. Do not expose the computer to direct sunlight. Do not place it nearsources of heat, such as a radiator. Do not expose the computer to temperatures below 0º C (32º F) orabove 50º C (122º F). Do not subject the computer to magnetic fields. Do not expose the computer to rain or moisture. Do not spill water or any liquid on the computer. Do not subject the computer to heavy shock or vibration. Do not expose the computer to dust or dirt. Never place objects on top of the computer. Do not slam the computer display when you close it. Never place the computer on uneven surfaces.Power cord informationHere are some ways to take care of your power cord:
First things first - 7 Do not step on the power cord or place heavy objects on top of it.Route the power cord and any cables away from where people walk. When unplugging the power cord, do not pull on the cord itself butpull on the plug. The total ampere ratings of the equipment plugged in should notexceed the ampere rating of the cord if you are using an extensioncord. Also, the total current rating of all equipment plugged into asingle wall outlet should not exceed the fuse rating.Cleaning and servicingWhen cleaning the computer, follow these steps:1. Turn off the computer.2. Use a soft, moist cloth. Do not use liquid or aerosol cleaners.If your computer is dropped or visibly damaged, or does not worknormally, please contact your nearest authorized Acer service center.For more information, please See Frequently asked questions onpage 35.
8 - Connecting to the InternetCONNECTINGT O TH EINTERNETThis chapter includes general information on types of connections,and getting connected to the internet. Some of this information maynot apply to your computer. For detailed information, please refer toNetwork connections on page 48.Your computer’s built-in network features make it easy for you toconnect your computer to the internet using a cable or a wirelessconnection.First though, in order to connect to the internet, you’ll need to sign upfor internet services from an ISP (Internet Service Provider) -- usuallya phone or cable company -- that will have to go to your home oroffice to set up internet service. The ISP will install a small box, arouter or modem, that will allow you to connect to the internet.Connecting to a wireless networkConnecting to a wireless LANA wireless LAN (or WLAN) is a wireless local area network, which canlink two or more computers without using wires. Once connected toWLAN, you can access the internet. You can also share files, otherdevices, and even your internet connection itself.WarningUsing wireless devices while flying in aircraft may be prohibited. Allwireless devices must be switched off before boarding an aircraft andduring take-off, as they may be dangerous to the operation of theaircraft, disrupt communications, and even be illegal. You may turn onyour computer’s wireless devices only when informed that it is safe todo so by the cabin crew.Your computer's wireless connection is turned on by default andWindows will detect and display a list of available networks duringsetup. Select your network and enter the password if required.Acer computers feature an Airplane mode hotkey that turns thenetwork connection on or off. You can use the network management
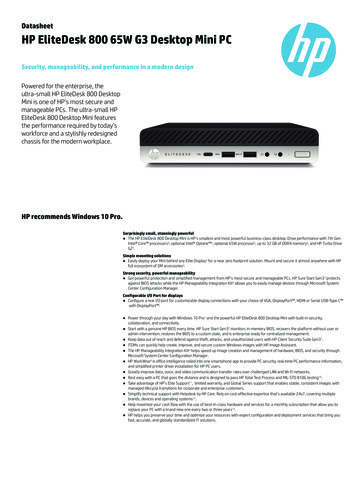
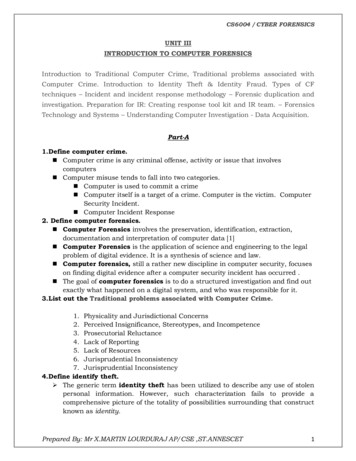
Connecting to the Internet - 9options to turn your wireless network on/off or control what is sharedover the network.To connect to a wireless network, please follow the steps below.1. Ensure you have a wireless router/access point and current internetconnection through the ISP of your choice. Make a note of thewireless network’s name and password (if necessary). If you aretrying to connect to a public network (such as at a coffeeshop),make sure you have the wireless network’s name.NotePlease refer to your ISP or router documentation for details on connecting tothe internet.2. In the icon tray in the lower right-hand corner of the screen, selectthe Notifications icon to open the Notifications pane.3. Select All settings.
10 - Connecting to the Internet4. Select Network & internet.5. You will see a list of available wireless networks. Select the one youwish to use.
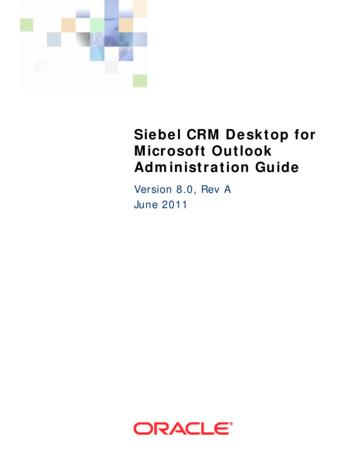
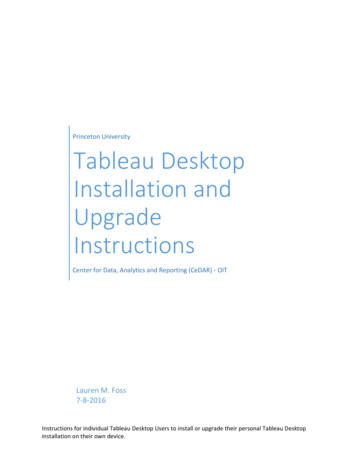
Connecting to the Internet - 116. Once you select a wireless network, select Connect.7. If required, enter the network’s password.
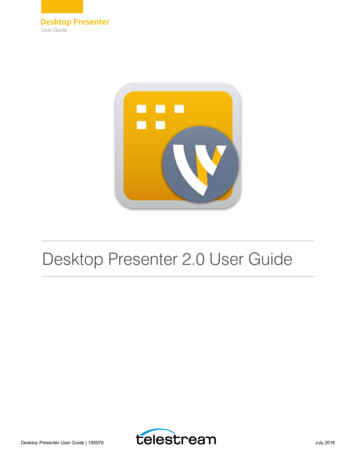
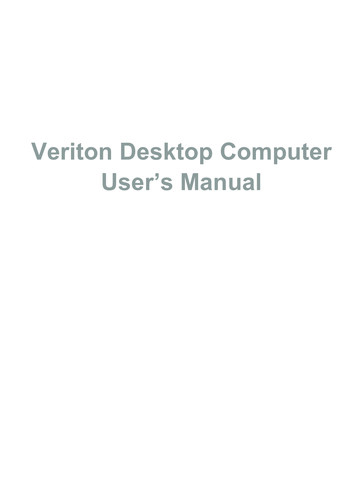
12 - Connecting to the InternetConnecting with a cableBuilt-in network featurePlug one end of a network cable into the network port on yourcomputer, and the other end into a port on your router. (Refer to theimage below.) Then, you'll be ready to get online.
- 13Keeping your computerand data safe.In this section you will find: How to secure your computer Setting passwords
14 - Acer ProShieldACER PROSHIELDOverviewAn all-in-one security solution, Acer ProShield provides an embeddedsecurity solution to address the following points of vulnerability: Securing the device against unauthorized access Protecting local storage Securing the networkAcer ProShield includes four modules that will secure your devicefrom unauthorized access and intrusion.NoteYour computer may not have all the modules mentioned below. Please referto your computer’s specifications to confirm which modules are supported. Credential Manager - Password, Online accounts configurationData Protection - Personal secure drive, file and folder encryptionData Removal - File shredderInformation - About this softwareSetting up Acer ProShieldThe first time you run Acer ProShield, you will be led through a setupwizard that allows you to set up the parameters for Acer ProShield.
Acer ProShield - 15Click Start to begin. You will be required to set a password, and canchoose to create a Personal Secure Drive.NoteSelect a password that you will remember, but is difficult to guess. Do not usewords that can be found in a dictionary. It is advisable to use a combinationof letters and numbers.Once you have set a password, you can click Next to proceed tosetting up a Personal Secure Drive or click Finish to exit the wizard.
16 - Acer ProShieldPersonal Secure DriveThe Personal Secure Disk (PSD) is a secure section of your hard diskwhere you can save files. You can only get access to the PSD viapassword authentication.Once setup is finished, you can go to the ProShield Console tomanage your computer or make changes to the settings.Use the menu in the left-hand pane to make changes.Credential Manager
Acer ProShield - 17Here you can set and manage your credentials, including Pre-bootauthentication.You can change your ProShield and Windows passwords, registerfingerprints, manage online account information, and back up orrestore credential information.Data ProtectionHere you can select files for encryption or decryption, and manageyour Personal Secure Drive.Data Removal
18 - Acer ProShieldHere you can select files to be completely removed from the harddisk. The File Shredder overwrites the data to make recovering thedata impossible.WarningMake sure you select only the information you want to shred. Once youhave shredded a file or folder, it is impossible to recover the data.
BIOS utility - 19BIOSUTILITYThe BIOS utility is a hardware configuration program built into yourcomputer's BIOS.Your computer is already properly configured and optimized, and youdo not normally need to run this utility. However, if you encounterconfiguration problems, you may need to run it.To activate the BIOS utility, press F2 while the computer logo isbeing displayed.Boot sequenceTo set the boot sequence in the BIOS utility, activate the BIOS utility,then select Boot from the categories listed on the left of the screen.Setting passwordsTo set a password on boot, activate the BIOS utility, then selectSecurity from the categories listed on the left of the screen.Find Set Supervisor Password and enter a password to enable thisfeature. Once you have entered a password for this feature, you maythen enable/disable Password on Boot.Remember to select F10 to properly save and exit the BIOS utilitywhen you are done making changes.
20 - Securing your computerSECURINGY O U R C O MP U TE RYour computer is a valuable investment that you need to take care of.Learn how to protect and take care of your computer.Using passwordsPasswords protect your computer from unauthorized access. Settingthese passwords creates several different levels of protection for yourcomputer and data: Supervisor Password prevents unauthorized entry into the BIOSutility. Once set, you must enter this password to gain access to theBIOS utility. See Setting passwords on page 19. User Password secures your computer against unauthorized use.Combine the use of this password with password checkpoints onboot-up and resume from Hibernation (if available) for maximumsecurity. Password on Boot secures your computer against unauthorizeduse. Combine the use of this password with password checkpointson boot-up and resume from Hibernation (if available) for maximumsecurity.ImportantDo not forget your Supervisor Password! If you forget your password,please get in touch with your dealer or an authorized service center.Entering passwordsWhen a password is set, a password prompt appears in the center ofthe display screen. When the Supervisor Password is set, a prompt appears when youenter the BIOS utility. Type the Supervisor Password and press Enter to access theBIOS utility. If you enter the password incorrectly, a warningmessage appears. Try again and press Enter . When the User Password is set and the password on bootparameter is enabled, a prompt appears at boot-up.
Securing your computer - 21 Type the User Password and press Enter to use the computer. Ifyou enter the password incorrectly, a warning message appears. Tryagain and press Enter .ImportantYou have three chances to enter a password. If you fail to enter thepassword correctly after three tries, the system halts. Press and holdthe power button for four seconds to shut down the computer. Thenturn on the computer again, and try again.
22 - Power managementPOWERMANAGEMENTThis computer has a built-in power management unit that monitorssystem activity. System activity refers to any activity involving one ormore of the following devices: keyboard, mouse, hard disk,peripherals connected to the computer, and video memory. If noactivity is detected for a period of time, the computer stops some or allof these devices in order to conserve energy.Saving powerDisable Fast startupYour computer uses Fast startup to start quickly, but also uses a smallamount of power to check for signals to start. These checks will slowlydrain your computer’s battery.If you prefer to reduce your computer’s power requirements andenvironmental impact, turn off Fast startup:NoteIf Fast startup is off, your computer will take longer to start from Sleep.Your computer will also not start if it receives an instruction to start over anetwork (Wake on LAN).1. Open the desktop.2. Click Power Options in the Notification area.3. Select More Power Options.4. Select Choose what the power buttons do.
Power management - 235. Select Change settings that are currently unavailable.6. Scroll down and disable Turn on fast startup.7. Select Save changes.
24 -Ports and connectors.In this section you will find: Information on the ports and connectors fitted to your computer
Ports and connectors - 25PORTSAND CONNECTORSThe tables below indicate what the different icons represent.NoteThe ports and connectors listed below may not be available on all models.IconItemIconItemPower buttonOptical driveMicrophone jackCard readerSpeaker or headphonejackBackup buttonUSB portRemoveable hard drivecarrier(s)RCA jackS/PDIF portPS/2 keyboardconnectorPS/2 mouse connectorExternal display (VGA)connectorSerial portRJ-45 EthernetconnectorLine-in jackLine-out / speaker-outjackHDMI portRecovery buttonNetwork / hard diskdrive indicatorsKensington lock slotDisplayPortThe DisplayPortadapter is available on"DP1" onlyDP
26 - Ports and connectorsIconItemIconItemDC-in jackDVIDVI portInformation on USB 3.0 USB 3.0 compatible ports are blue.Compatible with USB 3.0 and earlier devices.For optimal performance, use USB 3.0-certified devices.Defined by the USB 3.0 specification (SuperSpeed USB).Rear panel audio portsThe table below indicates the functions of the audio jacks on the rearpanel (if available).Icon color HeadsetBlueStereoQuadrophonic inMic-inMic-inCenter/wooferBlue
Micro USB - 27M I C R O USBThe USB (Universal Serial Bus) port is a high-speed serial bus whichallows you to connect USB peripherals without taking up systemresources.The Micro USB port provides a compact port that is compatible withUSB 2.0 devices.NoteA Micro USB-to-USB adapter is needed to connect to USB devices that usea full-sized connector. The adapter is only included with some models. If yourcomputer is not supplied with one, you will need to purchase one separately.
28 - Memory card readerMEMORYCARD READERConnectivity optionsYour computer has a card reader and other ports/jacks that allow youto connect peripheral devices to your computer. For instructions onhow to connect different external devices to the computer, read thefollowing section.Memory card readerMemory cards are used in a wide selection of digitalcameras, PDAs, MP3 players and mobile phones.Inserting a memory card1. Align the card so that the connector points towards the port, with theconnectors facing down.2. Carefully slide the card into the port. If you find you need to use anyforce to insert the card, try reorientating the card slightly.3. Push the card until it clicks into place. A few millimetres of the cardwill extend from beyond the slot.If the card contains some files, the Windows Auto Play window mayappear (this depends on the contents of the card) and ask you if youwish to use a program to access the contents of the card. Select anoption here if it is appropriate, otherwise select Cancel. If the cardcontains no files, or unknown files, a window will open showing thecontents of the card.SD, SDHC and SDXC cardsDifferent types of SD cards cover different capacities, while using thesame overall design. SD cards contain up to 4 GB; SDHC cardscontain up to 32 GB; and SDXC cards can contain up to 2048 GB
Memory card reader - 29(2 TB). Your computer provides an SDHC or SDXC compatible cardreader.NoteSDXC memory cards can only be used in an SDXC-compatible reader; SDand SDHC cards can be used in either type.Removing a card from a memory card reader1. Click on Show hidden iconsarrow in the Notification Area (nextto the clock).2. Click on the Safely RemoveHardware icon.3. Click on Eject SD Card (or thename of the device).4. Wait until a Safe to RemoveHardware message is displayed.5. Remove the card.213
30 - Video and audio connectorsVIDEOAND AUDIO CONNECTORSConnect to a monitor with a VGA or DVI port (the type of connectionsupported depends on your computer’s configuration). Theappropriate cable is usually included with the monitor.Follow these steps to connect an monitor to your computer:1. Check that the computer is powered off and the monitor powerswitch is turned off.2. Attach the video cable to the monitor port on the computer. Securethe cable connection with the screws provided.3. Connect the monitor power cable and plug it into a properlygrounded wall outlet.4. Follow any setup instructions in the monitor's user's guide.5. Turn on power to the monitor, then the computer.6. Make sure that the current resolution and refresh rate do not exceedthe specifications of the monitor. If necessary change the displaysettings used by the computer.NoteTo access the display controls, press the Windows key ("Display" and then click on Display.) W, typeHeadphones and microphoneThese ports allow you to connect audio devices. Use the headphoneport to plug in stereo headphones or powered speakers. Plugging anaudio device to the headphone port disables the built-in speakers.Use the microphone port to connect an external microphone for monorecording; plugging in an external microphone disables the built-inmicrophone.NoteSome computers have a single "combo" port that allows you to use single-pinheadsets with a built-in microphone. These headsets are most commonlyused with smartphones.
HDMI - 31HDMIHDMI (High-Definition Multimedia Interface) is a high-quality, digitalaudio/video interface. HDMI allows you to connect any compatibledigital audio/video source, such as your computer, a set-top box, DVDplayer, and audio/video receiver to any compatible digital audio and/orvideo monitor, such as a digital television (DTV) with a single cable.The single cable keeps everything neat and tidy while ensuring easyconnection and the best audio and visual quality.
32 - HDMI MicroHDMI MICROHDMI (High-Definition Multimedia Interface) is a high-quality, digitalaudio/video interface. HDMI allows you to connect any compatibledigital audio/video source, such as your computer, a set-top box, DVDplayer, and audio/video receiver to any compatible digital audio and/orvideo monitor, such as a digital television (DTV) with a single cable.The single cable keeps everything neat and tidy while ensuring easyconnection and the best audio and visual quality.HDMI Micro delivers the same high-quality playback as standardHDMI, with a slimmer connector, ideal for use in your desktopcomputers.NoteAn HDMI Micro-to-HDMI adapter is included with certain models.
Universal Serial Bus (USB) - 33UNIVERSAL SERIAL BUS (USB)The USB port is a high-speed port which allows you to connect USBperipherals, such as a mouse, an external keyboard, additionalstorage (external hard disks), or any other compatible device.NoteTwo USB standards are currently available on Acer computers: USB 2.0(High-speed USB) and USB 3.0 (SuperSpeed USB). USB 2.0 ports on Acercomputers have a black tongue in the port, while USB 3.0 ports have a bluetongue. For best performance, USB 3.0 devices should always be pluggedinto USB 3.0 ports. Consult your device’s documentation to see whichstandard it supports.You can also charge devices such as tablets, smartphones, or otherdevices through a USB port. Some USB 3.0 ports support chargingdevices when the computer is in Hibernate or turned off. Additionally,you can use a USB hub to connect multiple devices to a single USBport.ImportantWhen removing a USB storage device, you should right-click on theUSB icon in the Windows task bar and select "Eject device " to tell theoperating system to stop using the device before removing it. Failure todo this may result in data loss or damage to your peripheral.
34 -Got a question?In this section you will find: Frequently asked questionsTips for using Windows 10Troubleshooting informationHow to protect yourself while onlineWhere to find Acer service center contact information
Frequently asked questions - 35F R E Q U E N TL YASKED QUESTIONSThe following is a list of possible situations that may arise during theuse of your computer. Easy solutions are provided for each one.I turned on the power, but the computer does not start or boot up.Look at the power indicator: If it is not lit, no power is being supplied to the computer. Check thefollowing: If you are using on the battery, it may be low and unable to powerthe computer. Connect the AC adapter to recharge the batterypack. You may need to wait a few minutes before trying to turnyour computer on again. Make sure that the AC adapter is properly plugged into thecomputer and to the power outlet. If it is lit, check the following: Is a disc in the optical drive? Remove it and press Ctrl Alt Del to restart the system. Do you have a USB storage device (USB drive or smartphone)plugged into your computer? Unplug it and press Ctrl Alt Del to restart the system.Nothing appears on the screen.The computer’s power management system automatically blanks thescreen to save power. Press any key to turn the display back on.If pressing a key does not turn the display back on, three things mightbe the cause: The brightness level might be too low. Press Fn (increase)to adjust the brightness level. The display device might be set to an external monitor. Press thedisplay toggle hotkey to toggle the display back to the computer. If the power LED is flashing, the computer may be in Sleep orHibernate mode. Press and release the power button to resume.No audio is heard from the computer.Check the following:
36 - Frequently asked questions The volume may be muted. Look at the volume control (speaker)icon in the taskbar. If it is crossed-out, click the icon and deselect theMute all option. The volume level may be too low. Check the volume from thevolume control (speaker) icon in the taskbar. You can also use thevolume control hotkeys to adjust the volume. If headphones, earphones or external speakers are connected tothe headphone jack on the computer, the internal speakersautomatically turn off.I want to eject the optical drive tray without turning on the power.There is a mechanical eject hole on the optical drive. Simply insert thetip of a pen or straightened-out paperclip into the hole and push toeject the tray.The keyboard does not respond.Try attaching an external keyboard to a USB port on the computer. If itworks, contact your dealer or an authorized service center as theinternal keyboard cable may be loose.The printer does not work.Check the following: Make sure that the printer is connected to a power outlet and that itis turned on. Make sure that the printer cable is connected securely to a USB portand the corresponding port on the printer.
Frequently asked questions - 37I want to restore my computer to its original settings.NoteIf your system is the multilingual version, the operating system and languageyou choose when you first turn on the system will be the only option for futurerecovery operations.This recovery process helps you restore the C: drive with the originalsoftware content that is installed when you purchased your computer.WarningYour C: drive will be reformatted and all data will be erased. It isimportant to back up all data files before using this option.Before performing a restore operation, please check the BIOSsettings.1. Check to see if Acer disk-to-disk recovery is enabled or not.2. Make sure the D2D Recovery setting in Main is Enabled.3. Exit the BIOS utility and save changes. The system will reboot.NoteTo activate the BIOS utility, press F2 when you see the Acer logo duringboot up.Requesting serviceInternational Travelers Warranty (ITW)Your computer is backed by an International Travelers Warranty(ITW) that gives you security and peace of mind when traveling. AnITW passport came with your computer and contains all you need toknow about the ITW program. A list of available, authorized servicecenters is in this handy booklet. Read this passport thoroughly.Always have your ITW passport on hand, especially when you travel,to receive the benefits from our support centers. Attach your proof-ofpurchase to the ITW passport.If the country you are traveling in does not have an Acer-authorizedITW service site, you can still get in contact with our offices worldwide.Please visit www.acer.com.
38 - Frequently asked questionsBefore you callPlease have the fo
Manual. Basic care and tips for using your computer Turning your computer off To turn the power off, do any of the following: Use the Windows shutdown command: Press the Windows key or select the Windows Start button, select Power Shut down. Right-click the Windows Start button Shut down or sign out Shut down.