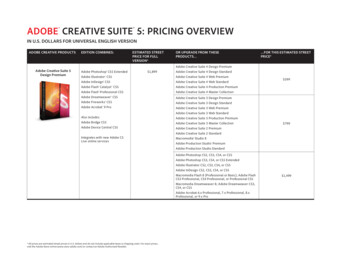
Transcription
Adobe Dreamweaver CS5 Tutorial
G ETTI NG S TA RT EDThis tutorial focuses on the basic steps involved in creating an attractive, functional website. In usingthis tutorial you will learn to design a site layout, insert images and text, create links, and how toupload your site to the Internet. This tutorial offers information for Mac and PC users.TABLE O F C O NT ENTSIn this tutorial, you will learn the following:1. Activating your WebspacePg. 32. Getting StartedPg. 43. Creating a HomepagePg. 74. Design and LayoutPg. 85. Inserting and Using TablesPg. 96. Adding Design ElementsPg. 127. Previewing in BrowserPg. 138. Creating HyperlinksPg. 149. Inserting Special Media Pg. 1610. Uploading Files to the WebPg. 182
1 . ACTIVATI NG YO U R W EB S PAC EBefore you get started, it is important that you have a space to upload your Web site When it iscompleted. BGSU offers 15 MB of free personal Web space for each student, so you can use thisspace to upload your project.To activate your personal Web space, follow these steps:1.2.3.4.5.Log onto your MyBGSU Account.Scroll to the bottom of the page to find the My Computer Accounts box (Fig. 1).Click the Add Server Account button.In BGSU Server Account Registration window, check the box next to Personal (Fig. 2).Click the Submit button. Now your Web space is activated.NOTE: An email will be sent when your account is activatedFigure 1. My Computer Accounts WindowFigure 2. BGSU Server Account Registration3
2 . G E TT I NG S TA RT EDCREATING YOUR LOCAL ROOT FOLDERFirst, you need to decide what you want to put on your website: images, buttons, videos, PDF documents, PowerPoint presentations, etc. To create and maintain an organized website, you need toestablish a hierarchy of folders that contain all of the components that make up your site. This folderis called your Local root folder. This folder is important because this is where Dreamweaver looksfor all your files.To create a root folder, follow these steps:1. Create a new folder on your desktop. On a Mac, click File New Folder. On a PC, right-click andchoose New Folder.2. Give the folder a brief, but descriptive name. Do not use capital letters, spaces, or specialcharacters when naming folders and files for your website. All of your pages will be saved withinthis folder.3. Open the folder, and create another new folder inside. Name this folder images (make sure thefile name is lower case). Put all of your images, buttons, movie files, etc. inside the images folder.NOTE: Make sure that all of your pages and images are saved in your rooter folder, or they will notappear the next your website is opened.MANAGING YOUR SITES1. Begin by opening Adobe Dreamweaver CS5.On a PC, click Start Programs Adobe Dreamweaver CS5, or click on theDreamweaver shortcut on the desktop.On a Mac, click Macintosh HD Applications Adobe Dreamweaver CS5 , or click theDreamweaver icon in the Dock. (Figure 3)Figure 3. Navigating to the Dreamweaver CS5 application. on a Mac4
2 . G E TTI NG S TA RT ED C O NT.The most important step you need to take every time you launch Dreamweaver CS4 is to defineyour Local Info. The local root folder is the name for the folder where you are storing all of yourwebsite’s contents.To define a site, follow these steps:1. Click Site Manage Sites.2. Click New Site.3. Select the Site tab.4. Enter a name for the site in the Site Name text field (This name will be for your use only– it will not be published with your site.)5. Click the small folder icon next to the Local Site Folder text field. Browse to the root folder thatyou created earlier in the tutorial. Once you’ve located the folder, click the Choose button.6. Select the Advanced Settings tab.6. Click the small folder icon next to the Default Images Folder text field (Figure 4). Browse tothe images folder that you created earlier in the tutorial. Once you’ve located the folder, click theChoose button.Figure 3. Selecting the Default Images Folder in Dreamweaver CS5 on a Mac.5
2 . G E TTI NG S TA RT ED C O NT.Next, every time you launch Dreamweaver, you have to define your Remote Info. The Remote Info tab isused to tell Dreamweaver where to put your files when you are ready to upload them to the web. If youare using the BGSU personal server space, use the diagram below (Figure 5) to fill out the information.(If you are using any other server you will need to know the host name.)To define the remote info, do the following:1.Click on the Server (Figure 5) tab located on the left side of the toolbar.2.To add a server, click the symbol from the bottom left-hand corner of the window.3.Type in personal.bgsu.edu for FTP Address.4.Type in public html for Host directory.5.Type in your webmail username for Username.6.Type in your webmail password for Password.7.Make sure the Use passive FTP (if not visible, click the More Options arrow toward the bottom)box is checked.8.Click Test to make sure it connects to the server correctly.Figure 5. Configuring the Remote Server in Dreamweaver CS5 on Mac.6
3 . CRE AT I NG A HO M EPAG ETo create a Web page, follow these guidelines:1. To add a new page go to File New and choose a basic HTML page. Save this page by clicking File Save As. Name the first page index.html. This will be the first page that users encounter when they visityour site. Save this file to your local root folder as index.html. Naming the homepage index.html tells theWeb browser that this is the first page it should open when someone visits your site.2. After your homepage index.html is created, you can use this page as a template layout for all theother pages in your site. Simply hit Save As and name the file whatever you wish, but be sure to keepthe name is simple, for example history.html, resume.html, etc. Remember not to use capital letters orspaces when naming files, this will make it easier for web browsers to find your files.3. To save the pages of your site simply click File Save for each page. Make sure your homepage isnamed index.html, and save all of your files in the folder you chose when you defined your site, i.e. inyour local root folder.NOTE: This process will save your files to your local site.You can transfer each file separately to theremote site or transfer the entire site once you have finished working on it.7
4 . DES I G N A ND LAYO U TEven if you are creating only a simple Website, you should begin by sketching out the layout of your site.Decide where you want titles, images, navigation buttons, and text to appear on the screen.Most web sites have the same design characteristics on every page. For example, Website titles are usuallyin the top left or top center, while navigation buttons usually appear vertically on the left or horizontallybelow the title. In addition to sketching out a layout for each page, you should determine how many pagesyou will need for the Website. Thorough planning is essential to good web design.In order to get your text, navigation buttons, and images to appear where you want them on the Webpage; you need to use tables to format content of each page. Everything on each page of your Websiteshould fit within one large table.Using your layout sketches, you can determine what your table needs to look like. Figure 5 shows asimple layout sketch. Figure 6 shows the same layout, with table borders drawn in. Figure 7 shows howthe table can be implemented in Dreamweaver.Now, simply create a table in Dreamweaver that has the same characteristics as the borders drawn onthe page. The next chapter will teach you how to insert your table.Figure 5: Simple layout sketchFigure 6: Simple layout sketch with borders8
5 . I NS ERTI NG A ND U S I NG TA B LESWhy use tablesTables help you divide the space on your page. They are similar to tables in Word or Excel but can beused in much more flexible ways. Tables give you the option of making your page a fixed size or makingit fit to the user’s window the best it can. Tables also guarantee that the location of your text and imagesdoes not change when seen on screen with different resolutions or in different Web browsers.How to insert a tableTo insert a table, follow these steps:1. In the main menu, click Insert Table.2. Insert the amount of Table Rows and Columns (Figure 7).3. Set Table width to between 600 and 800 pixels.4. Set Border thickness. To have a visible border type in 1 or higher, to have no border type in 0.5. Cell padding adds room inside of a cell. Enter 0 for no space or a number to Increase the space.6. Cell spacing adds space between cells. Enter 0 for no space or a number to Increase the space.7. Click Ok.Figure 7: Table window9
5. INS E RTI NG A ND U S I NG TA B LES C O NT.Properties of tablesIf you click on one of the table borders, you can view your table properties in the Properties window.Figure 8: Table Properties WindowIn the top section of this window (Figure 8) you can: name your table; change the number of rows and columns in the table; change the width and height of the table, using percent: this will make the table expand and contract as the user changes the size of thewindow, using pixels: this will make the table a set number of pixels no matter what size the user’s window is (there are 72 pixels/inch); change the Cell Pad: this is the number of pixels that come between the border of cells and thecontent of cells. change the Cell Space: this is the number of pixels that come between the borders of each cell. change the alignment: this is the position of the table on the left or right edge, or in the centerof the page. change the border: this is the number of pixels that make up the thickness of cell borders.In the bottom section of this window (Figure 8) you can: Clear and convert table widths and heights. Change the background color of the whole table. Insert a background image for the whole table. Change the border color.10
5. INS ERTI NG A ND U S I NG TA B LES C O NT.Properties of cells inside tableOnce the properties of the table have been set, you can also adjust the properties of individual cellswithin the table by clicking inside the cell (Figure 9).In the top section of this window you can format the text inside the table cell. In the bottom section ofthis window you can: Merge and split cells (this will be explained in the layout section). Change the alignment of the content horizontally and vertically. Change the width and the height of the cell (numbers alone represent pixels, add a percent signto make the cell a certain percentage of the whole table). Use Wrap. Insert Header; Insert a background image for the single cell. Change the background color for the single cell. Change the border color for the single cell.Figure 9: Table Format windowHere is an example of a page with a background color selected for the page, for each table, and for somespecific cells in each table (Figure 10).Figure 10: Background color, table color, cell color11
6 . ADDI NG DES I G N EL EM ENT SADDING TEXTTo insert text simply click inside a cell and type in your content. When you click ENTER, Dreamweaverautomatically adds paragraph spacing. To add a line space, click SHIFT ENTER.INSERTING IMAGESTo insert an image, follow these steps:1. Click in the cell where you want the image to appear.2. Click Insert Image.3. Locate the image you want to insert.NOTE: All of your images should be saved in the “images” folder that you established when you started.4. Click Choose to insert the image.Click on the image to view its properties in the Image Properties Inspector window (Figure 11).Figure 10: Image Properties Inspector WindowFORMATTING PAGE PROPERTIESTo change the background color of your pages or other overall properties of your website, go toModify Page Properties. Here, in the Page Properties window, you can set the default font, text size, textcolor, and background for all of your pages (Figure 12).12
6. ADDI NG DES I G N ELEM ENT S C O NT.Figure 12: Page Properties Window7 . PRE VI EW I NG I N B ROW S ERTO PREVIEW IN A BROWSERYou can preview your Web pages in a browser in many ways:1.2.3.Choose File Preview in Browser.Hit F12.Click on the world icon located on the toolbar at the top of your page (Figure 13).Figure 13: Preview in Browser Menu13
8 . CREAT I NG HY P ERL I NK SA hyperlink or link, is an object or text that, when clicked, takes the users to another webpage or opens afile. The various types of hyperlinks are explained below.INTERNAL LINKSInternal links are used to connect users to other pages within the same website. Before linking to otherpages, you must make sure that the other pages are saved in your local root folder and contain the fileextension .htm or .html.To create an internal link, follow these steps:1.2.3.4.Select the text or image you would like to make a hyperlink.Click on the small folder next to the Link field in the Properties Inspector (Fig.19 and 20).Browse through the files, and select the page you would like to link.Click Choose.Figure 6. Duplication Objects.EXTERNAL LINKSExternal links are used to connect the users to pages from other websites.To create an external link, do the following:1. Select a text or an image you want to make a hyperlink.2. Click the cursor inside of the link text field in the Properties Inspector.3. Type the complete URL (web address) of the website you want to link(e.g. http://www.bgsu.edu).4. Select the Target type as -blank.NOTE: If you select the Target type as -blank, it will open the link in a new window while keeping yourwebsite open in another window.14
8 . CRE ATI NG HY P ERL I NK S C O NT.LINKS TO FILESSometimes you may need to link a file such as a PDF, a Word document, or a PowerPoint presentation.When the user clicks the hyperlink, the files will either automatically open up in its original program, orthe browser will prompt the user to save the file on their hard drive.To create a link to a file, follow these steps:1.2.3.4.5.6.Make sure that the file you want to link is saved in your root folder.Select a text or an image you would like to make a hyperlink.Click on the small folder next to the Link field in the Properties Inspector.Browse through the files, and select the file you would like to link.Click Choose.Select the Target type as -blank.BASIC EMAIL LINKE-mail links are links that will automatically open the user’s default email program with a blank e-mail addressed to the specified e-mail link.There are two ways to create an email link you can:1. Click on the Insert menu at the top of the screen and select Email Link.2. Type in text for the hyperlink name or label, for example: My Email or Click here to email me (Fig.21).3. Type in your email address, i.e. where the email is to be sent.4. Click OK.Fig.21: E-mail Link windowOr, you can:1. Select the text you want to be your email link.2. In the Properties window in the Links field, type in mail to: yourusername@bgnet.bgsu.edu, or anyother email address you want to use as your contact.15
9 . INS E RTI NG S P EC I A L M EDI AFigure 10. Texting Wrapping.ROLLOVER IMAGESRollover images allow you to have a graphic change to a different graphic when the mouse rolls over it. Toinsert a rollover image, do the following:1. Click on Insert Image Objects Rollover Images.2. In the Insert Rollover Image dialog box under Original Image, browse for the image that is to be seenbefore the mouse rolls over it (Fig.23).3. Under Rollover Image browse for the image to be seen when the mouse rolls over it.4. In the When clicked. Go to URL field, you can enter a link by typing in the web address or browsing toa file.5. Click OK.QUICKTIME MOVIETo insert a movie, follow these simple steps:1. Click on Insert Media Plug-in.2. Navigate to the desired file.3. Click Choose. NOTE: By default the QuickTime is viewed in a very small window; to make the windowlarger, click on it once and drag one of the corners to the desired size. Make sure the movie file is locatedin your local root folder.16
9. I NS ERTI NG S P EC I A L M EDI A C O NT.EMBEDDING A POWERPOINT PRESENTATIONTo insert a Power Point Presentation, do the following:1. Open a project in PowerPoint.2. Click Save as Web Page.3. Put both the .html and the folder of files created in PowerPoint into your local rootfolder.NOTE: The file .html is now your PowerPoint embedded into a Web page; you can double-click on it toopen it in a browser.4. Insert a link to your PowerPoint .html file. Now if the user clicks on the link, your presentation willopen.17
1 0 . UPL OA DI NG YO U RTo upload your site to the Web successfully, you must make sure that you defined your Local Info andRemote Info before you did anything else in Dreamweaver. If you are working on a different computerand forgot to define your site, follow the steps on Getting Started page.You will have to create a new siteand enter all the information in the Local Info and Remote Info tabs. If you are sure that you defined yourRemote Info, but uploading is not working, go back and check your Remote Info. Go to Site ManageSites Your Site Name. If the name of the site is not there, follow the steps on Getting Started page.UPLOADING YOUR FILESTo upload your files to the Web, complete this process:1. Make sure your Files panel is open. If not, go to Window Files.2. Click the Connect button. This button connects Dreamweaver to your server space (see Fig.24).3. Make sure your toolbar displays Local View and your files can be seen in the panel. The Local View1 is2.A computerRRA NGNGroot folder.shows everything in the Files panel thaton thein yourIlocal4. Select your local root folder and click on the Put button (See Fig.24).Figure 16. Grouping Objects.NOTE: If you make changes, be sure to upload your entire folder and replace the old version to keep allfiles linked properly.1. In the toolbar, switch your view from Local to Remote View.You should now see your files under Remote as well. The Remote View shows you all of the files uploaded on your server space.2. Check your site in a browser by typing in your Web site address. If you are using the BGSU personalweb space your Web address is: http://personal.bgsu. edu/ (your username).NOTE: We recommend that you save a backup of your local root folder on something semi permanentsuch as a CD, a zip disk, or a flash drive (Do not use a floppy disk!) in order to save you time and energywhen you need to update the site.18
On a PC, click Start Programs Adobe Dreamweaver CS5, or click on the Dreamweaver shortcut on the desktop. On a Mac, click Macintosh HD Applications Adobe Dreamweaver CS5 , or click the . Type in personal.bgsu.edu for FTP Address . 4. Type in public_html for Host directory. 5. Type in your webmail username for Username. 6. Type in .