Transcription
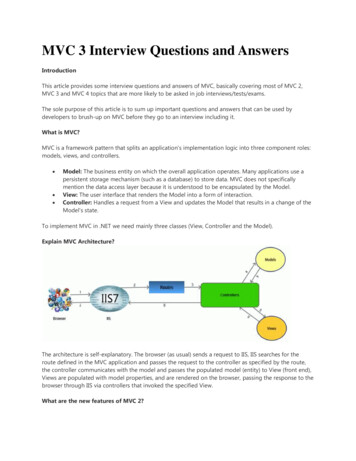
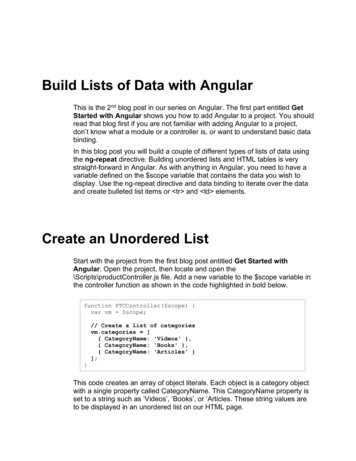
Add Angular to MVC – Part 1Many of us have MVC applications currently running. You would like to startusing Angular 2 or 4 in your web applications, but don’t have the time tocompletely rewrite. It would be nice if you could just re-write one or two pagesin Angular and keep the rest of your MVC project in place. Turns out you can.In this blog post, you will learn how to add Angular 2 or 4 to your MVCapplications. For this post, I am assuming you are a Microsoft Visual Studiodeveloper and are familiar with MVC, Angular, C#, and the Web API.Setup Your MachineBefore you begin to use Angular, you must prepare your developmentmachine. There are two tools required, as well as you must configure VisualStudio 2015 to use TypeScript. You should also get the Angular quick startproject.Install NodeIf you have not done so already, download and install Node.js and NodeJSPackage Manager (npm). You can get these two packages athttps://nodejs.org/en/download/. Follow the instructions for downloading andinstalling these tools on nodejs.org.Configure Visual Studio 2015Most developers are using TypeScript for Angular development. Ensure youhave downloaded and installed TypeScript 2.x for Visual Studio 2015. Selectthe Tools Extensions and Updates menu to bring up the Extensions andUpdates window (Figure 1) for Visual Studio. Click on the Installed node inthe tree view and look through your list and see if you have installedTypeScript 2.x. If you have an older version of TypeScript you need to updateit.
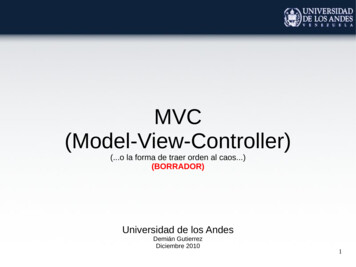
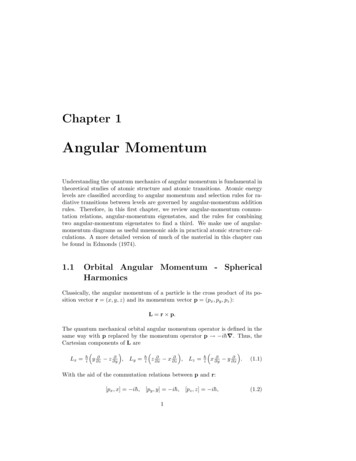
Add Angular to an MVC ApplicationFigure 1: Use the Extensions and Updates window to check for TypeScript.To update to TypeScript 2.x, click on the Online node in the tree view andperform a search for TypeScript. Locate the latest version of TypeScript anddownload and install it into Visual Studio.One last configuration item for Visual Studio is to select the Tools Optionsmenu and expand the Projects and Solutions node. Click on the External WebTools (Figure 2). Ensure that the (PATH) variable is located above any (DevEnvDir) variables if they exist in your environment. In my installation ofVisual Studio, these variables did not exist.2Add Angular to MVCCopyright 2017 by Fairway Technologies, Inc.All rights reserved worldwide. Reproduction is strictly prohibited.
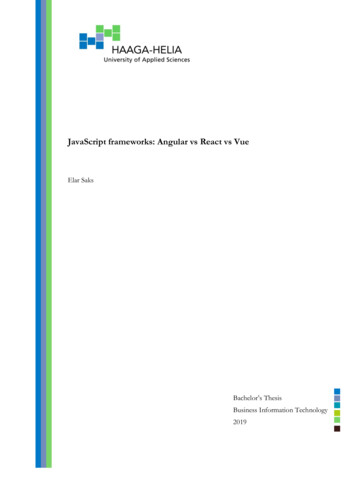
Sample MVC ApplicationFigure 2: Make sure the (PATH) variables is high in your location of externaltools.Download Angular Quick StartNow that you have configured Visual Studio, you are going to need someconfiguration files and some TypeScript files to make it easier to get startedwith Angular. The Angular team has created a sample project that containsthese files. This sample project is not a Visual Studio project, so you are onlygoing to use some of the files from this project and not bring all of them intoyour project. Download the quick start zip file fromhttps://github.com/angular/quickstart. After the zip file has been downloaded,unzip the files into a folder on your hard drive.Sample MVC ApplicationLet’s look at a sample MVC application, named PTC, that I am going to useas a demonstration (Figure 3). You can download this sample, and the finalsample by following the instructions at the end of this blog post.Add Angular to MVCCopyright 2017 by Fairway Technologies, Inc.All rights reserved. Reproduction is strictly prohibited.3
Add Angular to an MVC ApplicationFigure 3: A sample MVC application to display a product listThis is a vanilla MVC application that does not have the Web API in it. It hasthe following classes that are of interest.File4DescriptionProductControllerThe MVC controller to display the \Views\Product\Product.cshtmlpage.ProductAn entity class to represent a product objectPTCData-ExtensionsAdditional validation for Product dataAdd Angular to MVCCopyright 2017 by Fairway Technologies, Inc.All rights reserved worldwide. Reproduction is strictly prohibited.
Sample MVC ApplicationPTCDataEntity Framework generated data layer.PDSAPageModeEnumEnumeration for the mode that page is currently inProductViewModelA view model that is called from the ProductController to retrievedataProductDetail.cshtmlA partial page to display, add, and edit a single product record.ProductList.cshtmlA partial page that displays a list of product dataProduct.cshtmlA MVC page to list or edit product(s) retrieved from the viewmodel.Table 1: A list of the classes in the PTC MVC applicationInstall Product TableBefore you can run this sample, you need to download the sample project,locate the \SqlScripts folder and install the Product.sql into a SQL Serverdatabase. After you have created the Product table, open the Web.config fileand adjust the connection string to point to your server and your database.Test the PageYou can now run the Product.cshtml page and ensure you get something thatlooks like Figure 4.Figure 4: The product list pageAdd Angular to MVCCopyright 2017 by Fairway Technologies, Inc.All rights reserved. Reproduction is strictly prohibited.5
Add Angular to an MVC ApplicationAdd Angular FilesYou need to add a few Angular files from the quick start project youdownloaded. Prior to doing this, add a new folder named \app to your MVCproject. Using Windows Explorer, navigate to the folder where you extractedthe quick start files. Do NOT copy all these files into your Visual Studioproject, you do not need all of them. Locate and copy the following files intothe root of your new Visual Studio project. \package.json \tslint.json \src\tsconfig.jsonCopy the file \src\systemjs.config.js into the \scripts folder of your VS project.Copy the file \src\main.ts into the \app folder of your VS project. You will mostlikely receive a message that your project has been configured to supportTypeScript. It will ask you if you want to search for TypeScript typings. Justanswer No as you are not going to need these right now.Expand the \src\app folder in the quick start folder and copy the followingTypeScript files located in this folder into the \app folder you created in yourVS project. app.component.ts app.module.tsRestore PackagesEven though you added some TypeScript files, nothing is going to work yet.You need to download a new folder using the NodeJS Package Manager(npm). Visual Studio can download all of these files using npm, but you mustfirst close and reopen Visual Studio. If you don’t close and reopen VisualStudio, the appropriate menu item needed will not show up. Go ahead andclose your instance of Visual Studio now, then, reopen the ProductAppproject. Right mouse click on the package.json and select Restore Packages(Figure 5) from the menu. This process takes a little while, so be patient.6Add Angular to MVCCopyright 2017 by Fairway Technologies, Inc.All rights reserved worldwide. Reproduction is strictly prohibited.
Add Angular FilesFigure 5: The Restore Packages menu only shows up after closing and reopeningVisual Studio.After the installation of the packages is complete, click on the Show All Filesicon in the Solution Explorer window. You should see a new folder hasappeared named node modules (Figure 6). DO NOT include this folder inyour project, you do not need all these files in your project. They are just thereto support the various libraries you use when developing with Angular.Add Angular to MVCCopyright 2017 by Fairway Technologies, Inc.All rights reserved. Reproduction is strictly prohibited.7
Add Angular to an MVC ApplicationFigure 6: Don’t include the node modules folder in your project.Add Links to the MVC Shared LayoutNavigate to where you installed the quick start files and open the\src\index.html page. You need to copy a few lines of code from this page intothe \Views\Shared\ Layout.cshtml file. Open the Layout.cshtml file in VisualStudio. Locate the following lines of code in the index.html page and pastethem into the head section of the Layout.cshtml file.8Add Angular to MVCCopyright 2017 by Fairway Technologies, Inc.All rights reserved worldwide. Reproduction is strictly prohibited.
Add Links to the MVC Shared Layout base href "/" I like to the above line of code as the first one after the head element.Locate the next lines that start with the comment shown below and copy themall after the @Scripts.Render() and before the /head element. !-- Polyfill(s) for older browsers -- script src "node modules/core-js/client/shim.min.js" /script script src "node modules/zone.js/dist/zone.js" /script script src "node modules/systemjs/dist/system.src.js" /script script src "systemjs.config.js" /script script System.import('main.js').catch(function(err){ console.error(err); }); /script Since the Layout is in a different location in your project from the index.htmlin the quick start project, you need to fix up the src attributes. Add a forwardslash in front of each of the above references for the node modules. script src "/node modules/core-js/client/shim.min.js" /script script src "/node modules/zone.js/dist/zone.js" /script script src "/node modules/systemjs/dist/system.src.js" /script For the systemjs.config.js file, you placed that into the Scripts folder, so youneed to add /scripts/ in front of that file reference. script src "/scripts/systemjs.config.js" /script Locate the script tag that is responsible for importing the main.js file whichis transpiled from the main.ts file. This code is shown in the following codesnippet.Add Angular to MVCCopyright 2017 by Fairway Technologies, Inc.All rights reserved. Reproduction is strictly prohibited.9
Add Angular to an MVC Application script System.import('main.js').catch(function(err){ console.error(err); }); /script Since you moved the main.ts file into the \app folder, modify the parameterpassed to the import function to ‘app/main’ as shown in the following snippet. script System.import('/app/main').catch(function(err){ console.error(err); }); /script In the quick start project, the main.ts file was expecting to find theapp.module.ts file in the \app folder below the root folder. However, sincethese two files are now located in the same folder, you need to open themain.ts file located in the \app folder and locate the following line of code.import { AppModule } from './app/app.module';Remove the ‘/app’ portion from this line of code so that the final code lookslike the following snippet.import { AppModule } from './app.module';You should run your Product page again just to make sure that yourapplication still compiles and runs.Eliminate Hard-Coded HTML TemplateThe app.component.ts file contains a template property to output someHTML. I do not like having HTML written in TypeScript, so create an HTMLpage to display the HTML for the landing page of your Angular application.Right mouse click on the \app folder and select Add HTML Page and set thename to app.component.html. Click the OK button. Remove the HTML in thepage and replace it with the following:10Add Angular to MVCCopyright 2017 by Fairway Technologies, Inc.All rights reserved worldwide. Reproduction is strictly prohibited.
Eliminate Hard-Coded HTML Template router-outlet /router-outlet In the HTML above you are adding a location for the Angular routing engineto place HTML that comes from different components. For example, you aregoing to create a product list component and corresponding HTML page todisplay product data. That HTML will be placed in between these two tags.Open the \app\app.component.ts file and you will see the followingdeclaration.@Component({selector: 'my-app',template: h1 Hello {{name}} /h1 ,})Now that you have created the new HTML page, you are going to remove thehard-coded HTML from the template property in the @Component decorator.I have found that if you have any more than a few lines of HTML, this propertybecomes cumbersome to maintain. Let’s change the template property to thetemplateUrl property and set that property to the string ‘app.component.html’.@Component({moduleId: module.id,selector: 'my-app',templateUrl: './app.component.html'})Another change you are making to this @Component decorator is adding theproperty moduleId and setting that property to the value module.id. Thisproperty helps Angular understand relative paths in relation to the currentcomponent. If you did not use the moduleId property, then you change thetemplateUrl property to ‘./app/app.component.html’. I prefer to use relativepaths as opposed to having to fully quality the path in relation to the root.The AppComponent class that came with the quick start sample has a nameproperty set to the word ‘Angular’. Just delete this code and make yourAppComponent class look like the following:export class AppComponent { }You will learn more about how the routing works a little later in this article. Butfirst, let’s build the product list component and HTML.Add Angular to MVCCopyright 2017 by Fairway Technologies, Inc.All rights reserved. Reproduction is strictly prohibited.11
Add Angular to an MVC ApplicationStub the Angular Product ComponentsTo test that you can route to a Product list page from your MVC page, createa couple of new files.Right mouse click on the \app folder and add a new folder called \product.Right mouse click on this product folder and add a new HTML page calledproduct-list.component.html. Delete all the HTML in this new page and addthe single line below: h2 Product List /h2 Right mouse click on the product folder and add a new TypeScript file namedproduct-list.component.ts. Add the following code:import { Component } from "@angular/core";@Component({moduleId: module.id,templateUrl: "./product-list.component.html"})export class ProductListComponent { }Update the app.module.ts FileAdd the ProductListComponent class to the app.module.ts. Open theapp.module.ts file and add an import near the top of the file that looks like thefollowing.import { ProductListComponent }from "./product/product-list.component";In the @NgModule decorator, add the ProductListComponent class to thedeclarations property by adding a comma after AppComponent and typing inthe name of this class as shown below.12Add Angular to MVCCopyright 2017 by Fairway Technologies, Inc.All rights reserved worldwide. Reproduction is strictly prohibited.
Angular Routingdeclarations: [ AppComponent, ProductListComponent ]Angular RoutingNo Angular application would be complete without routing. Routing allows usto navigate from one page to another. The app.component.html page you justcreated is the main page for getting to other pages in our application via therouting engine. Add a new TypeScript file called app-routing.module.ts andadd the code shown in Listing 1.import { NgModule } from '@angular/core';import { RouterModule, Routes }from '@angular/router';import { ProductListComponent }from "./product/product-list.component";const routes: Routes [{path: 'productList',component: ProductListComponent},{path: 'Product/Product',redirectTo: 'productList'}];@NgModule({imports: [RouterModule.forRoot(routes)],exports: [RouterModule]})export class AppRoutingModule { }Listing 1: The routine class defines one or more routes for your application.The important part of the app-routing.module.ts file is the constant namedroutes. This constant contains an array of Route objects. Each object has apath property which is used in the routerLink attribute you created earlier. Ifthe path matches the address in the browser, then the component property isused to instantiate an instance of the object listed in this property. Once thisclass is instantiated, the HTML defined in that classes templateUrl property isinserted into the location where the router-outlet directive is located.Add Angular to MVCCopyright 2017 by Fairway Technologies, Inc.All rights reserved. Reproduction is strictly prohibited.13
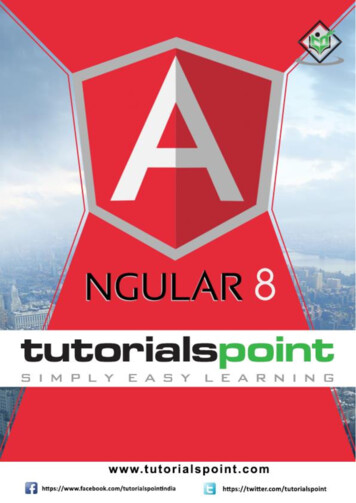
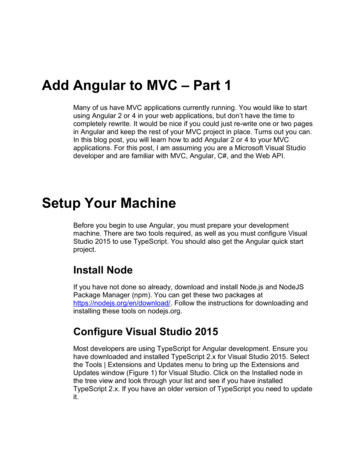
Add Angular to an MVC ApplicationThe routes constant is added to the singleton instance of the Router serviceusing the forRoot function. You can see this in the imports property of the@NgModule decorator. You can add as many routes to the routes constantas you need for your application.Overview of Angular RoutingWith all that description above, I thought a graphical representation (Figure 7)of the Angular routing you are using in this application might help clear thingsup a little.Figure 7: An overview of the Angular routing process.1. Anytime the browser address bar is updated via an anchor tag, or othermechanism, the last part of the address is matched up to one of the routesadded to the singleton instance of the Router service.2. Once it finds the path in the Router service, it instantiates the class listedin the component property.3. After the class is instantiated, the templateUrl property is read from the@Component decorator.4. The HTML from the file listed in the templateUrl property is loaded andinserted into the DOM at the location of the router-outlet directive.14Add Angular to MVCCopyright 2017 by Fairway Technologies, Inc.All rights reserved worldwide. Reproduction is strictly prohibited.
Angular RoutingUpdate the app.module.ts FileJust as you have done with all your other classes you created, you need todeclare your intention to use routing in the app.module.ts file. Open theapp.module.ts file and add the following import statement near the top of thefile.import { AppRoutingModule }from './app-routing.module';Add the AppRoutingModule to the imports property in the @NgModuledecorator. The imports property should now look like the following codesnippet.imports: [BrowserModule, AppRoutingModule ]Call our Angular page from the Product.cshtmlpageOpen the \Product\Product.cshtml page and delete all the code. Write thefollowing: my-app Loading products. /my-app Remember the my-app is the selector in the app.component.ts file. Whenthis selector is encountered, the Angular system kicks in and starts loadingour Angular components to run. You have now successfully removed yourselffrom the MVC system and are now running all client-side!Run the PageAt this point you should be able to run the page and see the h1 youentered. Your page should like Figure 8.Add Angular to MVCCopyright 2017 by Fairway Technologies, Inc.All rights reserved. Reproduction is strictly prohibited.15
Add Angular to an MVC ApplicationFigure 8: You have rerouted to an angular page from an MVC page.SummaryCongratulations! You have successfully integrated Angular into a VisualStudio MVC Application. There are a lot of steps to get Angular up andrunning, however, once you get the basics configured, adding new pages andnew components is quite easy because you use the same pattern youlearned in this post. In the next blog post, you add and call a Web API froman Angular service, and display the product data in an HTML page usingAngular.Sample CodeYou can download the code for this sample at www.pdsa.com/downloads.Choose the category “PDSA Blogs”, then locate the sample Add Angular toMVC - Part 1. To run the sample, locate the \SqlScripts\Product.sql file andrun the script in a SQL Server database. Open the Web.config file in the16Add Angular to MVCCopyright 2017 by Fairway Technologies, Inc.All rights reserved worldwide. Reproduction is strictly prohibited.
Sample Codeproject and update the connection string to point to your server and databasename.Add Angular to MVCCopyright 2017 by Fairway Technologies, Inc.All rights reserved. Reproduction is strictly prohibited.17
Add Angular to MVC - Part 1 Many of us have MVC applications currently running. You would like to start using Angular 2 or 4 in your web applications, but don't have the time to completely rewrite. It would be nice if you could just re-write one or two pages in Angular and keep the rest of your MVC project in place. Turns out you can.