Transcription
AWS IoT ExpressLinkSARA-R5 Starter KitGetting started guide for u-blox AWS IoT ExpressLinkSARA-R5 Starter KitGetting startedAbstractThis document describes how to begin working with the u-blox AWS IoT ExpressLink SARA-R5Starter Kit, which consists of a u-blox AWS IoT ExpressLink SARA-R5 module mounted on aSparkFun carrier board such that it can be used with a variety of microcontrollers or an attached PC.The u-blox AWS IoT ExpressLink SARA-R5 module provides communications over a cellular networkanywhere that LTE-M (also known as LTE Cat-M1) service is available and presents a simple-to-useAT interface designed to allow even resource-constrained microcontrollers to connect to AWS IoTCore.UBX-21042016 - R02C1-Publicwww.u-blox.com
AWS IoT ExpressLink SARA-R5 Starter Kit - Getting startedDocument informationTitleAWS IoT ExpressLink SARA-R5 Starter KitSubtitleGetting started guide for u-blox AWS IoT ExpressLink SARA-R5 Starter KitDocument typeGetting startedDocument numberUBX-21042016Revision and dateR02Disclosure restrictionC1-Public1-Dec-2021This document applies to the following products:Product nameu-blox AWS IoT ExpressLink SARA-R5 Starter Kitu-blox or third parties may hold intellectual property rights in the products, names, logos and designs included in thisdocument. Copying, reproduction, modification or disclosure to third parties of this document or any part thereof is onlypermitted with the express written permission of u-blox.The information contained herein is provided “as is” and u-blox assumes no liability for its use. No warranty, either express orimplied, is given, including but not limited to, with respect to the accuracy, correctness, reliability and fitness for a particularpurpose of the information. This document may be revised by u-blox at any time without notice. For the most recentdocuments, visit www.u-blox.com.Copyright u-blox AG.UBX-21042016 - R02C1-PublicDocument informationPage 2 of 20
AWS IoT ExpressLink SARA-R5 Starter Kit - Getting startedContentsDocument information . 2Contents . 31Overview . 42Hardware description . 42.1 Data sheet . 42.2 Standard kit contents . 52.3 User provided items . 52.4 Third party purchasable items . 53Set up your hardware . 53.1 Set up host machine. 54Setup your AWS account and permissions for IoT development . 65Registering AWS IoT ExpressLink SARA-R5 with your development account . 75.1 Setting up the module . 75.2 Registering with your AWS account . 85.3 Completion .136Connecting to and interacting with the AWS cloud . 146.1 Connecting .146.2 Sending data to the AWS cloud .146.3 Receiving data and commands from the AWS cloud .156.4 Exchanging Thing-specific data and commands with the AWS cloud .167Troubleshooting . 178Features supported . 18Related documentation . 19Revision history . 19Contact . 20UBX-21042016 - R02C1-PublicContentsPage 3 of 20
AWS IoT ExpressLink SARA-R5 Starter Kit - Getting started1OverviewThe u-blox AWS IoT ExpressLink SARA-R5 Starter Kit provides access to AWS IoT Core and AWS IoTservices over a cellular LTE-M (also known as LTE Cat M1) connection. The kit includes a u-blox AWSIoT ExpressLink SARA-R5 module mounted on a SparkFun MicroMod Asset Tracker Carrier Board intowhich a Sparkfun MicroMod processor board can be inserted, allowing the module to be used withmany different microprocessors. VERY IMPORTANT: you MUST complete the setup procedures of sections 3, 4, and 5 to configurethe endpoint connecting to your development account. The process used in this prototype versionis for the evaluation phase only and will be simplified in the commercial release. IMPORTANT: this starter kit is for evaluation purposes only; it is NOT suitable for production use.The module included in the kit has not been provisioned for commercial use and supports limitedfeatures. Please see section 8 for the supported features. PLEASE BE PATIENT: cellular is not like Wi-Fi, many radio bands must be searched, more than onenetwork might need to be tried, all before a connection to the AWS service can even be attempted.Please be patient, response times can be long, especially for commands such as AT CONNECT,AT SEND and AT DISCONNECT.2Hardware descriptionThis evaluation kit is based upon the standard SparkFun MicroMod Asset Tracker Carrier Board buthas the following critical differences: the SARA-R5 module mounted on the board is a SARA-R510S, not a SARA-R510M8S, and hencethe board (a) does NOT include GNSS functionality (and so is not provided with a GNSS antenna)and (b) does NOT power on automatically (see section 8 for the module power-on procedure),the SARA-R5 module mounted on the board is loaded with AWS IoT ExpressLink firmware andhence offers the AWS IoT ExpressLink AT interface and NOT the usual u-blox AT interface,because of the above, the example code provided by SparkFun does not apply; instead see theAWS IoT ExpressLink example code here: https://github.com/aws/iot-expresslink,the kit includes a Thingstream SIM card,the SIG INT (G5/bus 5/pin 73) signal of the MicroMod connector is connected to the GPIO3 pin ofthe SARA-R5 module.2.1 Data sheetThe product description for the u-blox AWS IoT ExpressLink SARA-R5 Starter Kit can be found on theproduct page of the Sparkfun website.Documentation for the u-blox SARA-R5 cellular module can be found on the SARA-R5 pages of theu-blox web site. All the information found there applies to the u-blox AWS IoT ExpressLink SARA-R5module except the AT command manual; the AWS IoT ExpressLink programmers manual replacesthe SARA-R5 AT command manual.The hardware (pins, voltages, timings, power-on procedure etc.) of the u-blox SARA-R5 module andthe u-blox AWS IoT ExpressLink SARA-R5 module is the same, with the following exceptions: the UART flow control lines, RTS and CTS, are NOT used,the EVENT pin, as defined by AWS IoT ExpressLink, is pin GPIO3 of the AWS IoT ExpressLink SARAR5 module and is available on the SARA INT (G5/bus 5/pin 73) signal of the MicroMod connectoron the board,the baud-rate of the UART is fixed at 115200.UBX-21042016 - R02C1-PublicOverviewPage 4 of 20
AWS IoT ExpressLink SARA-R5 Starter Kit - Getting started This means that the power-on procedure for the u-blox AWS IoT ExpressLink SARA-R5 module isNOT the AWS one, it is the original u-blox SARA-R5 one and there is no WAKE pin, see section 8.2.2 Standard kit contentsThis kit includes: the board with the SARA-R5 module,a cellular antenna,a Thingstream SIM card, which will have already been inserted into the board,an Asset Tracker Update Tool M.2 board.This is sufficient to allow you to use the u-blox AWS IoT ExpressLink SARA-R5 module from anattached PC via the USB-C interface. The SIM card includes 250 Mbytes of data transfer with the cellular network and after that mustbe discarded.Not covered in this getting started guide, but also included in this kit, is an ESP32 MicroMod boardthat can be plugged into the M.2 socket on the board, allowing you to experiment with driving themodule from a microcontroller; please refer to the ESP32 documentation for how to develop softwareusing the ESP32 chip.2.3 User provided itemsTo use the board via an attached PC, and to power it from USB, a USB-C cable is required.2.4 Third party purchasable itemsA variety of other SparkFun MicroMod processor boards, each carrying a different microcontroller(e.g. nRF5, STM32F4, Raspberry Pi Pico, etc.) are available to plug into the M.2 socket on the carrierboard to use the module directly.3Set up your hardwareSet up your hardware following the hook-up guide for the standard SparkFun MicroMod Asset TrackerCarrier Board, noting the differences described at the start of section 2.3.1 Set up host machineTo drive the u-blox AWS IoT ExpressLink SARA-R5 Starter Kit from an attached host machine, whichis ESSENTIAL during setup, you must plug the provided Asset Tracker Update Tool into the M.2socket on the carrier board.On the host machine you must install the drivers for the CH340 USB to UART bridge.UBX-21042016 - R02C1-PublicSet up your hardwarePage 5 of 20
AWS IoT ExpressLink SARA-R5 Starter Kit - Getting startedOpen a terminal application on your host machine (e.g., TeraTerm or Docklight for Windows orCoolTerm for Mac) and select the port corresponding to the evaluation kit. Configure the terminalapplication as follows – and take special note of the first three items: End of line:Local echo:Flow control:Baud rate:Bits:Parity:Stop:line feed (i.e. 0x0a, not 0x0d)yesnone1152008none1u-blox m-center and tools such as PuTTY will NOT work with the u-blox AWS IoT ExpressLinkSARA-R5 module since those tools use carriage return as a line ending when sending to themodule, not line feed.For a quick check, turn the cellular module on by pressing the “SARA On” button on the carrier boardfor around one second. Your terminal window should show the welcome message Welcome to u-bloxAWS IoT ExpressLink SARA-R5 from the cellular module1. In the terminal window type AT and press return . If you receive the answer OK, congratulations! You have successfully connected theevaluation kit to your host machine.Keep the terminal application open and connected, as it is needed for the subsequent steps.4Setup your AWS account and permissions forIoT developmentRefer to the instructions at Set up your AWS Account. Follow the steps outlined at that link to: sign up for an AWS account,create a user and grant permissions,open the AWS IoT console.Pay special attention to the notes.1One or two unprintable characters may appear before the welcome message; these are part of the module boot sequence andcan be ignored.UBX-21042016 - R02C1-PublicSetup your AWS account and permissions for IoT developmentPage 6 of 20
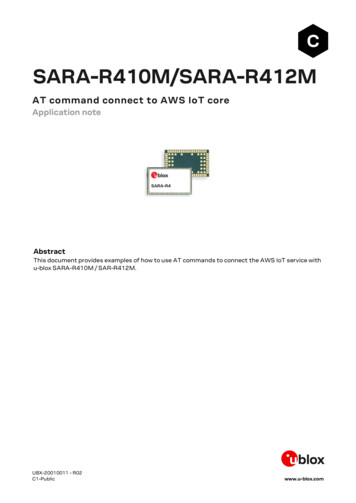
AWS IoT ExpressLink SARA-R5 Starter Kit - Getting started5Registering AWS IoT ExpressLink SARA-R5with your development account5.1 Setting up the moduleBefore a cellular module can be registered with your development account for the first time, it musthave registered with the cellular network for the first time. Ensure that: the provided Thingstream SIM is inserted in the board,a cellular antenna is connected to the antenna connector marked “LTE”,you are in range of a cellular network that supports LTE-M,the board is connected to a host machine using the USB-C connection,a serial terminal application configured as specified in section 3.1 is running on the host machine.Then a “dummy” CONNECT is performed as in the following steps:1.In the AWS IoT Console, choose Settings (bottom left of the navigation bar) and copy youraccount “Endpoint” string from “Device data endpoint”.2.Press the “SARA On” button on the carrier board for around one second to power the cellularmodule on; the white “On” LED should light.UBX-21042016 - R02C1-PublicRegistering AWS IoT ExpressLink SARA-R5 with your development accountPage 7 of 20
AWS IoT ExpressLink SARA-R5 Starter Kit - Getting startedAfter a short while, in your terminal application the text Welcome to u-blox AWS IoT ExpressLinkSARA-R5 should appear.3. In the terminal application type the command AT CONF EndPoint your endpoint string fromstep 1 here and press return .The configuration parameter name EndPoint is case sensitive.You should get OK back.4.In the terminal application, type the command AT CONNECT and press return . This will takea long time and should fail. The **exact expected** response is ERR14 UNABLE TO CONNECTCertificate generation completed. Proceed to register device with AWS cloud and then try toconnect again. On this very first cellular connection the module may take some considerable time to find LTE-Mnetwork service; many minutes, up to 15 minutes. This is because the device does not yet knowthe radio environment and must search all of the global LTE-M RF bands on each visible cellularnetwork. Connections should be quicker on subsequent attempts as the module will rememberhow it gained service previously. If you get an error response that is different than the one shown above (e.g., just ERR14 UNABLETO CONNECT), then the cellular connection has not been successful, and you should try again.See section 7 for troubleshooting advice.With these steps completed, the cellular module has in fact successfully connected to the cellularnetwork for the first time and registered with the necessary u-blox servers to create the certificatesyou will need to register it with your AWS account in the next steps (after which you should get OK 1CONNECTED back to your AT CONNECT attempts). Please proceed to section 5.2.5.2 Registering with your AWS accountTo create an IoT Thing and add it to your account, you will need to retrieve the u-blox AWS IoTExpressLink SARA-R5 module ThingName and its corresponding certificate. Please follow the stepsbelow.1. Open the AWS IoT Console. Select Manage then select Things.UBX-21042016 - R02C1-PublicRegistering AWS IoT ExpressLink SARA-R5 with your development accountPage 8 of 20
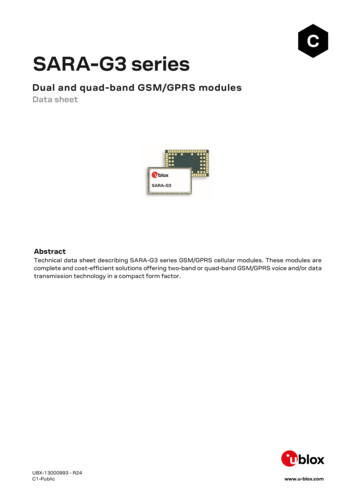
AWS IoT ExpressLink SARA-R5 Starter Kit - Getting started2.Click Create things, select Create single thing and click Next.3.With the u-blox AWS IoT ExpressLink SARA-R5 module still switched on, In the terminalapplication type the command AT CONF? ThingName and press return . 4.The configuration parameter name ThingName is case sensitive.Copy the sequence of numeric characters (i.e., the equivalent of “357862090000000” in theimage above) from the terminal. On the Specify thing properties page, paste the copied stringfrom the terminal into the Thing name under Thing properties in the console. Leave the otherfields as default, then click Next.UBX-21042016 - R02C1-PublicRegistering AWS IoT ExpressLink SARA-R5 with your development accountPage 9 of 20
AWS IoT ExpressLink SARA-R5 Starter Kit - Getting started5. In the terminal application type the command AT CONF? Certificate and press return .You must use the name Certificate and NOT the more recently introduced Certificate pem, whichis not supported/necessary in this release.6.Copy the returned string, including -----BEGIN CERTIFICATE----- and -----END CERTIFICATE---- but not including the line beginning with OK, into a text file on your host machine named“ThingName.cert.pem”.7.On the Configure device certificate page, select Use my certificate and choose CA is notregistered with AWS IoT.UBX-21042016 - R02C1-PublicRegistering AWS IoT ExpressLink SARA-R5 with your development accountPage 10 of 20
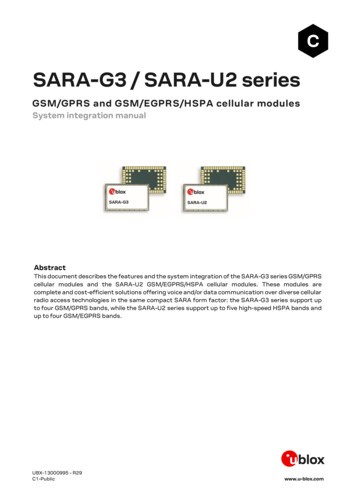
AWS IoT ExpressLink SARA-R5 Starter Kit - Getting started8.Under Certificate, select Choose file and upload the file “ThingName.cert.pem” from step 6.9.Under Certificate status, select Active and click Next.10. Click Create policy and a new browser tab will open:UBX-21042016 - R02C1-PublicRegistering AWS IoT ExpressLink SARA-R5 with your development accountPage 11 of 20
AWS IoT ExpressLink SARA-R5 Starter Kit - Getting started11. Type in a policy name of your choosing (e.g., “IoTDevPolicy”) and click Advanced mode.12. Replace the contents of the black console area that appears with the single line of text below:{ "Version": "2012-10-17", "Statement": [ { "Effect": "Allow", "Action": "*","Resource": "*" } ] } then click Create to create the policy. Note: the examples in this document are intended only for development environments. All devicesin your fleet must have credentials with privileges that authorize only intended actions on specificresources. The specific permission policies can vary for your use case. Identify the permissionpolicies that best meet your business and security requirements. For more information refer toExample IoT Policies and Security Best Practices.UBX-21042016 - R02C1-PublicRegistering AWS IoT ExpressLink SARA-R5 with your development accountPage 12 of 20
AWS IoT ExpressLink SARA-R5 Starter Kit - Getting started13. Return to the original browser tab, select the policy you just created (you can close the policycreation tab now) and click Create thing to complete your Thing creation.14. Congratulations! You have successfully created a new Thing in your AWS account.15. Return to the terminal application, type the command AT CONNECT once more and press return . After a short while you should receive the response OK 1 CONNECTED.Congratulations! You have successfully connected to your AWS cloud account.16. To close the connection, type the command AT DISCONNECT in the terminal application andpress return . After a short while you should receive the response OK 0 DISCONNECTED.5.3 CompletionCongratulations! You have completed the registration of the evaluation kit as a Thing in your IoTaccount. You will not need to repeat these steps the next time you connect, as the u-blox AWS IoTExpressLink SARA-R5 module will remember its configuration and will be ready to connect to yourAWS account automatically.UBX-21042016 - R02C1-PublicRegistering AWS IoT ExpressLink SARA-R5 with your development accountPage 13 of 20
AWS IoT ExpressLink SARA-R5 Starter Kit - Getting started6Connecting to and interacting with the AWScloudWe will use the MQTT client in the AWS IoT console to help us monitor the communication betweenyour evaluation kit and the AWS Cloud.1. Navigate to the AWS IoT console and select Test from the navigation pane to open the MQTT testclient.2.In Subscribe to a topic, enter # as the Topic filter and then click Subscribe.6.1 ConnectingWith the u-blox AWS IoT ExpressLink SARA-R5 module switched on, in the terminal application,establish a secure connection by typing the command AT CONNECT and pressing return .After a while, you should receive the response OK 1 CONNECTED. Some cellular networks will refuse service to a device for a “guard time” (e.g., 1 hour) if the deviceis seen to connect and disconnect [again] more than a handful of times in quick succession;frequent connections/disconnections should be avoided.6.2 Sending data to the AWS cloudTo send a “Hello World!” message, in the terminal application type the command AT SEND data HelloWorld! and press return .UBX-21042016 - R02C1-PublicConnecting to and interacting with the AWS cloudPage 14 of 20
AWS IoT ExpressLink SARA-R5 Starter Kit - Getting startedAfter a short while, you should receive the response OK.You should see the Hello World! message appear on the AWS IoT console under the topic data. In poor coverage conditions there may be up to a 30 second delay between the message arrivingin the AWS IoT console and OK being returned in the terminal application.6.3 Receiving data and commands from the AWS cloudTo receive messages on your device, in the terminal application type the command AT CONFTopic1 /MyTopic and press return .You should receive the response OK. The AT CONF TopicX command is NOT persistent across power-cycles of the device.Next, type the command AT SUBSCRIBE1 and press return ; you should receive the response OK. You must re-subscribe after an AT DISCONNECT or after powering-down the module.From the AWS IoT console MQTT test client, select Publish to a topic, type /MyTopic into the Topicname field (replacing the # that was there), under Message payload enter Hello from the AWS IoTconsole and then click Publish.UBX-21042016 - R02C1-PublicConnecting to and interacting with the AWS cloudPage 15 of 20
AWS IoT ExpressLink SARA-R5 Starter Kit - Getting startedWait for a handful of seconds for the message to arrive at the device (or monitor the EVENT pin) andthen, in the terminal application, type the command AT GET1 and press return .You should receive the response OK Hello from AWS IoT console.6.4 Exchanging Thing-specific data and commands with theAWS cloudIf you leave the leading / off the topic name then the TopicRoot, which defaults to the ThingName,will automatically be prepended to the subscription.For instance, if you typed the command AT CONF Topic2 MyTopic (i.e., leaving off the leading /) andpressed return , then subscribed to that topic by typing the command AT SUBSCRIBE2 andpressing return : then in the AWS IoT console MQTT test client, under Publish to a topic, you typed/ThingName/MyTopic into the Topic name field and, under Message payload, entered Hello just toThingName (or any message you like) and then clicked Publish: and then a few seconds later, in the terminal application, you typed the command AT GET2 andpressed return , you should receive the response OK Hello just to ThingName.You can also send to a TopicX using the command AT SENDx message ; if that TopicX does notstart with a leading / then your entire send/get exchange will automatically occur beneath the uniqueThingName of this device.UBX-21042016 - R02C1-PublicConnecting to and interacting with the AWS cloudPage 16 of 20
AWS IoT ExpressLink SARA-R5 Starter Kit - Getting started7TroubleshootingProblemActionNo lights come on.Ensure power is supplied to the board, e.g., via the USB-C connector.No welcome message is displayed when anAT terminal application is attached to theboard.Check that the white LED marked “On” is illuminated; the cellular module doesNOT come on automatically when the board is powered, you must press the“SARA On” button for around one second to power the module on.Also make sure that the baud rate of your terminal application is set to 115200.I don’t see anything in the terminalapplication when I type in it.The AWS IoT ExpressLink specification does not include echoing of receivedcharacters, which is normal for a “machine”-oriented interface; when typing incommands manually, please set “local echo” on in your terminal application sothat you can see what you’re doing.I can’t use backspace or delete or the cursor The AWS IoT ExpressLink specification does not support use of editing keys; itkeys to edit my AT commands when typing is meant to be used by a microcontroller, another machine, which would have noin the terminal application.use for editing keys. If you find this irritating when typing in commandsmanually, then you should find a terminal application that holds the entirecommand string locally, in the application, allowing you to edit it, and only sendsthe command string once return is pressed.No response is received to any ATcommands typed in the terminalapplication.Make sure that the baud rate of your terminal application is set to 115200 andthat AT commands are formed exactly as defined in the AWS IoT ExpressLinkprogrammers manual: the line ending must be line feed (0x0a); carriage return(0x0d) and carriage return followed by line feed (0x0d 0a) cannot be used.The AT command CONNECT does not work. Make sure that the supplied SIM card is inserted in the board, an antenna isconnected to the antenna socket on the board (the one marked “LTE”, not theGNSS one) and that you are within range of a cellular network that providesLTE-M coverage.Make sure that you have followed the registration procedure of section 5,including registering your device in your AWS account; the connection is to theendpoint of the device in that account (not just the cellular network) and so itcannot succeed until all of the registration steps have been completed.If CONNECT has worked in the past but is now failing in the same location andafter using the device for some while, it may be that the cellular network hasdecided to refuse service for a “guard time” (e.g. 1 hour) because the device hasconnected and disconnected [again] more than a handful of times in quicksuccession; unfortunately there is nothing that can be done about this (otherthan avoiding many connections/disconnections), it is a network “feature”.The AT command SEND returns OK evenwhen I have disconnected the cellularantenna and so I am plainly not in coverage.Messages are queued until it is possible to send them; if you reconnect thecellular antenna, you should find that the messages will be successfullypublished. If you do not do so, or you disconnect or reset the device, the queuedmessages will be lost.Setting a topic with the AT command CONF While a topic is subscribed-to it cannot be modified; please use the AT commandTopicX (where X is 1 to 16) returns an error. UNSUBSCRIBEX to unsubscribe from topic X before modifying it.The AT commands CONFMODE, OTA,HOTA and WHERE do not work.These AT commands are not supported in this preview release.Some parameters to the CONF command do Only parameters that are relevant to a cellular device, and are not required onlynot work.by OTA or HOTA, are supported; see section 8 for a full list.Issuing the SLEEP AT command does notIn this preview release the SLEEP command is accepted for compatibilityreduce the power consumption of the board. purposes but does not actually put any hardware into a low power state.The AT command TIME? does not work.You must be connected to the cellular network to obtain the time. If the problemhappens when you are connected, then the cellular network you are using doesnot support reporting of time to the mobile terminal (the feature is optional inthe network).Some downlink messages from the serverare going missing.Make sure that no downlink message exceeds 2048 bytes in size; in this releaseany downlink message larger than 2048 bytes in size will be silently discarded.Messages larger than around 512 bytes insize cannot be sent.The maximum AT command length in this release is 512 bytes and hence thislimits the maximum length of MQTT message that can be sent.UBX-21042016 - R02C1-PublicTroubleshootingPage 17 of 20
AWS IoT ExpressLink SARA-R5 Starter Kit - Getting started8Features supportedThe firmware provided on the u-blox AWS IoT ExpressLink SARA-R5 module in this evaluation kit is apreview release and hence it does NOT support all the features of the AWS IoT ExpressLink commandset. The following commands are supported:CONNECT, DISCONNECT, SLEEP2, RESET, FACTORY RESET, SEND3, GET4, SUBSCRIBE,UNSUBSCRIBE, CONF, EVENT, DIAG, TIME5.For the avoidance of doubt, the following commands are not currently supported:CONFMODE, OTA, HOTA, WHERE. OTA of the module is supported but only through u-blox uFOTA since it must work within theconstraints applied by the cellular network operators.For the CONF command, only the following parameters are supported:About, Version, ThingName, Certificate (without pem after it), EndPoint, APN, TopicRoot, TopicX(where X is 1 to 16, i.e., MaxTopic is 16). The power-on behavior of the module is defined by the underlying SARA-R5 HW, i.e. the moduledoes not power on until the PWR ON pin is asserted for 1 second and then released, see the u-bloxSARA-R5 data sheet for more details; the pin MUST be released as if it is held for more than16 seconds an emergency restart of the module will be performed. On the SparkFun MicroModAsset Tracker board a “SARA On” button is provided which will assert the PWR ON pin whilepressed. The PWR ON pin is a toggle, i.e., if it is asserted for 1 second and then released while the module ispowered on then the module will power off again. It is ALWAYS a good idea to power the moduleoff in this way before physically removing power. From the perspective of the SARA-R5 module, “asserted” means “pulled low” but the SparkFunMicroMod Asset Tracker Carrier Board includes an inverter in the line and hence, f
SparkFun carrier board such that it can be used with a variety of microcontrollers or an attached PC. The u-blox AWS IoT ExpressLink SARA-R5 module provides communications over a cellular network anywhere that LTE-M (also known as LTE Cat-M1) service is available and presents a simple-to-use