Transcription
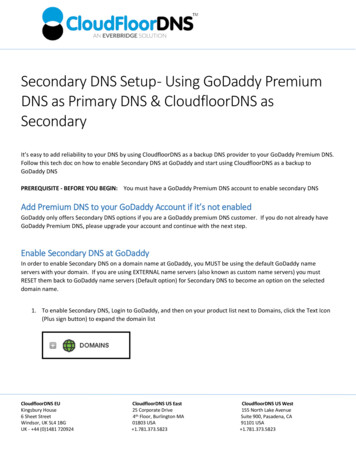
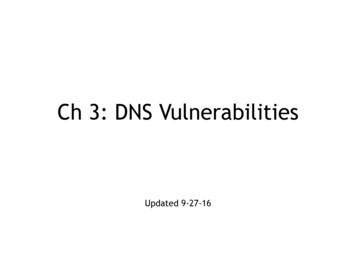
SEED Labs – Local DNS Attack Lab1Local DNS Attack LabCopyright 2018 - 2020 by Wenliang Du.This work is licensed under a Creative Commons Attribution-NonCommercial-ShareAlike 4.0 InternationalLicense. If you remix, transform, or build upon the material, this copyright notice must be left intact, orreproduced in a way that is reasonable to the medium in which the work is being re-published.1Lab OverviewDNS (Domain Name System) is the Internet’s phone book; it translates hostnames to IP addresses (and viceversa). This translation is through DNS resolution, which happens behind the scene. DNS attacks manipulate this resolution process in various ways, with an intent to misdirect users to alternative destinations,which are often malicious. The objective of this lab is to understand how such attacks work. Students willfirst set up and configure a DNS server, and then they will try various DNS attacks on the target that is alsowithin the lab environment.The difficulties of attacking local victims versus remote DNS servers are quite different. Therefore, wehave developed two labs, one focusing on local DNS attacks, and the other on remote DNS attack. This labfocuses on local attacks. This lab covers the following topics: DNS and how it worksDNS server setupDNS cache poisoning attackSpoofing DNS responsesPacket sniffing and spoofingThe Scapy toolReadings and videos. Detailed coverage of the DNS protocol and attacks can be found in the following: Chapter 18 of the SEED Book, Computer & Internet Security: A Hands-on Approach, 2nd Edition,by Wenliang Du. See details at https://www.handsonsecurity.net. Section 7 of the SEED Lecture, Internet Security: A Hands-on Approach, by Wenliang Du. See detailsat https://www.handsonsecurity.net/video.html.Lab environment. This lab has been tested on the SEED Ubuntu 20.04 VM. You can download a pre-builtimage from the SEED website, and run the SEED VM on your own computer. However, most of the SEEDlabs can be conducted on the cloud, and you can follow our instruction to create a SEED VM on the cloud.2Lab Environment Setup TaskThe main target for DNS cache poisoning attacks is local DNS server. Obviously, it is illegal to attack a realserver, so we need to set up our own DNS server to conduct the attack experiments. The lab environmentneeds four separate machines: one for the victim, one for the local DNS server, and two for the attacker.The lab environment setup is illustrated in Figure 1. This lab focuses on the local attack, so we put all thesemachines on the same LAN.
SEED Labs – Local DNS Attack work 10.9.0.0/24 Attacker10.9.0.1User10.9.0.5 Local DNS Server10.9.0.53 Attacker’s Nameserver10.9.0.153(zone: attacker32.com)Figure 1: Lab environment setup2.1Container Setup and CommandsPlease download the Labsetup.zip file to your VM from the lab’s website, unzip it, enter the Labsetupfolder, and use the docker-compose.yml file to set up the lab environment. Detailed explanation of thecontent in this file and all the involved Dockerfile can be found from the user manual, which is linkedto the website of this lab. If this is the first time you set up a SEED lab environment using containers, it isvery important that you read the user manual.In the following, we list some of the commonly used commands related to Docker and Compose. Sincewe are going to use these commands very frequently, we have created aliases for them in the .bashrc file(in our provided SEEDUbuntu 20.04 VM). docker-compose build docker-compose up docker-compose down# Build the container image# Start the container# Shut down the container// Aliases for the Compose commands above dcbuild# Alias for: docker-compose build dcup# Alias for: docker-compose up dcdown# Alias for: docker-compose downAll the containers will be running in the background. To run commands on a container, we often needto get a shell on that container. We first need to use the "docker ps" command to find out the ID ofthe container, and then use "docker exec" to start a shell on that container. We have created aliases forthem in the .bashrc file. dockps docksh id // Alias for: docker ps --format "{{.ID}} {{.Names}}"// Alias for: docker exec -it id /bin/bash// The following example shows how to get a shell inside hostC dockpsb1004832e275 hostA-10.9.0.50af4ea7a3e2e hostB-10.9.0.6
SEED Labs – Local DNS Attack Lab9652715c8e0a3hostC-10.9.0.7 docksh 96root@9652715c8e0a:/#// Note: If a docker command requires a container ID, you do not need to//type the entire ID string. Typing the first few characters will//be sufficient, as long as they are unique among all the containers.If you encounter problems when setting up the lab environment, please read the “Common Problems”section of the manual for potential solutions.2.2About the Attacker ContainerIn this lab, we can either use the VM or the attacker container as the attacker machine. If you look atthe Docker Compose file, you will see that the attacker container is configured differently from the othercontainers. Shared folder. When we use the attacker container to launch attacks, we need to put the attackingcode inside the attacker container. Code editing is more convenient inside the VM than in containers,because we can use our favorite editors. In order for the VM and container to share files, we havecreated a shared folder between the VM and the container using the Docker volumes. If you lookat the Docker Compose file, you will find out that we have added the following entry to some of thecontainers. It indicates mounting the ./volumes folder on the host machine (i.e., the VM) to the/volumes folder inside the container. We will write our code in the ./volumes folder (on theVM), so they can be used inside the containers.volumes:- ./volumes:/volumes Host mode. In this lab, the attacker needs to be able to sniff packets, but running sniffer programsinside a container has problems, because a container is effectively attached to a virtual switch, so itcan only see its own traffic, and it is never going to see the packets among other containers. To solvethis problem, we use the host mode for the attacker container. This allows the attacker container tosee all the traffics. The following entry used on the attacker container:network mode: hostWhen a container is in the host mode, it sees all the host’s network interfaces, and it even has thesame IP addresses as the host. Basically, it is put in the same network namespace as the host VM.However, the container is still a separate machine, because its other namespaces are still differentfrom the host.2.3Summary of the DNS ConfigurationAll the containers are already configured for this lab. We provide a summary here, so students are aware ofthese configurations. Detailed explanation of the configuration can be found from the manual.Local DNS Server. We run the BIND 9 DNS server program on the local DNS server. BIND 9 gets itsconfiguration from a file called /etc/bind/named.conf. This file is the primary configuration file, and
SEED Labs – Local DNS Attack Lab4it usually contains several "include" entries, i.e., the actual configurations are stored in those includedfiles. One of the included files is called /etc/bind/named.conf.options. This is where the actualconfiguration is set. Simplification. DNS servers now randomize the source port number in their DNS queries; this makesthe attacks much more difficult. Unfortunately, many DNS servers still use predictable source portnumber. For the sake of simplicity in this lab, we fix the source port number to 33333 in the configuration file. Turning off DNSSEC. DNSSEC is introduced to protect against spoofing attacks on DNS servers. Toshow how attacks work without this protection mechanism, we have turned off the protection in theconfiguration file. DNS cache. During the attack, we need to inspect the DNS cache on the local DNS server. Thefollowing two commands are related to DNS cache. The first command dumps the content of thecache to the file /var/cache/bind/dump.db, and the second command clears the cache.# rndc dumpdb -cache# rndc flush// Dump the cache to the specified file// Flush the DNS cache Forwarding the attacker32.com zone. A forward zone is added to the local DNS server, soif anybody queries the attacker32.com domain, the query will be forwarded to this domain’snameserver, which is hosted in the attacker container. The zone entry is put inside the named.conffile.zone "attacker32.com" {type forward;forwarders {10.9.0.153;};};User machine. The user container 10.9.0.5 is already configured to use 10.9.0.53 as its local DNSserver. This is achieved by changing the resolver configuration file (/etc/resolv.conf) of the usermachine, so the server 10.9.0.53 is added as the first nameserver entry in the file, i.e., this server willbe used as the primary DNS server.Attacker’s Nameserver. On the attacker’s nameserver, we host two zones. One is the attacker’s legitimatezone attacker32.com, and the other is the fake example.com zone. The zones are configured in/etc/bind/named.conf:zone "attacker32.com" {type master;file "/etc/bind/attacker32.com.zone";};zone "example.com" {type master;file "/etc/bind/example.com.zone";};
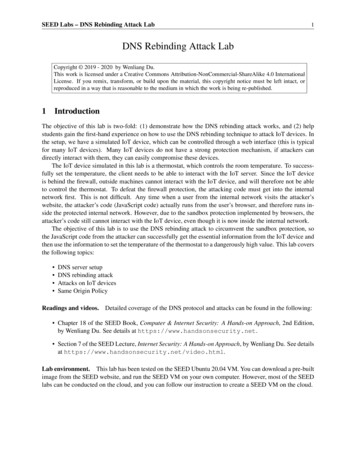
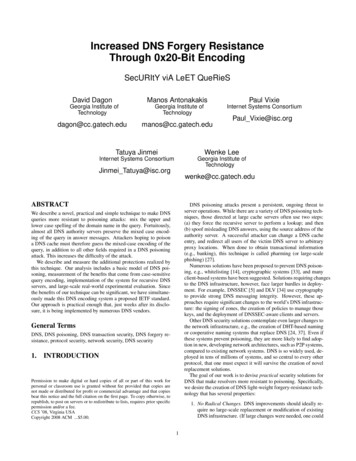
SEED Labs – Local DNS Attack Lab2.45Testing the DNS SetupFrom the User container, we will run a series of commands to ensure that our lab setup is correct. In yourlab report, please document your testing results.Get the IP address of ns.attacker32.com. When we run the following dig command, the local DNS server will forward the request to the Attacker nameserver due to the forward zone entryadded to the local DNS server’s configuration file. Therefore, the answer should come from the zone file(attacker32.com.zone) that we set up on the Attacker nameserver. If this is not what you get, yoursetup has issues. Please describe your observation in your lab report. dig ns.attacker32.comGet the IP address of www.example.com. Two nameservers are now hosting the example.comdomain, one is the domain’s official nameserver, and the other is the Attacker container. We will query thesetwo nameservers and see what response we will get. Please run the following two commands (from the Usermachine), and describe your observation.// Send the query to our local DNS server, which will send the query// to example.com’s official nameserver. dig www.example.com// Send the query directly to ns.attacker32.com dig @ns.attacker32.com www.example.comObviously, nobody is going to ask ns.attacker32.com for the IP address of www.example.com;they will always ask the example.com domain’s official nameserver for answers. The objective of theDNS cache poisoning attack is to get the victims to ask ns.attacker32.com for the IP address ofwww.example.com. Namely, if our attack is successful, if we just run the first dig command, the onewithout the @ option, we should get the fake result from the attacker, instead of getting the authentic onefrom the domain’s legitimate nameserver.3The Attack TasksThe main objective of DNS attacks on a user is to redirect the user to another machine B when the user triesto get to machine A using A’s host name. For example, when the user tries to access the online banking, ifthe adversaries can redirect the user to a malicious web site that looks very much like the main web site ofbank, the user might be fooled and give away password of his/her online banking account.3.1Task 1: Directly Spoofing Response to UserWhen a user types the name of a web site (a host name, such as www.example.com) in a web browser,the user’s computer will send a DNS request to the local DNS server to resolve the IP address of the hostname. Attackers can sniff the DNS request message, they can then immediately create a fake DNS response,and send back to the user machine. If the fake reply arrives earlier than the real reply, it will be accepted bythe user machine. See Figure 2).Please write a program to launch such an attack. A code skeleton is provided in the following. Section 4has an example showing how to create a DNS packet that includes various types of records. Detailedguidelines are provided in the SEED book.
SEED Labs – Local DNS Attack Lab6DNS QueryDNS QueryUser MachinesLocal DNS ServerGlobal DNS servers onthe InternetAttackerAttackerLANFigure 2: Local DNS Poisoning Attack#!/usr/bin/env python3from scapy.all import *import sysNS NAME "example.com"def spoof dns(pkt):if (DNS in pkt and NS NAME in printf("{DNS: %IP.src% -- %IP.dst%: %DNS.id%}"))ip IP(.)udp UDP(.)Anssec DNSRR(.)dns DNS(.)spoofpkt ip/udp/dnssend(spoofpkt)#####Create an IP objectCreate a UPD objectCreate an aswer recordCreate a DNS objectAssemble the spoofed DNS packetmyFilter "."# Set the filterpkt sniff(iface ’br-43d947d991eb’, filter myFilter, prn spoof dns)It should be noted that in the code above, the value (highlighted) for the iface argument should bereplaced with the actual interface name for the 10.9.0.0/24 network.While the attack program is running, on the user machine, you can run dig command on behalf of theuser. This command triggers the user machine to send out a DNS query to the local DNS server, whichwill eventually send out a DNS query to the authoritative nameserver of the example.com domain (if thecache does not contain the answer). If your attack is successful, you should be able to see your spoofedinformation in the reply. Compare your results obtained before and after the attack.Before launching the attack, make sure that the cache in the local DNS server is cleaned. If the cachehas the answer, the reply from the local DNS server will be faster than the one you spoofed, and your attackwill not be able to succeed.
SEED Labs – Local DNS Attack Lab7A potential issue. When we do this lab using containers, sometimes (not always) we saw a very strangesituation. The sniffing and spoofing inside containers is very slow, and our spoofed packets even arrive laterthan the legitimate one from the Internet, even though we are local. In the past, when we use VMs for thislab, we never had this issue. We have not figured out the cause of this performance issue yet (if you haveany insight on this issue, please let us know).If you do encouter this strange situation, we can get around it. We intentionally slow down the trafficgoing to the outside, so the authentic replies will not come that fast. This can be done using the followingtc command on the router to add some delay to the outgoing network traffic. The router has two interfaces,eth0 and eth1, make sure use the one connected to the external network 10.8.0.0/24.// Delay the network traffic by 100ms# tc qdisc add dev eth0 root netem delay 100ms// Delete the tc entry# tc qdisc del dev eth0 root netem// Show all the tc entries# tc qdisc show dev eth0You can keep the tc entry on for this entire lab, because all the tasks will face a similar situation.3.2Task 2: DNS Cache Poisoning Attack – Spoofing AnswersThe above attack targets the user’s machine. In order to achieve long-lasting effect, every time the user’smachine sends out a DNS query for www.example.com the attacker’s machine must send out a spoofedDNS response. This might not be so efficient; there is a much better way to conduct attacks by targeting theDNS server, instead of the user’s machine.When a local DNS server receives a query, it first looks for the answer from its own cache; if the answeris there, the DNS server will simply reply with the information from its cache. If the answer is not in thecache, the DNS server will try to get the answer from other DNS servers. When it gets the answer, it willstore the answer in the cache, so next time, there is no need to ask other DNS servers. See Figure 2.Therefore, if attackers can spoof the response from other DNS servers, the local DNS server will keepthe spoofed response in its cache for certain period of time. Next time, when a user’s machine wants toresolve the same host name, it will get the spoofed response from the cache. This way, attackers only needto spoof once, and the impact will last until the cached information expires. This attack is called DNS cachepoisoning.Please modify the program used in the previous task for this attack. Before attacking, make sure that theDNS Server’s cache is empty. You can flush the cache using the following command:# rndc flushYou can inspect the cache on the local DNS server to see whether it is poisoned or not. The followingcommands first dump the cache into a file, and then display the content of the cache file.# rndc dumpdb -cache# cat /var/cache/bind/dump.db
SEED Labs – Local DNS Attack Lab3.38Task 3: Spoofing NS RecordsIn the previous task, our DNS cache poisoning attack only affects one hostname, i.e., www.example.com.If users try to get the IP address of another hostname, such as mail.example.com, we need to launchthe attack again. It will be more efficient if we launch one attack that can affect the entire example.comdomain.The idea is to use the Authority section in DNS replies. Basically, when we spoofed a reply, in additionto spoofing the answer (in the Answer section), we add the following in the Authority section. When thisentry is cached by the local DNS server, ns.attacker32.com will be used as the nameserver for futurequeries of any hostname in the example.com domain. Since ns.attacker32.com is controlled byattackers, it can provide a forged answer for any query. The IP address of this machine is 10.9.0.153 inour setup.;; AUTHORITY ease add a spoofed NS record in your attack code, and launch the attack. Section 4 has an exampleshowing how to include an NS record in a DNS response packet. Detailed guidelines are provided in theSEED book. Before doing the attack, please remember to clear the cache on the local DNS server first. Ifyour attack is successful, when you run the dig command on the user machine for any hostname in theexample.com domain, you will get the fake IP address provided by ns.attacker32.com. Pleasealso check the cache on the local DNS server and see whether the spoofed NS record is in the cache or not.3.4Task 4: Spoofing NS Records for Another DomainIn the previous attack, we successfully poison the cache of the local DNS server, so ns.attacker32.combecomes the nameserver for the example.com domain. Inspired by this success, we would like to extendits impact to other domain. Namely, in the spoofed response triggered by a query for www.example.com,we would like to add additional entry in the Authority section (see the following), so ns.attacker32.com is also used as the nameserver for google.com.;; AUTHORITY Sns.attacker32.com.ns.attacker32.com.Please modify your attack code slightly to launch the above attack on your local DNS server. After theattack, check the DNS cache and see which record is cached. Please describe and explain your observation.It should be noted that the query that we are attacking is still the query to example.com, not one togoogle.com.3.5Task 5: Spoofing Records in the Additional SectionIn DNS replies, there is section called Additional Section, which is used to provide additional information.In practice, it is mainly used to provide IP addresses for some hostnames, especially for those appearing inthe Authority section. The goal of this task is to spoof some entries in this section and see whether theywill be successfully cached by the target local DNS server. In particular, when responding to the query forwww.example.com, we add the following entries in the spoofed reply, in addition to the entries in theAnswer section:;; AUTHORITY SECTION:example.com.259200INNSns.attacker32.com.
SEED Labs – Local DNS Attack Lab9example.com.259200INNSns.example.com.;; ADDITIONAL .4.5.6ÀÁÂEntries À and Á are related to the hostnames in the Authority section. Entry  is completely irrelevantto any entry in the reply, but it provides a “gracious” help to users, so they do not need to look up for the IPaddress of Facebook. Please use Scapy to spoof such a DNS reply. Your job is to report what entries will besuccessfully cached, and what entries will not be cached; please explain why.3.6What’s NextIn the DNS cache poisoning attack of this lab, we assume that the attacker and the DNS server are on thesame LAN, i.e., the attacker can observe the DNS query message. When the attacker and the DNS serverare not on the same LAN, the cache poisoning attack becomes much more challenging. If you are interestedin taking on such a challenge, you can try our “Remote DNS Attack Lab”.4GuidelineYou need to use Scapy for several tasks in this lab. The following sample code shows how to sniff a DNSquery and then spoof a DNS reply, which contains a record in the Answer section, two records in the Authority section and two records in the Additional section. The code is already included in the Labsetup.zipfile (inside the volumes folder).Listing 1: Sample code: dns sniff spoof.py#!/usr/bin/env python3from scapy.all import *def spoof dns(pkt):if (DNS in pkt and ’www.example.net’ in pkt[DNS].qd.qname.decode(’utf-8’)):# Swap the source and destination IP addressIPpkt IP(dst pkt[IP].src, src pkt[IP].dst)# Swap the source and destination port numberUDPpkt UDP(dport pkt[UDP].sport, sport 53)# The Answer SectionAnssec DNSRR(rrname pkt[DNS].qd.qname, type ’A’,ttl 259200, rdata ’10.0.2.5’)# The Authority SectionNSsec1 DNSRR(rrname ’example.net’, type ’NS’,ttl 259200, rdata ’ns1.example.net’)NSsec2 DNSRR(rrname ’example.net’, type ’NS’,ttl 259200, rdata ’ns2.example.net’)# The Additional SectionAddsec1 DNSRR(rrname ’ns1.example.net’, type ’A’,
SEED Labs – Local DNS Attack Lab10ttl 259200, rdata ’1.2.3.4’)Addsec2 DNSRR(rrname ’ns2.example.net’, type ’A’,ttl 259200, rdata ’5.6.7.8’)# Construct the DNS packetDNSpkt DNS(id pkt[DNS].id, qd pkt[DNS].qd, aa 1, rd 0, qr 1,qdcount 1, ancount 1, nscount 2, arcount 2,an Anssec, ns NSsec1/NSsec2, ar Addsec1/Addsec2)Q# Construct the entire IP packet and send it outspoofpkt IPpkt/UDPpkt/DNSpktsend(spoofpkt)# Sniff UDP query packets and invoke spoof dns().f ’udp and dst port 53’pkt sniff(iface ’br-43d947d991eb’, filter f, prn spoof dns)IPlease make sure replace the interface name in Line I with the one in your system. Line Q constructs theDNS payload, including DNS header and data. Each field of the DNS payload is explained in the following: 5id: Transaction ID; should be the same as that in the request.qd: Query Domain; should be the same as that in the Request.aa: Authoritative answer (1 means that the answer contains Authoritative answer).rd: Recursion Desired (0 means to disable Recursive queries).qr: Query Response bit (1 means Response).qdcount: number of query domains.ancount: number of records in the Answer section.nscount: number of records in the Authority section.arcount: number of records in the Additional section.an: Answer sectionns: Authority sectionar: Additional sectionSubmissionYou need to submit a detailed lab report, with screenshots, to describe what you have done and what youhave observed. You also need to provide explanation to the observations that are interesting or surprising.Please also list the important code snippets followed by explanation. Simply attaching code without anyexplanation will not receive credits.
User machine. The user container 10.9.0.5 is already configured to use 10.9.0.53 as its local DNS server. This is achieved by changing the resolver configuration file (/etc/resolv.conf) of the user machine, so the server 10.9.0.53 is added as the first nameserver entry in the file, i.e., this server will be used as the primary DNS server.