Transcription
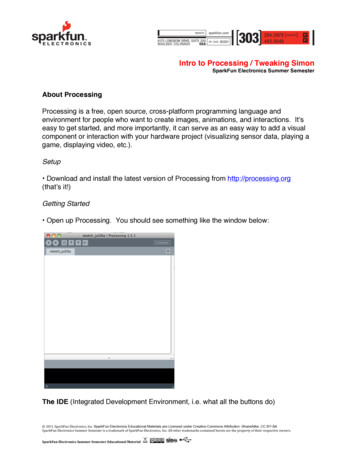
Intro to Processing / Tweaking SimonSparkFun Electronics Summer SemesterAbout ProcessingProcessing is a free, open source, cross-platform programming language andenvironment for people who want to create images, animations, and interactions. Itʼseasy to get started, and more importantly, it can serve as an easy way to add a visualcomponent or interaction with your hardware project (visualizing sensor data, playing agame, displaying video, etc.).Setup Download and install the latest version of Processing from http://processing.org(thatʼs it!)Getting Started Open up Processing. You should see something like the window below:The IDE (Integrated Development Environment, i.e. what all the buttons do) 2011SparkFunElectronics,Inc.SparkFun Electronics Educational Materials are Licensed under Creative Commons Attribution -ShareAlike, CC rkFunElectronicsSummerSemesterEducationalMaterial
Intro to Processing / Tweaking SimonSparkFun Electronics Summer SemesterYour First Sketch 2011SparkFunElectronics,Inc.SparkFun Electronics Educational Materials are Licensed under Creative Commons Attribution -ShareAlike, CC rkFunElectronicsSummerSemesterEducationalMaterial
Intro to Processing / Tweaking SimonSparkFun Electronics Summer Semester In the programming area, type:print("hello world!"); Press the ʻrunʼ button. Voila! You should see the message ʻhello world!ʼ in the outputarea of the IDE. You will also notice that a small grey box popped up – thatʼs becauseProcessing is primarily used as a visual tool, and so it comes built in with a canvasready to draw on.Drawing Drawing simple shapes in Processing is very straightforward. For example, typing:ellipse(40, 50, 100, 110);Gives us an ellipse with an x coordinate of 40, a y coordinate of 50, a width of 100, anda height of 110. Notice how the size goes off the canvas – weʼll get to that in a sec.Processing has a ton of built-in methods and functions - it would take us way too long tocover them all – but the full reference can be found at:http://processing.org/reference/Letʼs get seriousWhile very simple Processing sketches donʼt require much in the way of format, foranything dynamic (including motion, repetition, reading data, etc.) youʼll want to set upyour processing sketch with a certain structure.To help with this, Processing has a few reserved functions (much like Arduino): setup()and draw()As you might imagine, we do our setup within the setup() function and our drawingwithin the draw() function. For practical purposes this means that setup() only gets 2011SparkFunElectronics,Inc.SparkFun Electronics Educational Materials are Licensed under Creative Commons Attribution -ShareAlike, CC rkFunElectronicsSummerSemesterEducationalMaterial
Intro to Processing / Tweaking SimonSparkFun Electronics Summer Semestercalled once at the beginning of the sketch, and that draw() is called repeatedly, muchlike the loop() function in Arduino.In addition, things like import statements for libraries and global variables typically gobefore the setup function. Custom functions, class declarations, and other reservedmethods can go after the draw function or in a separate tab, depending on yourpreference. (Weʼll talk more about this later).Bouncy BallIn this example, weʼre going to see the basic structure of a Processing program set upto display a bouncing ball. In Processing, navigate to the top menu under File - Examples. A pop-up window (ordrop-down list) should appear. Go to Topics - Motion - Bounce and open the sketch. Go ahead and run it. You should see a white ball ʻbouncingʼ off the edges of thescreen. Hereʼs the code if you canʼt find it:int size 60;float xpos, ypos;// Width of the shape// Starting position of shapefloat xspeed 2.8;float yspeed 2.2;// Speed of the shape// Speed of the shapeint xdirection 1;int ydirection 1;// Left or Right// Top to Bottomvoid setup(){size(640, 200);noStroke();frameRate(30);smooth();// Set the starting position of the shapexpos width/2;ypos height/2;}void draw(){background(102); 2011SparkFunElectronics,Inc.SparkFun Electronics Educational Materials are Licensed under Creative Commons Attribution -ShareAlike, CC rkFunElectronicsSummerSemesterEducationalMaterial
Intro to Processing / Tweaking SimonSparkFun Electronics Summer Semester// Update the position of the shapexpos xpos ( xspeed * xdirection );ypos ypos ( yspeed * ydirection );// Test to see if the shape exceeds the boundaries of the screen// If it does, reverse its direction by multiplying by -1if (xpos width-size xpos 0) {xdirection * -1;}if (ypos height-size ypos 0) {ydirection * -1;}// Draw the shapeellipse(xpos size/2, ypos size/2, size, size);}A few things worth noticing / doing: Notice how setup() and draw() are used and where theyʼre placed, look at how globalvariables are used Look at some of the common built-in functions: size(), background(), width, height,frameRate(), smooth() Play with the size, speed, and direction variables and see what happens Move the background() command to the setup() function. What happens? Why? Change colors using stroke(), fill(), and background() Remove smooth() – what happens? 2011SparkFunElectronics,Inc.SparkFun Electronics Educational Materials are Licensed under Creative Commons Attribution -ShareAlike, CC rkFunElectronicsSummerSemesterEducationalMaterial
Intro to Processing / Tweaking SimonSparkFun Electronics Summer SemesterHacking Simon!Part 1: Hardware Setup If you havenʼt already, solder in some female headers to the breakout pins on yourSimon. Next, get your breadboard and run power and ground from the VCC and GND pins onthe Simon to the breadboard. On your breadboard, set up 2 trimpots, somewhat far apart, and run them to pins A0and A1 on the Simon. Make sure you run power and ground to your trimpots as well.A little diagram: Just think of the batteries as your power and ground from the Simonboard. Youʼll want to space out the two potentiometers as much as possible, so that itʼseasier to turn both at once. 2011SparkFunElectronics,Inc.SparkFun Electronics Educational Materials are Licensed under Creative Commons Attribution -ShareAlike, CC rkFunElectronicsSummerSemesterEducationalMaterial
Intro to Processing / Tweaking SimonSparkFun Electronics Summer SemesterPart 2: ArduinoNow that youʼre hardware is setup, open a new sketch in Arduino, and paste in theSimonSketch code:/* Simon Sketch - A Simon Tweak from SparkFun *///define pins for led's and buttons#define blueLed 13#define yellowLed 3#define redLed 5#define greenLed 10#define#define#define#defineblueButton 12yellowButton 2redButton 6greenButton 9int leftPot A0;int rightPot A1;int buttonState; //variable to detect button pressint numButtons 4; //number of buttonsint buttons[] { //put our buttons in an arrayblueButton, yellowButton, redButton, greenButton};int leds[] { //put our led's in an arrayblueLed, yellowLed, redLed, greenLed};void setup() {//init our pins - input for buttons, output for led'sfor(int i 0; i numButtons; i ) {pinMode(buttons[i], INPUT);pinMode(leds[i], OUTPUT);digitalWrite(buttons[i], HIGH); //init internal pull-up on button pins}Serial.begin(9600);//begin serial communication//UnComment this line after you configure your button pins//establishContact();} 2011SparkFunElectronics,Inc.SparkFun Electronics Educational Materials are Licensed under Creative Commons Attribution -ShareAlike, CC rkFunElectronicsSummerSemesterEducationalMaterial
Intro to Processing / Tweaking SimonSparkFun Electronics Summer Semestervoid loop() {////////UnComment these lines after you configure your button pinsif (Serial.available() 0) {int inByte Serial.read();//send trimpot valuesint leftPotVal analogRead(leftPot);Serial.print(leftPotVal, DEC);Serial.print(";");int rightPotVal analogRead(rightPot);Serial.print(rightPotVal, DEC);//read buttonsfor(int i 0; i numButtons; i ) {//is there a press?buttonState digitalRead(buttons[i]);//if so, light up the corresponding led, and send the value to// processing via serialif (buttonState 0) {digitalWrite(leds[i], elay(100);digitalWrite(leds[i], LOW);}}Serial.print('\n');}//UnComment this line after you configure your button pins//}void establishContact() {while (Serial.available() 0) {Serial.println("hello");// send a starting messagedelay(300);}} 2011SparkFunElectronics,Inc.SparkFun Electronics Educational Materials are Licensed under Creative Commons Attribution -ShareAlike, CC rkFunElectronicsSummerSemesterEducationalMaterial
Intro to Processing / Tweaking SimonSparkFun Electronics Summer Semester Next, get your FTDI breakout connected to your computer and to the Simon Board.You may need some male or female headers to do this. When plugging in the FTDI breakout to your Simon board, make sure the BLK andGRN markings on the FTDI breakout match up with those on the Simon. In Arduino, select ʻLilyPad Arduino w/ATmega 328ʼ as your board type. Upload the code! IMPORTANT: You will have to configure your button and LED pins at the top of thesketch to match the colors they are assigned to. (e.g., blueLed should be with bluebutton and actually make the color blue when pressed). You can do this by opening theSerial Monitor from Arduino and looking at the number that shows up when you presseach button. This is the button pin number that should be associated with the color ofthat LED. Note the formatting we do around printing out the sensor values – this is going to helpus separate them back out in Processing. After youʼve configured your button pins, Un-comment the lines of code that sayʻuncomment this line after youʼve configured your buttonsʼ. There are 3 places whereyou have to do this (around line 38, lines 44-46, and line 74). Re-upload your code to the Simon. If you re-uploaded the Arduino code successfully, open up the Serial Monitor – whatdo you see? Why? If you see ʻhelloʼ over and over again, youʼre done! Congrats! 2011SparkFunElectronics,Inc.SparkFun Electronics Educational Materials are Licensed under Creative Commons Attribution -ShareAlike, CC rkFunElectronicsSummerSemesterEducationalMaterial
Intro to Processing / Tweaking SimonPart 3: Interlude – Getting serial data into ProcessingSparkFun Electronics Summer SemesterWeʼre going to walk through the basics of setting up Serial communication inProcessing. Youʼre going to want to do most of these steps any time you want tocommunicate with Processing using the serial port, especially for things like reading insensor values from an Arduino. First, open Processing. (Duh.) Start a new sketch. Call it ʻSerialBasicʼ, or whateveryou prefer. Under the ʻSketchʼ menu in Processing, go to ʻImport Libraryʼ and select ʻSerial I/Oʼ.You should see something like: import processing.serial.*; in your sketch now. Goodjob! You just imported your first library. This allows us to make use of some Serialcommunication commands that will make our job much easier. Continue by copying the rest of the program below – make sure to read the commentsso you understand what each line is for./* SerialBasic w/ handshake * Prints out a set of sensor readings from Arduino using the Serial Library*///import the Serial library – should be there alreadyimport processing.serial.*;Serial myPort;//the Serial port object// since we're doing serial handshaking,// we need to check if we've heard from the microcontrollerboolean firstContact false;void setup() {// initialize your serial port:// this code picks the first port in the array of available ports,//and sets the baud rate to 9600myPort new Serial(this, Serial.list()[0], 9600);myPort.bufferUntil('\n'); //buffer until we get a carriage return} 2011SparkFunElectronics,Inc.SparkFun Electronics Educational Materials are Licensed under Creative Commons Attribution -ShareAlike, CC rkFunElectronicsSummerSemesterEducationalMaterial
Intro to Processing / Tweaking SimonSparkFun Electronics Summer Semestervoid draw() {//we can leave the draw method empty,//because all our programming happens in the SerialEvent (see below)}//the serialEvent method is called every time we get new stuff in on the// serial port//in this case we're constantly getting info, so it acts as our draw loopvoid serialEvent( Serial myPort) {//put the incoming data into a String //the '\n' is our end delimiter indicating the end of a complete packetString myString myPort.readStringUntil('\n');//make sure our data isn't empty before continuingif (myString ! null) {//trim whitespace and formatting characters (like carriage return)myString trim(myString);//println(myString);//look for our 'hello' string to start the handshake//if it's there, clear the buffer, and send a request for dataif (firstContact false) {if (myString.equals("hello")) {myPort.clear();firstContact true;myPort.write('A');println("contact");}}else { //if we've already got contact, keep getting and parsing data//split the string of data back into separate values, using the//semicolon we printed in Arduinoint sensors[] int(split(myString, ';'));//run through the sensor values and print them outfor (int sensorNum 0; sensorNum sensors.length; sensorNum ) {println("Sensor " sensorNum ": " sensors[sensorNum]);}// when you've parsed the data you have, ask for more:myPort.write("A");}}} 2011SparkFunElectronics,Inc.SparkFun Electronics Educational Materials are Licensed under Creative Commons Attribution -ShareAlike, CC rkFunElectronicsSummerSemesterEducationalMaterial
Intro to Processing / Tweaking SimonSparkFun Electronics Summer Semester Plug in your Simon and run your Processing sketch, if there are no errors, you shouldsee the sensor values from your Simon being printed out in the Processing terminal.Sweet! If not, check for syntax errors, make sure you imported the serial library, hooked upyour Simon properly, and donʼt have any other serial monitors open. Setting up Serial communication in this way in called a ʻhandshakeʼ – Arduino waits foran incoming byte from Processing before it starts sending data, and waits to send moredata until another byte from Processing arrives (signaling that Processing is done withthe earlier data). This helps control the flow of data between the two programs.Part 4: SimonSketch!At this point, weʼve got our Simon hooked up to some sensors, and we can read thevalues of those sensors in Processing. Now itʼs time to use these values in Processingto create a little thing we call the SimonSketch (think Simon meets Etch-A-Sketch).1. Copy and Paste your SerialBasic code into a new sketch, called ʻSimonSketchʼ.2. What does an etch-a-sketch do? It draws, and it moves using two dials, right? So weneed to keep track of our position, using info from our two dials (our trim pots). Letʼsmake global variables for our pots and the x and y coordinate of where weʼre currentlydrawing.Add these lines below your ʻSerial myPort;ʼ declaration:int leftPot;int rightPot;float x width/2;float y height/2;This gives us a place to store the values from the pots, as well as an x and y for theposition of our cursor. 2011SparkFunElectronics,Inc.SparkFun Electronics Educational Materials are Licensed under Creative Commons Attribution -ShareAlike, CC rkFunElectronicsSummerSemesterEducationalMaterial
Intro to Processing / Tweaking SimonSparkFun Electronics Summer Semester3. At the beginning of your Setup() function, weʼre going to put a few methods to ʻsetupʼour drawing environment.size(1000, 750); //defines the size of our canvas (width, height)background(255); //defines the starting background color (255 is white)stroke(255); //defines the starting stroke colorsmooth(); //the smooth() function ‘smoothes out’ motion and curves4. Although we will be drawing on the canvas, we can still leave the draw() methodempty and put all the actual drawing in the serialEvent method.5. Skip down to the section in the serialEvent method after we print out the sensorvalues (around line 70, shown below). Weʼre going to assign the sensor values fromArduino to our local leftPot and rightPot variables:for (int sensorNum 0; sensorNum sensors.length; sensorNum ) {println("Sensor " sensorNum ": " ot sensors[0]; // - new stuffrightPot sensors[1];6. Now that weʼve got the sensor values in their own variables, weʼve got to turn theminto numbers we want to use. In this case it means casting the integers as floats so thatwe can ʻmapʼ them to the width and height of the canvas – this is just an easy way oftaking the normal range of sensor values (0 to 1023) and mapping them in a way thatmakes sure they cover the whole canvas evenly (since our canvas might be bigger orsmaller than 1023 pixels squared).Add the following directly below the lines you just wrote:y (float)leftPot; //casting values from int to floatx (float)rightPot;y map(y, 0, 1023, 0, height); //map to height and width of canvasx map(x, 0, 1023, 0, width);//print out the new values for good measureprintln("X: " x " " "Y: " y); 2011SparkFunElectronics,Inc.SparkFun Electronics Educational Materials are Licensed under Creative Commons Attribution -ShareAlike, CC rkFunElectronicsSummerSemesterEducationalMaterial
Intro to Processing / Tweaking SimonSparkFun Electronics Summer Semester7. Great. We have sensor values that map to the height and width of our canvas, sonow we just have to draw a point (or a small circle) wherever our sensors tell us to go:ellipse(x, y, 5, 5);Yup. Simple as that.8. Next, weʼre going to add in some functionality for changing colors based on thebutton pushes from Simon, as well as an ʻeraseʼ mode if we push two buttons at once.To do this, we can just check the size of the sensor value array – if we get 3 values, thethird corresponds to the button we should change colors to. If we can 4 values, then 2buttons are being pushed at once, which is our cue to go into ʻeraseʼ mode.//if there's a third value, a button has been pressed, so change the colorif (sensors.length 2) {int colorC sensors[2];changeColor(colorC);//this is passing the value to our ‘changeColor’ function (see below)}if (sensors.length 3) {fill(255);stroke(255);}//if you press 2 buttons, set to erase modeBefore this code will work – we need to write our changeColor method that we useabove. Put this after your serialEvent method at the end of your sketch:void changeColor(int colorC) {//match the color to the button pressswitch (colorC) {case 2: //yellowstroke(255, 255, 0);fill(255, 255, 0);break;case 6: //redstroke(255, 0, 0);fill(255, 0, 0); 2011SparkFunElectronics,Inc.SparkFun Electronics Educational Materials are Licensed under Creative Commons Attribution -ShareAlike, CC rkFunElectronicsSummerSemesterEducationalMaterial
Intro to Processing / Tweaking SimonSparkFun Electronics Summer Semesterbreak;case 9: //greenstroke(0, 255, 0);fill(0, 255, 0);break;case 12: //bluestroke(0, 0, 255);fill(0, 0, 255);break;default:stroke(0, 0, 255);}}Thatʼs it! Youʼve hacked your Simon! Try running your sketch. Youʼll have to push abutton to get drawing, then control the drawing with the two potentiometers, just like anEtch-A-Sketch. Try changing colors using the buttons, and make sure your erase modeworks. Get painting!Hereʼs the full sketch in case you get stumped:/* SimonSketch - A Simon Tweak from Sparkfun* Use the buttons on your simon to pick colors,* the trimpots to move your cursor* 2 yellow* 6 red* 9 green* 12 blue* incoming string leftPot;rightPot;buttonPress* if no button press, then just leftPot;rightPot*/import processing.serial.*;Serial myPort;int leftPot;int rightPot;float x width/2;float y height/2;// Whether we've heard from the microcontrollerboolean firstContact false; 2011SparkFunElectronics,Inc.SparkFun Electronics Educational Materials are Licensed under Creative Commons Attribution -ShareAlike, CC rkFunElectronicsSummerSemesterEducationalMaterial
Intro to Processing / Tweaking SimonSparkFun Electronics Summer Semestervoid setup() {size(1000, Serial.list()); //list serial ports//init serial object (picks 1st port available)myPort new Serial(this, Serial.list()[0], 9600);myPort.clear();}void draw() {}void serialEvent(Serial myPort) {String myString myPort.readStringUntil('\n');// if you got any bytes other than the linefeed:if (myString ! null) {myString trim(myString);//println(myString);if (firstContact false) {if (myString.equals("hello")) {myPort.clear();firstContact true;myPort.write('A');println("contact");}}else {int sensors[] int(split(myString, ';'));// print out the values you got:for (int sensorNum 0; sensorNum sensors.length; sensorNum ){println("Sensor " sensorNum ": " ot sensors[0];rightPot sensors[1];y (float)leftPot;x (float)rightPot;y map(y, 0, 1023, 0, height);x map(x, 0, 1023, 0, width); 2011SparkFunElectronics,Inc.SparkFun Electronics Educational Materials are Licensed under Creative Commons Attribution -ShareAlike, CC rkFunElectronicsSummerSemesterEducationalMaterial
Intro to Processing / Tweaking SimonSparkFun Electronics Summer Semesterprintln("X: " x " " "Y: " y);ellipse(x, y, 5, 5);//if there's a third value, a button has been pressed, change the colorif (sensors.length 2) {int colorC sensors[2];changeColor(colorC);}if (sensors.length 3) { //got 2 buttons, set to erase modefill(255);stroke(255);}// when you've parsed the data you have, ask for more:myPort.write("A");}}}void changeColor(int colorC) {//match the color to the button pressswitch (colorC) {case 2: //yellowstroke(255, 255, 0);fill(255, 255, 0);break;case 6: //redstroke(255, 0, 0);fill(255, 0, 0);break;case 9: //greenstroke(0, 255, 0);fill(0, 255, 0);break;case 12: //bluestroke(0, 0, 255);fill(0, 0, 255);break;default:stroke(0, 0, 255);}} 2011SparkFunElectronics,Inc.SparkFun Electronics Educational Materials are Licensed under Creative Commons Attribution -ShareAlike, CC rkFunElectronicsSummerSemesterEducationalMaterial
Intro to Processing / Tweaking SimonSparkFun Electronics Summer SemesterGoing FurtherThe Simon has 6 Analog Pins broken out for us to use, so why stop after only using 2?Letʼs push it a little further. In addition, weʼre going to write a class called SimonCursorto control how our cursor behaves while we draw.The following is just one example, but feel free to improve and improvise using othercomponents.SimonSketchPro with Size and Transparency ControlStep 1: Hardware A another Trim Pot to your board, and connect it to Pin A5 on the Simon Add a photo-resistor to your board (donʼt forget the 10K resistor), and connect it to PinA4 on the SimonIt should look something like this when youʼre done: 2011SparkFunElectronics,Inc.SparkFun Electronics Educational Materials are Licensed under Creative Commons Attribution -ShareAlike, CC rkFunElectronicsSummerSemesterEducationalMaterial
Intro to Processing / Tweaking SimonSparkFun Electronics Summer SemesterStep 2: ArduinoSince we added more sensors, weʼre going to have to change our Arduino code to readthose sensors and send them out to Processing.1. Copy and Paste your ʻSimonSketchʼ code into a new sketch called ʻSimonSketchProʼ(or whatever you like).2. Add these lines at the beginning of your sketch for Pin declarations (new code isBold):intintintintleftPot A0;rightPot A1;lightSensor A4;sizePot A5;3. In our loop() method, weʼll have to read, format, and print the new sensor values:int leftPotVal analogRead(leftPot);Serial.print(leftPotVal, DEC);Serial.print(";");int rightPotVal analogRead(rightPot);Serial.print(rightPotVal, DEC);Serial.print(";");// - newint sizePotVal analogRead(sizePot);Serial.print(sizePotVal, DEC);Serial.print(";");int lightSensorVal l, DEC);4. Before you upload, comment out the lines for the handshake and check your serialmonitor to make sure the sensor values are being sent correctly.IMPORTANT: Every photocell is a little different and gets different values depending onthe conditions (sunny vs. cloudy, indoor vs. outdoor, etc.). As you look at the serialmonitor, make a note of the high and low values youʼre getting – weʼll need this later inthe Processing sketch. 2011SparkFunElectronics,Inc.SparkFun Electronics Educational Materials are Licensed under Creative Commons Attribution -ShareAlike, CC rkFunElectronicsSummerSemesterEducationalMaterial
Intro to Processing / Tweaking SimonSparkFun Electronics Summer SemesterMake sure to uncomment the handshake code and re-upload your code before movingon.Thatʼs it for the Arduino part! On to our Processing code!Step 3: ProcessingNow we have to change a few things in our Processing code. Weʼll have the extra trimpot control the size of our stylus, and the photocell will control the transparency.1. Copy and Paste your ʻSimonSketchʼ Processing code into a new sketch calledʻSimonSketchProʼ (or whatever you like).2. Letʼs start writing our class. You can start a class at the bottom of your current code,but you may find it cleaner to create a new tab (under the tab menu) and name it afteryour class, in this case SimonCursor.3. In this case, our class is going to take care of the values from our four sensors tocontrol the X position, Y position, size of the cursor, and its transparency. So letʼsdeclare our class and its attributes:class SimonCursor {floatfloatfloatfloatx;y;siz;light;}4. After the ʻfloat light;ʼ line, we need to add a constructor. This is a statement thatprepares the object for use upon its creation, by setting up the parameters that alignwith the variables we just declared. Basically itʼs a method with the same name as yourclass, and a dummy variable for each attribute your object possesses. It may look a littlestrange, but itʼs necessary:SimonCursor (float x, float y, float siz, float light) {x x;y y; 2011SparkFunElectronics,Inc.SparkFun Electronics Educational Materials are Licensed under Creative Commons Attribution -ShareAlike, CC rkFunElectronicsSummerSemesterEducationalMaterial
Intro to Processing / Tweaking SimonSparkFun Electronics Summer Semestersiz siz;light light;}Notice the underscores – these differentiate the variables in our constructor methodfrom those in our class (even though weʼre assigning them to each other).5. Next weʼre going to crate a render() method to draw our cursor with the position andsize that weʼve passed in:void render() {ellipse(x,y,siz,siz);}6. Finally, weʼre going to move our entire changeColor method into our new class – justcopy and paste the entire method in, after the render() method. Donʼt forget the lastcurly bracket ( } ) to close out our class.7. Weʼre done with writing our class – now we need to go back into the main Processingsketch and change our code to
SparkFun Electronics Summer Semester !! 2011SparkFun!Electronics,!Inc.!SparkFun Electronics Educational Materials are Licensed under Creative Commons Attribution -ShareAlike, CC BY-SA . Hereʼs the code if you canʼt find it: int size 60; // Width of the shape float xpos, ypos; // Starting position of shape