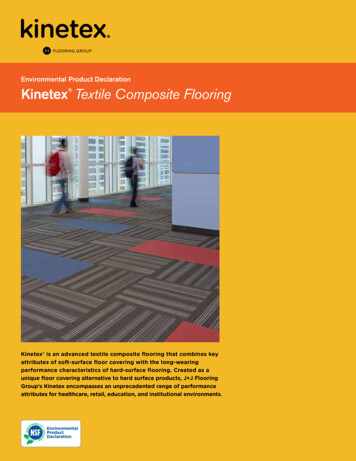
Transcription
Beautiful Floors. Healthy Living. Eco Friendly Flooring.Solid Woven Flooring InstallationInstructionsECOTIMBER RECOMMENDS USING THE SERVICES OF A PROFESSIONALHARDWOOD FLOORING INSTALLER. READ THESE INSTRUCTIONSTHOROUGHLY BEFORE BEGINNING INSTALLATION. IN ADDITION TO THESEINSTRUCTIONS, WE RECOMMEND THAT THE INSTALLER FOLLOW ALLINSTALLATION GUIDELINES SET FORTH BY THE NATIONAL WOOD FLOORINGASSOCIATION (NWFA.ORG). WHERE THESE INSTRUCTIONS DIFFER FROMNWFA GUIDELINES, THIS DOCUMENT TAKES PRECEDENCE. THESEINSTALLATION INSTRUCTIONS DO NOT APPLY TO PRODUCTS OTHER THANSOLID WOVEN BAMBOO FLOORING.OWNER/INSTALLER RESPONSIBILITYThe owner/Installer assumes all responsibility for final inspection of product quality. Inspectionof all flooring should be done prior to installation. If material is not acceptable, contact the sellerimmediately. Manufacturer cannot accept responsibility for flooring installed with visibledefects. Prior to installation, the owner/installer must determine that the job-site environmentand the sub-surfaces involved meet or exceed all applicable standards. The manufacturerdeclines any responsibility for product failure resulting, or associated with, subfloor andsubstrates or job-site environmental deficiencies.TOOLS AND ACCESSORIES1) Tape Measure2) Pencil3) 3M 2080 Blue Tape4) Tapping Block5) Hand, Table, Circular, or Band Saw6) Pry Bar or Pull bar7) Hammer8) Spacing Wedges9) Rubber Mallet10) Safety Equipment (Goggles and Mask)11) Carpenter’s Square12) Utility Knife13) Chalk Line14) Calibrated Moisture MeterPage 1 of 7 Strand Woven Wood Flooring 2.2.178400B Remington Avenue Pennsauken, NJ 08110 USA Toll Free: 1.877.740.9420 Phone: 1.303.586.9400 EcoTimber.com
Beautiful Floors. Healthy Living. Eco Friendly Flooring.For Glue-Down installation, you’ll also need:1) Flooring adhesive - urethane based such as Bostik Best Damp and Dry Towels2) Trowel, per flooring adhesive manufacturer’s recommendations Adhesive removerFor Nail-Down installation, you will also need:1) Pneumatic nailer appropriate for 9/16" flooring Air Compressor 15 lb Asphalt Paper(roofing felt)2) 1-1/4" or 1-1/2" 18-20 gauge cleats or staples (staples should have ¼" wide crown) NailPunchPREPARATIONJob SiteYour flooring should be one of the last items installed in any new construction or remodelproject. All work involving water or moisture should be completed before flooring installation.Permanent HVAC should be on and operational and maintained between 60-75 F & relativehumidity should be 30%-60% for min 14 days prior to delivery, as well as during and afterinstallation.Storage and HandlingStore flooring in the rooms where they are to be installed, with both ends of the boxescompletely opened, to allow flooring to acclimate. Do not store directly on concrete or nearoutside walls. Flooring should be acclimated until its moisture content is within 2%of the moisture content of the subfloor. Acclimation will progress more slowlywith Woven Bamboo than with hardwoods, due to its extreme density and resincontent. In very dry or very humid climates, proper acclimation may requireseveral weeks. Non-intrusive surface meters tend to give more accurate readings than pintype meters. All moisture meters must be calibrated and adjusted to specific settings fordifferent species. For Woven Bamboo, use the setting for Ipe (Brazilian Walnut). Failure toacclimate properly may result in shrinkage or expansion and cupping/buckling.Sub FloorAcceptable subfloor types:1) CDX plywood-at least 5/8" thick for joist spacing up to 16", min 3/4" thick for joistspacing greater than 16" on center (19.2" max)2) Underlayment grade particleboard (minimum 40 lb. density) – glue-down only3) OSB – at least 3/4" thick, PS 2-92 rated or PS 1-95 rated4) Concrete slab – glue-down onlyPage 2 of 7 Strand Woven Wood Flooring 2.2.178400B Remington Avenue Pennsauken, NJ 08110 USA Toll Free: 1.877.740.9420 Phone: 1.303.586.9400 EcoTimber.com
Beautiful Floors. Healthy Living. Eco Friendly Flooring.5) Existing wood flooring – must be smooth, level, well-adhered and unfinished (if gluingnew flooring)6) Resilient tile and sheet vinyl – glue-down only; tile/vinyl must be new and non-urethanecoated7) Lightweight concrete (gypcrete) coated with latex primer - glue-down only (NOTE:EcoTimber provides no guarantee that lightweight concrete or gypcrete will remainstructurally sound during the life of the floor. Separation of the flooring from thesubfloor caused by deterioration or fracturing of the substrate will not be considered aproduct failure.)All subfloors must be dry and remain dry year-round, structurally sound, clean and level within3/16" per 10' radius. Moisture content of wood sub floors must not exceed 12%, wood flooringmoisture content must be within 2% of wood subfloor moisture content, and concrete must notexceed 3 lbs. per Calcium Chloride Test (test method ASTM 1869-89), or 2 lbs. when installingover radiant heat. For glue down installations, subfloor must be free of wax, grease, paint, oldadhesives, etc., which can be removed by sanding. Do not sand existing vinyl floors, as they maycontain asbestos. Concrete subfloors must be fully cured, at least 60 days old, and should havemin 6-mil polyfilm between concrete and ground. If gluing down on concrete that is on or belowgrade, even if the Calcium Chloride test results are under 3 lbs., we highly recommended the useof a concrete sealer. Resilient tile and sheet vinyl must be well bonded to sub floor, in goodcondition, clean and level.Radiant HeatWhen installing Solid Woven Bamboo over radiant heat, the glue-down installation method isrecommended, but nail-down installations are warranted provided that all of these instructionsare carefully followed. This flooring is not warranted for use over radiant heatsystems heated by electric elements. Only hydronic systems are approved. Hydronicsystems must include in-floor temperature sensors and an outdoor thermostat that allows thesystem to adjust the water temperature according to anticipated heat loss. Flooring installed inmulti-unit projects where the water temperature is not regulated separately in each unit is notwarranted. The moisture content for concrete subfloors must not exceed 2.0 lbs. per1000 square feet per ASTM 1869-89 (Calcium Chloride Test), and the moisturecontent for wood subfloors must not exceed 12%. If moisture levels exceed these limits,do not install the flooring. The surface temperature of the subfloor must never exceed82 F in any location. The temperature setting must always remain within 15 F ofnormal operating level, and should never be turned completely off. Excessive heat,rapid heating, and/or failure to maintain humidity levels between 30% and 60% are likely tocause cracking, cupping and other forms of floor failure. Seasonal gapping and surfacechecking (cracking), particularly at the ends of planks, should be expected ininstallations over radiant heat and do not constitute a product failure. All concretemust be allowed to properly cure and dry for a minimum of 4 weeks prior to the operation of theradiant heat system. The system should then be operated at at least 2/3 maximum output for aminimum of 2 weeks prior to installation of flooring to further allow moisture from the subfloorto dissipate and reach equilibrium. This procedure must be followed regardless of the time ofyear. Three (3) days prior to flooring installation, reduce thermostat to 65 F. In glue-downinstallations, the system should be turned off 24 hours prior to and during installation toPage 3 of 7 Strand Woven Wood Flooring 2.2.178400B Remington Avenue Pennsauken, NJ 08110 USA Toll Free: 1.877.740.9420 Phone: 1.303.586.9400 EcoTimber.com
Beautiful Floors. Healthy Living. Eco Friendly Flooring.prevent premature curing of the adhesive. As always, relative humidity of the jobsite must bemaintained between 30% and 60%. Use of a humidification/dehumidification systemmay be required to maintain the proper humidity levels, particularly over radiantheat. Failure to maintain proper humidity levels will void all warranties. Beginning 48 hoursafter installation, slowly raise the temperature of the heating system to its preferred operatinglevel over a period of 5 days. Please refer to the Radiant Panel Association for more information.INSTALLATIONMake sure subfloor is tested for moisture content first and is properly prepared.Since Bamboo, like wood, expands with any increase in moisture content, always leave at least a½" expansion space between flooring and all walls and any other permanent vertical objects,(such as pipes and cabinets). This space will be covered up once you reapply base moldingsaround the room. Use wood or plastic spacing wedges along all walls and other fixed objectsduring installation to maintain this ½" expansion space.No area of connected flooring can span greater than 25 feet in width or 50 feet in length withoutan expansion gap. For larger spans, install T-moldings or other transition pieces that allow theflooring to expand and contract.Measure the room carefully in order to calculate the width of the last row. If the last row is lessthan 1.5" wide, cut 1.5" off the width of the first row to ensure the stability of the floor.Work from several open boxes of flooring and “dry lay” a portion of the floor before permanentlyinstalling it. This will allow you to select the varying grains & colors and to arrange them in aharmonious pattern. The actual floor may differ in grain and color from the samples used inselecting the product. This is not a product defect. It is the installers’ responsibility to work withthe end user to determine the expectations of what the actual finished floor will look like.All Methods1. Remove any existing base, shoe mold or doorway thresholds.2. Saw off the bottoms of doorjambs and trim so that the flooring can be slipped under. Todo this, use a scrap piece of flooring as a guide and with a handsaw cut off the jamb andtrim.3. Install moisture barrier system and/or underlayment if necessary, determined by thegrade and type of subfloor and the installation method used.4. Establish a straight working line by choosing a starting wall and measuring out from thewall at both ends, the width of a panel (including the tongue) plus ½", and snapping achalk line.5. Lay out the first row end to end with the grove toward the wall. Align the tongue of thepanels with your straight working line. Remember to allow for ½" expansion spaces atboth ends when measuring and cutting the last piece in a row. You may need to scribecut the first row of planks to match the wall and maintain your ½" expansion space, asPage 4 of 7 Strand Woven Wood Flooring 2.2.178400B Remington Avenue Pennsauken, NJ 08110 USA Toll Free: 1.877.740.9420 Phone: 1.303.586.9400 EcoTimber.com
Beautiful Floors. Healthy Living. Eco Friendly Flooring.most walls are not straight. Take the time to measure to ensure your expansion space isadequate and equal throughout the whole length of the wall and use spacing wedgesalong all walls to help maintain expansion space.6. Once you are satisfied with your alignment and expansion space, secure the first row byface nailing and/or gluing. Face-nailing will leave nail holes that must be filled withputty. Make sure the starting row is straight and drawn tight. To draw planks together,always use a tapping block or pull bar, as tapping the flooring itself will result in edgedamage. Never apply pressure to the groove edge of the flooring – only usethe tapping block against the tongue. After gluing with one of the approvedadhesives (or Liquid Nails LN-901), set weight on top of them and allow them to setsecurely before installing additional rows.7. Start remaining rows with partial planks that are at least 8" long. Stagger end joints fromrow to row by at least 8" for maximum stability and a professional look. Avoid ‘H’patterns, where planks just two rows away from each other end in the same location, bystarting each row with a plank cut to a random length.8. To install the last row you will need to measure the space you have left between the walland the edge of the new floor. Subtract 1/2" for expansion and use this number for thewidth to cut your planks. Install and secure in the same manner as you did the first row,scribe cutting to match the wall and maintain expansion space.Glue down installation1) Make sure subfloor is tested for moisture content first and is properly prepared.2) On concrete subfloors that are on or below grade (ground level), always assume theworst. Even if they measure dry, we recommend taking one of the following twoinstallation steps to ensure a trouble-free installation:3) Method #1: Install a sheet vinyl floor first and then glue down your floor over the sheetvinyl. Follow the vinyl manufacturer’s installation recommendations.4) Method #2: Taylor and Bostik offer Moisture Barrier Systems on which they provide awarranty that moisture will not pass through and damage your flooring. Followmanufacturer’s recommendations for application/installation.5) Remember a concrete slab on/below grade that measures dry today may become moistin the future due to rising groundwater. Installing a moisture barrier now may beviewed as an insurance policy against concrete becoming wet in the future; this willlead to subsequent floor failure. The manufacturer is not responsible for relatedmoisture issues.6) Carefully review the adhesive manufacturer’s instructions for proper trowel size,minimum temperature, adhesive set time and open times before beginning installationof flooring. EcoTimber does not directly warrant the performance of adhesive or sealerproducts.7) Spread adhesive and allow to setup sufficiently per adhesive manufacturer’s instructionsbefore securing the floor.Page 5 of 7 Strand Woven Wood Flooring 2.2.178400B Remington Avenue Pennsauken, NJ 08110 USA Toll Free: 1.877.740.9420 Phone: 1.303.586.9400 EcoTimber.com
Beautiful Floors. Healthy Living. Eco Friendly Flooring.8) Use tapping block or pull bar to fit planks together, but be careful not to let installedfloor move on wet adhesive while you are working.9) After the first row is set securely, continue to spread adhesive and lay flooring section bysection until installation is complete.10) Use a damp cloth to IMMEDIATELY REMOVE ANY ADHESIVE FROM THEFLOORING SURFACE. If adhesive cannot be completely removed with a damp cloth,use the manufacturer’s recommended adhesive remover. Never let flooring adhesive drycompletely on the finished surface. The manufacturer is not responsible for finishdamage that might be caused by adhesive that has been allowed to dry completely.11) Use 3M 2080 Blue Tape to hold any pieces which might have side bow and need to beheld straight & tight until the adhesive sets. Do not allow tape to remain on floor longerthan 30 minutes and remove tape prior to cleaning floor with a cleaner or solvent. Do notapply tape to flooring that has been previously wiped with a solvent.12) Within the adhesive working time, walk each section of flooring in order to make sure itis well bonded to the subfloor. Flooring planks on the perimeter of the room may requireweight on them until the adhesive cures enough to hold them down.Staple / Nail Down Installation1) Make sure subfloor is tested for moisture content first and is properly prepared.2) Place a 15-lb. felt paper or equivalent, meeting ASTM D4869 standards, over the entiresubfloor, following the manufacturer's instructions.3) Since it can be difficult getting the nail gun close to the wall, it may be necessary to facenail and/or glue down the first few rows.4) Use a flooring nailer that is appropriate for 9/16" thick flooring and, depending on themodel of the nailer, 1-1/4" or 1-1/2" 18-20 gauge cleats or staples.5) Lay by using floor nailer to blind-nail top inside edge of tongue at a 45 degree angle.6) Test to make sure that nailing will not cause dimpling (localized raised edges) in thefinished floor. Note: be sure to look at the face of the installed flooring at a low anglefrom a distance to see if dimpling is occurring, as it is hard to see when directly above thefloor. If you see dimpling, STOP and adjust the nailer shoe, angle/place of nail entry orair pressure until test planks confirm that dimpling is no longer occurring. Themanufacturer is not responsible for replacing material that has been installed withdimples.7) Nail each board every 6-8" and 3-4" from each end.8) Remember to stagger end joints from row to row at least 8" apart and use a tapping blockor pull bar to fit boards together.9) Periodically check (looking from a low angle) to make sure that the nailer is still notcausing dimpling.10) It may be necessary to face-nail and or glue down the flooring in doorways or tight areaswhere the nailer can’t fit.11) The last rows may need to be face-nailed or glued in the same manner as the first rows.Page 6 of 7 Strand Woven Wood Flooring 2.2.178400B Remington Avenue Pennsauken, NJ 08110 USA Toll Free: 1.877.740.9420 Phone: 1.303.586.9400 EcoTimber.com
Beautiful Floors. Healthy Living. Eco Friendly Flooring.After InstallationRemove expansion spacers and install or reinstall base and/or quarter round moldings to coverthe expansion space by nailing to the wall, not the floor. Install any transition pieces that may beneeded (reducers, T-moldings, nosing, etc.). If using the glue-down installation method, do notallow foot traffic or heavy furniture on floor for 24 hours. Buff the floor with lamb’s wool pads inorder to remove any loose splinters, residues, footprints, etc. and dust mop or vacuum the floorthoroughly to remove any dirt or debris.CARE AND MAINTENANCEEcoTimber bamboo flooring is durable and hard wearing. Taking care to protect your floor frompotentially damaging elements will ensure that it continues to look its best and provides decadesof use. Below are some care tips to help you maintain the beauty and longevity of your floor.1) Regularly dust mop, sweep with a soft bristle broom, or vacuum with a soft accessory tokeep your bamboo floor clean from dust, dirt or grit.2) Remove spills and dirt promptly. A soft cloth damp with water may be used to wipe upfoodstuffs and other spills, provided the area is dried immediately.3) Heel or scuff marks and stubborn stains may be removed by lightly rubbing with a clothand a wood floor cleaner.4) It is recommended to remove high-heel shoes prior to walking on bamboo flooring.Alternatively, be sure to clean shoes well. Gravel, rocks and debris can get stuck in thebottom of shoes and scratch the finish.5) Use area rugs on high traffic pathways. Only use colorfast and non-scratch area rugs onyour bamboo floor. Rubber backed rugs should be avoided. Use mats in the kitchen,bathroom and laundry room to protect against spills.6) Install floor protectors under all furniture legs.What not to do1) Do not allow floor cleaner or any other liquid to remain longstanding on your bamboofloor.2) Do not let sand, dirt or grit build up.3) Do not use a wet mop or sponge to clean the floor - excessive amounts of water will causeyour floor to swell and cup.4) Never wax your bamboo floor.5) Do not use steel wool or other abrasive scouring pads.6) Do not use oil soap, scouring powder, abrasive cleansers or harsh detergents to cleanyour bamboo floor.7) As with all natural products, exposure to the sun and ultra-violet rays can cause bambooto become discolored. Remember, spending a little time looking after your bambooflooring will ensure that it continues to look good and lasts for many years.Page 7 of 7 Strand Woven Wood Flooring 2.2.178400B Remington Avenue Pennsauken, NJ 08110 USA Toll Free: 1.877.740.9420 Phone: 1.303.586.9400 EcoTimber.com
Page 1 of 7 Strand Woven Wood Flooring 2.2.17 8400B Remington Avenue Pennsauken, NJ 08110 USA Toll Free: 1.877.740.9420 Phone: 1.303.586.9400 EcoTimber.com Beautiful Floors. Healthy Living. Eco Friendly Flooring. Solid Woven Flooring Installation Instructions ECOTIMBER RECOMMENDS USING THE SERVICES OF A PROFESSIONAL