Transcription
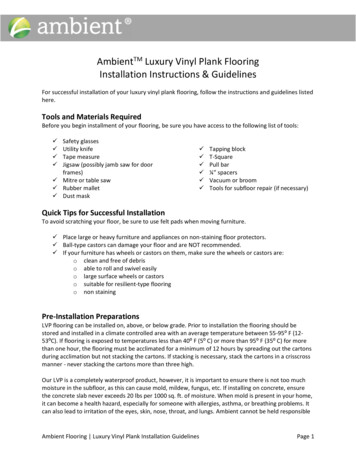
AmbientTM Luxury Vinyl Plank FlooringInstallation Instructions & GuidelinesFor successful installation of your luxury vinyl plank flooring, follow the instructions and guidelines listedhere.Tools and Materials RequiredBefore you begin installment of your flooring, be sure you have access to the following list of tools: Safety glassesUtility knifeTape measureJigsaw (possibly jamb saw for doorframes) Mitre or table saw Rubber mallet Dust mask Tapping blockT-SquarePull bar¼” spacersVacuum or broomTools for subfloor repair (if necessary)Quick Tips for Successful InstallationTo avoid scratching your floor, be sure to use felt pads when moving furniture. Place large or heavy furniture and appliances on non-staining floor protectors. Ball-type castors can damage your floor and are NOT recommended. If your furniture has wheels or castors on them, make sure the wheels or castors are:o clean and free of debriso able to roll and swivel easilyo large surface wheels or castorso suitable for resilient-type flooringo non stainingPre-Installation PreparationsLVP flooring can be installed on, above, or below grade. Prior to installation the flooring should bestored and installed in a climate controlled area with an average temperature between 55-95⁰ F (1253⁰C). If flooring is exposed to temperatures less than 40⁰ F (5⁰ C) or more than 95⁰ F (35⁰ C) for morethan one hour, the flooring must be acclimated for a minimum of 12 hours by spreading out the cartonsduring acclimation but not stacking the cartons. If stacking is necessary, stack the cartons in a crisscrossmanner - never stacking the cartons more than three high.Our LVP is a completely waterproof product, however, it is important to ensure there is not too muchmoisture in the subfloor, as this can cause mold, mildew, fungus, etc. If installing on concrete, ensurethe concrete slab never exceeds 20 lbs per 1000 sq. ft. of moisture. When mold is present in your home,it can become a health hazard, especially for someone with allergies, asthma, or breathing problems. Itcan also lead to irritation of the eyes, skin, nose, throat, and lungs. Ambient cannot be held responsibleAmbient Flooring Luxury Vinyl Plank Installation GuidelinesPage 1
for these moisture-related Issues. General guidelines suggest installing a 6 mil polyfilm over concretesubfloors to prevent moisture from contacting the floors.Direct exposure to sunlight can result in floor expansion and discoloration. Using curtains, blinds, orwindow tinting methods is required to prevent sun-related damage to the floor.To prevent your floor from being damaged by other construction / installation activities that might beoccurring in your house, be sure to install your LVP flooring AFTER all other work has been completed.Use a Portland based compound for all subfloor patching, and allow it to completely dry and cure beforeinstallation of your LVP floor.Before installing or cutting an LVP floor plank, inspect it carefully for damage BEFORE installation. If yousee a defect, call Ambient Tech Services at (866) 710-7070 for a possible refund or replacement. OurClaims/Returns department cannot accept any planks that have been already installed and/or cut.Because there are variations in vinyl plank design, Ambient recommends blending floor planks fromseveral different cartons during installation.Subfloor PreparationTo ensure a successful installation of your LVP floor, properly prepare your subfloor by ensuring it isclean, dry, flat, and in good structural shape. The required flatness of the subfloor is 3/16" in 10' or 1/8"in 6'.InstallationThe floating method is used when installing LVP flooring. Cabinets or fixed objects should not beinstalled on top of LVP flooring. LVP requires proper expansion space, undercutting of all door jams, andprohibits fastening wall moldings and transition strips to LVP flooring.Installation Over Existing Floors:NEVER install LVP flooring over ANY type of carpet.It is acceptable to install LVP flooring over most types of hard-surface floor types; as long as the existingfloor has a clean, dry, flat, surface that is in good structural shape. Use T-moldings at doorways and forany span greater than 40’ in any direction.If installing LVP flooring over a sheet vinyl floor surface, the existing floor should have little cushion fromsoft underlay or substrates. Too much cushion can compromise the strength of our product.Solvents and adhesive removers with citrus should never be used to remove adhesive residue from thefloor, because the chemicals from any leftover residue could potentially damage the new flooring.The area in which the flooring is installed must remain climate controlled with the temperature between60 -90 F for the life of the product and ideally the relative humidity should stay between 35-70%.Ambient Flooring Luxury Vinyl Plank Installation GuidelinesPage 2
Step 1: Begin installation of LVP flooringfrom a corner of the room and workingfrom left to right. Install spacers betweenthe plank and the wall at the end andedges where the plank and wall cometogether.Step 3: Cut the last plank to fit the space. Usethe leftover plank from first row as starter forsecond row, and so on for each row. Theremust be at least 8” between plank end jointson adjacent rows.*Step 2: Lock short end of plank by insertingtongue into groove at an angle. Then dropinto place. Continue this step to the end ofthe row.Step 4: Lock the long edge of plank byInserting tongue into groove at an angleand drop in place. Next, slide the planktoward the end of previously installed plankuntil the tongue just touches the groove.*For tile planks, the distance between end jointsshould be at least 12 inches.Ambient Flooring Luxury Vinyl Plank Installation GuidelinesPage 3
Step 5: THIS IS AN IMPORTANT STEP! Use arubber mallet or hammer and a wood block.Tap the block to tap long edge of the plankto ensure a tight fit. MAKE SURE THERE IS NOGAPPING AS IT CAN COMPROMISE THELOCKING SYSTEM!Step 7: Place wood block at end of plank and tapwith hammer to lock ends of planks together.Remove bridge and continue toward the wall untilinstalling the final plank in the row. BE SURE TOTAP ON EDGE OF VINYL SO AS NOT TO DAMAGELOCKING MECHANISM OF PLANKS.Step 6: Using the tongue and groove, attacha scrap piece of floor plank to bridge gapbetween ends of planks and hold themsteady.Step 8: Use a hammer and pull bar to lockthe final piece in the row. Insert a spacer atend of the row. Continue installation on nextrow until final row.Ambient Flooring Luxury Vinyl Plank Installation GuidelinesPage 4
Step 9: Use a hammer and pull bar to locklong edges of planks on the final row.Step 10: To install under door jambs, use ajamb saw to undercut space under doorjamb to allow the plank to slide freely. Tapthe long edge with hammer and tappingblock to lock in place. Use the hammer andpull bar to lock short end of plank.Installation Over Radiant Heat SystemsPlease note that these are general guidelines. Please contact your radiant heat system manufacturerprior to installation to ensure that your specific system is compatible with bamboo flooring as well as ifthey have any specific requirements.FEW NOTES ABOUT INSTALLING OVER RADIANT HEAT New concrete needs to cure for at least 60 days before installing flooring materials. If considering Radiant heat, only Hydronic radiant heat can be used. The heating components must have a minimum of 3/8” separation from the product. System must be operational for a minimum of two weeks prior to installation. A transition strip must be used for any installation longer than 40 linear feet and/or wider than30 linear feet. It is also suggested to use T-Molding in doorways.PRIOR TO INSTALLATION – RADIANT HEAT SUBFLOORSIf the radiant heat system is embedded in concrete, turn the radiant heat system on with thetemperature set on high for 5-6 days. The should help burn off any moisture residing in the concreteprior to installation and this should be done the week leading up to installation. Next, the temperatureshould be set to 65 F and held at that temperature 5 days prior to acclimating the floors – duringacclimation – during installation – and for 72 hours after installation.DURING INSTALLATION Must leave at least a 1/2" expansion gap at all walls and doorways (the SPC flooring expandsslightly when heated) Must install break every 25 ft. (max run 25 ft in any direction) The temperature of the radiant heat system should always be maintained at a constant 65 F.Ambient Flooring Luxury Vinyl Plank Installation GuidelinesPage 5
A stove or any other item that can affect the temperature of the ground should not be used atthe job site. The flooring must be acclimated over the radiant heat with the system turned on and set to 65 F. The same acclimation preparation must be followed as always, including cutting the boxesopen and stacking.If the radiant heat system is encased in concrete or another substrate that releases moisture, a6mm polyethelene barrier must be placed between the flooring boxes and the substrate so thatthe flooring does not absorb moisture during acclimation. AFTER INSTALLATION / MAINTENANCE During the first three days after installation, the radiant heat system temperature should bemaintained at a temperature of 65 F (18⁰ C). After that, the temperature can be set warmer, by5 F per hour to a maximum operation temperature of 85 F (29⁰ C). The temperature of the sub-floor must never exceed 85 F (29⁰ C).When turning off the radiant heat system, it must cool by a temperature of 1.5 Fahrenheit perday. Never turn your radiant system off suddenly.The radiant heat system cannot fluctuate in temperature rapidly. Room temperature shouldvary no more than /-7 degrees Fahrenheit year around.Questions? Please call Ambient Tech Services at (866) 710-7070.Ambient Flooring Luxury Vinyl Plank Installation GuidelinesPage 6
LVP flooring can be installed on, above, or below grade. Prior to installation the flooring should be stored and installed in a climate controlled area with an average temperature between 55-95⁰ F (12-53⁰C). If flooring is exposed to temperatures less than 40⁰ F (5⁰ C) or more than 95⁰ F (35⁰ C) for more