Transcription
FTP Plug-In User Guide2017.1May 2017
Copyright 2001-2017 Perforce Software.All rights reserved.Perforce software and documentation is available from www.perforce.com. You can download and use Perforce programs, butyou can not sell or redistribute them. You can download, print, copy, edit, and redistribute the documentation, but you can not sellit, or sell any documentation derived from it. You can not modify or attempt to reverse engineer the programs.This product is subject to U.S. export control laws and regulations including, but not limited to, the U.S. Export AdministrationRegulations, the International Traffic in Arms Regulation requirements, and all applicable end-use, end-user and destinationrestrictions. Licensee shall not permit, directly or indirectly, use of any Perforce technology in or by any U.S. embargoed country orotherwise in violation of any U.S. export control laws and regulations.Perforce programs and documents are available from our Web site as is. No warranty or support is provided. Warranties andsupport, along with higher capacity servers, are sold by Perforce Software.Perforce Software assumes no responsibility or liability for any errors or inaccuracies that might appear in this book. Bydownloading and using our programs and documents you agree to these terms.Perforce and Inter-File Branching are trademarks of Perforce Software.All other brands or product names are trademarks or registered trademarks of their respective companies or organizations.Any additional software included within Perforce software is listed in "License Statements" on page 41.
ContentsAbout this Manual5Feedback5Other Helix documentation5Syntax conventions5Why an FTP server?6Installing and Configuring P4FTP7System requirements7Product architecture8Installation and configuration8Downloading P4FTPChoosing a port numberStarting P4FTP manually(Optional) Configuring P4FTP to start automaticallyCreating Perforce users and client workspace specificationsSpecifying a template for undefined workspace specificationsUsing config filesVerifying your installation8991112181919Automatically syncing a Perforce workspace21P4FTP configuration options22P4FTP startup options23Configuring Macromedia Dreamweaver with P4FTP25OverviewCreating web sitesSample configurationWorking in a team environmentUpdating a live web siteTroubleshooting notes: adding files252629293132Configuring HoTMetal PRO 6.033Configuring Hot Dog Professional 633Configuring AceHTML33Troubleshooting P4FTP35Error messages35Other questions353
Using a command-line FTP clientPerforce and FTP DifferencesFTP differencesHow files are managed on the client computerHow files are transferredThe pwd commandSupported FTP commandsPerforce differencesChangelist numberingChangelist descriptionsFiletypesWorkspace managementConcurrencyStandards compliance and limitationsLicense Statements4363737373738383838393939404041
About this ManualThis guide tells you how to install, configure and run the Perforce FTP Plug-in (P4FTP). For details abouthow to use or administer Perforce, see the documentation at www.perforce.com.FeedbackHow can we improve this manual? Email us at manual@perforce.com.Other Helix documentationSee urces/documentation.Syntax conventionsHelix documentation uses the following syntax conventions to describe command line syntax.NotationMeaningliteralMust be used in the command exactly as shown.italicsA parameter for which you must supply specific information. For example, fora serverid parameter, supply the ID of the server.[-f]The enclosed elements are optional. Omit the brackets when you composethe command.nRepeats as much as needed:lnRecursive for all directory levels:llelement1 element2alias-name[[ (arg1).[ (argn)]] transformationclone perforce:1666 //depot/main/p4. /local-repos/mainp4 repos -e //gra./rep.Either element1 or element2 is required.5
Why an FTP server?Why an FTP server?P4FTP enables an FTP client to access files in Perforce depots. For example, you might store sharewarein a Perforce depot and use P4FTP to enable non-Perforce users to download the files.Many development tools commonly used in web development environments are not integrated withversion management software. The majority of these tools have a built in FTP client for publishingdeveloped works. The Perforce FTP Plug-in uses this built-in FTP client to enable you to use Perforce’sversion management system in conjunction with your web development tools. When you use P4FTP inplace of standard FTP, your files are kept in a Perforce depot under version control.6
Installing and Configuring P4FTPP4FTP is both an FTP server and a Perforce client application. Files that are downloaded from the FTPserver are retrieved from the depot, and files that are uploaded are put into the depot. For details, see"Product architecture" on the next page.This chapter tells system administrators how to install and configure P4FTP.System requirementsThere are four components you need to install and configure to use FTP to access files in Perforcedepots:nFTP client: a command-line client or a web authoring tool such as Dreamweaver, which has anFTP client embedded in it. The FTP client communicates with P4FTP.nP4FTP: accepts requests from an FTP client and communicates with a Perforce server.nPerforce service: manages files in shared repositories called depots.NoteIf you use versions lower than 2000.2, P4FTP does not display files' sizes when you issue theFTP ls command.nPerforce application: enables you to perform Perforce tasks directly. The most commonly-usedPerforce applications are P4V, the P4 command-line interface, and P4Web.For details about installing Perforce, refer to the Helix Versioning Engine Administrator Guide:Fundamentals.The following table shows you where the components are installed. Note that you can install two or morecomponents on the same computer. However, the Perforce server is typically a remote computer,because there is no advantage to be gained by locating your depot on the same computer as theworkspace files.Computer DescriptionClientcomputerThe computer where you work on files.System requirementsnFTP clientnNetwork access to theFTP servernPerforce application(recommended)7
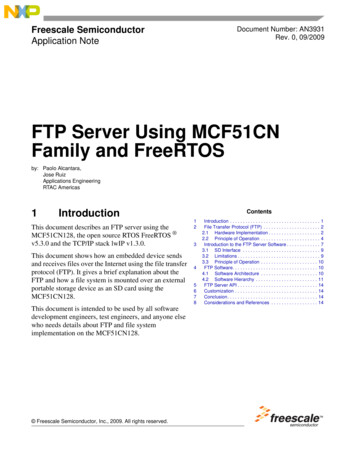
Product architectureComputer DescriptionFTP serverPerforceserverSystem requirementsThe computer where you run P4FTP.The computer where the Perforce service runs andwhere your repository resides.nP4FTPnNetwork access to thePerforce servercomputernPerforce application(required)nPerforce serverProduct architectureThe following figure shows a high level view of the architecture of P4FTP:There are some important differences in behavior between P4FTP and a normal FTP server. For detailsabout these differences, refer to "Perforce and FTP Differences" on page 37.Installation and configurationTo install P4FTP, perform the following steps:1. Download P4FTP.2. Choose a port number.3. Start P4FTP.4. Optionally, configure P4FTP to start automatically when you reboot the computer on which it runs.5. Create Perforce users and workspace specifications.After you perform these procedures, you can configure web authoring tools such as MacromediaDreamweaver to use Perforce to store and retrieve your web site files. For details, see "ConfiguringMacromedia Dreamweaver with P4FTP" on page 25. The following sections tell you how to installP4FTP.Downloading P4FTPTo download P4FTP:8
Choosing a port number1. Launch a web browser and go to:http://www.perforce.com/downloads/complete list2. On the Perforce product download web page, find the version of P4FTP that is compatible with theplatform where you intend to run it.3. Download the file to the directory where you intend to run it.NoteRecommended installation directories are:nWindows: C:\Program Files\Perforce\nUNIX: /usr/bin/ or /usr/local/bin/Choosing a port numberP4FTP is a modified FTP server. Its default port number is 21, which is also the default port number forstandard FTP servers. To avoid port conflicts, you can assign a different port number to P4FTP when youstart it, as follows:nCommand line: specify the -l flag when you start P4FTP.nWindows service: use the p4 set -S command option to set the P4FTPPORT environmentvariable for the service. For details, see "(Optional) Configuring P4FTP to start automatically" onpage 11.Starting P4FTP manuallyTo start P4FTP manually (that is, from the command line), perform the following steps:1. Login as the user that you want to run P4FTP.NoteUnix users: If you want to run p4ftpd on a privileged port (a port number lower than 1024),login as root. The default port for standard FTP servers is port 21. To enable P4FTP to listenon a privileged port while running as a user other than root, specify the -u username flagwhen you start p4ftpd.NoteWindows users: open a DOS window.9
Starting P4FTP manually2. Run p4ftpd.When starting p4ftpd, you can specify the host and port number of the Perforce server youwant to access, and optionally the port on which P4FTP accepts FTP commands.For example, to start p4ftpd with its default port (21) on the same computer (namedperforce) where the Perforce server is running on its default port (1666), issue the followingcommand: p4ftpdTo start p4ftpd on port 1232 communicating with a Perforce server running on port 2343 on aremote computer named bigcomputer, issue the following command: p4ftpd -p perforce.bigcomputer.com:2343 -l 1232By default, p4ftpd submits changelists with the following description:[P4FTPD] Automatic changelist for uploaded filesWhen you start p4ftpd, you can override the default description using the -t flag. In the description,you can specify the following macros, which are expanded when the changelist is submitted:MacroExpands to%user%user name%client%client workspace name%ftphost%host name (p4ftpd host)%time%timestampFor example: p4ftpd -t "[P4FTP(%ftphost%)] submit by %user% from %client% at%time%"To specify the verbosity and content of debugging output, specify the -vftp n flag, where n is thedesired level, as follows:LevelDescription1Log all connections as they arrive2Log all successful and failed login attempts3Log all disconnections4Log all transfers6Log all commands and responses to stdout as they are received10
(Optional) Configuring P4FTP to start automaticallyLevelDescription8Log all Perforce commands to stdout as they are executed9Log all data transferred over the data channel to stdoutEach level includes all preceding (lower) levels.(Optional) Configuring P4FTP to start automaticallyYou can configure P4FTP to start automatically when its host computer is rebooted.UNIX computersEdit the startup scripts according to the convention for your UNIX platform. If you intend to run P4FTP ona port other than the default, be sure to set the P4FTPPORT environment variable in the startup script.Windows computersTo configure P4FTP to start automatically when its host computer is rebooted, create a service asfollows:1. At the DOS command prompt, change to the directory where the file p4ftpd.exe is located.(This file is the one you downloaded from the Perforce web site.2. Create a copy of p4ftpd.exe named p4ftps.exe by issuing the following command:C:\ copy p4ftpd.exe p4ftps.exe3. Create a service by issuing the following command:C:\ svcinst CREATE -n "Perforce FTP Server" -e"fullpath/p4ftps.exe" -awhere fullpath indicates that you must specify the full location of the p4ftps.exe file.Windows displays the following results:Creating ServiceServiceName Perforce FTP ServerExeName c:\Program Files\perforce\p4ftps.exeAutostart requested(To verify the service has been successfully created, use the Services control panel.)NoteThe svcinst utility is installed when you install the Perforce service on Windows, in thesame directory as the server. For more details, refer to http://kb.perforce.com/article/3511
Creating Perforce users and client workspace specifications4. To specify a host and port for the service, issue the p4 set command. For example, to ensurethat P4FTP listens on port 1892, issue the following command: p4 set -S "Perforce FTP Server" P4FTPPORT 1892You can also configure the user and client workspace name for the P4FTP service, for example: p4 set -S "Perforce FTP Server" P4USER bruno p4 set -S "Perforce FTP Server" P4CLIENT brunoTo start the service manually, use the Services control panel. The service starts automatically when youreboot your computer. To view settings, use regedit to display E\Parameters whereSERVICENAME is the name you gave the service when you created it.Creating Perforce users and client workspace specificationsFor each user who intends to access Perforce depots using P4FTP, you must create a Perforce user anda client workspace specification on the P4FTP server computer. Perforce uses the client workspacespecification to determine the location of its client workspace, where it stores files on your computer.The following sections tell you how to create a Perforce user and client workspace specification. Performthese steps from a computer where P4V or the Perforce command-line interface (p4) is installed. Youcan direct P4FTP to create a client specification using a template, when a user that has not P4FTP clientspecification connects for the first time. For details, see "Specifying a template for undefined workspacespecifications" on page 18.Using P4VTo create a Perforce user and client specification using P4V, perform the following steps.12
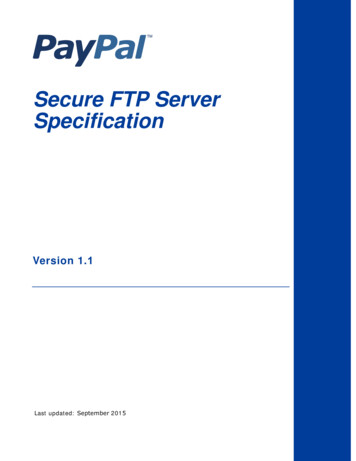
Creating Perforce users and client workspace specifications1. Launch P4V. The Open Connection dialog is displayed.2. Click the New button next to the User field. The New User dialog is displayed.3. Enter the information for the user you want to create and click Save to dismiss the dialog.13
Creating Perforce users and client workspace specifications4. Click the New button next to the Workspace field. When prompted, enter ftp- followed by thename of the user you created in the preceding steps. The New Workspace dialog is displayed.14
Creating Perforce users and client workspace specifications5. Enter the required information. Note that, because you define the client workspace on thecomputer where P4FTP runs, you only need to correct the normdir option. Check the followingentries:FieldDescriptionHostnameSpecify the name of the computer where P4FTP runs. For example:RootSpecify the directory on your FTP server computer where you want the Perforceclient workspace to be located. P4FTP uses the client workspace as temporarylocal storage.mycomputer.example.orgSpecify a location below the root directory, such as C:\p4client. To avoidcluttering the root directory of your computer, do not use the root directory as theroot of your workspace. Choose a directory that is not used by another program orprocess.OptionsCheck rmdir. If your Perforce depot is located on a UNIX computer and your FTPclient is located on a Windows computer, set the LineEnd option to win.ViewSpecifies the mapping of the Perforce depot to your client workspace, todetermine which files in the depot are visible to your client computer. Do notchange this entry unless you understand Perforce workspace views and want toalter the mapping.6. Click Save to save your changes.The user and workspace are created. You do not need to connect to the server using P4V for your entriesto take effect.Using the P4 command-line interfaceTo create a Perforce user and client specification using the Perforce command-line interface, perform thefollowing steps.1. At the command line, issue the p4 user command. Perforce launches a text editor anddisplays thePerforce User Specification form as follows.15
Creating Perforce users and client workspace specifications2. Enter the information for the new user in the User, Email, FullName, and (optionally) Passwordfields.3. Save and close the file.16
Creating Perforce users and client workspace specifications4. At the command line, issue the p4 client command. Perforce displays thePerforce ClientWorkspace Specification form as follows:17
Specifying a template for undefined workspace specifications5. Change the entries in the following fields:FieldDescriptionClientSpecify ftp- followed by the Perforce user name.HostSpecify the name of the computer where P4FTP runs. For example:mycomputer.example.org.RootSpecify the directory on your FTP client computer where you want the Perforceclient workspace to be located. Recommendation: specify a location below theroot directory, such as C:\p4client. To avoid cluttering the root directory ofyour computer, do not use the root directory as the root of your workspace.ClientoptionsChange normdir to rmdir. If your Perforce depot is located on a UNIXcomputer and your FTP client is located on a Windows computer, set theLineEnd option to win.ViewSpecifies the mapping of the Perforce depot to your client workspace, todetermine which files in the depot are visible to your client computer. Do notchange this entry unless you understand Perforce workspace views and want toalter the mapping.6. Save and close the file.Specifying a template for undefined workspace specificationsTo enable P4FTP to create an ftp- client specification for users that lack one, you can specify atemplate client specification. The first time a user that lacks an ftp- client specification connects,p4ftpd creates an ftp- client specification based on the client template. If you do not specify atemplate, P4FTP requires all ftp- client specifications to exist when it attempts to connect to thePerforce server.The client template is an existing Perforce client specification. You define the client template asdescribed in "Creating Perforce users and client workspace specifications" on page 12. To ensure thatclient roots do not conflict, you can use macros in the client root field of the template. For example, thefollowing client root definition directs P4FTP to create a client root directory using the format/data/host/user:Root: /data/%ftphost%/%user%To ensure that client roots do not conflict, and to tailor the client view to meet your needs, you can usemacros in both the client root field and the view field of the template. For template/main/.18
Using config hese definitions ensure that each user’s client root is unique and map a user-specific depot path intotheir client view, along with files in the //depot/main/. path.To specify the client template that you want P4FTP to use, specify the -T flag when you start p4ftpd.For example: p4ftpd -T ftp-myclient-templateUsing config filesYou can use Perforce config files to specify client options for p4ftpd. A config file is a text filecontaining specifications for Perforce client settings. (For detailed information about config files, see theP4 Command Reference.) In addition to the standard Perforce client settings, you can specify thefollowing P4FTP OG (UNIX only)nP4FTPCHANGEnP4FTPTEMPLATE (template client specification; see "Specifying a template for undefinedworkspace specifications" on the previous page)For details about these settings, see "P4FTP configuration options" on page 22. Note that p4ftpdobtains settings for P4USER, P4PASSWD and P4CLIENT from its FTP client and therefore ignoresany config file entries for these settings. Any settings that you specify on the command line when youstart p4ftpd override corresponding config file settings.Verifying your installationThe following sections tell you how to verify that P4FTP is up and running. Note that, to perform theseprocedures, your Perforce server must be running and you must have started P4FTP as described in theprevious sections.Using the command lineTo verify that you have successfully installed and configured P4FTP, issue the following commands tostart an FTP client and connect with P4FTP:19
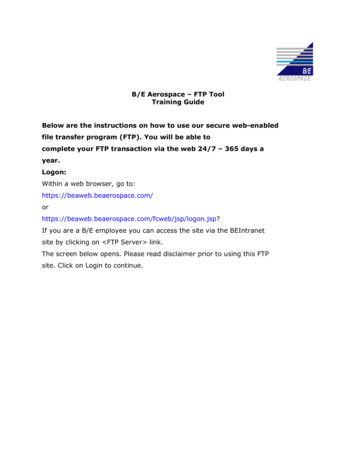
Verifying your installation1. At the operating system prompt, start FTP by issuing the ftp command.2. At the ftp prompt, issue the open command to connect to the host where P4FTP is running; forexample, to connect to a host named myhost listening on port 1234:ftp open myhost 1234The message 220 PerforceP4FTP FTP Server ready is displayed.3. If prompted, log in.4. Display the contents of the Perforce depot by issuing the FTP ls command. To browse the depotand transfer files, use other standard FTP commands.5. To display information about commands supported by P4FTP, issue the help command.Using a Web browserTo verify that you have successfully installed and configured P4FTP, perform the following steps to use abrowser to connect with P4FTP:1. Launch a Web browser.2. In the URL window, enter a URL that specifies FTP protocol, the Perforce user, and the P4FTPhost name and port.For example, if P4FTP is running on mycomputer and listening on port 1850, enter:ftp://mitch@mycomputer:1850If you are using Internet Explorer, you must specify the user password (if any) in the URL in thefollowing 20
Automatically syncing a Perforce workspace3. If prompted, enter your password and click OK.The browser displays the contents of the depot. The following figure shows a browser displaying adepot.Automatically syncing a Perforce workspaceTo configure P4FTP to automatically sync files to a specified workspace, you can specify the followingoptions when you start p4ftpd. You cannot start p4ftpd in single-threaded mode (using the -f flag)if you want to use its automatic sync feature.Valid options are as follows:n-O autosync: Sync the entire client view every 300 seconds (five minutes).n-O syncdelay n: Sync every n seconds. The default interval is 300 seconds. If you specifythis option, omit the -O autosync option.n-O syncspec valid sync specification: Sync only the specified files. validsync specification can be any file specification you can use with the p4 sync command,including wildcards, labels or changelist numbers. By default, the entire client view is synced. Ifyou specify this option, omit the -O autosync option.The workspace that is automatically synced is taken from the environment of the p4ftpd processwhen it is started, including Perforce config files. For details about configuring workspace settings, referto {cite-intro}. For details about using config files, refer to the P4 Command Reference.You can specify these settings:21
P4FTP configuration optionsnwhen you start p4ftpd, ornby setting the P4FTPOPTIONS environment variable before you start p4ftpd, ornin a Perforce config file in or above the directory from which p4ftpd was started.If you run p4ftpd as a Windows service, you must use the P4FTPOPTIONS environment variable toset options.ExampleSetting p4ftpd to sync the entire client view every five minutes p4ftpd -O autosyncExamplehourSetting p4ftpd to sync the files in the external web directory every p4ftpd -O syncdelay 3600 -O syncspec //external web.ExampleHow to specify the preceding settings in a config file P4FTPOPTIONS "syncdelay 3600,syncspec //external web."P4FTP configuration optionsYou can use the following environment variables to configure fies the TCP port to listen on. The default port is 21.P4FTPPREFIXSpecifies the prefix to be prepended to the user’s login to determine thecorresponding Perforce client workspace. The default prefix is ftp-.P4FTPCHANGESpecifies the description to be included when P4FTP submits changelists.Overrides the default description.P4FTPLOGSpecifies the file where P4FTP logs errors. By default, errors are sent toSTDERR.22
P4FTP startup et multiple options, including automatic syncing of the current workspace,how often to check for submitted changelists and which files to sync. Usecommas to separate multiple options. For example: P4FTPOPTIONS dwlocking,autosync,syncdelay 10For details about the options you can specify, see "P4FTP startup options"below.P4FTPSYSLOGUNIX only: If set, enables logging using syslog().P4FTP startup optionsYou can specify the following options when you start p4ftpd.CommandLine FlagDescription-c prefixPrefix applied to the username in order to derive the name of the Perforce clientto use. Defaults to “ftp-” if not specified.-C charsetDo not set unless your Perforce server is running in international mode (ask yourPerforce administrator, and consult the description of P4CHARSET in the P4Command Reference for details.)Valid nmacosroman-dRun as a daemon process (UNIX only), meaning that p4ftpd does not shutdown when the user that started it logs off.-fRun in single threaded mode. p4ftpd will service one request at a time in thismode.-hPrint the command line syntax and exit.-iStarted from inetd (UNIX only). Implies -f, because inetd creates adedicated P4FTP for each request.23
P4FTP startup optionsCommandLine FlagDescription-l portSpecify the TCP port number on which p4ftpd listens for incomingconnections. By default, p4ftpd listens on port 21, which is standard for FTPservers. On UNIX machines, only processes started by root can listen on portsbelow 1024.-L logfileRedirect all log messages to the specified file. If not specified, error messagesare directed to STDERR-O p4ftpoptionSpecifies various P4FTP settings. Specify each option separately; for example:-O dwlocking -O autosyncValid options are:dwlocking: uses Dreamweaver file locking to ensure that Perforce andDreamweaver each observe the other’s locks.dw4locking: same as dwlocking for version of Dreamweaver prior toversion 2004.NoteThe dwlocking and dw4locking options control Dreamweaverlocking, not Perforce locking. For details about configuring locking in a teamenvironments, see "Working in a team environment" on page 29.autosync: enables automatic syncing of the entire client view every fiveminutes.syncdelay n: specifies how often to sync automatically. You can omitautosync if you specify this option.syncspec valid sync arg: specifies the portion of the client view tobe automatically synced. Specify valid sync arg using any validspecification for the p4 sync command, including changelists and wildcards.You can omit autosync if you specify this option.keepfiles: prevents P4FTP from deleting files from its workspace aftersyncing them. By default, files are deleted, but if you are using P4FTP foranonymous FTP, this option prevents race conditions that can occur if twopeople request the same file at almost the same time.-p addressAddress of the Perforce server that serves the depot. Defaults toperforce:1666 if not specified-sRedirect all log messages to the syslog daemon (UNIX only).24
Configuring Macromedia Dreamweaver with P4FTPCommandLine FlagDescription-T clienttemplateSpecify a Perforce client to be used as a template for clients lacking acorresponding ftp- client specification. For details, refer to "Specifying atemplate for undefined workspace specifications" on page 18.-tdescriptionSpecify the description to be attached to all changelists created by P4FTP.Defaults to:[P4FTP] Automatic changelist for uploaded files-u usernameUNIX only: Specify the username with which the p4ftpd process runs.Enables you to assign a privileged port (a port number lower than 1024) top4ftpd without assigning root privileges to the process.For example, to start p4ftpd on the local machine on port 21, running with a non-root user andcommunicating with the Perforce server running on perforce.example.org on port 1666, issuethe following command: p4ftpd -p perforce.example.org:1666 -l 21 -u p4ftpadministratorConfiguring Macromedia Dreamweaver with P4FTPThe following sections tell you how to configure Dreamweaver and Perforce with P4FTP so you can storeyour web site files in Perforce depots and access them in Dreamweaver exactly as you access remotesites using normal FTP.OverviewThe areas you must configure to use Dreamweaver with Perforce are as follows:nClient workspace: an area of working storage on the computer where P4FTP runs. Must notoverlap the local root.nLocal root: the directory where Dreamweaver stores its working copies of the web site files forediting.nHost directory: a path relative to the root of your Perforce workspace, where Dreamweaverpublishes the site’s files.For example, if you’re running Dreamweaver on a Windows computer, P4FTP on a UNIX computernamed ftpserver and the Perforce server on a UNIX computer named perforceserver,configure as follows:25
Creating web sitesnnClient specification for ftp-mitchlHost: ftpserverlClient root: /usr/team/mitchlClient view: //depot/. //ftp-mitch/.Dreamweaver configuration for a Web site named marketing09lLocal root: c:\dwroot\marketing09lHost Directory: /main/marketing09/After you configure Dreamweaver and Perforce, you use Dreamweaver’s Get, Put, Check In and CheckOut menu options to store and retrieve web site files.Creating web sitesTo use Dreamweaver to create a web site that resides in a Perforce depot, perform the following steps:1. Create a folder on your computer where you want Dreamweaver to store the local copies of yourweb site files. (Example: C:\mywebsite).2. In Dreamweaver, choose Site Manage Sites . The Manage Sites dialog is displayed.3. Click Ne w.26
Creating web sites4. Enter the local settings for the new site, as illustrated in the following figure.ImportantIn the Local Root Folder field, specify an existing directory that does not reside in your clientworkspace root.5. In the Category pane, click Remote Info. The Remote Info pane is displayed.27
Creating web sites6. From the Access list, choose FTP. The following fields are displayed.28
Sample configuration7. Make the following entries:FieldDescrip
n Perforce service: manages files in shared repositories called depots. Note If you use versions lower than 2000.2, P4FTP does not display files' sizes when you issue the FTP ls command. n Perforce application: enables you to perform Perforce tasks directly. The most commonly-used