Transcription
Real World TerrainVersion 4.6Infinity Code, 2013-2021https://infinity-code.com/
ContentsOverview . 5Description . 5Specification . 5Using. 5Generation of Gaia stamps . 6Generation of RAW files . 7Providers of tiles . 7Using «Provider - Custom» . 7Commercial use . 8Real World Terrain Window . 9Description of fields . 9History . 11Best Settings . 11Settings of Real World Terrain . 11Memory usage . 12Clear the cache . 12Helper. 13Usage of the helper . 13Alternative helper . 13POI . 14Additional features . 15Generation of additional elements . 15Buildings . 15Roads . 15Rivers . 16Trees . 16Grass. 16Regeneration . 17Utils . 17Overview . 17Building Manager . 17Object Placer. 18POI Manager . 19Scaler . 19Show Location. 20
Post-processing. 20Overview . 20Brightness, Contrast and HUE. 20Color Balance . 21Color Levels. 22Erosion Filter. 22Generate Grass from Texture . 23Generate SplatPrototypes from Texture . 24Export / import RAW data . 24Export Mesh as OBJ . 24Third Party Assets . 25Overview . 25BuildR - Procedural Building Generator . 25EasyRoads3D Pro v3 . 26Gaia и Gaia Pro . 26Huge Texture . 27Online Maps. 27Playmaker . 27R.A.M 2019 - River Auto Material 2019 . 27Relief Terrain Pack (RTP) . 28Road Architect . 28uContext . 28Vegetation Studio and Vegetation Studio Pro . 29Volume Grass . 29WorldStreamer . 30Real World Terrain API . 30Updating versions . 30Troubleshooting. 31Known issues . 31Your problem is not listed . 32Frequently asked questions . 32Support . 33Other Infinity Code assets . 34Huge Texture . 34Mesh to Terrain . 35
Online Maps. 36Terrain Quality Manager . 37uContext (FREE, PRO) . 38uPano . 41Final words . 42Links . 42
OverviewDescriptionReal World Terrain is designed to generate Terrains, Meshes, Gaia stamps and RAW files, based on realEarth elevation data, and buildings, roads, rivers, grass, trees, based on data from Open Street Map.With Real World Terrain comes utility that allows you to select the necessary part on Google Maps, a setof tools for post-processing terrains, textures, place objects on the map.SpecificationReal World Terrain uses: For elevation maps uses:o ArcGIS. Accuracy: 10m – USA, 90m - 56 S - 60 N, 900m – other.o Bing Maps. Accuracy: 10m – USA, 90m - 56 S - 60 N, 900m – other.o Mapbox. Accuracy is unknown.o SRTM v4.1. Accuracy of 3 arcseconds (90 meters). The relative error in height for thedata of less than 6 meters.o SRTM 30. Accuracy of 1 arcseconds (30 meters).To create additional objects used Open Street Map data.To create textures used: ArcGIS, DigitalGlobe, Map Quest, Mapbox, Mapy.CZ, Nokia Maps(HERE.com), Virtual Earth (Bing Maps), Open Street Map, Sentinel-2.Mapbox Streets v8 is used to generate Terrain nce/mapbox-streets-v8/Note: SRTM data do not contain water depth maps, so zero height is used for seas and oceans.UsingSelect the menu item «Window / Infinity Code / Real World Terrain / Open Real World Terrain», to openReal World Terrain window.Enter the coordinates of the area in decimal, configure the fields and click «Start».Real World Terrain will automatically download the necessary elevation data, textures, Open Street Mapdata, create new GameObjects or files containing the specified area, and add them to the scene. Foreach Terrain creates an information block containing the coordinates, texture, and giving theopportunity to re-create it with the new settings.Created terrains are stored in «Assets / RWT Result».
IMPORTANTReal World Terrain works with a lot of data, and can, depending on the settings to use a lot of memory.We do not limit Real World Terrain settings, so you can get exactly what you want. But when a largenumber of generated Terrains, you may get an error of memory, with crashes to Unity Editor.To create the most detailed Terrains and avoid errors, we recommend the following steps: Create the desired area without textures, or with a minimum resolution (128 or less).Create a texture with the required resolution.Create additional objects.After the successful completion of each step to save your scene.Generation of Gaia stampsSelect the menu item «Window / Infinity Code / Real World Terrain / Open Real World Terrain», to openReal World Terrain window.Enter the coordinates of the area in decimal, select «Result - Gaia Stamp», specify the requiredresolution and click «Start».Note: Real World Terrain uses Gaia's built-in features to generate terrains, so only Gaia stamp iscreated.Real World Terrain will create a new RAW object that contains elevation data.RAW object will be scanned using Gaia Scanner and saved as Gaia stamp in «Assets / Gaia / Stamps /Bases» folder.The new Gaia stamp will be opened in Gaia Stamper.You will need to specify the required size, position and Base Level, and click «Stamp».Read more about working with Gaia stamps in the Gaia documentation.Note: If you do not have a Gaia Session Manager in the scene, the new Session Manager will be created.
Generation of RAW filesSelect the menu item «Window / Infinity Code / Real World Terrain / Open Real World Terrain», to openReal World Terrain window.Enter the coordinates of the area in decimal, select «Result - Raw File», specify the result type, filename,required resolution and click «Start».Real World Terrain can generate two types of the result: RAW - binary file where elevation values are linear and use two bytes.Mapbox RGB - image (PNG) where each elevation value is encoded in -data/Providers of tilesReal World Terrain can use to generate textures any source of the tiles in WGS84 Web Mercator(Spherical Mercator) projection.Real World Terrain has presets for most known compatible sources of satellite tiles. If the source of thetiles you want to use does not have a preset, you can do it using «Provider – Custom».Note: The preset for Google Maps tiles has been removed, because it has a limit on the amount ofdownloaded data. But if you really want to use it, you can do it using Provider-Custom.The legal way to use tiles from Google ion/tile/Note: Some tile sources require API keys (tokens), for example: DigitalGlobe and Mapbox.Using «Provider - Custom»To use «Provider - Custom» in the field «URL» specify a URL pattern for download tiles.URL pattern supported tokens:{zoom} – Zoom level.{x} – Tile X.{y} – Tile Y.{quad} – Tile Quad Key. Uses in Virtual Earth (Bing Maps).
General instructions:1.2.3.4.5.Open in a browser map on the site of provider, tiles from which you want to use.Open a browser developer tools. Hotkey in most browsers - F12.Find the address of tile.In the address replace the numbers that are responsible for the tile zoom, x, y to tokens.Insert the URL pattern into the field «URL».Commercial useYou can use terrains, buildings, roads, rivers, trees, grass, created with Real World Terrain, forcommercial purposes.The rights to the commercial use of textures depending on the selected provider. You are responsible toread the license agreement on the provider's site.
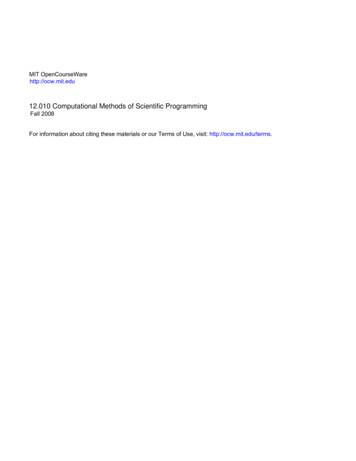
Real World Terrain WindowDescription of fieldsAlong with most of the fields added icons, when you hover on which you can read a summary of thefield. Clicking on the icon will open a detailed description of the field.File - allows you to export and import settings.History - contains the history of generations.Settings - opens the settings window.Help - documentation, API reference and useful links.Area - the coordinates of the top-left and bottom-rightcorners of the area in decimal or UTM (Universal TransverseMercator) format.Title - a description of the current generation. Used only inhistory.Use Anchor - whether to use anchor coordinates. If yes, thenthe zero position of the container in the scene will have thespecified coordinates.Insert the coordinates from the clipboard - inserts thecoordinates copied in the helper.Run the helper - open the helper.Get the best settings for the specified coordinates - opensthe wizard that will help you get the best result.Show Open Street Map - opens Open Street Map in thebrowser on your current location. It is useful to know whichobjects are marked on the selected area.Result type - the type of object being created. Terrain - standard Unity Terrain. After creating theobject, you will be available built-in tools to work with the Terrain. Mesh Gaia Stamp RAW fileCount terrains - the number of new terrains by longitude and latitude.Align Water Line - If disabled terrains will have zero Y at minimum elevation. If enabled, terrains willhave zero Y on the water line (zero elevation).Size type - the method of determining the size of created Terrains.
Real world sizes. Width equal to the average of the lengths of the upper and lower parallels. Heightequal to the length of the meridian. Mercator sizes. The size of one degree of latitude and longitude is fixed. Fixed Size. Each terrain or mesh will have a fixed specified size.Scale - a scaling factor to the new area.Max elevation - the maximum height of the new area. Auto detect - the maximum height is determined automatically. Recommended. Real World Value - the maximum height is 15,000 meters.Max underwater depth - the value used when no value of the height map. Usually it is the sea, oceans,lakes. Uses the absolute depth, such as «-30».Detail Resolution - the number of cells available for placing details onto the Terrain tile. This value issquared to make a grid of cells.Resolution Per Patch - the number of cells in a single patch (mesh). This value is squared to form a gridof cells, and must be a divisor of the detail resolution.Base Map Resolution - the resolution of the composite texture to use on the Terrain when you view itfrom a distance greater than Basemap Distance.Height Map Resolution - the pixel resolution of the Terrain’s heightmap.Create prefab - specifies whether to create prefab, in the folder results. Create prefab takes some time.Elevation Provider – provider of elevation data. ArcGISBing Maps. Required Bing Maps API Key.Mapbox. Required a Mapbox API key (public token).SRTMSRTM 30. Required a login / password for earthdata.nasa.gov.Generate textures - indicates whether the created texture.Result Type - type of texture result. Regular Texture. One texture for each terrain will be generated, and set to the first Terrain Layer.Huge Texture. One Huge Texture (up to 26624x26624px) will be generated for each terrain. Fordisplay, Huge Texture material will be created and set as material for terrain.Important: when using Huge Texture, you cannot use Terrain Layers.(Unity 2018.3 and higher) Terrain Layers. Terrain Layers will be generated based on vector tile datafrom Mapbox. You can flexibly configure the generation rules for each layer and tag.Provider - the source that will be downloaded texture. Textures derived from different providers vary inquality, maximum detail and conditions of use.Type - the type of texture map.Count textures - number of created textures. Only Mesh.
Texture width / height - size of the texture created for each terrain.Max level - the highest level of approximation for the textures.Generate buildings - specifies whether to create buildings.Generate roads - specifies whether to generate roads. This field will be available if the integration withEasyRoads3D v3 or Road Architect is enabled.Generate rivers - specifies whether to create rivers.Generate trees - specifies whether to create trees.Generate grass - specifies whether to create grass.HistoryIt contains the history of all runs Real World Terrain.Each record contains fields: Number.Title. If the title is empty, then the coordinates of the area are displayed.Time of starting the generation. - restores the generation settings.X - remove a record from the history.Best SettingsIf you do not know what settings to use for the selected area, click «Get the best settings for thespecified coordinates». Move the sliders to the desired quality setting and press «Apply».Settings of Real World TerrainTo open the Settings window, click «Settings» in the upper part of the window.In the settings you can: Change the folder of the application cache. This is useful if you want to use a shared cache formultiple applications.Specify the name of the created GameObject.Enable or disable working with third-party assets. To enable will be available only assets that arepresent in the project.To return to the default settings, click «Revert to default settings».
Memory usageClick «Memory Usage» in the main window of Real World Terrain to open memory usage informationwindow.This window displays the uncompressed size of terrains and textures, after being generated with thecurrent settings.Only the main fields affecting the size of the result are shown.Important: This window does not show the memory that Real World Terrain will use to generate theresult.Clear the cacheReal World Terrain uses a large amount of data that it caches in the folder «{PROJECT FOLDER} /RWT Cache». If this data is not more than you need, you can clear cache by pressing the «Clear cache»in Real World Terrain.
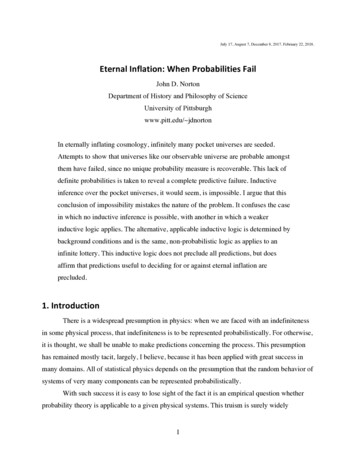
HelperUsage of the helperClick «Run the helper», to show a helper. Helper will run in the default browser with the coordinatesspecified in Real World Terrain.Helper contains: A search box.Google map with a frame added to it that indicates the area that will be used in Real WorldTerrain. The frame can be resized and moved. To move the entire frame, hold down «CTRL».Block information on the current position, the code to copy and control buttons.o Add POI - adds a new POI (point of interest) in the center of map.o Place selector - fits the frame to the visible area of the map and set the frame size - 70%of the visible area.o Show Open Street Map - opens in a new tab «openstreetmap.org» in the same positionin which the map in the helper.o Show download links shows the download links height maps.Block POI lists all the POI on the map. What would change the title of the POI, double-click onthe title. POI on the map supports Drag and Drop.Download links height maps of the selected area.Place the frame on the desired area on the map, select and copy the text in the block «Copy this toClipboard». In Real World Terrain, click «Insert the coordinates from the clipboard» and selected in thehelper coordinates frame will be inserted into Real World Terrain.Alternative helperIf you have any problems when using the built-in helper, you can use an alternative helper:http://service.infinity-code.com/RWT Helper/RWT Helper.html
POIContains a list of points of interest.Point of interest contains:- Title - the title of POI.- Latitude (Lat) - geographical latitude of POI.- Longitude (Lng) - geographical longitude of POI.- Altitude - altitude of POI above sea level. If “0” is specified, the zero height above the terrain will beused.- Prefab - GameObject that will be used to display the POI.After creating the terrains all the POI will be placed in right places. You can quickly navigate to thedesired POI double-clicking on the line in the window «Hierarchy».Use the utility «POI Manager» to comfortably work with POI.To replace POI GameObject, drag a new prefab from the project to Real World Terrain POI Item (Script).To update the position of POI in the scene based on the coordinates, click «Update World Position».To update the coordinates of POI based on the position in the scene, click «Get Coordinates from WorldPosition».
Additional featuresGeneration of additional elementsReal World Terrain can automatically create buildings, roads, trees and grass, based on real data fromOpen Street Map.Before the creation of additional objects please visit «www.openstreetmap.org» and make sure thatyou are required objects are marked on the map. In Europe, perfectly marked, almost all of the city. InAmerica, most buildings are not marked.Important: the created objects may be slightly different from the picture on the texture. This is becausethe layout objects in Open Street Map. If the building is present on the texture, but not created, then itmeans that it is not marked in Open Street Map.BuildingsReal World Terrain can generate buildings in the following modes: Built-in - To display buildings using the built-in building engine.UV maps are automatically generated for buildings and walls.Textures for roofs and walls are chosen randomly. BuildR2 - BuildR 2 is used to display buildings. BuildR3 – BuildR v3.x is used to display buildings. Instantiate Prefab - The specified prefabs will be used as buildings.For buildings and walls added a description of all available tags Open Street Map. For many of thebuildings there including address, name, height, etc.If the tag contains the height or number of floors, the object will be created with the correct height. Youcan always correct height, specifying the desired value and pressing the «Update». For buildings canchange the type and height of the roof.If the building was created with the wrong normals walls or roof, you can quickly fix it by pressing«Invert wall normals» or «Invert roof normals» respectively.RoadsReal World Terrain can generate roads for EasyRoads3D v3 or Road Architect.When generating roads, you can select the types of roads to be created.For EasyRoads3D v3, you can specify the types of roads from the Open Street Map and the types ofroads EasyRoads3D, customize the width of the road and generate connections.
RiversReal World Terrain can generate rivers as Mesh or for R.A.M 2019 - River Auto Material 2019 (thirdparty asset).To generate rivers as meshes, you need to specify the material of the rivers.This may be a regular material or a material of a third-party asset (for example, R.A.M - River AutoMaterial).To generate rivers for R.A.M 2019, specify profiles for Area and Spline.Both profiles will be used for rivers, just OSM has two types of rivers.Ram Spline will be used to generate rivers for which OSM has only spline points.Lake Polygon will be used to generate rivers for which OSM has coastline points.TreesReal World Terrain can generate trees: Regular terrain trees.Specify the density of grass and prefabs of trees. Areas of trees for Vegetation Studio.Specify the Vegetation Package and select Vegetation types.GrassReal World Terrain can generate grass: Regular terrain grass.Specify the density and textures of the grass. Grass areas for Volume Grass. Grass areas for Vegetation Studio.Specify the Vegetation Package and select Vegetation types.
To do this, select «Real World Terrain» in the «Hierarchy» and click:withthenewsettings.Regenerate terrains - to change the parameters Terrains.Regenerate textures - to create textures with the new settings.Regenerate additional - to rebuild the buildings, roads, trees and grass.UtilsOverviewReal World Terrain contains a set of tools that will be useful for the search and placement of objects onthe map, working with the POI, etc.These tools are grouped in «Real World Terrain Container / Utils».Building ManagerTool to search the buildings.It allows you to filter the buildings on the values of tags.Enter the street name, house number or any other information contained in the tags, and will showbuildings that contain tags with the specified value.
Object PlacerA tool for placing objects on the terrains by geographical coordinates.This tool works in two modes: Creating a new GameObject at the specified coordinates.Updating existing provisions GameObject.To create a new GameObject select «Place New Object», specify prefab and coordinates, and click«Place».To update position of existing GameObject select «Update Position», select GameObject, specify acoordinate, and click «Update».Place your cursor on the terrains, to see the location under the cursor.Press «CTRL SHIFT», to insert the coordinates under the cursor in coordinates fields.
POI ManagerPOI management tool created using the helper or specified before generating.For each POI is displayed: name, coordinates and buttons:S - Select POI GameObject.P - Open the POI in Object Places.ScalerTool to change the size of terrain in the scene.It works in two modes: Relative. Specify the relative scale of terrains and
Real World Terrain will automatically download the necessary elevation data, textures, Open Street Map data, create new GameObjects or files containing the specified area, and add them to the scene. For each Terrain creates an information block containing the coordinates, texture, and giving the opportunity to re-create it with the new settings.