Transcription
Toad Data Modeler User GuideToad Data Modeler 3User Guide
Table of ContentsToad Data Modeler 3Introduction to Toad Data ModelerAbout Toad Data Modeler11111With Toad Data Modeler you can:11Benefits11Key Features12Other Useful Features13Technical Requirements13Supported DatabasesInterface Layout1415Layout Description15Main Menu and Toolbars16Application Window18Workspace versus Designer19Navigation on Workspace21Workspace Right-Click Options21Application View22Explorers23Model Explorer23Message Explorer23Shortcuts of Objects24About Shortcuts of Objects24Use Shortcuts26Example 1:27Example 2:29Tips and Tricks31
Toad Data Modeler User GuideTable of Contents3Command Line Parameters31Hot Keys33Dock Panes36Modeless Dialogs/Forms38Instances of Forms40Inplace Editor41Object Navigator Box42Object Viewer43Search Objects44Search Items in Trees46Other Quick Tips46Physical Data Model48About Physical Model48Create Entity Relationship Diagram48Select Target Database48Create Entities50Create Attributes52Create Primary Key54Tips and Tricks for Keys58Other Notes59Create Relationship59Identifying Relationship61Non-Identifying Relationship62Self-Relationship for Non-identifying Relationship62M:N Relationship63Define CardinalitySynchronization of NotNull and Mandatory Parent.Display Partiality646566
Toad Data Modeler User GuideTable of Contents4Set up Referential Integrity Rules67Connect Parent and Child Entities68Understanding of Foreign Keys70PFK71FK71Parent Attributes (Rolenames)73Advanced Database Design75About Advanced Options75Dictionary Items75User Data Types75Dictionary Types75Domains76Export/Import of the Dictionary76Alternate Keys84Indexes86Check Constraints and Triggers89Views93Materialized Views96Procedures, Functions, Schemas, Synonyms, Defaults.98Users and User Groups100Permissions105Naming Conventions106About Naming Conventions106Basic Operations108Default Synchronization of Caption and Name109Scenario 1111Scenario 2119Scenario 3122
Toad Data Modeler User GuideTable of Contents5Scenario 4125Use Cases - Different Naming Convention Settings127A: Automatic Synchronization On, Apply Naming Convention Rules On128B: Automatic Synchronization Off, Apply Naming Convention Rules Off128C: Automatic Synchronization On, Apply Naming Convention Rules Off128D: Automatic Synchronization Off, Apply Naming Convention Rules On129Glossaries, Import of CSV FilesVerificationModel VerificationDocumentation130133133135Documentation to Physical Model135Report Generation136XSL Transformation146Advanced Users147Where to Find the Simplified XML File?149Predefined XSL TemplatesPath to XSLT filesSample XSLT FileSpecial instructions, parametersEdit Existing XSLT Templates150150151151151XSD Generation152Script Generation153Order of Generated Objects153Select Encoding155Select Items155Detailed Settings157Referential Integrity158Select Entities/Workspaces and Save Settings159
Toad Data Modeler User GuideTable of Contents6Preview SQL Script160Example of Generated Script162Reverse Engineering169About Reverse Engineering169Select Stored Alias170Select Data Source172Select Data Provider172Connect to Database173Select Data Migrator174Select Objects to Reverse174Select Options175Save Alias177Select Schemas and Tables178Reverse Engineering178LIVE Reverse Engineering180How does it work?180Load Models from DDL/SQL Script182Model Compare186Model Compare186Model Update/Model Merge186Model Update186Model Merge189Alter ScriptsAlter ScriptsModel Conversion192192196Model Conversion - PER - PER196Model Conversion - PER - LER199Import Toad Data Modeler 2.x Models201
Toad Data Modeler User GuideTable of ContentsImport Toad Data Modeler 2.x ModelLogical Data Model7201202About Logical Model202Create Logical ER Diagram202Create Logical Model202Add Entities204Add Attributes205Create Unique Identifier206Create Relationship208Specify Relationship Properties208Create Inheritance210Specify Inheritance Properties211VerificationModel Verification213213Report Generation214Report Generation214Model CompareLER Model CompareModel Update/Model Merge216216217LER Model Merge217Model Conversion218Information on LER - PER Conversion218Conversion LER - PER219Change the Look and Save Models222Rename222Display Modes222Change Notation224
Toad Data Modeler User GuideTable of Contents8Format Workspaces and Objects225Display Level for Entities226Select Colors for Attributes226Show Grid and Grid Size227Align Objects228Arrange Relationship Lines229Straight Mode229Right Angled Mode230Move Relationship Anchor Points230Move Relationship Lines230Move, Hide, Find Relationship Names230Autolayout231Zoom, Overview, Loupe, Move231Tips232Categories233Add Notes and Note Lines235Add Stamp236Save Model238Maintaining ModelsModel ExplorerExamples of Use in Model Explorer240240242Message Explorer243To Do List243Undo/Redo Functions245Toad for Oracle IntegrationIntegration OptionsToad for Oracle Aliases247247247
Toad Data Modeler User GuideTable of Contents9Toad for Oracle as a Default Editor247Toad for Oracle Icons in Toad Data Modeler248Open Toad for Oracle Projects248Import Toad for Oracle ER abase and Model Synchronization254Physical Model and Logical Model Synchronization254Version Manager256Create New Project and Add Files to Projects256Work with Versions/Revisions261Version Check Out261Version Check In262Places to Manage Versions264Tips on Version Right-click Options265View and Sort VM ItemsConfigurationOptionsCustomization - Sample269271271273Expert Mode273Script and Package Explorers274Our Goal274Our Goal Definition:Create PackageCreate a New PackageAdd New Properties in MetamodelHow To Add New Properties275277277281281
Toad Data Modeler User GuideTable of Contents10Modify Form287Set Default Values295How to Define Default Values295Add Events297Access Property Values via Scripting Window304Code:306Where to find information about objects and their properties and methods?308Executing the Script310Create Script311Code312Explanation313Call Existing Script from Model Properties Form313Code316Explanation317Modify HTML Reports317Code:323Explanation324Printing Models327Page Format Setup327Preview and Print328Export to Graphic File330Appendix: Contact Quest332Contact Quest Support332Contact Quest Software332About Quest Software332Index334
1Introduction to Toad Data ModelerAbout Toad Data ModelerQuest Software's Toad Data Modeler helps organizations create, maintain and documenttheir database systems with an easy-to-use graphical interface into new or existingdatabase structures. Toad Data Modeler enables users to reverse engineer databasestructures, update models, design and generate SQL, compare models and generate alterscripts, create HTML or RTF reports, in addition to versioning of database designs andcreation of to-do lists.With Toad Data Modeler you can:lllVisually create database structures (Logical and Physical Entity RelationshipDiagrams - ERD).Create ERD for various database systems (Oracle, MS SQL, MySQL etc.).Reverse engineer already existing database structures and see the existing databasestructure in form of a diagram.lAdd logical data to your diagrams and describe existing database structures better.lVerify ERD (model) and get a list of Errors, Warnings and Hints.lAutomatically generate SQL code for selected target database.lGenerate detailed documentation in HTML, RTF or PDF format.llllllSynchronize your model with physically existing database (using Alter Script Generationand Model Merge features).Keep track of changes using internal Version Manager.Create and maintain a list of tasks related to their model or particular part of a modelusing To-Do list feature.Perform their daily tasks quickly and comfortably, thanks to GUI improvements.Customize the product according to your requirements (including customization offorms) and more.Affect objects in ERD via internal scripting (user-defined batch rename scripts etc.).BenefitslReduce faults in developmentlSignificantly improve your productivity
Toad Data Modeler User GuideIntroduction to Toad Data Modeler12lVisualize your database structures and get better understanding of your existing databaseslVerify your work automaticallylGenerate very detailed HTML or RTF reportslWork with existing database structureslKeep existing database structures up-to-datelCreate databases fasterKey FeatureslPhysical ModellLogical ModellSupport for Various DatabaseslReverse EngineeringlSQL/DDL Script GenerationlAlter Scripts GenerationlHTML/RTF ReportslVersion ManagerlModel ExplorerlModel MergelModel ComparelModel VerificationlPackage ExplorerlScript ExplorerlAutolayoutlWorkspaces and DesignerslEditable FormslDockable PaneslModeless Dialogs/FormslCategorieslMessage ExplorerlUndo/RedolTo-Do ListlZoom, Loupe, Model Overview features and many more.
Toad Data Modeler User GuideIntroduction to Toad Data Modeler13Other Useful FeatureslObject Navigator boxlPossibility to define and change default values in forms/dialogs/frameslllPossibility to open and view different/same parts of your large model at the same time ina different zoomMessage ExplorerMultiple graphical representation of one object in a Workspace or more Workspaces(Object Shortcut)lColorful distinguishing of objects (parts) of your large models (Categories)lFast moving and shifting in your model and among modelslZooming an object or group of objectslModel MergelScripting Features - customize the application via Script and Package ExplorerslCreating projects in Version ManagerlModel UpdatelModel Conversionland more.Technical RequirementsMinimalOptimalPlatformPentium IVPentium dual coreMemory256 MB1 GBHard Disk Space100 MB200 MBOperating SystemMicrosoft Windows 2000 Professional Edition (Service Pack 4)Microsoft Windows XP 32-bitMicrosoft Windows XP 64-bitMicrosoft Windows Vista 32-bitMicrosoft Windows Vista 64-bit
Toad Data Modeler User GuideIntroduction to Toad Data ModelerSupported DatabaseslDB2 9.5 (LUW)lDB2 v. 9 (LUW)lDB2 UDB v. 8 (LUW)lMS Access 2000/2002/2003lMS SQL Server 2008lMS SQL Server 2005lMS SQLServer 2000lMySQL 5.1lMySQL 5.0lOracle 11glOracle 10glOracle 9lPostgreSQL 8.3lPostgreSQL 8.2lPostgreSQL 8.1lSybase ASE 15lSybase ASE 12.5Support for latest versions of other database systems will be added to the product gradually.14
2Interface LayoutLayout DescriptionToad Data Modeler interface is intuitive, clear and flexible thanks to the ability to dock panes.This function allows you to change the layout to suit your needs and preferences.The default look of Toad Data Modeler consists of the following components:lMain Menu and ToolbarslApplication Window (with Designers and Workspaces)lApplication ViewlModel ExplorerlMessage Explorer
Toad Data Modeler User GuideInterface Layout16Related TopicsMain Menu and Toolbars (page 16)Application Window (page 18)Application View (page 22)Explorers (page 23)Main Menu and ToolbarsMain menu options and toolbars differ by type of model (logical, physical etc.), and by what isactive in the Application Window (Designers, Scripting Window etc.). E.g. To enable the
Toad Data Modeler User GuideInterface Layout17
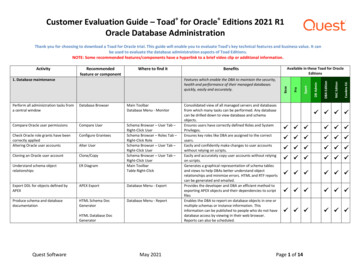
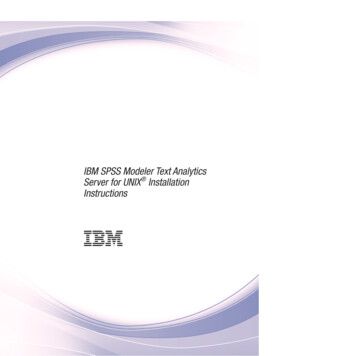
Toad Data Modeler User GuideInterface Layout18To turn on and off particular toolbar»Select View Toolbars.Tip: Right-click the toolbar to modify the toolbar view.Main Menu and Toolbars before a model is opened:(Expert Mode is disabled.)Main Menu and Toolbars after the Designer for PER model hasbeen opened:(Expert Mode is enabled.)In the View menu Icons Theme, you can select Toad Data Modeler icons or Toad for Oracleicons. See the toolbar with Toad for Oracle icon theme:Note: Detailed toolbar description hot keys used in Toad Data Modeler can be found in theHelp file, "Interface Layout" chapter.Related TopicsExpert Mode (page 273)Application WindowApplication Window is a space where Workspaces (WS) and their Designers are placed. It's anarea where you design your models, write scripts etc.lllToad Data Modeler 3.x allows you to work with several models of same or differentdatabases simultaneously. - The models and their Workspaces and Designers areorganized in the Application Window on tabs by models.To close all model WS and Designers at one jump, click x (upper x) in the right-handcorner of the model tab in AW.To close a tab with particular Designer, click x (lower x) or select File Close Designer.
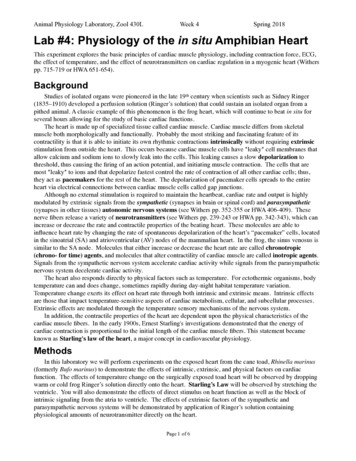
Toad Data Modeler User GuideInterface Layout19Tip: You can move tabs in the Application Window easily. - Press CTRL, select a tab and usedrag&drop techniques to move it.Workspace versus DesignerlDesigner displays a Workspace (WS). It is an area where WS is displayed (tab).lOne Designer represents one WS.lIf you create a new Workspace, its Designer will open automatically in theApplication Window.lA model can have several Workspaces.lFor one WS, you can open several Designers.Example: Videorental model has five Workspaces - see them listed in the Model Explorer.Designers of three of them are opened in the Application View - All Items, Borrowing andOrdering. For the Ordering WS, two Designers are opened.lllWorkspaces are similar to submodels. They allow you to display different/same objects ofyour model. The first WS is called All Items and is meant as main model.Designers opened for the same Workspace display the same objects. They allow you toview different/same parts of the WS, and e.g. in a different zoom.You can undock designers or dock them to a particular model in theApplication Window.
Toad Data Modeler User GuideInterface Layout20Close Model when Closing its Last DesignerWhen you close the last Designer of your model, the following dialog will display:This message should draw your attention to the fact that although you have closed your modelfrom the Application Window, it is still open in Toad Data Modeler (see the model listed in theApplication View). This message should prevent you from the situation when you open the samemodel again and rewrite the changes made in first instance of the model.Select Yes to close your model. If you made any changes, you will be asked to save them beforethe model close.
Toad Data Modeler User GuideInterface LayoutNavigation on WorkspacelCTRL scroll mouse to zoom in/zoom outlCTRL , CTRL Page Up to zoom inlCTRL-, CTRL Page Down to zoom outlScroll mouse to move up/down on the WorkspacelSHIFT scroll mouse to move to the right/left on the WorkspacelHolding down the middle button to move on entire page/WorkspaceOther tips:lPossibility to move shapes on the Workspaces using the keyboard arrowslPossibility to resize shapes of objects on the Workspace: SHIFT keyboard arrowsWorkspace Right-Click OptionsRight-click the work area in the Application Window to see the following options:OptionDescriptionEditOpens the Workspace Properties dialog.WorkspaceFormatOpens the Workspace Format dialog.Add All ModelObjects toWorkspaceAdds shortcuts of all objects of the model to theselected WS.Add SelectedObjects toWorkspaceOpens a dialog where you can select shortcuts ofobjects that you want to add to the WS.Straight AllLinesStraights all relationship lines in ERD on particularWorkspace. (This option is disabled in the RightAngled mode.)Change Linesto RightAngledChanges all relationship lines in ERD on particularWorkspace from straight to right-angled.Select ObjectsSelects objects by category or schema/owner onWorkspace.21
Toad Data Modeler User GuideInterface Layout22Application ViewlllllllAll currently opened models and their Workspaces are listed here.Via the Application View, you can manage your models (activate model, save, close,open the Model Properties dialog and enter description etc.), edit their names (F2 orRename), and work with Workspaces (add WS, open Designer, edit WS format, addshortcuts to selected WS etc.)In the Application View, also versions and revisions saved in Version Manager (VM) arelisted provided that you selected Check Out for particular version/revision in VM. So,you can manage them from the Application View or Version Manager. (Note: VersionManager is available after Expert Mode is enabled.)You can open several instances of the Application View, e.g. for each model.By default, it's docked next to the Message Explorer on the left side, however, you candock it also in other places.To hide/show the Application View, click the splitter in the middle of the pane"Application View, Message Explorer".You can close the Application View (x) and open later (select Tools Application View).Example:
Toad Data Modeler User GuideInterface Layout23ExplorersIn the default look of the application, you can see the following Explorers:lModel ExplorerlMessage ExplorerModel ExplorerIn Model Explorer, Workspaces, Designers and all objects of your model, including dictionarytypes, domains, procedures etc. are listed. The content of Model Explorer depends on model type(physical/logical) and database. You can manage items in Model Explorer very easily.Model Explorer is docked by default on the left side of the application. You can change itsposition, however it can be docked only to appropriate model on the Application Window.See "Model Explorer" (page 240) for more information.Message ExplorerIn Message Explorer, all hints, errors, warnings and other messages that appear during your workwith Toad Data Modeler are displayed.In Toad Data Modeler, frames e.g. for reverse engineering or script generation, have their ownlog area too. However, their log area displays only the information on the particular operationproceeding in the dialog/wizard (Show/Hide Log options are available.) Message Explorerdisplays all information on all operations in the application.See "Message Explorer" (page 243) for more information.In Toad Data Modeler, there are also other two Explorers - Script Explorer and PackageExplorer. They are available only in Expert Mode. These Explorers are determined forcustomization of the application and shall be used by advanced users. More details can be foundin the "Customization - Sample" chapter.
Toad Data Modeler User GuideInterface Layout24Shortcuts of ObjectsAbout Shortcuts of ObjectsIn Toad Data Modeler, you can create multiple representatives of an object on one Workspace ormore Workspaces - shortcuts of objects.You can create shortcuts of the following objects:lEntitylRelationshiplViewlMaterialized ViewlInheritancelNotelStamplCategory (caption of Category)You can use shortcuts:lFor large modelslWhile working with WorkspacesWhat Is A Shortcut?lA shortcut is another representative of an object. It is not a copy of an object.lObjects that you can see on Workspaces of your model are shortcuts in fact.Tip: As soon as you create a new entity on the WS, you automatically create ashortcut of this entity on particular WS. - You can check it out easily: Find theentity in Model Explorer and open its Shortcuts folder.lA shortcut has neither higher, nor lower priority than its object and vice versa.lA shortcut has the same name as its object. Shortcuts are numbered.lllA shortcut has the same properties as its object. You can edit ANY shortcut - all changeswill be applied to all other shortcuts automatically and so will in the original object.An object can have none or many shortcuts. Their number is not limited. Also, there is noneed to have any shortcut of an object displayed on any WS.You can set individual format for each single shortcut of the same object, eveno in one WS.
Toad Data Modeler User GuideInterface Layoutl25You can remove shortcuts from Workspace easily - press Delete. If you need to deleteparticular object from your model completely, including all its shortcuts, press SHIFT Delete (also Objects Delete Object).Note: To learn about the Delete options in Toad Data Modeler and differencesbetween remove shortcut and delete object, please see the Help file, "Modeling","Model Objects", "Deleting Objects".List of ShortcutsYou can find shortcuts of entities, relationships, views and inheritances in Model Explorer particular Object folder (e.g. Entities) Shortcuts folder.List of shortcuts that are contained on particular Workspace can be found in Model Explorer Workspaces folder particular workspace folder (e.g. Ordering) Entity Shortcuts, RelationshipShortcuts, View Shortcuts.
Toad Data Modeler User GuideInterface LayoutUse ShortcutsThere are several ways how to create shortcuts of objects. Some of them are described in thefollowing examples.26
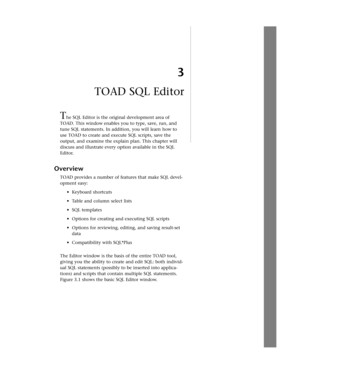
Toad Data Modeler User GuideInterface Layout27Example 1:ScenarioEntity Customer (placed on page [1,1]) is related to entity Borrowingthat is placed far from it (placed on page [3,1]. Both entities aredisplayed on the same Workspace. You want to see the two entitiescloser to each other.Scenario: Create shortcuts for both entities and place them closer to each other.1. Click the Customer entity on the Workspace and hold the mouse key down.2. Press CTRL SHIFT keys and hold them down.3. Drag the Customer entity next to the original entity (the mouse cursor will change itsappearance).4. Release the mouse button and then the keys. - Customer : 2 shortcut has been created.5. Take the same steps for entity Borrowing.6. Move the entity shortcuts where you need.Scenario: You think it would be fine to connect the shortcuts with the relationship makes andsee it on both pages. - Create shortcuts of the relationship.7. Right-click the Workspace and select Add Selected Objects to Workspace.
Toad Data Modeler User GuideInterface LayoutClick Linksselected WS.28to display only relationships of which shortcuts can be added to the8. See the columns Object 1 WS and Object 2 WS for the makes relationship, and select theappropriate items.9. Confirm OK to add two other shortcuts of the makes relationship to the WS.10. Now the original shortcut of the makes relationship is useless. Let's remove it. Simplyselect it on the WS and press Delete.Result:
Toad Data Modeler User GuideInterface Layout29Note: Still there is only one entity Customer, one entity Borrowing and onerelationship Makes in your model. Feel free to check it out in Model Explorer orselect Model Entities/Relationships.Example 2:ScenarioYou have divided your large model into several Workspaces - All ItemsWS,Borrowing WS and Ordering WS. You need to have entity Customeron each of these Workspaces.You can create shortcuts of this entity on each WS. There are severalways how to do it. Feel free to select the most acceptable method foryou.Scenario A: Starting point: The Customer entity shortcut is displayed only on the All Items WS.You need to add it to other two WS.
Toad Data Modeler User GuideInterface Layout301. Right-click the Customer entity on the All Items WS and select Add into Workspace.2. In the Workspaces dialog, select the Borrowing WS and confirm OK.Scenario B: Of course, you can take the same steps for adding the entity to the Ordering WS.However, let's check out another way:3. Activate the Ordering WS in the Application Window.4. Right-click the WS and select Add Selected Objects to Workspace.5. In the dialog, all entity and relationship shortcuts that you can add to this WS are listed.Select table Customer and confirm OK.Scenario C: Starting point: You have Model Explorer opened, and WS where you want to addthe entity is active in the Application Window.
Toad Data Modeler User GuideInterface Layout316. Find the Customer entity in Model Explorer Entities folder.7. Drag the entity to the Workspace.Tips:llThis way you can create shortcuts of more entities at one jump. Use SHIFT or CTRL formultiple selection of entities and then take the same steps as above.Have a look at the Shortcuts folder of the Customer entity in Model Explorer. See itsshortcuts and names of Workspaces where they occur.Remove Shortcuts from WorkspaceTo remove a shortcut from Workspace»Select the shortcut and press Delete (also Objects menu Remove from WS).To delete an object with all its shortcuts from your model»Select any shortcut of the object on the WS and press SHIFT Delete (also Objects menu Delete Object).Options for Entity ShortcutsRight-click an entity shortcut in Model Explorer or on the Workspace to see thefollowing options:OptionDescriptionFill ParentObjectsDisplays shortcuts of parent objects of the selectedentity on the Workspace.Fill ChildObjectsDisplays shortcuts of child objects of the selectedentity on the Workspace.Fill Parent andChild ObjectsDisplays shortcuts of parent and child objects of theselected entity on the Workspace.Tips and TricksCommand Line ParametersYou can use the following command line parameters:
Toad Data Modeler User GuideInterface glImport Toad for Oracle ER diagram and Toad for Oracle Project32Open-FileOpens file defined in command line parameters.Definition:Open-File space -File Delimiter Name string [,Name string ]*Example:TDM.exe Open-File -File:Name "My logical model.txl", Name "My physical model.txp"New-ModelCreates a new modelDefinition:New-Model space -ModelType Delimiter string [ space -ModelName delimiter string ]Examples:TDM.exe New-Model -ModelType "Logical Model"TDM.exe New-Model -ModelType "Logical Model" -ModelName:"My Database Model"Execute-ScriptExecutes script stored in Toad Data Modeler. First parameter must contain ScriptName, secondmust contain ScriptMethodName, other parameters are parameters of the ScriptMethod.Definition:Execute-Script space [Parameter Delimiter HashValues ] Switches Switches : - InputScript space [- OtherSwitch ] InputSwitch : -TDM OtehrSwitch : -Silent HashValues : ScriptName string , MethodName string [, Name string ]*
Toad Data Modeler User GuideInterface Layout33Examples:TDM.exe Execute-Script -ParameterScriptName MyScript,MethodName MyMethodInsideMyScript,Par1Name Par1Value,Par2Name Par2Value-TDMTDM.exe Execute-Script -Parameter ScriptName MujScript,MethodName MojeMetoda -TDM-SilentSwitches:-TDM. Explanation: Script is stored in Toad Data Modeler application (Other switches will bedefined later and users will be able to execute scripts outside Toad Data Modeler.)-Silent. Explanation: Script will be executed in Silent mode and you will be able to work withthe application regardless the state of the executed script.Start-LogWrites messages to log. May be useful for sending reports to Toad Data Modeler developers.Definition:Start-LogImport Toad for Oracle ER diagram and Toad for Oracle ProjectTDM.exe Import-ToadForOracleERD -file:"NopathMovERD.erd"TDM.exe Import-ToadForOracleERD -file:NopatMovERD.erd Connection:"SERVER OstDbServer:1521/ORCL,USER movies,PROTOCOL TNS,CONNECTAS NORMAL,SAVEPASSWORD 1,ORACLEHOME c:\oracle\product\11,HOST OstDbServer,SErVICENAME ORCL, PORT 1521,LDAP ,METHOD 1"Related TopicsIntegration Options (page 247)Hot KeysShortcutDescriptionCTRL NOpens the New Model dialog.CTRL OOpens already existing model.
Toad Data Modeler User GuideInterface Layout34ShortcutDescriptionCTRL SSaves a model.CTRL WCreates a new Workspace (WS).F9Opens the DDL Script Generationdialog.CTRL F9Opens the Model Verification dialog.CTRL ECreates a new entity.CTRL RCreates an identifying relationship.CTRL CCopies selected object(s).CTRL XCuts selected objects(s).CTRL VPastes copied or cut object(s).CTRL ZUndo step.SHIFT CTRL ZRedo step.CTRL ASelects all.CTRL FOpens the Find dialog.CTRL ALT FOpens the Find in Scripts dialog.DelRemoves selected object(s) fromWorkspace.SHIFT DelDeletes selected object(s) from model.ALT OThe Delete Confirmation dialog - OKbutton.ALT CThe Delete Confirmation dialog - Cancelbutton.CTRL MMinimizes Forms.CTRL ALT SSynchronizes metamodel.CTRL ICreates Inheritance (Logical Model).F1Opens the Help file.F2Renames model/object.
Toad Data Modeler User GuideInterface Layout35ShortcutDescriptionCTRL UpMoves selected object(s) up. (Order ofGenerated Objects)CTRL DownMoves selected object(s) down. (Order ofGenerated Objects)Keyboard arrowsMoves shapes in Workspace (select ashape first).SHIFT keyboard arrowsChanges size of entity box.CTRL scroll mouseZooms in/out.CTRL , CTRL Page UpZooms in.CTRL-, CTRL PageDownZooms out.SHIFT scroll mouseMoves to the right/left in Workspace.Scroll mouseMoves up/down in Workspace.Holding down the middlemouse buttonMoves in entire page/Workspace.SHIFTMultiple selection of objects (in WS,dialogs, forms, Model Explorer etc.)Drag&Droptechniques CTRL SHIFTCreates a shortcut of object in WS.Drag&Drop techniquesfrom Model ExplorerCreates a shortcut of object in WS.Drag&droptechniques CTRLCopies objects in WS/Object dialog (e.g.Entities dialog)/Model Explorer.CTRL Drag&DroptechniquesCopies attributes between entities in WS.CTRL click an attributeSelects an attribute to move it to anotherentity box in WS. (Click the attribute andrelease CTRL key to move the selectedattribute.)CTRL click attributesMultiple selection of attributes in entitybox in WS.
Toad Data Modeler User GuideInterface Layout36ShortcutDescriptionCTRL double-click anobject nameRenames the object name in WS(including attributes).CTRL click a relationshiplineAdds a handle point.CTRL click a handlepointDeletes the selected handle point.ALT click a relationshiplineSelects a relationship line segment.Dock PanesFeel free to customize layout of Toad Data Modeler at your convenience.You can dock panes to one or more places, or left undocked. After you re-arrange the interface,the layout will be saved automatically after you close the application.There are two kinds of forms/panes:lBig dockable forms (Designer, Script Editor etc.)lSmall dockable forms (Message Explorer, Application View etc.)You can dock forms/panes:lOne on anotherlOne by anotherlOne below anotherlOn tabslOn the Application WindowlCombination of these optionsIf you dock forms one on another, you can dock only small forms on big ones or big formson big ones.To dock a form/pane1. Press SHIFT and hold it down.2. Click t
Quest Software's Toad Data Modeler helps organizations create, maintain and document their database systems with an easy-to-use graphical interface into new or existing database structures. Toad Data Modeler enables users to reverse engineer database structures, update models, design and generate SQL, compare models and generate alter