Transcription
USER MANUALXHD 5MP SERIES4/8 CHANNELwww.NightOwlSP.com
Thank you for choosing Night Owl Security Products!By purchasing a Night Owl product, you receive a one (1) year warranty coveringmanufacturing defects in material and workmanship. Make the most of yourwarranty by completing the registration form online. In addition to warrantyand technical support benefits, you will have access to our multitude of freeinstructional “How to Videos”. You can also view our instructional videos byclicking the “How to Videos” tab within your product’s page on our website.Register at www.NightOwlSP.com!Night Owl’s XHD Series Camera Compatibility:Night Owl’s XHD Series DVRs are compatible with most analog cameras (400900TVL), Night Owl’s Analog HD (AHD) and HD Analog (HDA) cameras. If thecamera’s video quality either day or night is degraded, you may need to changethe cable run from the camera to the DVR. This system is designed to work with24 AWG UL Approved cabling or better.Please see the warranty section of this manual for exclusions and additional details.Not all features and capabilities are shared across all models so you may seefeatures which are not applicable. In addition you may see screen images thatdo not exactly match those on your display. This manual was accurate at the timeit was completed. Due to our ongoing effort to constantly improve our products,functions may have been added or changed.Night Owl highly recommends installing the mostcurrent firmware version available for your system.Verify your firmware version on the Info screen ofthe System menu tab.Scan the QR code below to access our Quick Setup Guide that canassist you in configuring your Night Owl Security system.Quick Setup Guide2XHD Series User’s Manual
TABLEOF CONTENTSTable of Contents3
Table of ContentsCHAPTER 1:FCC WARNINGS. . . . . . . . . . . . . . . . . . . . . . . . . . . . . . . . . . 7CHAPTER 2:SAFETY INSTRUCTIONS. . . . . . . . . . . . . . . . . . . . . . . . . . . 9CHAPTER 3:SPECIFICATIONS. . . . . . . . . . . . . . . . . . . . . . . . . . . . . . . . 113.1System Requirements. . . . . . . . . . . . . . . . . . . . . . . . . . . . . 123.2Package Contents. . . . . . . . . . . . . . . . . . . . . . . . . . . . . . . . 123.2.1DVR Diagram . . . . . . . . . . . . . . . . . . . . . . . . . . . . 123.2.2Camera Diagram. . . . . . . . . . . . . . . . . . . . . . . . . . 143.2.3Mouse Diagram. . . . . . . . . . . . . . . . . . . . . . . . . . . 14CHAPTER 4:CAMERA INSTALLATION . . . . . . . . . . . . . . . . . . . . . . . . . . 154.1Video/Audio. . . . . . . . . . . . . . . . . . . . . . . . . . . . . . . . . . . . 164.2Power. . . . . . . . . . . . . . . . . . . . . . . . . . . . . . . . . . . . . . 164.2.1 Standard Camera Power. . . . . . . . . . . . . . . . . . . . . . . 164.3CHAPTER 5:Mounting the Cameras . . . . . . . . . . . . . . . . . . . . . . . . . . . . 17DVR INSTALLATION. . . . . . . . . . . . . . . . . . . . . . . . . . . . . . 195.1Connecting to a TV (via HDMI). . . . . . . . . . . . . . . . . . . . . . . 205.2PowerCHAPTER 6:6.1. . . . . . . . . . . . . . . . . . . . . . . . . . . . . . . . . . . . . . 21GETTING STARTED . . . . . . . . . . . . . . . . . . . . . . . . . . . . . . 22Startup Wizard. . . . . . . . . . . . . . . . . . . . . . . . . . . . . . . . . . 236.1.1Camera Test. . . . . . . . . . . . . . . . . . . . . . . . . . . . . 246.1.2Network Check. . . . . . . . . . . . . . . . . . . . . . . . . . . 246.1.3Firmware Check . . . . . . . . . . . . . . . . . . . . . . . . . . 266.1.4Password Creation. . . . . . . . . . . . . . . . . . . . . . . . . 276.1.5Date and Time Setup. . . . . . . . . . . . . . . . . . . . . . . 286.1.6Night Owl X . . . . . . . . . . . . . . . . . . . . . . . . . . . . . 296.1.7Password Verification. . . . . . . . . . . . . . . . . . . . . . . 306.1.8Camera/Channel Settings. . . . . . . . . . . . . . . . . . . . 304XHD Series User’s Manual
6.1.9Camera Positioning. . . . . . . . . . . . . . . . . . . . . . . . 316.1.10Channel Configuration. . . . . . . . . . . . . . . . . . . . . . 316.1.11Default View. . . . . . . . . . . . . . . . . . . . . . . . . . . . . 326.1.12Helpful Links . . . . . . . . . . . . . . . . . . . . . . . . . . . . 336.1.13Wizard Complete. . . . . . . . . . . . . . . . . . . . . . . . . . 346.2Night Owl X Mobile App . . . . . . . . . . . . . . . . . . . . . . . . . . . 346.3Displays and Icons. . . . . . . . . . . . . . . . . . . . . . . . . . . . . . . 356.3.1Login Screen. . . . . . . . . . . . . . . . . . . . . . . . . . . . 356.3.2Live View (All Channels). . . . . . . . . . . . . . . . . . . . . 366.3.3Menu Screen . . . . . . . . . . . . . . . . . . . . . . . . . . . . 37CHAPTER 7:7.1MENUS AND SETTINGS. . . . . . . . . . . . . . . . . . . . . . . . . . . 38General Menu . . . . . . . . . . . . . . . . . . . . . . . . . . . . . . . . . . 407.1.1Display. . . . . . . . . . . . . . . . . . . . . . . . . . . . . . . . . 407.1.2Network. . . . . . . . . . . . . . . . . . . . . . . . . . . . . . . . 417.2Cameras Menu. . . . . . . . . . . . . . . . . . . . . . . . . . . . . . . . . . 427.2.1Settings. . . . . . . . . . . . . . . . . . . . . . . . . . . . . . . . 427.2.2Encode. . . . . . . . . . . . . . . . . . . . . . . . . . . . . . . . . 437.2.3Motion. . . . . . . . . . . . . . . . . . . . . . . . . . . . . . . . . 447.2.4Alarm Status. . . . . . . . . . . . . . . . . . . . . . . . . . . . . 457.2.5Setting Detection Area. . . . . . . . . . . . . . . . . . . . . . 467.3Record Menu. . . . . . . . . . . . . . . . . . . . . . . . . . . . . . . . . . . 477.3.1Schedule . . . . . . . . . . . . . . . . . . . . . . . . . . . . . . . 477.3.2Playback . . . . . . . . . . . . . . . . . . . . . . . . . . . . . . . 487.3.3Exporting Recordings. . . . . . . . . . . . . . . . . . . . . . . 507.4Device Menu. . . . . . . . . . . . . . . . . . . . . . . . . . . . . . . . . . . 527.4.1HDD . . . . . . . . . . . . . . . . . . . . . . . . . . . . . . . . . . 527.4.2PTZ. . . . . . . . . . . . . . . . . . . . . . . . . . . . . . . . . . . 52Table of Contents5
7.5System Menu. . . . . . . . . . . . . . . . . . . . . . . . . . . . . . . . . . . 547.5.1General . . . . . . . . . . . . . . . . . . . . . . . . . . . . . . . . 547.5.2Users. . . . . . . . . . . . . . . . . . . . . . . . . . . . . . . . . . 557.5.3Info. . . . . . . . . . . . . . . . . . . . . . . . . . . . . . . . . . . 567.5.4Log . . . . . . . . . . . . . . . . . . . . . . . . . . . . . . . . . . . 567.6Advanced Menu. . . . . . . . . . . . . . . . . . . . . . . . . . . . . . . . . 577.6.1Maintain. . . . . . . . . . . . . . . . . . . . . . . . . . . . . . . . 577.6.2Events. . . . . . . . . . . . . . . . . . . . . . . . . . . . . . . . . 587.6.3Auto Upgrade. . . . . . . . . . . . . . . . . . . . . . . . . . . . 59CHAPTER 8GLOSSARY . . . . . . . . . . . . . . . . . . . . . . . . . . . . . . . . . . . . 60CHAPTER 9:WARRANTY. . . . . . . . . . . . . . . . . . . . . . . . . . . . . . . . . . . . 62CHAPTER 10:TROUBLESHOOTING. . . . . . . . . . . . . . . . . . . . . . . . . . . . . 65CHAPTER 11:USER INFORMATION. . . . . . . . . . . . . . . . . . . . . . . . . . . . . 68CUSTOMER SUPPORT. . . . . . . . . . . . . . . . . . . . . . Back CoverNight Owl’s DVRs are manufactured for quality and ease of use.As such, our DVRs contain menus designed for advanced user’sthat should not be adjusted without having enhanced knowledgeADVANCED regarding the menu. In most cases the default settings allow foroptimal functionality. The menus that should maintain the defaultsettings are indicated with this icon.DISCLAIMER: The exact components of your system, images and quantities mayvary depending on your model number. While these may vary, this Manual willaddress the setup and initial configuration of your DVR and cameras.6XHD Series User’s Manual
CHAPTER 1FCC WARNINGSChapter 1: FCC Warnings7
Chapter 1: FCC WarningsFCCThis device complies with Part 15 of the FCC Rules. Operation is subject to thefollowing two conditions: (1) this device may not cause harmful interference and(2) this device must accept any interference received, including interference thatmay cause undesired operation.FCC Compliance StatementThese limits are designed to provide reasonable protection against frequencyinterference in residential installation. This equipment generates, uses and canradiate radio frequency energy and if not installed or used in accordance with theinstructions, may cause harmful interference to radio communication. However,there is no guarantee that interference will not occur in television reception, whichcan be determined by turning the equipment off and on. The user is encouragedto try and correct the interference by one or more of the following measures: Reorient or relocate the receiving antenna. Increase the separation between the equipment and the receiver. Connect the equipment into an outlet on a circuit different from that to whichthe receiver is connected. Consult the dealer or an experienced radio/TV technician for help.CAUTIONThe Federal Communications Commission warns the user that changes ormodifications to the unit not expressly approved by the part responsible forcompliance could void the user’s authority to operate the equipment.8XHD Series User’s Manual
CHAPTER 2SAFETYINSTRUCTIONSChapter 2: Safety Instructions9
Chapter 2: Safety InstructionsUse the provided power adapter.Do not use this product with a powersource that applies more than thespecified voltage.Never insert metal into the DVR caseor its openings. Inserting metal into theDVR case may cause electric shock.Do not operate in wet or dusty areas.Avoid placing the DVR in areas suchas a damp basement or dusty attic.Do not expose the DVR to rain or usenear water. If the DVR accidentallygets wet, unplug it and contacttechnical support immediately.Keep product surfaces clean and dry.To clean the outside case of the DVR,use a lightly dampened cloth. Do notuse cleaning solutions or solvents.Do not install near any heat sources.Do not install the DVR near any heatsources such as stoves, heat registers,radiators or electronics (includingamplifiers) that produce heat.Unplug the DVR when moving it.Make sure that the DVR is unpluggedbefore you move it. When moving thisdevice, be sure to handle it with care.Make sure there is good air circulationaround the DVR.This DVR uses an internal hard drive,which generates heat during operationfor video storage. Do not block ventson the DVR, as these vents reducethe generated heat while the systemis running. Place this product in wellventilated area.Do not attempt to remove the topcover. If you observe any abnormaloperation, unplug the DVR immediatelyand contact technical support. Do notattempt to open the DVR to diagnosethe cause of the problem.Handle the DVR carefully.If you drop the DVR on any hardsurface, it may damage the device.If the DVR doesn’t work properlydue to physical damage, contact anauthorized dealer for repair.It is recommended to use your DVRwith an uninterruptible power supply(UPS). Connecting your DVR andcameras to a UPS allows continuousoperation even during power outages.The run-time duration will depend onthe rating of the UPS used.You may be subjected to severe electrical shockif you remove the cover of the DVR.10XHD Series User’s Manual
CHAPTER 3SPECIFICATIONSChapter 3: Specifications11
Chapter 3: Specifications3.1 System RequirementsPlease be sure that your PC/MAC complies with the following specifications: PC Operating System: Windows 7, Windows 8/8.1 and Windows 10 PC Browser: IE 8 and above, Edge , Google Chrome and Firefox MAC Operating System: MAC OS X 10.7 and above MAC Browser: Safari 7.1 and abovePlease be sure that your mobile device complies with the following specifications: Android : 4.0 and above iOS : 7.1 and above3.2 Package Contents 1 x XHD DVRIndoor/Outdoor Cameras*Bundles of Camera Cable*Mounting Hardware and Screws*HDMI Cable1 x RJ-45 Cable (Ethernet) 1 x USB Mouse1 x Support Material PacketCamera Power Adapter(s)*1 x DC 12V DVR Power AdapterCamera Power Splitters*3 x Night Owl Security StickersCameras, additional cables, power adapters andsplitters only included in certain security kits. Checkthe product packaging for detailed kit contents.3.2.1 DVR DiagramQR CodeModel #12Once you have downloaded Night Owl X and connected yourDVR to your router, you can network your DVR by scanningthe QR code which is located on the top of the DVR.FRONT VIEWXHD Series User’s Manual
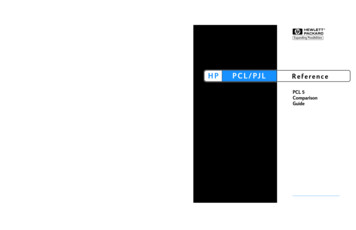
RJ-45(Ethernet)PortAudioVGAOutput OutputPowerVGAVIDEO INVideo InputsAUDIO OUTHDMIHDMIOutputREAR VIEWAUDIO INAudioInputsLAN / USBRS485POWER12VUSB RS-485Ports (PTZ)PortImages used are for reference only. Your product may vary slightly.An 8 channel model is displayed above.1. Video Inputs – video inputs allow for the connection of BNC cameras.2. Audio Output – audio output allows for the connection of an amplified speaker.3. Audio Inputs – audio inputs allow for the connection of audio enabled camerasby connecting the white RCA plug to one of the audio inputs. After makingthe audio input connection, be sure to enable the audio function in the DVR’smenu interface.4. HDMI Output – HDMI output allows for the video connection. If the TV/Monitorhas an HDMI input, connect the HDMI cable from the HDMI output port onthe DVR to the HDMI input port on your TV/Monitor.5. VGA Output – VGA output allows for the video connection. If the TV/Monitorhas a VGA input, connect the VGA cable from the VGA output port on the DVRto the VGA input port on your TV/Monitor. (VGA Cable not included)6. RJ-45 (Ethernet) Port – RJ-45 port will be used to connect the DVR toyour router/modem via the included Ethernet cable. Keep in mind, you canquickly network your DVR to begin viewing your cameras remotely right fromyour mobile device by completing the DVR’s Startup Wizard once you haveconnected the DVR to your router and powered on the DVR.7. USB Ports – USB ports allow for the connections of a USB mouse and/or aUSB flash drive. You will connect the included USB mouse to assist you innavigating the DVRs menu interface. You will connect a USB flash drive todownload video files from the DVR and save them to your USB flash drive.8. RS-485 (PTZ) Port – RS-485 port allows for the connection of a PanTilt-Zoom (PTZ) camera. Some PTZ cameras utilize Up the Cable (UTC)technology and will not require the RS-485 port to function.9. Power Input – power input to connect the included 12V DC power supply.Chapter 3: Specifications13
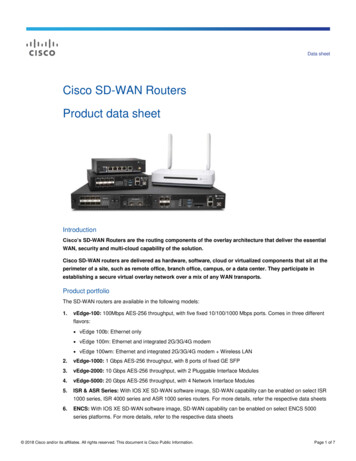
3.2.2 Camera DiagramHD ResolutionIR Cut FilterInfrared PIR SensorBaseVideo/Power CablesCAMERANOTE: Connect all cameras locally before final placement to ensure that allcomponents function properly.3.2.3 Mouse DiagramMOUSELive Viewing:Double-click the left button on any camera view in split-screen mode to bring itto full screen display.Double-click again to return to split-screen mode.Right-click to show the control bar at the bottom of the screen.Right-clicking again will hide the control bar.In Setup:Left-click to make a selection.Right-click to cancel setup or return to previous screen.To Enter Values:Move the cursor to a blank field and click the mouse. A virtual keyboard willappear which supports numbers, letters and symbols. The Shift function willaccess symbols in addition to upper case letters.14XHD Series User’s Manual
CHAPTER 4CAMERAINSTALLATIONChapter 4: Camera Installation15
Chapter 4: Camera Installation4.1 Video/AudioNOTE: Connect all cameras locally before final placement to ensure that allcomponents function properly.1. Locate an included 60 foot Video/Power cable.2. Connect a camera to one end of the cable by matching the BNC connectors(yellow) and DC power connectors (red).3. Audio enabled cameras will have an additional (white) RCA connection whichwill transmit the audio signal and will connect to the audio in port on the backof your DVR.4. Plug BNC connectors on the other end of the cable into a Video Input porton the back panel of the DVR.5. Repeat for each camera, noting the channel number each camera isplugged into.4.2 Power4.2.1 Standard Camera Power1. Locate an included power splitter.2. Connect the power splitter to the remaining DC power connectors (red) ofthe cables.3. Plug the power splitter into the labeled camera power supply, then plug thecamera power supply into an available wall outlet or UPS. Keep in mind,Night Owl always recommends utilizing a surge protector to minimize the riskof damage caused to your DVR in the event of a power surge.16XHD Series User’s Manual
Cameras, additional cables, power adapters andsplitters only included in certain security kits. Checkthe product packaging for detailed kit contents.Make sure all cameras are working prior to mounting byconnecting them as described in the section above. Once allcameras are confirmed to be fully operational, you can runthe cables and mount the cameras at their final locations.4.3 Mounting the CamerasCamera distance from DVR.The further the camera is from the DVRor monitor, the higher the chancesof signal degradation. The camera’spower supply should be locatedas near to the camera as possiblewhen the distance exceeds 200 ft.Connect all cameras locally before final placementas the power level will drop overto ensure that all components function properly.extended distances resulting in video degradation.Do not place near high voltage wires or other sources of electrical interference.Electrical interference will degrade the quality of the signal.Place camera out of reach to avoid vandalism.Avoid direct exposure to weather. Do not place the camera where rain or snow willhit the lens directly nor should the camera be placed so that the sun or brightlight shines directly into the lens. Your camera is weatherproof, but it will not workwhen submerged in water. Ensure that all power and video connections are notdirectly exposed to water and are protected from the elements.Mounting surface. The mounting surface must hold at least four times thecamera’s total weight.1. Locate a camera and choose a location where you would like to mountthe camera.Chapter 4: Camera Installation17
2. Indicate screw positions by marking three holes on the surface where you planto mount the camera, using the holes in the camera base as a guide.3. Using a drill bit slightly smaller than the included screw anchors, drill into themounting surface using the guide marks you placed in the previous step.4. Insert the screw anchors.5. Line up the camera base holes with the screw anchors. Holding the base inplace, insert screws and tighten until secure.6. Once the base is screwed in place, make sure that the camera is securelymounted by placing gentle pressure on the mount.7. Adjust the camera housing to point in the direction of the area you would liketo monitor.Don’t feel like installing thesystem yourself? Let InstallerNet do the work for you! Contact us at1-800-806-5513 or visit us atwww.NightOwlSP.com.18XHD Series User’s Manual
CHAPTER 5DVR INSTALLATIONChapter 5: DVR Installation19
Chapter 5: DVR Installation5.1 Connecting to a TV (via HDMI)1. Locate the included HDMI cable.2. Plug one end of the cable into the HDMI port on the back of the DVR.3. Connect the other end of the cable to an available HDMI input on your TVor monitor.4. Select the appropriate video input channel on your TV or monitor to viewthe DVR.20XHD Series User’s Manual
If your TV does not have an HDMI port, youwill need to purchase a VGA or a BNC-to-RCAvideo cable.For a VGA connection, attach one end of the VGA cable tothe DVR VGA port and the other end to your TV VGA port.5.2 Power1. Locate the labeled DVR power adapter; the camera power adapter and DVRpower adapter should never be interchanged.DVR power adaptermay vary slightly.2. Plug the included power adapter cable into the back of the DVR.3. Plug the other end of the power adapter cable into an available wall outlet. Ifyou are using an uninterruptible power supply (UPS), plug the adapter cableinto one of its output sockets. Keep in mind, Night Owl always recommendsutilizing a surge protector to minimize the risk of damage caused to your DVRin the event of a power surge.Chapter 5: DVR Installation21
CHAPTER 6GETTING STARTED22XHD Series User’s Manual
Chapter 6: Getting Started6.1 Startup WizardWhen your DVR is powered on it will display the Night Owl logo while initializing.After initialization, you will be prompted to use the Startup Wizard. Follow theon-screen instructions to: Complete the basic setup of your DVR.Test your cameras locally.Upgrade the firmware.Create an Admin password.Set up the Night Owl X App.Configure the recording settings.Configure notifications.Chapter 6: Getting Started23
6.1.1 Camera TestThe Camera Test screen of the Startup Wizard serves as a reminder to test thecamera connections to the DVR. If a connected camera displays a “No Signal”message, please visit www.NightOwlSP.com and click on the Support tab.6.1.2 Network CheckThe Network Check screen of the Startup Wizard displays instructions for howto connect your DVR to the Internet. You will need the included Ethernet cableto establish connection, your DVR will not be able to wirelessly connect to yourrouter/modem.24XHD Series User’s Manual
Once you have made the required connection using the Ethernet cable, you mayclick Test within the Startup Wizard to confirm Internet connection.The Advanced Network Configuration tab is recommended only for advanced users.Once the Internet connection has been established, the Startup Wizard willdisplay a successful connection screen.Chapter 6: Getting Started25
If your DVR is not able to establish Internet connectivity, a Connection Failed screenwill appear. Follow the instructions on this screen to re-test the network.If you wish to proceed with the DVR setup without a network connection, you maydo so by clicking the box marked, “I do not want to connect to a network.”6.1.3 Firmware CheckThe Firmware Check screen of the Startup Wizard will automatically check forupdated firmware for your DVR.NOTE: If your DVR does not have a network connection, the firmware will not update.When the firmware for you DVR is updated to the most current version, theStartup Wizard will display the above screen.26XHD Series User’s Manual
6.1.4 Password CreationThe Password Creation screen of the Startup Wizard requires you to create anAdmin password for your DVR system. Night Owl strongly suggests that youwrite down your Admin password within the Quick Setup Guide of your DVR,as you will be required to log in any time you want to configure or adjust yoursystem settings.This screen will also require that you set a recovery email address in the eventthat your Admin password is forgotten.NOTE: You will not be able to complete the Startup Wizard unless a recoveryemail address is established.Simply click on the text box to open the on-screen keyboard. Use this keyboardto create your Admin password and to input your recovery email address.Chapter 6: Getting Started27
If you have forgotten your Admin password, simply click on the “? Forget PWD”tab in the Startup Wizard and a Secure Code will be sent to your recovery emailaddress. Use the Secure Code to restart your DVR and create a new password.6.1.5 Date and Time SetupThe Date and Time Setup screen of the Startup Wizard will allow you to set thecurrent date and time. You may choose to use Network Time Protocol (NTP) toauto-configure the current date and time.28XHD Series User’s Manual
6.1.6 Night Owl XThe Night Owl X screen of the Startup Wizard gives you information on whereto find the Night Owl X App and how it can be used to remotely view your DVRrecordings and live stream.Once you have installed the Night Owl X app on your smart device and created anaccount, you can scan the QR code on the Startup Wizard to configure your DVR withthe Night Owl X app!Night Owl recommends using the same recovery email address that you previouslychose in the Startup Wizard when creating your Night Owl X account.NOTE: In order to view your system remotely, your DVR must be connected tothe Internet.Chapter 6: Getting Started29
6.1.7 Password VerificationThe Password Verification screen of the Startup Wizard will display yourAdmin password.Night Owl strongly recommends writing down your password within the QuickSetup Guide of your DVR.6.1.8 Camera/Channel SettingsThe Camera/Channel Settings screen of the Startup Wizard serves as a reminderto mount your system’s cameras in the final position so you can make accurateadjustments to positioning, detection area and channel sensitivity.30XHD Series User’s Manual
6.1.9 Camera PositioningThe Camera Positioning screen of the Startup Wizard shows how you can use theLive View feature of the Night Owl X app to easily adjust your cameras’ positionand viewing angle.6.1.10 Channel ConfigurationThe Channel Configuration screen of the Startup Wizard explains in detail how youwill configure your Channel Settings. Please read this screen thoroughly as thefollowing screen will allow you to configure Channel Settings.Chapter 6: Getting Started31
The second Channel Configuration Screen of the Startup Wizard allows you toconfigure the following Channel Settings: Edit channel name. Turn on/off channel notifications. Define motion detection area. Adjust motion sensitivity. Configure channel recording schedule. 24/7 Motion: channel records when motion is detected. 24/7 Continuous: channel records nonstop during selected times. Custom Schedule: you define the recording modes, dates and times.NOTE: if you select Custom Schedule but do not edit some channels, those 3 will beset to 24/7 Motion. If no camera is connected to the channel, just click Next.6.1.11 Default ViewThe Default View screen of the Startup Wizard allows you to select the defaultview of the monitor connected to your DVR. You may select several viewingoptions from the drop-down menu:32XHD Series User’s Manual
QuadQuadQuadQuadView:View:View:View:1"1 channels onscreen2"2 channels onscreen3"3 channels onscreen8 channels onscreen6.1.12 Helpful LinksThe Helpful Links and Support screen of the Startup Wizard contains QR codeslinked to: DVR Troubleshooting Guide PC/MAC software download page DVR Support page Remote Viewing Support pageFor more information, visit www.NightOwlSP.com and click the Support tab atthe top of the page.Chapter 6: Getting Started33
6.1.13 Wizard CompleteOnce you have successfully completed the Startup Wizard, click Finish to beginusing your Night Owl DVR.6.2 Night Owl X Mobile AppThe Night Owl X mobile app lets you access your DVR remotely with live viewingfrom your tablet or smartphone. Download our free Night Owl X application from theiTunes App or Google Play store.Once you have downloaded Night Owl X and connected your DVR to your router, you cannetwork your DVR by scanning the QR code which is located on the top of the DVR.Disclaimer: The QR Code within the image is not active.34XHD Series User’s Manual
6.3 Displays and IconsThe following sections will describe the 2 main screens you will access for login,playback, recording and configuration.6.3.1 Login ScreenAny time you want to configure or adjust your system settings you will be requiredto log in by entering your user name and password. It’s important you save your logininfo or you won’t be able to access your DVR. Be sure to store your user name andpassword in a safe location. You will need this information to access the main menu.User: enter the User name you created in the Startup Wizard or User Menu.Password: enter the Password you created in the Startup Wizard or User Menu.If the password is incorrect you will be prompted to try again. Keep in mind thepassword is case sensitive and must be 8 characters long.Forgot PWD: sends a secure code to your recovery email. Once you input the securecode, your DVR will restart and you will be able to create a new password.Chapter 6: Getting Started35
6.3.2 Live View (All Channels)Live View is the default screen you will see when viewing all channels on your DVR.Rearrange the channel order by left clicking and dragging individual channels to otherlocations in the on-screen layout. You can also move the Date and Time display by leftclicking and dragging the display to other areas of your screen.1234567891011121. Date and Time: current date and time of the system.2. Channel Name and Number: channel name and number.3. Main Menu: access the main menu to configure or adjust settings. Be sureto store your user name and password in a safe location. You will need thisinformation to access the main menu.4. Lock Screen: manually locks or unlocks screen. Once the screen is locked,you will need to enter your user name and password to gain access.5. Startup Wizard: prompts the Startup Wizard to begin Startup Configuration.6. Quad View: 4 channel viewing layout.7. 8-Channel View: 8 channel viewing layout.8. 9-Channel View: 9 channel viewing layout.9. Auto Sequence: start/stop the slide show sequence of each channel.10. Audio: adjust the volume of your monitor.11. PTZ: open the Pan, Tilt, Zoom (PTZ) menu. This function will only work whena PTZ camera is connected to your DVR.12. Playback: access the recording/playback menu and functions.36XHD Series User’s Manual
6.3.3 Menu ScreenAccess the main menu by selecting the Menu Icon on the Live View bar.Within the menus, you will be able to access settings and parameters for allaspects of your DVR system.1234561. General Menu: configure display and network.2. Cameras Menu: access channel display, color settings, encode settings andmotion record settings.3. Record Menu: setup or modify general recording, triggered events andrecording settings. Access recordings playback.4. Device Menu: monitor available HDD space and access PTZ settings.5. System Menu: access general set
Night Owl's XHD Series DVRs are compatible with most analog cameras (400-900TVL), Night Owl's Analog HD (AHD) and HD Analog (HDA) cameras. If the camera's video quality either day or night is degraded, you may need to change the cable run from the camera to the DVR. This system is designed to work with