Transcription
EKATERINA LUKASHEVAFloralOrigami1
Copyright 2018 by Ekaterina Pavlović (Lukasheva)All rights reserved. No part of this publication may be reproduced, distributed, or transmitted inany form or by any means, including photocopying, recording, or other electronic or mechanicalmethods, without the prior written permission of the publisher, except in the case of brief quotationsembodied in critical reviews and certain other noncommercial uses permitted by copyright law.The designs in the book are intended for personal use only, no commercial use without author’swritten permission. For permission requests or wholesale orders, write to art@kusudama.me.Publisher’s Cataloging-in-Publication dataLukasheva, Ekaterina.Floral Orgami / Ekaterina LukashevaISBN-13: 978-0997311907ISBN-10: 0997311908The origami models in this book were created by Ekaterina Pavlović (Lukasheva) in the following years:2009: Gloriosa;2010: Belladonna, Carambola, Carcass, Easy Curls, Ice Queen, Igel, Imperialis,Lucia, Lyrica, Marquise, Mattiola, Mimosa, Rosette (former: Clematis);2013: Fabiana (Belladonna var.), Psyche, Roxane;2014: Anise, Astra, Curly, Matricaria, Polianta;2017: Almond, Leaf, Maple Leaf, Palm Leaf.Leaf model is very easy and seems to have been created by multiple people.Thanks to all the people who helped me make, test fold,proof-read and illustrate this book. Namely:Adams familyTatyana BushuevaUniya FilonovaEkaterina KimNatalya RomanenkoXander PerrotRui RodaTanya TurovaJean WallacePatsy Wang-Iversonand all the other people who inspired, encouraged and asked me to write a new book.Photo creditsTatyana Bushueva: picture on page 40;Ekaterina Kim: portrait on the back cover.Natalya Romanenko: pictures on page 56, page 76.Tanya Turova: pictures on page 42, page 52, page 63, page 81.2
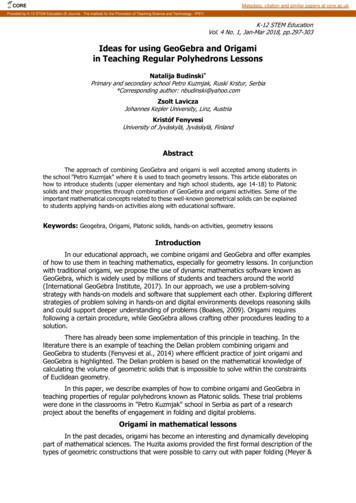
CONTENTS6899101011121314141632Origami SymbolsCutting RectanglesAbout the AuthorBook SymbolsPaperWhat is Modular OrigamiModular AssemblyOctahedron (12 units)Icosahedron (30 units)Assembly HintTips and TricksFlowers and LeavesKusudama ModelsPalm Leafpage 31Rosettepage 16Carambolapage 18Carambolapage 18Gloriosapage 21Leafpage 26Maple Leafpage 28Matricariapage 24Marquise starpage 783
4Easy Curlspage 32Carcasspage 34Gloriosapage 21Belladonnapage 36Igelpage 40Curlypage 48Psyche var.page 62Lyricapage 42Lyricapage 46Fabianapage 38Imperialispage 50Ice Queenpage 53
Mimosapage 63Lyricapage 42Poliantapage 57Psychepage 60Ice Queenpage 53Astrapage 66Anisepage 68Almondpage 70Mattiolapage 73Luciapage 76Marquisepage 78Roxanepage 815
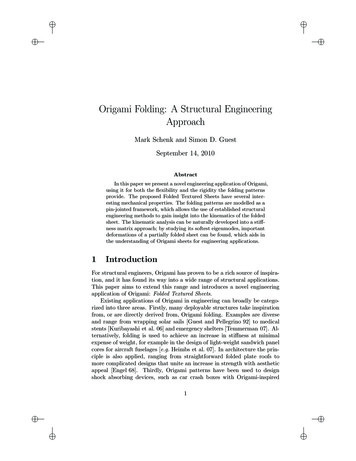
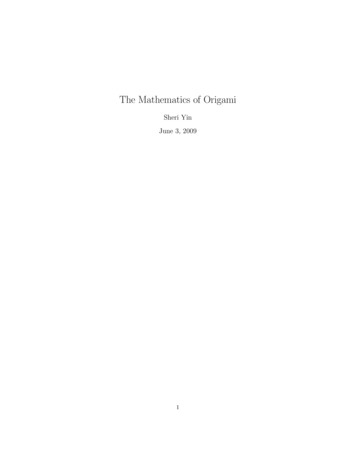
ORIGAMI SYMBOLSvalley foldmountain foldvalley fold and unfoldmountain fold and unfoldequal lengths6pleat foldequal anglesunfoldunfold/pull paperback (hidden) layer
90 90 inside reverse fold: open, squash and then fold the remaining part flatinside reverse foldenlarged view aheadcurl90 rotate 90 (or any other angle if specified)90 repeat on the other side90 turn paper overturn paper over90 semi-fold (pre-crease)put inside7
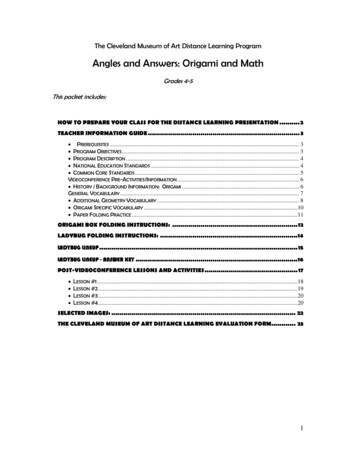
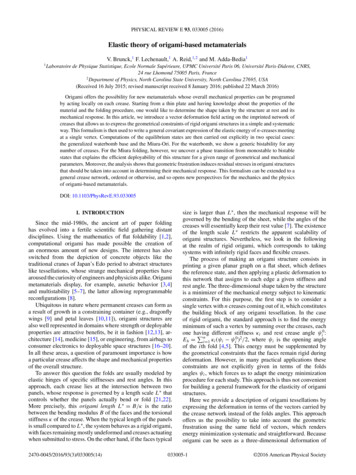
HOW TO CUT A 1: 3 RECTANGLE1234DIVISION INTO THIRDS1234 make the crease parallelto the side through theintersection, then makethe second creaseUSING A TEMPLATEUse the following method to divide a square into thirds in order to save time and avoid unnecessary creases.Divide the first square into thirds by using the above method and use it as a template for the other units.1 to make the templatefollow steps 1-4 of theabove method82 insert the other square ofthe same size to the endof the fold on the template3 make the crease on the new squareto the paper border; the new creasewill be exactly 1/3 of the square
ABOUT THE AUTHORMy name is Ekaterina Lukasheva, but myfriends call me Kate. I became acquaintedwith modular origami as a teenager; it quicklybecame my passion and has been eversince. As I grew up, I continually developedmy modular origami skills, and at some pointI started creating my own designs. It is veryinteresting, since I compose the puzzles thatI can then assemble into beautiful spheres.When I create a new origami model, I try toeither make it look different from the existingmodels or make its modular locks different.This book is my fourth published book.Kusudama Origami came out in 2014,followed by Modern Kusudama Origami in2015 and Modular Origami Kaleidoscope in2016. You can find more information aboutmy other books on page 84. Besides, Ialso publish my diagrams in various origamijournals and convention books throughoutthe world. You can find numerous kusudamapictures as well as a few free diagrams andvideos on my website: www.kusudama.meand some advanced origami tricks inmy blog www.blog.kusudama.me.I was born in 1986 in Moscow,Russia, but moved to USA in 2015. Sinceearly childhood I was fond of architectureand design art books and catalogs, aswell as “entertaining math” books. I triedseveral hobbies throughout my life suchas construction sets, drawing, painting,photography, modeling and. origami. I amfascinated by the latter at the moment. For meit is the ultimate manifestation of mathematics,art and design. I gain inspiration from various3-dimensional objects like flowers, cacti,architecture objects and stellated polyhedrons.I recently started doing more single sheettessellation-style curved-fold origami.Although I hold a M.Sc. in appliedmath and computer science and a PhDin differential equations, I do not think abackground in mathematics is necessaryto make and enjoy beautiful origami. ;)BOOK SYMBOLSSuggests the use oforigami-specific gradientpaper: there are severaltypes of different patterns.Specific patterns canenhance the model a lot.Suggests the use of paperwith different colors oneach side.The other side of thepaper won’t be seen.Difficulty level out of 5.Number of units(see pages 12-13).30 or 12 units7x7 cm squareRecommended paper size(novices may want to use largerpaper, whereas experiencedfolders could go even smaller).MODEL NAME9
PAPERThere are plenty of types of origamipaper. I will only mention the most commontypes of paper for modular origami: You can use note paper or sticky notesfor folding, you can apply some cornstarch directly on the adhesive, makingit less sticky and more ideal for folding. Duo-colored paper has different coloredsides and sometimes also has a patternon one of the sides. This paper may notbe specifically marketed for origami,although specially marked origamipaper usually serves better for origami. Patterned paper: the paper that hascontrast patterns on one or both ofthe sides. My personal opinion isthat this paper is good only for veryeasy models, because it can makecomplicated models look chaotic. Harmony paper: paper with gradientcoloring with smooth blending ofthe colors. This paper can makemodular origami truly spectacular. Thispaper is usually sold specifically fororigami in 5, 7.5 or 15 cm packs.MODULAR ORIGAMIOrigami is the art of paper folding.Traditional origami uses a single, uncut sheetof paper, whereas modular origami usesmultiple sheets joined together to create asingle form. This method offers great flexibility,while keeping the single unit relativelysimple. So if you dislike 100 step origamidiagrams, but still want the resulting piece tolook intricate, modular origami is for you.The figures created through modularorigami are usually highly symmetric,because they are made from multipleequivalent units, or modules. The origamimodules usually have special locks to allow10unit-to‑unit connection without using anyadhesive. This feature of modular origamibrings it closer to construction sets: you arejust making the pieces of the constructionset yourself prior to the assembly process.There are several names for modularorigami throughout the world. In the Westit is referred to as modular origami, butin Eastern Europe and South America,the Japanese word “kusudama” is commonlyused for ball‑like modular origami figures.In Japan, the word “kusudama” originallymeant “medicine ball”, possibly referring to aball made from flowers and used for incense.
MODULAR ASSEMBLYThe units presented in this book can be assembled in various ways. Theassembly methods for modular origami spheres are based on the structureof Platonic1 and Archimedean2 solids. Each unit corresponds to an edge ofthe solid. The detailed assembly of these solids is outlined below.There are two types of units in this book: ‘edge’ units and ‘solid’ units. Theformer act and look like real edges of the solids when you assemble the modules.But indeed the ‘solid’ units act in the same way: the only difference is that the finalshape becomes solid, and the holes between the units turn into pyramids.edge unitssolid unitsIt means that the same assembly methods can be used for both ‘types’ of units.The following image illustrates the correspondence between units and the underlying sedgeverticesThe methods below will illustrate the assembly methods for the edge units. But thesame assembly schemes apply to the solid units as well. The assembly schemes aregiven symbolically, each arrow represents the unit’s particular connection method.1 A Platonic solid is a regular convex polyhedron composed ofidentical regular polygons meeting at identical vertices.2 An Archimedean solid is a highly symmetric, semi-regular convex polyhedron composed oftwo or more types of regular polygons meeting at identical vertices. They are distinct from thePlatonic solids, which are composed of only one type of polygon meeting at identical vertices.11
OCTAHEDRONA regular octahedron is a Platonic solid composed of 8 equilateral triangles, 4 of which meet at each vertex. Sincean octahedron is formed with 12 edges, you will need 12 units to complete a modular octahedron figure.connect 4 units so thatthey meet at a single pointcontinue adding the units so that every 3 units form atriangular hole (triangular pyramid in case of solid units)complete octahedronadd 4 more units so that 4units meet at a single point each timeconnect the sides marked with thestars in the illustration to a single pointbehind, completing the octahedronthe solid version of the octahedron: the dottedlines show the underlying octahedron12
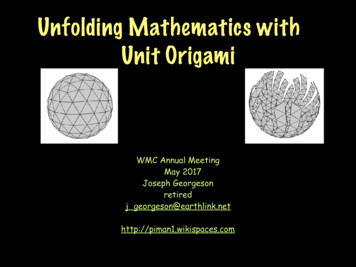
ICOSAHEDRONAn icosahedron is a polyhedron composed of 20 triangular faces, with 5 of those meeting at each vertex.Since an icosahedron is formed with 30 edges, you will need 30 units to complete a modular icosahedron figure.connect 5 units so thatthey meet at a single pointadd 5 more units toform 5 trianglesconnect the loose sides of the unitsso that they form 5 trianglesadd units to thenon-finished vertices so that5 units meet at a single point;the units marked with the stars in thepicture should meet at a single pointconnect 2 additional units to everyunfinished vertex, so that 5 units meet ata single vertex each timethe complete icosahedron (left)and the solid version of theicosahedron (right)the size of the holes, as well asthe sharpness of the spikes, mayvary from unit to unit13
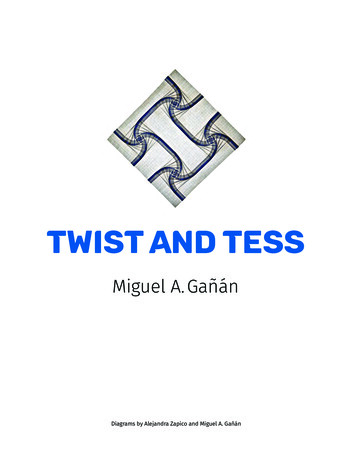
ASSEMBLY HINTSome of the models in this book sharewhen you assemble an icosahedron, finisha similar connection system which can lookthe vertices where five edges are connected.unstable at first glance. However, if you joinSince a “star” of five units is enclosed itbecomes stable (steps 1-5 in the picture).the pieces as shown below, they will connectmore firmly, and the assembly process willInstead of closing the adjacent triangles, yoube less cumbersome. The diagram belowshould then assemble the next “star” (stepsillustrates the modified assembly sequence for 6-10). Continue to assemble the modelthe icosahedron (30 units), but the same idea by finishing the vertices, proceedingin this fashion until the model is finished.may be applied to any sphere you assemble.As you go, keep in mind that the holesThe concept behind thisis tounitstry :andHowmethodto assemblethe connection becomes stable when it’s connected to the closed ”star”.finish the vertices of thepolyhedron first. Thus, between the units should be triangular.Close the circle from first 5 units and then arrange the second star neat the first.49103586217Continue adding units so that each five meet at one pointand the windows between the units are triangles. You will need 30 units.TIPS AND TRICKSIf you assemble other modular forms (below) you should assemble complete verticesto make them stable. Try to choose papers of the same typeand weight for a single model. If youmix papers with different properties ina single model it may not only lookinconsistent but may also lack symmetry.12 units Try folding a test unit from a largerpiece of paper before starting the entiremodular. It may give you a hint as towhat paper size would be most comfortable for you, as well as how the coloror pattern of the paper will appearwhen folded into a particular module.12 units Be as accurate as possible when making every single unit. The more preciseyou are, the better the final model willlook. Some modular locks only functionwhen your folding is very precise.14 Rotate the paper to make your foldscomfortable. Diagrams are drawn tobe clear and straightforward but thismay not be the most comfortable wayfor folding. Try rotating the paper sothat you30 unitsfold ‘from you’. This is especially true about bigger, longer folds. Many units in this book have a centralvalley fold. When you fold such a unit,leave the tiniest gap between the upperlayer of paper and the central line.This way there won’t be overlappinglayers30 unitsof paper in a final unit.leave tiny gapin the center
If you are not sure how to perform aparticular step, refer to the next step inthe diagram, as the illustration shouldgive you a hint of the resulting shape. Shaping, rounding or curling thepetals is a very powerful techniqueand it can drastically change yourmodel’s appearance. Use yournails or pincers for shaping. Some units have connectors that canserve both as a flap and as a pocket.For such units always assign which partof the unit is a flap and whic
Kusudama Origami came out in 2014, followed by Modern Kusudama Origami in 2015 and Modular Origami Kaleidoscope in 2016. You can find more information about my other books on page 84. Besides, I also publish my diagrams in various origami journals and convention books throughout the world. You can find numerous kusudama