Transcription
EKATERINA LUKASHEVAMODULAR ORIGAMIKALEIDOSCOPE1
Copyright 2016 by Ekaterina Pavlović (Lukasheva)All rights reserved. No part of this publication may be reproduced, distributed, or transmitted inany form or by any means, including photocopying, recording, or other electronic or mechanicalmethods, without the prior written permission of the publisher, except in the case of brief quotationsembodied in critical reviews and certain other noncommercial uses permitted by copyright law.The designs in the book are intended for personal use only, no commercial use without author’swritten permission. For permission requests or wholesale orders, write to art@kusudama.me.Publisher’s Cataloging-in-Publication dataLukasheva, Ekaterina.Modular origami kaleidoscope / Ekaterina LukashevaISBN-13: 978-0-9973119-4-5ISBN-10: 0-9973119-4-0The origami models in this book were created by Ekaterina Pavlović (Lukasheva) in the following years:2010: Aristata, Masquerade;2011: Eve, Prima, Tigra, Tiger;2012: Almandine, Chameleon Eye, Delicate Flower, Flower Star, Forma Perfecta;2013: Bicolor, Insignia, Kohleria, Lathyrus, Pulsatilla, Radiant Flower, Secret Flower;2014: Flora, Flora Flower;2015: Clematis, Sprouts, Nerium.Thanks to all the people who helped me make, test fold,proof-read and illustrate this book. Namely:Elena BelogorodtsevaOlga DumerUniya FilonovaEkaterina KimInna LupanovaRosemary Lyndall WemmAlina MaslovaBoris PavlovićTanya TurovaJean Wallaceand all the other people who inspired, encouraged and asked me to write a new book.Photo creditsEkaterina Kim: portrait on the cover.Inna Lupanova: picture on page 38 (top).Alina Maslova - picture on page 51, page 56.Tanya Turova: pictures on page 22, page 26, page 30, page 31, page 35, page 38(bottom), page 39, page 40, page 60, page 50 (bottom), page 64, page 66.Jean Wallace: the diagrams on page 60, page 48.2
CONTENTS681010111213141516161718Origami SymbolsCutting RectanglesWhat is Modular OrigamiAbout the AuthorModular AssemblyOctahedron (12A)Cube (12B)Icosahedron (30A)Dodecahedron (30B)Assembly HintTips and TricksBook SymbolsModelsDelicate Flowerpage 20Clematispage 32Flower Starpage 18Aristata Transformerpage 42Tigrapage 48Almandinepage 22Forma Perfecta var.2page 38Chameleon Eye var.1page 30Aristatapage 403
4Tigrapage 48Chameleon Eyepage 27Bicolor variationpage 26Tiger variationpage 53Forma Perfecta var.3page 39Florapage 44Bicolorpage 24Tigerpage 51Forma Perfecta var.2page 38Pulsatillapage 64Primapage 54Kohleriapage 56
Flora Flowerpage 46Insigniapage 58Secret Flowerpage 60Secret Flower variationpage 63Masqueradepage 71Radiant Flowerpage 66Evepage 68Masqueradepage 71Floral Masqueradepage 75Sproutspage 76Neriumpage 78Lathyruspage 795
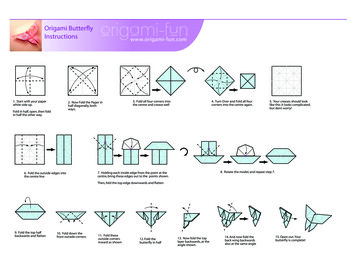
ORIGAMI SYMBOLSvalley foldmountain foldvalley fold and unfoldmountain fold and unfoldequal lengths6pleat foldequal anglesunfoldunfold/pull paper
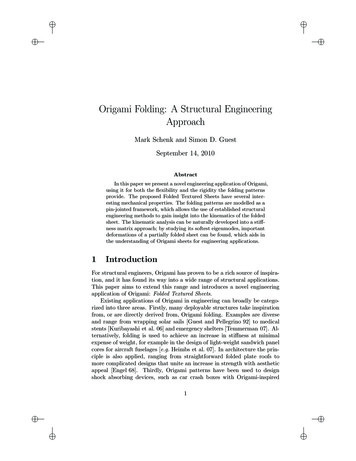
enlarged view aheadcurlsink foldinside reverse foldback (hidden) layerrepeat on the other side90 90 90 rotate 90 (or any other angle if specified)90 turn paper over90 semi-fold (pre-crease)put inside7
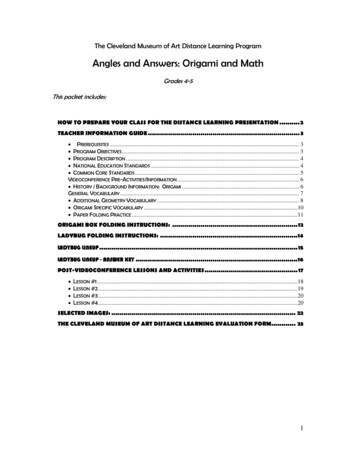
HOW TO CUT A.1:2 RECTANGLE (HALF SQUARE)121: 3 RECTANGLE213434 the lower rectangle1: 2 RECTANGLE1 start with squareor rectangle82has 1: 2 proportion
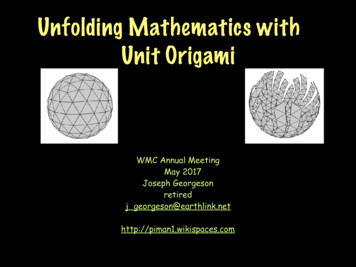
DIVISION INTO THIRDS123USING A TEMPLATE4 make the creaseparallel to the sidethrough the intersection, then makethe second creaseUse the following method to divide a square into thirds in order to save time and avoid unnecessary creases.Divide the first square into thirds by using the above method and use it as a template for the other units.1 to make the templatedo steps 1-4 of theabove method2 insert the other square of3 make the crease on the new squarethe same size till the endto the templateto the paper border; the new creasewill be exactly 1/3 of the square2:3 RECTANGLE1 start with step 4 ofdividing to thirds23At step 1, the gray partis equal to 2/3 of thesquare’s length, and thewhite part is equal to 1/3.If you want a large 2:3rectangle, cut the whitepart away at this step anduse the remaining grayarea. If you wish to havesmaller 2:3 rectangles,continue to steps 2-3.9
MODULAR ORIGAMIOrigami is the art of paper folding.Traditional origami uses a single, uncut sheetof paper, whereas modular origami usesmultiple sheets joined together to create asingle form. This method offers great flexibility,while keeping the single unit relativelysimple. So if you dislike 100 step origamidiagrams, but still want the resulting piece tolook intricate, modular origami is for you.The figures created through modularorigami are usually highly symmetric,because they are made from multipleequivalent units, or modules. The origamimodules usually have special locks to allowunit-to‑unit connection without using anyadhesive. This feature of modular origamibrings it closer to construction sets: you arejust making the pieces of the constructionset yourself prior to the assembly process.There are several names for modularorigami throughout the world. In the Westit is referred to as modular origami, butin Eastern Europe and South America,the Japanese word “kusudama” is commonlyused for ball‑like modular origami figures.In Japan, the word “kusudama” originallymeant “medicine ball”, possibly referring to aball made from flowers and used for incense.ABOUT THE AUTHORMy name is Ekaterina Lukasheva, but myfriends call me Kate. I became acquaintedwith modular origami as a teenager; it quicklybecame my passion and has been eversince. As I grew up, I continually developedmy modular origami skills, and at some pointI started creating my own designs. It is veryinteresting, since I compose the puzzles thatI can then assemble into beautiful spheres.When I create a new origami model, I try toeither make it look different from the existingmodels or make its modular locks different.This book is my third published book.Kusudama Origami came out in 2014followed by Modern Kusudama Origamiin 2015. You can find more informationabout my other books on page 82.Besides, I usually publish my diagrams invarious origami journals and conventionbooks throughout the world. You canalso find numerous kusudama pictures as10well as a few free diagrams and videoson my website: www.kusudama.me.I was born in 1986 in Moscow,Russia. Since early childhood I was fondof architecture and design art books andcatalogs, as well as “entertaining math”books. I tried several hobbies throughoutmy life such as construction sets, drawing,painting, photography, modeling and.origami. I am fascinated by the latter at themoment. For me it is the ultimate manifestationof mathematics, art and design. I gaininspiration from various 3-dimensionalobjects like flowers, cacti, architectureobjects and stellated polyhedrons.Even hold a M.Sc. in appliedmath and programming and a PhD indifferential equations, I do not thinkbackground in mathematics is necessaryto make and enjoy beautiful origami. ;)
MODULAR ASSEMBLYThe units presented in this book can be assembled in various ways. Theassembly methods for modular origami spheres are based on the structureof Platonic1 and Archimedean2 solids. Each unit corresponds to an edge ofthe solid. The detailed assembly of these solids is outlined below.There are two types of units in this book: ‘edge’ units and ‘solid’ units. Theformer act and look like real edges of the solids when you assemble the modules.But indeed the ‘solid’ units act in the same way: the only difference is that the finalshape becomes solid, and the holes between the units turn into pyramids.edge unitssolid unitsIt means that the same assembly methods can be used for both ‘types’ of units.The following image illustrates the correspondence between units and the underlying sedgeverticesThe methods below will illustrate the assembly methods for the edge units. But thesame assembly schemes apply to the solid units as well. The assembly schemes aregiven symbolically, each arrow represents the unit’s particular connection method.1 A Platonic solid is a regular convex polyhedron composed of identical regular polygons meeting at identical vertices.2 An Archimedean solid is a highly symmetric, semi-regular convex polyhedron composed of twoor more types of regular polygons meeting at identical vertices. They are distinct from the Platonic solids, which are composed of only one type of polygon meeting at identical vertices.11
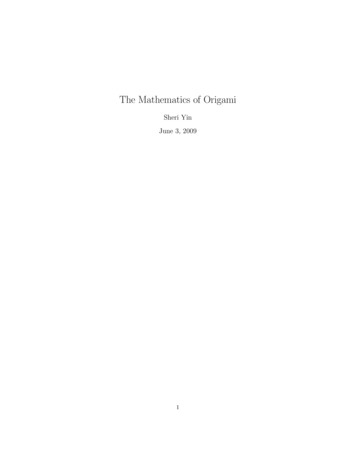
OCTAHEDRONmethod 12AA regular octahedron is a Platonic solid composed of 8 equilateral triangles, 4 of which meet at each vertex. Sincean octahedron is formed with 12 edges, you will need 12 units to complete a modular octahedron figure.connect 4 units so thatthey meet at a single pointcontinue adding the units so that every 3 units form atriangular hole (triangular pyramid in case of solid units)complete octahedronadd 4 more units so that 4units meet at a single point each timeconnect the sides marked with thestars in the illustration to a single pointbehind, completing the octahedronthe solid version of the octahedron: the dottedlines show the underlying octahedron12
CUBEmethod 12BA regular cube is a Platonic solid composed of 6 square faces, with3 edges meeting at each vertex. Since a cube is formed with 12edges, you will need 12 units to complete a modular cube figure.connect 3 units so that theymeet at a single pointconnect loose units as showncomplete cubeadd units to the loose sides of the edges sothat 3 units meet at a single point each timeadd the remaining units so that 3 units meet ata single vertex, connect the sides of the unitsmarked with triangles to a single point behindthe solid version of the complete cube: thedotted line shows the underlying cube13
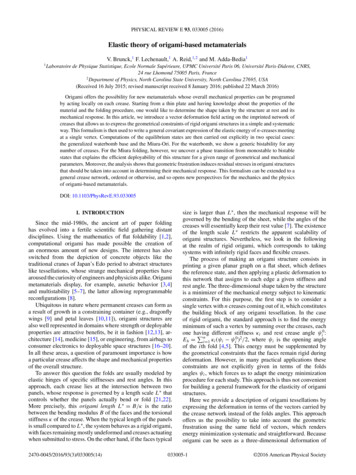
ICOSAHEDRONmethod 30AAn icosahedron is a polyhedron composed of 20 triangular faces, with 5 of those meeting at each vertex.Since an icosahedron is formed with 30 edges, you will need 30 units to complete a modular icosahedron figure.connect 5 units so thatthey meet at a single pointadd 5 more units toform 5 trianglesconnect the loose sides of the unitsso that they form 5 trianglesadd units to thenon-finished vertices so that5 units meet at a single point;the units marked with the stars in thepicture should meet at a single pointconnect 2 additional units to everyunfinished vertex, so that 5 units meet ata single vertex each timethe complete icosahedron (left)and the solid version of theicosahedron (right)the size of the holes, as well asthe sharpness of the spikes, mayvary from unit to unit14
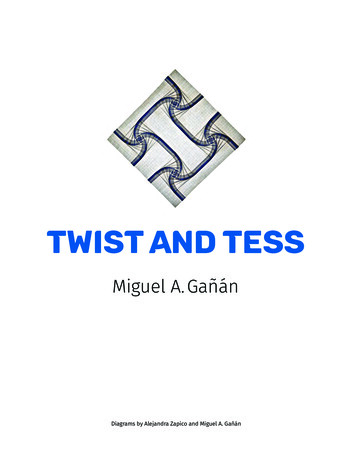
DODECAHEDRONmethod 30BA dodecahedron is a Platonic solid composed of 12 pentagonal faces, with 3 of those meeting at each vertex. Sincea dodecahedron is formed with 30 edges, you will need 30 units to complete a modular dodecahedron figure. Theassembly scheme described below may not be the most comfortable; while it illustrates the algorithm, the actual sequenceof the assembly may be slightly different.5554connect 5 units so that theyform a ring1add 2 units to every loose sideof the unit so that 3 units meetat every pointconnect 5 more units so thatevery 3 units meet at a singlevertex as shown211!252!45335354add 5 more units sothat every 3 units meet at a singlepoint, then make a new ring of unitsthe same way you did in the first step4connect the loose edges sothat you get 5 pentagonal ringsaround the central oneconnect this new ring to the figure so thatthe numbers in the grey pentagons match up4this picture is to illustrate the structure only,as it is easier to add the last 5units one by onethe complete dodecahedron (left)and the solid version ofdodecahedron (right)the size of the holes as well as thesharpness of the spikes may varyfrom unit to unit15
ASSEMBLY HINTSome of the models in this book sharethe polyhedron first. Thus, when you assemblea similar connection system which can lookan icosahedron, finish the vertices where fiveunstable at first glance. However, if you joinedges are connected. Since a “star” of fiveunits is enclosed it becomes stable (steps 1-5the pieces as shown below, they will connectmore stable, and assembly process willin the picture). Instead of closing the adjacentbe more comfortable. The diagram belowtriangles, you should then assemble theillustrates the modified assembly sequencenext “star” (steps 6-10). Continue tofor the icosahedron (30A method), but theassemble the model by finishing the vertices,How to assemble units:proceeding in this fashion until the model issame idea may be applied to any spherethe connection becomes stable when it’s connected to the closed ”star”.finished. As you go, keep in mind that theyou assemble. The concept behind thisClose the circle from first 5 units and then arrange the second star neat the first.method is to try and finish the vertices ofholes between the units should be triangular.17256843109TIPS AND TRICKSContinue adding units so that each five meet at one pointand the windows between the units are triangles. You will need 30 units.youtoassemblemodularvertices IfTrychooseotherpapersof theformssame(below)type you should Ifassembleyou are completenot sure howto perform ato make them stable.and weight for a single model. If youparticular step, refer to the next step inmix papers with different properties inthe diagram, as the illustration shoulda single model it may not only lookgive you a hint of the resulting shape.inconsistent but may also lack symmetry. If you would like to use sticky notes for Try folding a test unit from lager piece offolding , you can apply some cornpaper before starting the entire modular.starch directly on the adhesive, makingIt may give you a hint as to what paperit less sticky and more ideal for folding.size would be most comfortable for you, Be as accurate as possible when makas well as how the color or pattern ofing every single unit. The more precisethe paper will appear when folded intoyou are, the better the final model willa particular module.look. Somemodular locks
Kusudama Origami came out in 2014 followed by Modern Kusudama Origami in 2015. You can find more information about my other books on page 82. Besides, I usually publish my diagrams in various origami journals and convention books throughout the world. You can also find numerous kusudama pictures as well as a few free diagrams and videos