Transcription
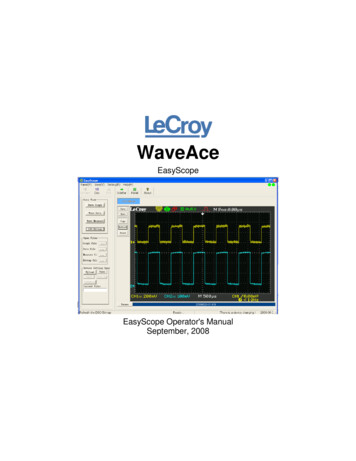
WaveAceEasyScopeEasyScope Operator's ManualSeptember, 2008
LeCroy Corporation700 Chestnut Ridge RoadChestnut Ridge, NY, 10977-6499Tel: (845) 578-6020, Fax: (845) 578 5985Internet: www.lecroy.com 2008 by LeCroy Corporation. All rights reserved.LeCroy, ActiveDSO, JitterTrack, WavePro, WaveMaster, WaveSurfer, WaveLink, WaveExpert, Waverunner, and WaveAce areregistered trademarks of LeCroy Corporation. Other product or brand names are trademarks or requested trademarks of theirrespective holders. Information in this publication supersedes all earlier versions. Specifications are subject to change withoutnotice.916512-RevA
EasyScope Operator's ManualTABLE OF CONTENTSEasyScope Overview . 4Installing EasyScope . 5Installing the USB Driver . 6Uninstalling EasyScope . 8Getting Started with EasyScope . 9Getting to Know EasyScope . 9Wave Graphs . 12Displaying WaveGraphs . 12Opening Waveform Graphs . 13Copying Waveform Graphs. 13Printing Waveform Graphs. 13Saving Waveform Graphs . 14Wave Data . 15Copying Wave Data . 15Printing Wave Data . 15Saving Wave Data . 16Wave Measurements . 17Copying Wave Measurements . 17Printing Wave Measurements . 17Saving Wave Measurements . 18Setting Pass/Fail Ranges. 19DSO Bitmaps . 20Displaying Bitmap Images . 20Copying Bitmap Images . 20Printing Bitmap Images . 20Saving Bitmap Images . 21Device Settings . 22Transferring Device Settings . 22Virtual Panel. 23Using the Virual Panel . 23Exiting EasyScope . 28Disconnecting and Exiting EasyScope . 28ES-OM-E-RevAiii
WaveAceEasyScope OverviewThe EasyScope software utility is provided to connect your WaveAce series oscilloscope to your PC. TheEasyScope application lets you view waveforms, waveform data, waveform measurements, and bitmap images ofyour waveforms. You can also upload/download oscilloscope settings. You can connect your WaveAce seriesoscilloscope to your PC using the USB serial interface or RS-232 interface.4ES-OM-E-RevA
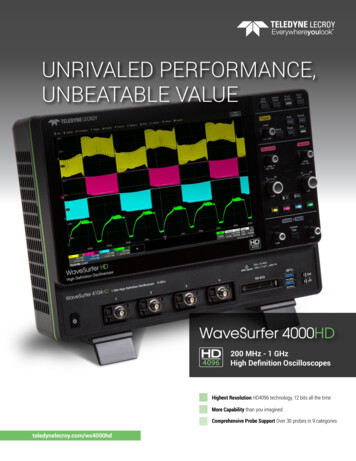
EasyScope Operator's ManualInstalling EasyScopeThe EasyScope software provides an easy-to-use Wizard. Simply run the SETUP.EXE file and follow the onscreen instructions. The wizard creates a new program group, installs the files and drivers, and puts an icon onyour desktop.1.2.Insert the installation CD into the CD-ROM drive.Double-click EasyScope3.0 Set up SETUP.EXE to start the EasyScope 3.0 Setup Wizard.3.Click Next to select an installation folder.ES-OM-E-RevA5
WaveAce4.Click Next to use the default installation folder. The Confirm Installation window opens.Note: If you want to install EasyScope 3.0 to a different folder, click the Browse button and choose alocation.5.6.Click Next to start the installation.When the installation is complete, a confirmation message is displayed. Click Close to exit the EasyScopeinstallation.Installing the USB DriverIf you connect your WaveAce series oscilloscope by the USB interface, you need to install the USB driver. If youconnect your WaveAce series oscilloscope by RS-232 interface, you do not need to install a device driver.1.2.6Connect the oscilloscope to your PC using the USB serial cable. Microsoft Windows automatically detectsthe oscilloscope and display the Found New Hardware window.Click the Found New Hardware window. The Found New Hardware Wizard opens.ES-OM-E-RevA
EasyScope Operator's Manual3.Choose Install from a list or specific location (Advanced) and click Next. The Please choose yoursearch and installation options window opens.ES-OM-E-RevA7
WaveAce4.5.Choose Include this location in the search and click Browse to locate the EasyScope3.0 USB Driverfolder and then click Next. The USB Driver will be installed.Click Finish to close the wizard.Uninstalling EasyScopeYou can uninstall EasyScope using Add/Remove Programs in the Microsoft Windows Control Panel.1.2.3.8To open Add/Remove Programs, click Start Control Panel and then double-click Add/RemovePrograms.Click Change or Remove Programs, and then click EasyScope3.0.To remove EasyScope, click Remove.ES-OM-E-RevA
EasyScope Operator's ManualGetting Started with EasyScopeOnce you have installed the EasyScope application, make sure your oscilloscope is connected to your PC.Double-click the EasyScope iconon your desktop.The EasyScope main window opens.Make sure your oscilloscope is connected to your PC. Turn on your oscilloscope. The left Link Status indicatorlight should be displayed green.Click the Connect button on the toolbar.The Link Status indicator lights in the upper right corner bothdisplay green to indicate that the oscilloscope was successfully connected.Getting to Know EasyScopeThe EasyScope screen is divided into these main sections: Menu BarToolbarBase Control PanelData/Graph Display AreaStatus BarMenu BarThe top of the screen contains a menu bar of commonly used functions.There are four menus: Panel(P) - Provides menu options for connecting/disconnecting your oscilloscope using EasyScope andexiting the application.View(V) - Provides menu options to view/hide the Toolbar, Status Bar, and Base Control Panel.Setting(S) - Provides menu options to define EasyScope settings, such as connection settings.Help(H) - Provides information about your EasyScope software.Link Status Indicator - Indicates whether the link between the PC and the oscilloscope is normal andwhether EasyScope and the oscilloscope are communicating. The left indicator turns green when a the PCand the oscilloscope are connecting and it turns red when the link is disconnected. The right indicator turnsgreen when the oscilloscope and EasyScope are communicating data and it turns red when they stop datacommunication.Note: You can quickly access a menu by clicking the Alt button and the keyboard shortcut for that menu. Forexample, to quickly access the View menu, press Alt v.ES-OM-E-RevA9
WaveAceToolbarThe Toolbar lets you quickly access EasyScope functions. Press Connect to connect to your oscilloscope (this is the same as choosing Panel Connect from themenu bar).Press Disc to disconnect your oscilloscope (this is the same as choosing Panel Disconnect from themenu bar).Press Exit to exist the EasyScope application (this is the same as choosing Panel Exit from the menubar).Press Sidebar to turn the Base Control Panel On or Off (this is the same as choosing View BaseControl Panel from the menu bar).Press Panel to display the Virtual Panel. You can operate the oscilloscope using the Virtual Panel.Press About to display information about your EasyScope software (this is the same as choosingHelp About EasyScope from the menu bar).Base Control PanelThe Base Control Panel is divided into three areas: Goto ViewOpen FilesDevice Setting Oper 10Wave Graph - displays up to sevenwaveforms at the same time in theGraph Display Area.Wave Data - displays data for up toseven waveforms.Wave Measure - displays waveformmeasurement values for up to sevenwaveforms.DSO Bitmap - displays a bitmap imageof a waveform in the display area.Graph file - click this button to recallsaved waveform graph files.Data file - click this button to recallsaved waveform data files.Measure file - click this button to recallsaved waveform measurement valuefiles.Bitmap file - click this button to recallsaved bitmap image files.Upload - uploads settings to youroscilloscopeDownload - downloads setting from youroscilloscopeES-OM-E-RevA
EasyScope Operator's ManualStatus Bar1.2.3.4.Current operationCommunication statusLink status or oscilloscope modelCurrent DateES-OM-E-RevA11
WaveAceWave GraphsYou can use the Wave Graph function to view waveforms.1.2.3.4.5.Graph Oper - lets you save, copy, open, and print waveform graphs.Refresh Oper - lets you obtain and display waveform graphs.Graph Show - lets you indicate the channels you want to display in the Graph display area.Graph Display - displays the waveform graph(s).Parameters - displays the waveform parameters for the selected channels, such as Sec/div, Horizontalposition, Volts/div, Vertical Position, and Trigger Level.Displaying WaveGraphsWhen displaying waveform graphs, there are two modes: Auto and Manual. Auto mode automatically refreshesthe waveform and parameter data using the Refresh Rate setting. Manual mode, the default mode, thewaveform graph and data are refreshed once each time you press the Refresh button.PLEASE NOTE THE FOLLOWING: 1.2.3.If you use Auto mode, do not press the RUN/STOP front panel or Virtual Panel button. When you stop theacquisition, EasyScope will not be able to automatically refresh.If you want to change the Refresh Rate for Auto mode, make sure you set the display mode to Manual.Then, change the Refresh Rate and set it to Auto mode.To display waveform graphs, click the Wave Graph button on the Base Control Panel.Click GetAllData.If you want to automatically refresh the waveform, click Auto.OR4.5.12If you want to manual refresh the waveform, click Manual.To display waveform measurements in the parameter table below the graph, click CH1 and/or CH2.Choose the channels you want to display in the Graph Show area. The channels you selected aredisplayed in the Graph display areaES-OM-E-RevA
EasyScope Operator's Manual6.Click the Refresh button.Note: When you choose Manual refresh mode, you must click the Refresh button to refresh the display. In Autorefresh mode, the waveform is automatically refreshed.Opening Waveform GraphsYou can open saved waveform graph files by clicking the Open button in the Graph Oper area or by clicking thebutton next to Graph File in the Open Files area. An Open File window is displayed. Select the file you want toopen and click OK.Copying Waveform GraphsYou can copy waveform graphs quickly by clicking Copy in the Graph Oper area. This takes a screen print of thewave graph so you can paste it in another application.Printing Waveform GraphsYou can print the wave graph data by clicking the Print button in the Graph Oper area. When you click Print, aprint preview of the wave graph data is displayed.To print the wave graph data click the Print toolbar button.ES-OM-E-RevA13
WaveAceSaving Waveform Graphs1.You can save the waveform graph data by clicking the Save button in the Graph Oper area. The Selectthe Channel window opens.2.3.Select a channel and click OK.In the Save Graph window, click Browse to choose a location for the saved file. Type a filename and clickOK to save the data.The wave graph data is saved as a comma separated file (.csv). You can then open this file in other programs,such as Microsoft Excel.14ES-OM-E-RevA
EasyScope Operator's ManualWave DataYou can use the Wave Data function to obtain and display waveform data. To display waveform data, click theWave Data button.Copying Wave DataYou can copy waveform data quickly by clicking the Copy button at the top of the window. This takes a screenprint of the wave data so you can paste it in another application.Printing Wave DataTo print the wave data click the Print button at the top of the wave data window. The Select the list item to printwindow opens.Type a starting and ending item in the list that you want to print and click OK. A print preview of the wave data isdisplayed.ES-OM-E-RevA15
WaveAceTo print the wave data, click the Print toolbar button.Saving Wave Data1.You can save the waveform data by clicking the Save button at the top of the window. The Select theChannel window opens.2.3.Select a channel and click OK.In the Save Data window, click Browse to choose a location for the saved file. Type a filename and clickOK to save the data.The wave data is saved as a wave data file (.wdf).Note: You can open a wave data file (.wdf) using the Data File. button in the Open Files area.16ES-OM-E-RevA
EasyScope Operator's ManualWave MeasurementsThe WaveAce series oscilloscope can automatically measure 32 parameters. Once you have a waveform graphdisplayed, you can view its' waveform measurements. You can copy, print, and save the waveformmeasurements. You can also set Pass/Fail ranges for each measurement.Note: You should use Auto mode when displaying waveform graphs to display waveform measurement values.To display waveform measurements, click the Wave Measure button.Copying Wave MeasurementsYou can copy waveform measurements quickly by clicking the Copy button at the top of the Wave Measurewindow. This takes a screen print of the wave measurements so you can paste them in another application.Printing Wave MeasurementsYou can print the wave measurement data by clicking the Print button at the top of the window. When you clickPrint, a print preview of the wave measurement data is displayed.ES-OM-E-RevA17
WaveAceClick the Print button on the toolbar to print the waveform measurements.Saving Wave Measurements1.You can save the waveform measurements by clicking the Save button at the top of the window. TheSelect the Channel window opens.2.3.Select a channel and click OK.In the Save Data window, click Browse to choose a location for the saved file. Type a filename and clickOK to save the data.The wave data is saved as a waveform measurement file (.wmf).Note: You can open a wave measurement file (.wmf) using the Data File. button in the Open Files area.18ES-OM-E-RevA
EasyScope Operator's ManualSetting Pass/Fail RangesThe WaveAce series oscilloscope can automatically measure 32 parameters. You can set the Pass/Fail rangesfor each of these measurements.1.To set pass/fail ranges, in the Wave Measure window click the Pass/Fail button. The Pass/Fail settingwindow opens.2.Click the drop-down arrow to select a measure type, such as Vpp, Vmax, Vmin, etc. and click the Enablecheckbox.Under Pass Range Settings, type a minimum and maximum limit.3.Note: The limits must be between -999 and 999.2.Click OK.ES-OM-E-RevA19
WaveAceDSO BitmapsDisplaying Bitmap ImagesYou can use the DSO Bitmap function to display a bitmap (.bmp) image of the current waveform in the displayarea. Once you have displayed a bitmap image, you can copy, print, and save it.Click Refresh to display a bitmap image of the current waveform.ORClick Open to open a previously saved bitmap image file (.bmp).Copying Bitmap ImagesYou can copy bitmap images quickly by clicking the Copy button at the top of the DSO Bitmap window. This takesa screen print of the image so you can paste it in another application.Printing Bitmap ImagesTo print the bitmap image click the Print button at the top of the window. When you click Print, a print preview ofthe image is displayed.20ES-OM-E-RevA
EasyScope Operator's ManualTo print the bitmap image, click the Print toolbar button.Saving Bitmap Images1.2.You can save the waveform bitmap image by clicking the Save button at the top of the window.In the Save Bmp file window, click Browse to choose a location for the saved file. Type a filename andclick OK to save the data.The image is saved as a bitmap file (.bmp).Note: You can open a previously saved bitmap image file (.bmp) using the DSO Bitmap. button in the OpenFiles area.ES-OM-E-RevA21
WaveAceDevice SettingsTransferring Device SettingsYou can transfer the oscilloscope's settings to your PC and save it for use at another time. You can alsodownload the oscilloscope setup data from a saved scope setting file to the oscilloscope.Uploading Device Settings to your PC1.2.In the Device Setting Oper area, click the Upload button. The current oscilloscope settings are uploadedto your PC and a default filename is listed in the Current file field.If you want to save the uploaded settings, click Save to save settings to the default scope setting file (.ssf)listed in the Current file field.ORClick Save As to select a location and enter a new filename for the scope setting file.Downloading Device Settings to your Oscilloscope1.2.3.22In the Device Setting Oper area, click the Open button.In the Open Setting File window, locate the scope setting file (.ssf) you want to download and click OK.The scope setting file you chose is listed in the Current file field.Click the Download button. The scope settings are downloaded to your oscilloscope.ES-OM-E-RevA
EasyScope Operator's ManualVirtual PanelUsing the Virual PanelYou can use the EasyScope Virtual Panel to control your oscilloscope using your PC. The Virtual Panel isarranged to be the same as your Front Panel Controls on your WaveAce oscilloscope.To access the Virtual Panel, click the Panel toolbar button.The Virtual Panel is displayed.Intensity/Adjust Knob Intensity/Adjust knob - You can use the Adjust knob with many functions, such as adjusting the holdofftime, moving cursors, setting the pulse width, setting the video lineage adjusting the upper and lowerfrequency limits, adjusting X and Y masks when using the Pass/Fail function, etc. You can also use theAdjust knob to adjust the storage position of setups, waveforms, pictures when saving/recalling and toselect menu options. Click the left/right arrow buttons to "turn" the knob.ES-OM-E-RevA23
WaveAceMenu Control Buttons Menu Option buttons (1-5) - Press to choose menu options. Press a menu option button adjacent to yourselection.Menu Function Buttons CURSORS - Press to turn on the cursors and display the Cursor menu. You can use the Cursor menu toset the Cursor Mode (Auto, Off, Manual, Track). When Cursors are on (CURSORS button is lit), press theleft/right arrow buttons to "turn" the Adjust knob to position the cursors.ACQUIRE - Press to display Acquire menu. You can use the Acquire menu to set the acquisitionSampling Mode (Sampling, Peak Detect, Average).SAVE/RECALL - Press to display the Save/Recall menu. You can use the Save/Recall menu to save andrecall up to 20 scope setups or waveforms in internal memory (up to 20 waveforms) or on a USB memorydevice (limited by memory capacity of USB device). You can also use it to recall the default factorysettings, to save waveform data as a comma-delimited file (.CSV), and to save or print the displayedwaveform image.MEASURE - Press to display a menu of measurement parameters. The Display Type must be set to YTmode.DISPLAY - Press to open the Display menu. You can use the Display menu to set grid and waveformdisplay styles, and persistence.UTILITY - Press to open the Utility menu. You can use the Utility menu to configure WaveAce features,such as sound, language, counter, etc. You can also view system status and update software.General Control Buttons 24DEFAULT SETUP - Press to reset the oscilloscope's settings to the default factory configuration. For a listof default settings, see your WaveAce Getting Started Manual.ES-OM-E-RevA
EasyScope Operator's ManualRun Control Buttons SINGLE - Press to acquire a single waveform. Each time you press the SINGLE button, the oscilloscopeacquires another waveform. When the oscilloscope detects a trigger it completes the acquisition and stops.RUN/STOP - Press when you want the oscilloscope to acquire waveforms continuously. Press RUN/STOPagain to stop the acquisition.AUTO - Press to have the oscilloscope automatically identify the type of waveform and adjust the controlsto produce a usable display of the input signal. When you press the AUTO front panel button, the Auto Setmenu opens. You can use this menu to display multiple-cycle signals, a single-cycle signal, the rising edge,the falling edge or recall the previous setup.Vertical Controls Volts/Div knobs (CH1/CH2)- Click the left/right arrow buttons to "turn" the Volts/Div knob to adjust thevolts/division setting (vertical gain) of the corresponding channel (CH1 or CH2). Press the knob to togglebetween fine (variable) and coarse (fixed) adjustments.Channel buttons (CH1/CH2) - Press a channel button (CH1 or CH2) to turn that channel ON or OFF andopen the Channel menu for that channel. You can use the Channel menu to set up a channel. When thechannel is ON, the channel button is lit.Vertical Position knobs (CH1/CH2) - Click the left/right arrow buttons to "turn" the Vertical Position knobto adjust the vertical position of the corresponding channel (CH1 or CH2). Press to set the vertical positionto zero.MATH - Press to display the Math menu. You can use the Math menu to use the oscilloscopes Mathfunctions.REF - Press to display the Ref Wave menu. You can use this menu to save and recall two referencewaveforms (REFA and REFB) in internal memory.ES-OM-E-RevA25
WaveAceHorizontal Controls Horizontal Position knob - Click the left/right arrow buttons to "turn" the Horizontal Position knob to adjustthe horizontal position of all channels and math waveforms (the position of the trigger relative to the centerof the screen). The resolution of this control varies depending on the timebase setting. Press to set thehorizontal position to zero.HORI MENU - Press to display the Horizontal menu. You can use the Horizontal menu to display thewaveform and to zoom a segment of a waveform.Time/Div knob - Click the left/right arrow buttons to "turn" the Time/Div knob to change the horizontal timescale to magnify or compress the waveform. When Window Zone is enables, it changes the width of theWindow Zone by changing the window timebase. When Time/Div control is set to 100 ms/div or slower andthe trigger mode is set to Auto, the oscilloscope enters the scan acquisition mode. In this mode, thewaveform display updates from left to right. There is no trigger or horizontal position control of waveformsduring scan mode.Trigger Controls TRIG MENU - Press to display the Trigger menu. You can use the Trigger menu to set the trigger type(Edge, Pulse, Video, Slope, Alternative) and trigger settings.FORCE - Press to complete the current waveform acquisition whether the oscilloscope detects a trigger ornot. This is useful for SINGLE acquisitions and Normal trigger mode.SET TO 50% - Press to stabilize a waveform quickly. The oscilloscope can set the Trigger Level to behalfway between the minimum and maximum voltage levels automatically. This is useful when you connecta signal to the EXT TRIG connector and set the trigger source to Ext or Ext/5.LEVEL - Press the left/right arrows to select the trigger threshold level.Virtual Panel Controls26ES-OM-E-RevA
EasyScope Operator's Manual Refresh - Press to refresh the data.Close - Press to close the Virtual Panel.Knob Controls Knob Scale - Displays the knob scale when you press the left/right Adjust knob arrows.Knob Done - Press Knob Done when you want to apply the knob scale setting.ES-OM-E-RevA27
WaveAceExiting EasyScopeDisconnecting and Exiting EasyScopeBefore you can exit the EasyScope application, you must first disconnect the oscilloscope.Disconnecting the OscilloscopeTo disconnect, click the Disc toolbar buttonor choose Panel Disconnect from the menu bar. The rightLink Status indicator light will turn red when the oscilloscope is no longer communicating with EasyScope.Exiting EasyScopeTo exit EasyScope, click the Exit toolbar button28or choose Panel Exit from the menu bar.ES-OM-E-RevA
EasyScope Operator's Manual ES-OM-E-RevA 5 Installing EasyScope The EasyScope software provides an easy-to-use Wizard. Simply run the SETUP.EXE file and follow the on-screen instructions. The wizard creates a new program group, installs the files and drivers, and puts an icon on your desktop. 1. Insert the installation CD into the CD-ROM drive. 2.