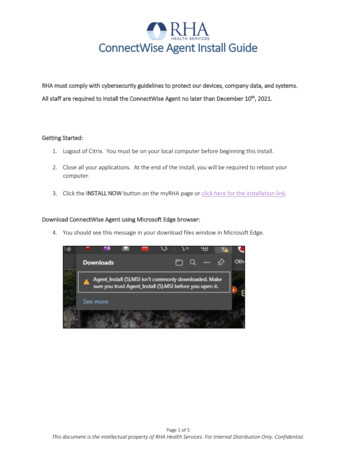
Transcription
HorizonIntegrator ConnectWise Add-in GuideHorizon / Integrator ConnectWise Add-in Guide1artemis.marketing
ContentsContents . 2Introduction . 3ConnectWise Add-in Guide . 3Configuration . 4Testing . 5Dialling configuration . 6Functionality . 7Horizon / Integrator ConnectWise Add-in Guide2
IntroductionConnectWise Add-in GuideThis document will guide you through configuration and basic use of Horizon Integrator’sConnectWise Add-in. It is expected that you are already familiar with the Address Book, Call Historyand Preview window, and the basic concepts of integration and screen popping using the Add-ins.See the ‘full user guide' for these topics.ConnectWise and the database used to store your contact data should already be installed andworking normally before proceeding with this integration.Integrator must also be installed already with the initialconfiguration completed. If this is not the case, please see the ‘fulluser guide' or consult your Horizon administrator.You will need to make sure that the short date setting in yourRegion and Language Settings screen is set to 4 digits for theyear. If this is not done, it will cause problems later.This can be set at:Control Panel Date and Time Set the Date and Time ChangeDate and Time Change Calendar SettingsInformation You’ll Need; ConnectWise server URL ConnectWise company name ConnectWise Integrator Login Username and Password. (Note: This is an Integrator Login,not for your regular full loginHorizon / Integrator ConnectWise Add-in Guide3
ConfigurationIn order to search through ConnectWise using the CTI, you will need to create a user with APIaccess. The same user can be used for all installations at the same ConnectWise site. To do this,you will need to use the ConnectWise software on your PC (not the web portal) and select Setup,Setup Tables, and then search for integrator in the table field. From here you can add a new useror select an existing one.To add a new user, click the new user button and type in your chosen username and password.Make sure that the access level is set to all records. Enable the Company API and the Contact APIand save the user.To use an existing user, you will need to select the user you want to log in as and make sure thatthe access level is set to all records. Enable the Company API and the Contact API and save theuser.Right-click the CTI client’s tray icon in the system tray menu and then left-click the Configurationoption from the menu that pops up. In theIntegration area, click the (Add new) button,select ConnectWise from the Type dropdownbox and then click the Set button.On the Configuration group, enter your ConnectWiseServer URL into the URL field, enter the username andpassword information that you created in ConnectWise aswell as the company name from ConnectWise into therelevant boxes (your system administrator should knowthese if you don’t).In the Entities field, tick which boxes you would like the software to search.Click the Save button to store the information you’ve entered and apply the configuration.Horizon / Integrator ConnectWise Add-in Guide4
TestingTo test if the configuration worked, enter a phone number from your ConnectWise account into the‘Telephone’ box in the ‘Integration test’ area and click the ‘Search’ button. The results will bedisplayed after a few seconds.The test area results should look similar to theresults showing in the figure above. If the testdoes not work, go to the ‘Log’ page ofconfiguration and turn on logging, then do the testagain and see if there are any errors in the log.Horizon / Integrator ConnectWise Add-in Guide5
Dialling configurationTo dial out from within ConnectWise, diallingneeds to be configured correctly.Right-click Integrator’s tray icon in the systemtray menu and then left-click the ‘Configuration’option from the menu that pops up, this willopen the ‘Configuration’ screen. In the ‘General’group, click on the ‘Dialling’ option.Make sure the TAPI dialling (requires restart)option is ticked.Click Save to store your settings.Save to store your settings.Then, in ConnectWise, open the Other section and click on My Account.Navigate to the Preferences tab. Make sure that the TAPItick box in the Phone Preferences section is ticked andthat the UC Tapi Driver option has been selected in thedropdown box.Click the save icon and then Close. You may need torestart the CTI client and ConnectWise before thesettings take effect.Horizon / Integrator ConnectWise Add-in Guide6
FunctionalityTo call one of your ConnectWise contacts, simply clickthe icon next to the number you want to dial.When a call comes in, the CTI client’s Preview Window will popup and display the phone number that is calling. If the caller isrecognised as one of your contacts from ConnectWise, theirdetails will also be displayed and you can ‘pop’ their contactrecord by clicking the ConnectWise button in the window.You can also pop recognised callers’ ConnectWise contact recordsby clicking the ConnectWise button on the Phone Window.Calls can be deflected to another extension before answering them by clicking the Deflectbutton, entering the extension number and clicking Deflect again.To answer a call on either the Preview or Phone window, you just need to clickthe Answer button.To speak to a colleague during an active call, click the Consult button, enter the extensionnumber and click Consult again; the active call is automatically held. To end the call to yourcolleague and resume the held call, click Cancel or to complete the transfer, click Complete.To transfer a call to another extension, click the Transfer button, enter the extensionnumber and click Transfer again.Horizon / Integrator ConnectWise Add-in Guide7
Horizon / Integrator ConnectWise Add-in Guide Configuration In order to search through ConnectWise using the CTI, you will need to create a user with API access. The same user can be used for all installations at the same ConnectWise site. To do this, you will need to use the ConnectWise software on your PC (not the web portal) and select Setup,