Transcription
ULTRA WASH DishwasherLavavajillas ULTRA WASH Manualde u. o y cu d doLave-vaisselleModels/Modelos/ModelesULTRA WASH ars Roebuck and Co., Hoffman Estates, IL 60179 U.S.A.Sears Canada, Inc., Toronto, Ontario, Canada M5B 2B8www.sears.comwww.sears.ca
TABLE OF CONTENTSPROTECTION AGREEMENTS .In the U.S.A .In Canada .223WARRANTY .3DISHWASHER SAFETY .Before Using Your Dishwasher .PARTS AND FEATURES .ULTRA WASH Soil Removal System .START-UP GUIDE .Using Your New Dishwasher .DISHWASHER LOADING .4567778Loading Suggestions .Loading Top Rack .Loading Bottom Rack .Loading Silverware Basket .DISHWASHER USE .Detergent Dispenser .Rinse Aid Dispenser .Dishwasher Efficiency Tips .Control Panel .Cycle Selection Charts .Canceling a Cycle .Changing a Cycle or Setting .Adding Items During a Cycle .Option Selections .Cycle Status Indicator .Drying System .Overfill Protection Float .889910101111121213131313131414WASHING SPECIAL ITEMS .14DISI-IWASHER CARE .15Cleaning .Drain Air Gap .Storing .TROUBLESHOOTING .15151516SERVICE NUMBERS .BACK COVERPROTECTIONAGREEMENTSMaster Protection AgreementsCongratulations on making a smart purchase. Your newKenmore appliance is designed and manufactured for years ofdependable operation. But like all products, it may requirepreventive maintenance or repair from time to time. That's whenhaving a Master Protection Agreement can save you money andaggravation.Purchase a Master Protection Agreement now and protectyourseff from unexpected hassle and expense.The Master Protection Agreement also helps extend the life ofyour new appliance. Here's what's included in the Agreement: Expert serviceby our 12,000 professionalrepair specialistsv" Unlimited service and no charge for parts and labor on allcovered repairsv" "No-lemon"guarantee - replacement of your coveredproduct if more than three product failures occur within twelvemonthsv" Product replacementif your covered product can't be fixedv" Annual Preventive Maintenanceextra chargeCheck at your request - nov" Fast help by phone - non-technical and instructionalassistance on products repaired in your home, plus convenientrepair schedulingv" Power surge protection against electrical damage due topower fluctuationsv" Rental reimbursementlonger than promisedif repair of your covered product takesOnce you purchase the Agreement, a simple phone call is all thatit takes for you to schedule service. You can call anytime day ornight, or schedule a service appointment online.Sears has over 12,000 professional repair specialists, who haveaccess to over 4.5 million quality parts and accessories. That'sthe kind of professionalism you can count on to help prolong thelife of your new purchase for years to come. Purchase yourMaster Protection Agreement today!Some limitations and exclusions apply. For prices andinformation call 1-800-827-6655.Sears Installation ServiceFor Sears guaranteed professional installation of homeappliances and items like garage door openers and waterheaters, in the U.S.A. call 1-800-4-MY-HOME .2
WARRANTYRESTRICTIONIf the dishwasher is subject to other than private family use, theabove warranty coverage is effective for only 90 days.Maintenance AgreementsYour purchase has added value because you can depend onSears HomeCentral for service. With over 2,400 ServiceTechnicians and access to over 900,000 par s and accessories,we have the tools, parts, knowledge and skills to back ourpledge: We Service What We Sell.Your Kenmore appliance is designed, manufactured and testedto provide years of dependable operation. Yet any majorappliance may require service from time to time. The SearsMaintenance Agreement offers you an outstanding serviceprogram, affordably priced.The Sears Maintenance Agreement Guarantees tomorrow's service at today's price. Eliminates repair bills resulting from normal wear and tear. Covers non-technical Provides an annual Preventive Maintenance Check, at yourrequest, to ensure that your appliance is in proper runningcondition.and instructionalWARRANTY SERVICEWARRANTY SERVICE IS AVAILABLE BY CONTACTING THENEAREST SEARS SERVICE CENTER IN THE UNITED STATESOR CANADA. This warranty applies only while the product is inuse in the United States or Canada.This warranty gives you specific legal rights and you may alsohave other rights which vary from state to state or province toprovince.Warranty terms may vary in Canada.For Sears warranty information in the United States or Canada,please reference the service numbers located on the back pageof this manual.Sears, Roebuck and Co.D/817WA, Hoffman Estates, IL 60179Sears Canada, Inc.Toronto, Ontario, Canada M5B 2B8service calls.Some limitations apply. For information concerning SearsHome Central Maintenance Agreements, call1-800-361-6665.WARRANTYPRODUCTRECORDIn the space below, record your complete model number, serialnumber, and purchase date. You can find this information on themodel and serial number label, located as shown in the Parts andFeatures section of this book. Have this information available tohelp you quickly obtain assistance or service when you contactSears concerning your appliance.Model number 665.Serial numberPurchase dateFULL ONE-YEAR WARRANTYULTRA WASH DISHWASHERON THIS KENMOREFor one year from the date of purchase, when this dishwasher isinstalled and operated according to instructions provided in theInstallation Instructions and Use & Care Guide, Sears will repairthis dishwasher, free of charge, if defective in material orworkmanship.FULL WARRANTY FOR THE LIFE OF THE DISHWASHER,ON ULTRA LIFE TM TUB MODELS, AGAINST LEAKS IN THETUB AND INNER DOOR PANELFor the life of the dishwasher, if a leak should occur as a result offailure of the polypropylene tub or inner door panel due tocracking, chipping or peeling, Sears will replace free of chargethe tub or inner door panel.LIMITED TWO-YEAR WARRANTY ON THE ULTRA WASH WASH SYSTEMAfter the first year and until two years from the date of purchase,when the dishwasher is installed and operated in accordancewith the instructions provided in the Installation Instructionsand Use & Care Guide, Sears will replace any part of theULTRA WASH wash system (motor, pump, spray arms, spraytower, motor seals and pump gasket) due to defective materialsor workmanship. Customer assumes any labor costs associatedwith replacement of these parts.Save these instructions and your sales receipt for futurereference.
DISHWASHER SAFETYYoursafety and the safety of othersare veryimportant.We have provided many important safety messages in this manual and on your appliance. Always read and obey allsafety messages.This symbol alerts you to potential hazards that can kill or hurt you and others.Allfollow the safety alert symbol and either the word "DANGER" orThissafetyis themessagessafety alertwillsymbol."WARNING." These words mean:You can be killed or seriously injured if you don'timmediately follow instructions.You can be killed or seriously injured if you don'tfollow instructions.All safety messages will tell you what the potential hazard is, tell you how to reduce the chance of injury, and tell youwhat can happen if the instructions are not followed.IMPORTANT SAFETY INSTRUCTIONSWARNING:When using the dishwasher, follow basic precautions, including the following: Read all instructions before using the dishwasher.Use the dishwasher only for its intended function.Use only detergents or rinse agents recommendedfor use in a dishwasher, and keep them out of thereach of children. Do not operate the dishwasher unless all enclosurepanels are properly in place. Do not tamper with controls.Do not abuse, sit on, or stand on the door, lid, or dishracks of the dishwasher. When loading items to be washed:1) Locate sharp items so that they are not likely todamage the door seal; and2) Load sharp knives with the handles up to reducethe risk of cut-type injuries. To reduce the risk of injury, do not allow children toplay in or on the dishwasher. Do not wash plastic items unless they are marked"dishwasher safe" or the equivalent. For plasticitems not so marked, check the manufacturer'srecommendations. Do not touch the heating element during orimmediately after use.Under certain conditions, hydrogen gas may beproduced in a hot water system that has not beenused for two weeks or more. HYDROGEN GAS ISEXPLOSIVE. If the hot water system has not beenused for such a period, before using the dishwasherturn on all hot water faucets and let the water flowfrom each for several minutes. This will release anyaccumulated hydrogen gas. As the gas is flammable,do not smoke or use an open flame during this time. Remove the door or lid to the washing compartmentwhen removing an old dishwasher from service ordiscarding it.SAVE THESE INSTRUCTIONS4
GROUNDING INSTRUCTIONSFor a grounded, cord-connectedTip OverHazardDonot usedishwasheruntil completelyinstalled.Donot pushdownon opendoor.Doingso canresultin seriousinjury or cuts.WARNING:Improper connection of theequipment-grounding conductor can result in arisk of electric shock. Check with a qualifiedelectrician or service representative if you are indoubt whether the dishwasher is properlygrounded. Do not modify the plug provided withthe dishwasher; if it will not fit the outlet, have aproper outlet installed by a qualified nddishwasher.Connectgroundwireto greengroundconnectorin terminalbox.Donot useanextensioncord.Failureto follow these instructions can result indeath, fire, or electrical shock.IInstall where dishwasher is protected from the elements.Protect against freezing to avoid possible rupture of fill valve.Such ruptures are not covered by the warranty. See "Storing"in the "Dishwasher Care" section for winter storageinformation.IInstall and level dishwasher on a floor that will hold theweight, and in an area suitable for its size and use.IRemove all shipping plugs from hoses and connectors (suchas the cap on the drain outlet) before installing. SeeInstallation Instructions for complete information.dishwasher:The dishwasher must be grounded. In the eventof a malfunction or breakdown, grounding willreduce the risk of electric shock by providing apath of least resistance for electric current. Thedishwasher is equipped with a cord having anequipment-grounding conductor and a groundingplug. The plug must be plugged into an appropriate outlet that is installed and grounded inaccordance with all local codes and ordinances.For a permanently connected dishwasher:The dishwasher must be connected to agrounded metal, permanent wiring system, or anequipment-grounding conductor must be runwith the circuit conductors and connected to theequipment-grounding terminal or lead on thedishwasher.SAVE THESE INSTRUCTIONS
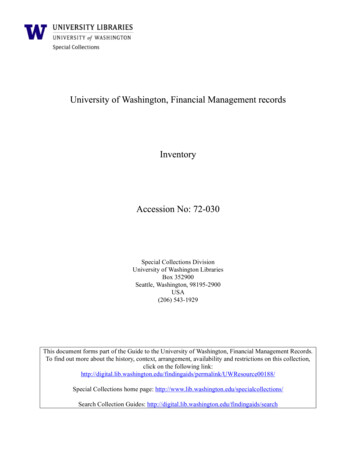
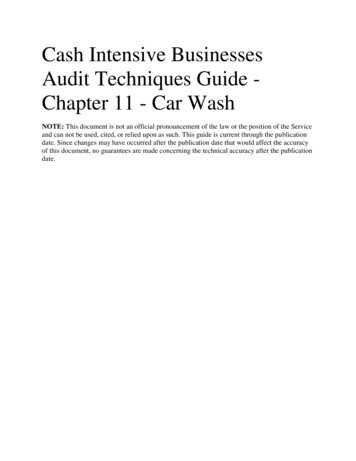
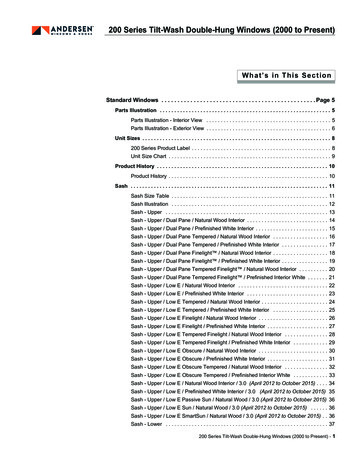
PARTS AND FEATURES10111213141516171. Upper level wash2. 3-position adjuster3. Top rack4. Bottom rack5. Lower spray arm6. Water inlet opening [in tub wall]Control7. Rack bumper8. Heating element9. Vent10. Top spray arm11. Spray tower12. Silverware basketPanelfoenoNs613. Model and serial number label14. ULTRA WASH module15. Overfill protection float16. Detergent dispenser17. Rinse aid dispenser
The ULTRA WASH soil removal system gives you sparkling cleandishes, while using less energy and time. The ULTRA WASH soilremoval system includes:A heavy-duty grinder that acts as a food disposer to grind anddispose of large food particles.How the ULTRA WASH soil removal system works1. Load the dishwasher. Remove bones, large chunks orburned-on food. No rinsing is necessary. Any remaining foodsoil will be ground up and disposed down the drain with therinse water.2.Hot water fils the dishwasher to a level near the bottom ofthe overfill protection float.3.The HEATING indicator glows and the dishwasher pauseswhile the water is heated.4.When the water reaches the proper temperature, theHEATING indicator turns off and the cycle countdownresumes.5.Detergent from the detergent dispenser is dispensed at thecorrect cycle times and hot water is pumped through theULTRA WASH pump.6.Hot water and detergent sprays against the soiled surfaces ofthe load and removes food particles.7.8.Food soil is held in an accumulatingSTART-UP GUIDEBefore using your dishwasher, remove all packaging materials.Read this entire Use and Care Guide. You will find importantsafety information and useful operating tips.1.Scrape large food soil and hard items (toothpicksfrom dishes.2.Properly load the dishwasher. (See "Dishwasher Loading.")Make sure nothing prevents the spray arm(s) from spinningfreely.3.Add detergent and check the rinse aid dispenser. Add rinseaid if needed. (See "Dishwasher Use.")4.Push door firmly closed. The door latches automatically. Runhot water at the sink nearest your dishwasher until the wateris hot. (See "Dishwasher Efficiency Tips.") Turn off water.5.Press the desired cycle and option selections. (See"Dishwasher Use.") Turn the Cycle Control knob to thedesired cycle to start.chamber.Food soil is disposed down the drain with the wash water.Fresh, hot water enters the dishwasher and sprays on thedishes. The rinse water is then pumped through theULTRA WASH soil removal system and remaining soilis removed.10. The food soil that is held in the ULTRA WASH soil removalsystem is disposed down the drain with the rinse water.11. The final rinse water is heated. The rinse aid is added to thewater for the final rinse to prepare the dishes for drying.or bones)9.
DISHWASHERLOADINGRemove leftover food, bones, toothpicks and other harditems from the dishes. It is not necessary to rinse the dishesbefore putting them into the dishwasher. The wash moduleremoves food particles from the water. The module contains achopping device which will reduce the size of food items.12 place settingNOTE: If hard items such as fruit seeds, nuts, and egg shellsenter the wash module, you might hear chopping, grinding,crunching, or buzzing sounds. These sounds are normalwhen hard items enter the module. Do not let metallic items(such as pot handle screws) get into the wash module.Damage can occur. it is important for the water spray to reach all soiled surfaces. Load dishes so they are not stacked or overlapping, ifpossible. For best drying, water must be able to drain from allsurfaces. Make sure pot lids and handles, pizza pans, cookie sheets,etc., do not interfere with the spray arm rotation.Run a rinse cycle to keep dishes moist if you do not plan towash them soon. Foods such as eggs, rice, pasta, spinach,and cooked cereals may be hard to remove if they are left todry over a period of time.Quiet operating tipsTo avoid thumping/clatteringnoises during operation: Make sure lightweightload items are secured in the racks. Make sure pot lids and handles, pizza pans, cookie sheets,etc., do not touch interior walls or interfere with the rotation ofthe spray arm. Load dishes so they do not touch one another.Place items so open ends face down for cleaning anddraining.Load glasses in top rack only. The bottom rack is notdesigned for glasses. Damage can occur.Place cups and glasses in the rows between tines. Placingthem over the tines can lead to breakage and water spots.China, crystal, and other delicate items must not touch eachother during dishwasher operation. Damage may occur.Load plastic items in the top rack only. Only plastic itemsmarked "dishwasher safe" are recommended. Load plastic items so the force of the spray does not movethem during the cycle. To avoid chipping, do not let stemware touch other items. Small bowls, pans, and other utensils can be placed in thetop rack. Load bowls in the center section for best stability.Adjustable 3-position top rack (on some models)You can raise or lower the top rack to fit tall items in either the topor bottom rack. Two adjusters are located on each side of the toprack. Each adjuster has 3 preset positions. The high and lowpositions are marked on the adjuster.To adjust the top rack1.Hold the top rack with one hand near the adjuster.2.With the other hand, pull out the top of the adjuster.3.Raise or lower the rack to one of the preset positions.4.Release the adjuster.NOTE: For built-in models, keep sink drain plugs closed duringdishwasher operation to prevent noise transfer through drains.The top rack is designed for cups, glasses, and smaller items.(See recommended loading patterns shown.)NOTE: The features on your dishwasherdrawings shown.rack may vary from theDo not cover upper level wash. See arrow.Repeat the steps for the remaining adjusters as needed. The 4adjusters can be raised or lowered separately or together. Thetop rack does not have to be level.10 place setting8
The bottom rack is designed for plates, pans, casseroles, andutensils. Items with cooked-on or dried-on food should be loadedwith soiled surfaces facing inward to the spray. (Seerecommended loading patterns shown.)Load the silverware basket while it is in the bottom rack or takethe basket out for loading on a counter or table.NOTE: The features on your dishwasherdrawings shown. Place small items such as baby bottle caps, jar lids, corncobholders, etc., in a covered section. Close the cover to holdsmall items in place. Use suggested loading patterns, as shown, to increasewashability of your silverware. This silverware basket can be separated and placed into thebottom rack in several locations. Load silverware in allsections or just one, depending upon your load. When covers are up, mix items in each section of the basketwith some pointing up and some down to avoid nesting.Spray cannot reach nested items.rack may vary from theNOTE: Unload or remove the basket before unloading the racksto avoid spilling water droplets on the silverware.Do not cover spray tower. See arrow.10 place setting Do not load glasses, cups, or plastic items in the bottomrack. Load small items in the bottom rack only if they aresecured in place. Load plates, soup bowls, etc., between tines and facinginward to the spray. Overlap the edges of plates for large loads.Load soup, cereal, and serving bowls in the rack in a varietyof ways depending upon their size and shape. Load bowlssecurely between the rows of tines. Do not nest bowlsbecause the spray will not reach all surfaces.IMPORTANT: Always load sharp items (knives, skewers, etc.)pointing down.To remove a small basket1. Hold the center basket and one small basket. Slide the smallbasket forward to release the tabs from the correspondingslots.12 place settingLoad cookie sheets, cake pans, and other large items at thesides and back. Loading such items in front can keep thewater spray from reaching the detergent dispenser andsilverware basket. Secure heavily soiled cookware face down in the rack. Make sure pot handles and other items do not stop rotationof the spray arm(s). The spray arm(s) must move freely. Do not load items between the bottom rack and the side ofthe dishwasher tub because they might block the water inletopening.NOTE: If you have removed the bottom rack for unloading orcleaning, replace it with the bumpers in front.2. Pull the baskets apart.NOTES: DO not load silver or silver-plated silverware with stainlesssteel. These metals can be damaged by contact with eachother during washing. Some foods (such as salt, vinegar, milk products, fruit juices,etc.) can pit or corrode silverware. Run a rinse cycle if you donot have a full load to wash immediately.
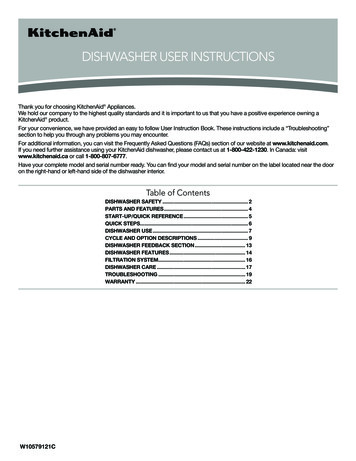
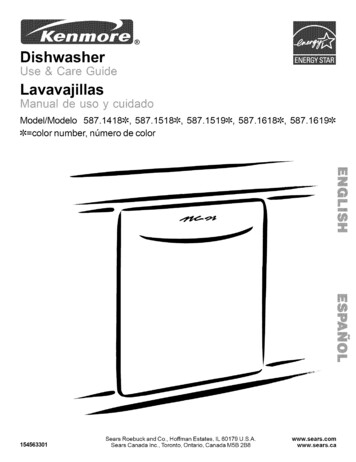
DISHWASHER USEWheretofillTop of 3rd step (3 tbs or 45 g)The detergent dispenser has 2 sections. The Pre-Wash sectionempties detergent into the dishwasher when you close the door.23Top of 2nd step (2 tbs or 30 g)4Top of 1st step (1 tb or 15 g)1.2.3.4.CoverMain Wash sectionCover latchPre-Wash sectionThe larger Main Wash section automatically empties detergentinto the dishwasher during the main wash. (See the "CycleSelection Charts.") Water HardnessAmount of DetergentSoft to MediumHard Water0 to 6 grains perFor normally soiled loads Fill the Main Wash section to thetop of the 2nd step (2 tbs or 30 g)gallon Use automatic dishwashing detergent only. Other detergentscan produce excessive suds that can overflow out of thedishwasher and reduce washing performance. Add detergent just before starting a cycle. Store tightly closed detergent in a cool, dry place. Freshautomatic dishwasher detergent results in better cleaning.NOTE: Add only 1 tb or 15 g ofdetergent to both sections if dishesare pre-rinsed or the water is verysoft (0 to 2 grains per gallon).For heavily soiled loads Fill the Main Wash section to thetop of the 3rd step (3 tbs or 45 g)NOTE: Do not use detergent with a rinse cycle.Filling the dispenser1. If the dispenser cover is closed, open the cover by pushingthe Cover latch. 2.Fill the Main Wash section with detergent. See "How MuchDetergent to Use."Medium to HardWater3.Close the Main Wash dispenser cover. Fill the Pre-Washsection if needed.7 to 12 grains pergallonIt is normal for the cover to open partially when dispensingdetergent.NOTE: Use both sections for cycles with 2 washes. Use only thecovered section for cycles with 1 wash. See the "Cycle SelectionCharts" for more details.How much detergent to use The amount of detergent to use depends on the hardness ofyour water and the type of detergent. If you use too little,dishes won't be clean. If you use too much in soft water,glassware will etch. Water hardness can change over a period of time. Find outyour water's hardness by asking your local water department,water softener company, or county extension agent.Different brands of dishwasher detergent have differentamounts of phosphorus for softening water. If you have hardwater and use a detergent with a phosphorous content ofless than 8.7%, you might need to use more detergent, or usea detergent with a phosphorous content higher than 8.7%.10Fill the Pre-Wash section to thetop of the 2nd step (2 tbs or 30 g)if neededFill the Pre-Wash section to thetop of the 2nd step (2 tbs or 30 g)For normally soiled andheavily soiled loads Fill the Main Wash section to thetop of the 3rd step (3 tbs or 45 g) Fill the Pre-Wash section to thetop of the 2nd step (2 tbs or 30 g)if neededNOTE: Fill amounts shown are for standard powdered detergent.Amounts may vary if you use liquid or concentrated powdereddetergent. Follow instructions on the package when using liquiddishwasher detergent or concentrated powdered detergent.
Rinse aids prevent water from forming droplets that can dry asspots or streaks. They also improve drying by allowing water todrain off of the dishes during the final rinse by releasing a smallamount of the rinse aid into the rinse water. Your dishwasher isdesigned to use a liquid rinse aid. Do not use a solid or bar-type.Checking the dispenserCheck the center of the Fill Indicator cap. Clear means it needsfilling.ORHot water dissolves and activates the dishwashing detergent.Hot water also dissolves grease on dishes and helps glasses dryspot-free. For best dishwashing results, water should be 120 F(49 C) as it enters the dishwasher. Loads may not wash as well ifthe water temperature is too low. Water that is too hot can makesome soils harder to remove and cause certain detergentingredients not to function. If your water heater is located far fromthe dishwasher, it may be necessary to run the hot water at thefaucet closest to the dishwasher to minimize the amount of coldwater in the water line.To check water temperature1. Run hot water at the faucet closest to your dishwasher for atleast 1 minute.2.Place a candy or meat thermometercup.Or you can remove the Fill Indicator cap. If an "E" is visible, thedispenser is empty.in a glass measuringFilling the dispenserThe rinse aid dispenser holds 6 oz (175 mL) of rinse aid. Undernormal conditions, this will last for about three months. You donot have to wait until the dispenser is empty to refill it. Try to keepit full, but be careful not to overfill it.1.Make sure the dishwasher door is completely open.2.Remove the Fill Indicator cap.3.3.Add rinse aid. Fill to the smallest opening in the lower part ofthe dispenser. Overfilling can cause the rinse aid to leak out,and could cause oversudsing.Check the temperature on the thermometerrunning into the cup. To save water, energy and time, do not rinse dishes beforeputting them into the dishwasher.as the water isUse a low energy, quick, or short cycle whenever possible.These cycles use less hot water and energy than a normalcycle.Use a delay feature (on some models) to run your dishwasherduring off-peak hours. Local utilities recommend avoidingheavy usage of energy at certain times of day.During the summer, run your dishwasher at night. Thisreduces daytime heat buildup in the kitchen.4.Clean up any spilled rinse aid with a damp cloth.5.Replace the Fill Indicator cap. Close tightly.Use the energy-saving dry option whenever possible. Allowlonger drying times (overnight) when using these options. Usea rinse aid to improve drying.Use cycles or options that add extra heat to the wash or rinseportion of the cycle only when needed.Run your dishwasher with full loads. Run a rinse cycle aftermeals until the dishwasher is full.If your home is equipped with a water softener, you may wantto avoid starting the dishwasher during the regeneration ofthe softener, as this may contribute to poor washperformance.11
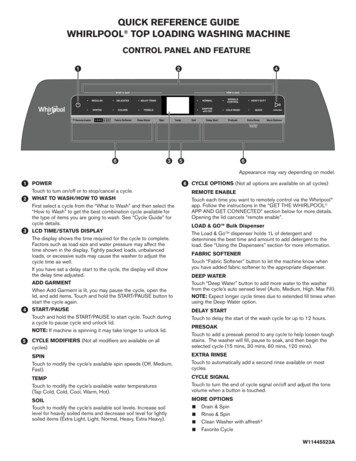
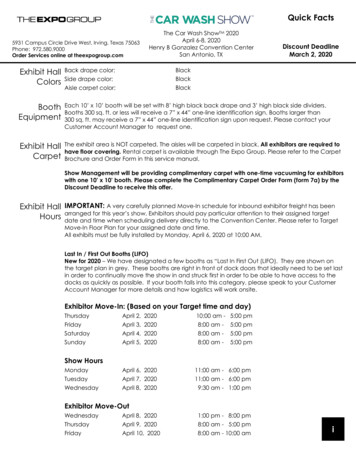
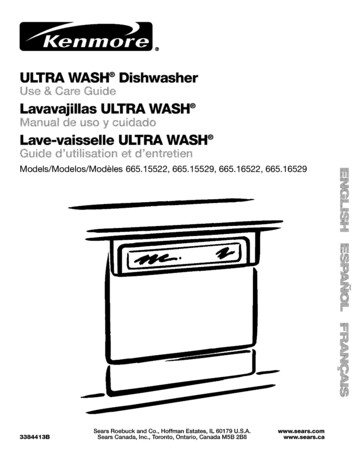
fOyc/e ;; 3ksPress the desired cycle. Turn the Cycle Control knob to thedesired cycle. If the door is latched, you will hear the cycles startand stop as the Cycle Control knob passes each cycle mark. Thisis normal and does not hurt the dishwasher. If you prefer, you canset the Cycle Control knob with the door unlatched.To use Quick Rinse, press any cycle and turn the Cycle Controlknob to QUICK RINSE.WATERWashUse this cycle for prerinsed and lightly-soiledloads. This cycle usesless hot water than theNormal Wash tion.RinseDryTime(min)WaterUsage(gaUL) 140 F 72*4 3/16 3NOTE: Use the Air Dry option with the Quick Rinse cycle. (6ooc)A "O" shows what steps are in each cycle.Temperaturesindicate where extra heat is added.Water usage is shown in U.S. gallons/liters.Use this cycle for chinaand crystal. This cycleuses a light wash andgentle dry. During theheated dry, the heatingelement cycles on and off.Cycle time includes dry time. An asterisk ( * ) by the cycle timeindicates the cycle time might be longer depending on thetemperature of the water entering the dishwasher. The cooler thewater, the longer the cycle time. If the water is already hotenough, the cycle time will be as shown.NOTE: The Cycle Control knob pauses while water is beingheated.WashRinseMainWash Use this cycle for hard-toclean, heavily-soiled pots,pans, casseroles, andregular tableware,pOTSPANSUse ryTime(min)WaterUsage(gal/L) 140 F 140 F 140 F 98*8 5/32 2(6ooc)(6ooc)Wash RinseMainWash 12Use (gaUL) 140 F cycled72*4 8/18 2RinseMainWashRinse RinseDryTime(min)WaterUsage(gal/L) 140 F 82*6 4/24 2(6ooc)DryUse this rinse cycle forrinsing dishes, glasses,and silverware that willnot be washed right away.WashUse this cycle for loadswith normal amounts offood soil. (The energyusage label is based onthis pensersection.Do not usedetergentwith thiscycle.DryTime(min)WaterUsage(gaUL)62.2-/8.3
Air DrySelect this energy-saving option to dry without heat. Air drying isuseful when loads contain plastic dinnerware that may besensitive to high temperatures.You can cancel a cycle at any time.1.2.Turn the Cycle Control knob slowly clockwise until you hearwater draining. Let the dishwasher drain completely.Open the door.3
Some limitations and exclusions apply. For prices and information call 1-800-827-6655. Sears Installation Service For Sears guaranteed professional installation of home appliances and items like garage door openers and water heaters, in the U.S.A. call 1-800-4-MY-HOME _. 2