Transcription
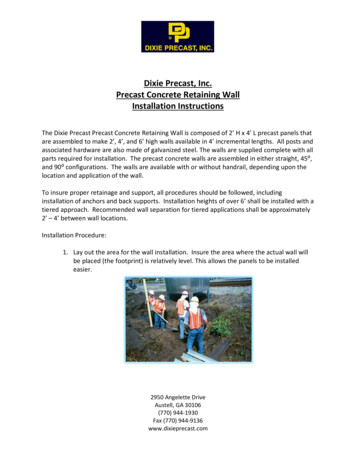
Dixie Precast, Inc.Precast Concrete Retaining WallInstallation InstructionsThe Dixie Precast Precast Concrete Retaining Wall is composed of 2’ H x 4’ L precast panels thatare assembled to make 2’, 4’, and 6’ high walls available in 4’ incremental lengths. All posts andassociated hardware are also made of galvanized steel. The walls are supplied complete with allparts required for installation. The precast concrete walls are assembled in either straight, 45⁰,and 90⁰ configurations. The walls are available with or without handrail, depending upon thelocation and application of the wall.To insure proper retainage and support, all procedures should be followed, includinginstallation of anchors and back supports. Installation heights of over 6’ shall be installed with atiered approach. Recommended wall separation for tiered applications shall be approximately2’ – 4’ between wall locations.Installation Procedure:1. Lay out the area for the wall installation. Insure the area where the actual wall willbe placed (the footprint) is relatively level. This allows the panels to be installedeasier.2950 Angelette DriveAustell, GA 30106(770) 944-1930Fax (770) 944-9136www.dixieprecast.com
2. Drive the center post into place. This will serve as the start point for theconstruction of the wall.3. Position the first concrete panel into place to determine placement of the next post.Install the post in the proper location.2950 Angelette DriveAustell, GA 30106(770) 944-1930Fax (770) 944-9136www.dixieprecast.com
4. Install brackets on both side of the panels/posts, using the bolt to secure the panelin place. Continue installation of the panels and posts as layout requires.5. After installation of the lower panels and panels are secured in place with thebrackets, the next panel is installed on top of the lower panel and secured in placewith brackets. Refer to Detail Sheets 1 & 2 for specific brackets and assembly detail.2950 Angelette DriveAustell, GA 30106(770) 944-1930Fax (770) 944-9136www.dixieprecast.com
6. Install the back anchors as shown on the drawings. The anchors should be locatedas to not interfere with the foundation or structure. The anchor cable is placedaround the bracket and secured with the supplied cable clamps.7. The other end of the cable is secured to the clevis end of the anchor. One cable issupplied for each post (excluding end posts). One anchor is supplied for every twocables.8. Backfill the area behind the wall with appropriate material. Material should betamped to 90% compaction.9. If the wall is supplied with a handrail, the cable is ran through the top of the postsand secured with the cable clamps. The cable guards are installed on the cable asrequired.2950 Angelette DriveAustell, GA 30106(770) 944-1930Fax (770) 944-9136www.dixieprecast.com
10. Complete installation and backfill for finished installation.2950 Angelette DriveAustell, GA 30106(770) 944-1930Fax (770) 944-9136www.dixieprecast.com
2950 Angelette DriveAustell, GA 30106(770) 944-1930Fax (770) 944-9136www.dixieprecast.com
The Dixie Precast Precast Concrete Retaining Wall is composed of 2' H x 4' L precast panels that are assembled to make 2', 4', and 6' high walls available in 4' incremental lengths. All posts and . Austell, GA 30106 (770) 944-1930 Fax (770) 944-9136 www.dixieprecast.com 2. Drive the center post into place.