Transcription
Setting up IO Python Library onBeagleBone BlackCreated by Justin hon-library-on-beaglebone-blackLast updated on 2021-11-15 06:01:31 PM EST Adafruit IndustriesPage 1 of 22
Table of ContentsOverview3Installation on Angstrom4 Commands to setup and install Adafruit BBIO Test your Installation (optional) Manual Installation (optional)556Installation on Debian and Ubuntu6 Commands to setup and install BBIO Test your Installation (optional) Manual Installation (optional)778Using the Adafruit BBIO Library8GPIO10 Setup10PWM11 Setup11ADC12 Setup13I2C13SPI15 Pins used for SPI0 and SPI1UART SetupPin Table for UARTUsing UART with PythonTesting and Using the UART161616161717Pin Details19FAQ21 Adafruit IndustriesPage 2 of 22
OverviewThe BeagleBone Black is unique in that it has quite a few pins that are available oneasy to use pin headers, as well as being a fairly powerful little system. There are 2 x46 pins available (well, not all of them are, but we'll get to that later) to use.Some of the functionality that is available: 7 Analog Pins 65 Digital Pins at 3.3V 2x I2C 2x SPI 2x CAN Bus 4 Timers 4x UART 8x PWM A/D ConverterQuite the feature list! The Adafruit BeagleBone IO Python library doesn't support all ofthem, but we hope to add more as we go.The next pages will guide you through installing the library, as well as basic usage toget you started.This tutorial is written for Angstrom, Ubuntu and Debian installations only at thistime. Adafruit IndustriesPage 3 of 22
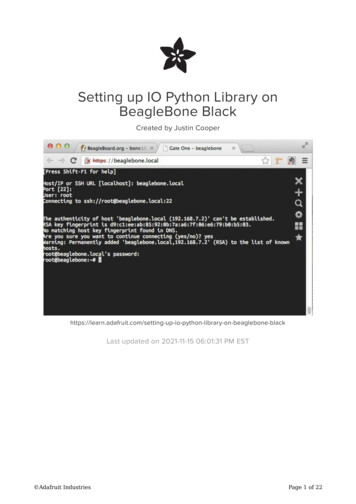
Installation on AngstromInstalling the Adafruit-BeagleBone-IO-Python (phew!) library is fairly simple. Let'smake sure we have a good foundation setup first.The most important part here is that you are using a Linux distribution with the 3.8kernel. This kernel version made some fairly significant changes with how GPIO andPWM is accessed. The good news is that your BeagleBone Black came pre-installedwith the proper kernel. It just may not be the latest and greatest. If you have someextra time, it may not be a bad idea to follow our installation guide for Angstrom (https://adafru.it/cg2), and flash your BeagleBone Black with the latest version.Connecting to your BeagleBone Black (SSH)Once you have the latest version of Angstrom on your BBB, let's ssh into the systemso we can execute commands. The easiest way to gain access to the system is byusing GateOne SSH. You can easily access GateOne by typing in the following intoyour browser window:http://beaglebone.localOnce the page loads successully (you should see a green box that says "Your board isconnected!"), you can click on the "GateOne SSH link to the upper left, in the sidebar.Then, click the "GateOne SSH client" link to get started. Some browsers may complainabout invalid certificates, but you can proceed anyways.To sign into the beaglebone, type the following at the prompts (assuming root user ona fresh Angstrom installation): Adafruit IndustriesPage 4 of 22
Host/IP or SSH URL [localhost]: beaglebone.localPort [22]: (just hit enter)User: rootConnecting to ssh://root@beaglebone.local:22Commands to setup and install Adafruit BBIONow that you're connected to the BBB, you'll want to start with setting the date andtime so that it's accurate. Copy and paste the following into your terminal (you maywant to make it execute this on startup in the future):/usr/bin/ntpdate -b -s -u pool.ntp.orgThese commands will require internet access. If you get errors, please view theFAQ page for resolutions.Next, execute each of the following lines. Copy and paste the following one-by-oneinto the terminal, and hit enter:opkg update && opkg install python-pip python-setuptools python-smbuspip install Adafruit BBIOTest your Installation (optional)You can optionally test if your installation was successful by simply trying to load oneof the modules. Execute the following command from the console (not from within thepython interpretor), it shouldn't throw any errors, but return one line:python -c "import Adafruit BBIO.GPIO as GPIO; print GPIO"#you should see this or similar: Adafruit IndustriesPage 5 of 22
<module 'Adafruit BBIO.GPIO' from '/usr/local/lib/python2.7/dist-packages/Adafruit BBIO/GPIO.so'>You can also validate by executing the 'python' command to enable the interpreter,and run the following code (you can tell you're in the right place when you see the" " in your terminal):import Adafruit BBIO.GPIO as GPIO; print GPIO#you should see this or similar:<module 'Adafruit BBIO.GPIO' from '/usr/local/lib/python2.7/dist-packages/Adafruit BBIO/GPIO.so'>Manual Installation (optional)You can also install Adafruit BBIO by cloning the git repository. The followingcommands should get it installed as well:git clone ython.git#set the date and time/usr/bin/ntpdate -b -s -u pool.ntp.org#install dependencyopkg update && opkg install python-distutils python-smbuscd adafruit-beaglebone-io-pythonpython setup.py installInstallation on Debian and UbuntuThe majority of this library will need to be run as sudo in Debian and Ubuntu.Installing the Adafruit-BeagleBone-IO-Python (phew!) library is fairly simple. Let'smake sure we have a good foundation setup first.The most important part here is that you are using a Linux distribution with the 3.8kernel. This kernel version made some fairly significant changes with how GPIO, PWMand ADC are accessed.Connecting to your BeagleBone Black (SSH)Let's ssh into the system so we can execute commands. Open your favorite terminal,and SSH into your BeagleBone Black (BBB). Note, Ubuntu does not come with AvahiDaemon pre-installed. This means you need to use the IP address to connect and notthe hostname.ssh ubuntu@your.bbb.ip.address Adafruit IndustriesPage 6 of 22
Enter the the password (default is 'temppwd' most likely). You should now have aprompt available to enter commands.Commands to setup and install BBIONow that you're connected to the BBB, you'll want to start with setting the date andtime so that it's accurate. Copy and paste the following into your terminal (you maywant to make it execute this on startup in the future):sudo ntpdate pool.ntp.orgNext install the dependencies:sudo apt-get updatesudo apt-get install build-essential python-dev python-setuptools python-pip pythonsmbus -yDepending on which version of Debian or Ubuntu you have installed, you mayneed a patched version of dtc.The patched version of dtc (device-tree-compiler) includes the ability to compileoverlays. The Adafruit BBIO library compiles a set of overlays for SPI and UART. If youhave no use for SPI or UART, you can skip this step of upgrading and patching dtc.You can test dtc by following this guide (https://adafru.it/d8k). If you're notcomfortable following the guide, it shouldn't cause any issues to just install thepatched version of dtc.You can view the overlays in our Github repository (https://adafru.it/clo).You can find the patched version of dtc with instructions here (https://adafru.it/Ccw).Once you've determined if you need the patched version of dtc, and installed it,execute the command to install BBIO:sudo pip install Adafruit BBIOTest your Installation (optional)You can optionally test if your installation was successful by simply trying to load oneof the modules. Execute the following command from the console (not from within thepython interpretor), it shouldn't throw any errors, but return one line:sudo python -c "import Adafruit BBIO.GPIO as GPIO; print GPIO" Adafruit IndustriesPage 7 of 22
#you should see this or similar:<module 'Adafruit BBIO.GPIO' from '/usr/local/lib/python2.7/dist-packages/Adafruit BBIO/GPIO.so'>You can also validate by executing the 'python' command to enable the interpreter,and run the following code (you can tell you're in the right place when you see the" " in your terminal):import Adafruit BBIO.GPIO as GPIO; print GPIO#you should see this or similar:<module 'Adafruit BBIO.GPIO' from '/usr/local/lib/python2.7/dist-packages/Adafruit BBIO/GPIO.so'>Manual Installation (optional)You can also install BBIO by cloning the git repository. The following commandsshould get it installed as well:sudo ntpdate pool.ntp.orgsudo apt-get updatesudo apt-get install build-essential python-dev python-pip python-smbus -ygit clone ython.gitcd adafruit-beaglebone-io-pythonsudo python setup.py installcd .sudo rm -rf adafruit-beaglebone-io-pythonUsing the Adafruit BBIO LibraryThis library has quite a few changes being made to it. Please read theCHANGELOG anytime you update the library to ensure it doesn't break yourprograms.Using the Adafruit BBIO library with the BeagleBone Black (BBB) is fairly simple,especially if you're familiar with the RPi.GPIO library for the Raspberry Pi.To start, you'll want to import the library. There are two different options at this time toimport. The first one is for GPIO:import Adafruit BBIO.GPIO as GPIOIf you'd like to use PWM, then import as follows:import Adafruit BBIO.PWM as PWM Adafruit IndustriesPage 8 of 22
You can access the channels by either referencing the pin "key" or the name. If youlook at your BeagleBone Black, you can see that each set of pin headers has a name,either P8 or P9. Then, you can see that there are pin numbers that start from 1, and goto 46.When you count the pins, you don't go length-wise, but start at 1, then across to 2,and then back up to the next pin 3, and so on. The following image illustrates this abit better:So, to access the first pin on P9, you'd use "P9 1". You can also use the name of thepin to access it, which would be . You wouldn't want to do this though, as P9 1 isactually gnd! You'll want to view the last page of this guide to see which pins areavailable to use.Not all pins are necessarily available. HDMI, and the eMMC flash module take upquite a few of them by default. Adafruit IndustriesPage 9 of 22
I2C is only compatible with Python2 due to the python-smbus dependency.GPIOBelow are a few examples of using the Adafruit BBIO.GPIO module. It's fairly simpleto use.You may need to run this library with sudo, particularly on Ubuntu.SetupTo setup a digital pin as an output, set the output value HIGH, and then cleanup afteryou're done:import Adafruit BBIO.GPIO as GPIOGPIO.setup("P8 10", GPIO.OUT)GPIO.output("P8 10", GPIO.HIGH)GPIO.cleanup()You can also refer to the pin names:GPIO.setup("GPIO0 26", GPIO.OUT)In the first example, you can see we used the "P8 10" key to designate which pinwe'd like to set as the output, and the same pin in the second example, but using it'sname "GPIO0 26".You can also set pins as inputs as follows:import Adafruit BBIO.GPIO as GPIOGPIO.setup("P8 14", GPIO.IN)Once you've done that, you can access the input value in a few different ways. Thefirst, and easiest way is just polling the inputs, such as in a loop that keeps checkingthem:if GPIO.input("P8 14"):print("HIGH")else:print("LOW") Adafruit IndustriesPage 10 of 22
You can also wait for an edge. This means that if the value is falling (going from 3Vdown to 0V), rising (going from 0V up to 3V), or both (that is it changes from 3V to 0Vor vice-versa), the GPIO library will trigger, and continue execution of your program.The wait for edge method is blocking, and will wait until something happens:GPIO.wait for edge("P8 14", GPIO.RISING)Another option, that is non-blocking is to add an event to detect. First, you setup yourevent to watch for, then you can do whatever else your program will do, and later on,you can check if that event was detected.A simple example of this is as follows:GPIO.add event detect("P9 12", GPIO.FALLING)#your amazing code here#detect wherever:if GPIO.event detected("P9 12"):print "event detected!"We'll continue to add more examples, and features as we go, so check back often!PWMBelow are a few examples of using the Adafruit BBIO.PWM module. It's fairly simpleto use as well!SetupTo setup a pin to use PWM:import Adafruit BBIO.PWM as PWM#PWM.start(channel, duty, freq 2000, polarity 0)PWM.start("P9 14", 50)#optionally, you can set the frequency as well as the polarity from their defaults:PWM.start("P9 14", 50, 1000, 1)The valid values for duty are 0.0 to 100.0. The start method activate pwm on thatchannel. There is no need to setup the channels with Adafruit BBIO.PWM.Once you've started, you can then set the duty cycle, or the frequency:PWM.set duty cycle("P9 14", 25.5)PWM.set frequency("P9 14", 10) Adafruit IndustriesPage 11 of 22
You'll also want to either disable that specific channel, or cleanup all of them whenyou're done:PWM.stop("P9 14")PWM.cleanup()ADCADC currently has three methods available. setup, read and read raw. You'll need toensure you use setup prior to reading, otherwise an error will be thrown.ADC is available on only a few pins, as listed IN1","P9 33""P9 35""P9 36""P9 37""P9 38""P9 39""P9 40"1.8V is the maximum voltage. Do not exceed 1.8V on the AIN pins! VDD ADC(P9 32) provides 1.8V. Use GNDA ADC (P9 34) as the ground.An easy way to drop the 3.3V of your device to the required 1.8V would be by usingresistor divider. Two identical resistors (10K to 100K) in series from your 3v analogsignal to ground, then connect the analog input pin between the two. The divider willdivide the 0 to 3.3v into 0-1.65V which gives you a little bit of headroom as well. Adafruit IndustriesPage 12 of 22
SetupTo setup ADC, simply import the module, and call setup:import Adafruit BBIO.ADC as ADCADC.setup()Then, to read the analog values on P9 40, simply read them:value ADC.read("P9 40")In addition to the key (above), you can also read using the pin name:value ADC.read("AIN1")There is currently a bug in the ADC driver. You'll need to read the values twice inorder to get the latest value.The values returned from read are in the range of 0 - 1.0. You can get the voltage bydoing the following:import Adafruit BBIO.ADC as ADCADC.setup()value ADC.read("P9 40")voltage value * 1.8 #1.8VYou can also use read raw to get the actual values:import Adafruit BBIO.ADC as ADCADC.setup()value ADC.read raw("P9 40")I2CThe Adafruit I2C.py module is now included in the Adafruit BBIO library as a toplevel module. This means that many of the popular Python libraries built for theRaspberry Pi, will now just work on the BeagleBone Black if they are using I2C, suchas the BMP085 sensor library (https://adafru.it/ciz).To use the module, it's as simple as importing it, and setting the I2C address, andoptionally the bus (the default is I2C-1): Adafruit IndustriesPage 13 of 22
from Adafruit I2C import Adafruit I2Ci2c Adafruit I2C(0x77)I2C requires the python package 'python-smbus' installed from your distribution'spackage manager (opkg or apt-get) in order to function properly. It was includedas part of the Adafruit BBIO installation instructions. python-smbus is onlycompatible with Python2 thus far.The I2C SCL and SDA pins enabled by default are as follows:P9 19: I2C2, SCLP9 20: I2C2, SDAProbe the I2C busses for connected devices:i2cdetect -y -r 0i2cdetect -y -r 1Latest pydoc of the I2C module:class Adafruit I2C Methods defined here: init (self, address, busnum -1, debug False) errMsg(self) readList(self, reg, length) Read a list of bytes from the I2C device readS16(self, reg) Reads a signed 16-bit value from the I2C device readS16Rev(self, reg) Reads a signed 16-bit value from the I2C device with rev byte order readS8(self, reg) Reads a signed byte from the I2C device readU16(self, reg) Reads an unsigned 16-bit value from the I2C device readU16Rev(self, reg) Reads an unsigned 16-bit value from the I2C device with rev byte order readU8(self, reg) Read an unsigned byte from the I2C device reverseByteOrder(self, data) Reverses the byte order of an int (16-bit) or long (32-bit) value write16(self, reg, value) Writes a 16-bit value to the specified register/address pair write8(self, reg, value) Writes an 8-bit value to the specified register/address Adafruit IndustriesPage 14 of 22
writeList(self, reg, list)Writes an array of bytes using I2C formatSPISPI is included with the Adafruit BBIO library. The following are the basics on how touse it.You can import the SPI module:from Adafruit BBIO.SPI import SPIOnce you've imported it, you'll want to initialize the bus and device:spi SPI(0,0)The BeagleBone Black (BBB) includes SPI0, as well as SPI1. SPI1 is currently notavailable by default as the HDMI interface is utilizing one of the pins.Note: It is not possible to use SPI1 on the BeagleBone Black without disablingthe HDMI interface.There are four /dev/spidev* bus and device combinations available. They areavailable by executing the following code:#import the libraryfrom Adafruit BBIO.SPI import SPI#Only need to execute one of the following lines:#spi SPI(bus, device) #/dev/spidev<bus>.<device>spi SPI(0,0)#/dev/spidev1.0spi SPI(0,1)#/dev/spidev1.1spi SPI(1,0)#/dev/spidev2.0spi SPI(1,1)#/dev/spidev2.1If you'd like to disable HDMI to access SPI1, you can add the following to your uEnv.txtfile in the small FAT partition on your BBB:mkdir /mnt/bootmount /dev/mmcblk0p1 /mnt/bootnano /mnt/boot/uEnv.txt#change contents of uEnv.txt to the following:optargs quiet capemgr.disable partno BB-BONELT-HDMI,BB-BONELT-HDMIN Adafruit IndustriesPage 15 of 22
Pins used for SPI0 and SPI1PORTCS0DODISCLKSPI0P9 17P9 21P9 18P9 22SPI1P9 28P9 29P9 30P9 31UARTThe Adafruit IO Python library will export the UART device tree overlays as aconvenience. There are five serial ports brought to the expansion headers (UART3only has a single direction, TX), and one (UART0) with dedicated headers that aren'tavailable to use in your Python programs.SetupTo setup and export the UART, you can do the following:import Adafruit BBIO.UART as UARTUART.setup("UART1")That's it!Also, there is a cleanup() method ready to go, but it's not currently working due to abug in the kernel that causes kernel panics when unloading device tree overlays.We'll update this when it's working. A workaround is to either leave the UARTenabled, or restart your BeagleBone Black.Pin Table for UARTUARTRXTXCTSRTSDeviceUART1P9 26P9 24P9 20P9 19/dev/ttyO1UART2P9 22P9 21UART3UART4P9 11 Adafruit Industries/dev/ttyO2P9 42P8 36P8 34/dev/ttyO3P9 13P8 35P8 33/dev/ttyO4Page 16 of 22
UART5P8 38P8 37P8 31P8 32/dev/ttyO5Using UART with PythonYou can use the pyserial module in Python, but you'll first need to install it using pip. Ifyou don't have pip installed, you can follow the instructions on the installation pagesfor this tutorial.SSH into the BeagleBone Black, and execute the following command:pip install pyserialBelow is a very simple python program that is a good starting point. Save it to a file,and execute it with 'python file name.py'import Adafruit BBIO.UART as UARTimport serialUART.setup("UART1")ser serial.Serial(port "/dev/ttyO1", baudrate 9600)ser.close()ser.open()if ser.isOpen():print "Serial is open!"ser.write("Hello World!")ser.close()# Eventually, you'll want to clean up, but leave this commented for now,# as it doesn't work yet#UART.cleanup()Testing and Using the UARTYou can easily test that everything is working, without having to code anything, orinstalling any other dependencies to get started.Next, you'll want to connect two wires to the UART pins. We're just going to cross theRX/TX of the UART1 and UART2. The first wire should connect from P9 24 to P9 22.The second wire should connect from P9 26 to P9 21. Adafruit IndustriesPage 17 of 22
Next, export the UART1 and UART2 in the python interpreter with the Adafruit IOlibrary:root@beaglebone: # pythonPython 2.7.3 (default, May 29 2013, 21:25:00)[GCC 4.7.3 20130205 (prerelease)] on linux2Type "help", "copyright", "credits" or "license" for more information.>>> import Adafruit BBIO.UART as UART>>> UART.setup("UART1")>>> UART.setup("UART2")>>> exit()Once you've done that, execute the following commands to launch minicom (usingtwo separate ssh sessions using your terminal of choice, mine are separated by tabsin OS X):#first terminal window:minicom -b 9600 -D /dev/ttyO1#second terminal window:minicom -b 9600 -D /dev/ttyO2 Adafruit IndustriesPage 18 of 22
It should look like this once you've opened minicom:Now, type in one of the terminal windows, and hit enter. Look at the other terminal,and you should see something like this:You can exit from minicom by typing Ctrl-A, then Z, then X, and hit enter at the dialog.Pin DetailsMore Details coming soon! The below images are from the BeagleBone Black SystemReference Manual.The below table is useful to find the GND and VDD pins: Adafruit IndustriesPage 19 of 22
Avoid the eMMC and HDMI (LCD) pins altogether, unless you don't mind disablingthose features.The Boot Configuration pins are to be avoided during BeagleBone bootup. Adafruit IndustriesPage 20 of 22
FAQI get errors installing with opkg or doing ntpupdate to setthe time. How can that be resolved?You'll need internet connectivity to your BeagleBone Black in order to install the IOPython Library. Ensure that you can access the internet. You can try: pingadafruit.com as an example, or if you're using the HDMI out, and have a desktop,open a browser and test out the internet.First, ensure you have ethernet connected to a switch or router. Or, if you've setupwifi using one of our guides, ensure that it's working properly.Next, you can try to fix this by adding a DNS nameserver. Simply do that with thefollowing command:echo nameserver 8.8.8.8 > /etc/resolv.confWhere is the source for the Adafruit BBIO python core?Check it! - pythonDoes the Adafruit BBIO library support Python 3?It's close. Everything is in place, but we mostly need people to test it, and submitany bugs (with fixes would be nice!) to the GitHub repository.I have some ideas to improve the library, how should Icontribute?The source code is located on GitHub here (https://adafru.it/elY). Please submit pullrequests with your code, along with tests supporting it. Adafruit IndustriesPage 21 of 22
If you have any bugs, please submit them there as well.If you have any questions on how to use the library, please ask them on theAdafruit Forums (https://adafru.it/elZ) as they will be answered quickly there. Adafruit IndustriesPage 22 of 22
Connecting to your BeagleBone Black (SSH) Let's ssh into the system so we can execute commands. Open your favorite terminal, and SSH into your BeagleBone Black (BBB). Note, Ubuntu does not come with Avahi-Daemon pre-installed. This means you need to use the IP address to connect and not the hostname. ssh ubuntu@your.bbb.ip.address