Transcription
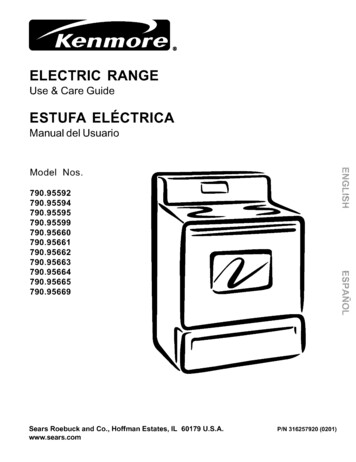
ELECTRICRANGEUse & Care GuideESTUFAELI:I:CTRIC AManual del .95665790.95669VSears Roebuckwww.sears.comand Co., HoffmanEstates,IL 60179U.S.A.PIN 316257920 (0201)
Table of ContentsProduct RecordFree-Standing Range Warranty .2Product Record .2IMPORTANT SAFETY INSTRUCTIONS . 3-5Serial Plate Location .5Range Features .6Before Setting Oven Controls . 743Setting Surface Controls .8-9Oven Control Functions .10Setting Oven Controls .11-14Setting Warmer Drawer Controls . 15-16Self Cleaning .17-18Care & Cleaning .19-22Adjusting Your Oven Temperature . 22Before You Make a Service Call . 23-24Notes .25Sears Service .26Espafiol .27-52Free-StandingIn this space below, record the date of purchase, model andserial number of your product. You will find the model andserial number printed on an identification plate. This serialplate is located on the right side of the oven front frame in thestorage or warmer drawer compartment. See page 5 of thisUse & Care Guide for the serial plate location.Model No. 7 90.Serial No.Date of PurchaseSave these instructionsreference.and your sales receipt for futureRange WarrantyFULL ONE YEAR WARRANTYON ALL PARTSIf, within one year from the date of installation, any part fails to function properly due to a defect in material or workmanship,Sears will repair or replace it, at our option, free of charge.Your ceramic glass smoothtop is covered by an additional 2nd through 5th year limited warranty. This warranty provides forreplacement for any defective surface heating element, deteriorated rubberized-silicone seal, or glass smoothtop that cracksdue to thermal breakage. Damage or breakage due to customer abuse is not covered by this warranty.If the product is subjected to other than private residential use, the above warranty is effective for only 90 days.WARRANTY SERVICE IS AVAILABLE BY CONTACTINGSTATES.THE NEAREST SEARS SERVICE CENTER IN THE UNITEDThis warranty gives you specific legal rights, and you may also have other rights which vary from state to state.Sears Roebuck and Co., Dept. 817WA Hoffman Estates, IL 60179WE SERVICEWHAT WE SELLYour purchase has added value because you can depend on Sears HomeCentral for service. With over 12,000 trainedrepair specialists and access to over 4.2 million parts and accessories, we have the tools, parts, knowledge and skills toensure our pledge: We Service What We Sell.Sears Maintenance AgreementsYour Kenmore appliance is designed, manufactured and tested to provide years of dependable operation. Yet any majorappliance may require service from time to time. The Sears Maintenance Agreement offers you an outstanding serviceprogram, affordably priced.The Sears Maintenance AgreementIs your way to buy tomorrow'sservice at today's price.Eliminates repair bills resulting from normal wear and tear.Provides for non-technical and instructional assistance.Even if you don't need repairs, provides an annual Preventive Maintenance Check,at your request, to ensure that your appliance is in proper running condition.Some limitations apply. For more information, call 1-899-827-6655.For information concerning Sears Canada Maintenance Ag reements, call 1-800-361-6665.2
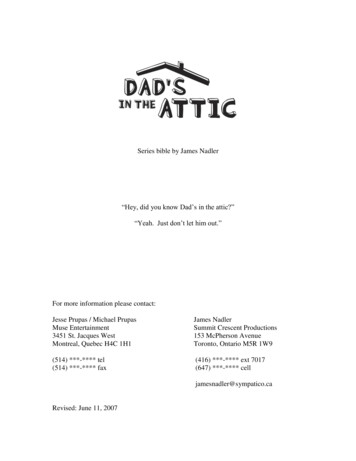
Important Safety InstructionsRead all instructions before using this appliance.Save these instructions for future reference.This manual contains important safety symbols and instructions,Please pay attention to these symbols and follow all instructions given.! ,V/.'I:I#II [ 11This symbol will help alert you to Situations that may cause serious bodily harm, death or property damageThis Symbol Will help alert you to Situations that may Cause bodily injury Or property damage Remove all tape and packaging before using the range. Destroythe carton and plastic bags after unpacking the range. Neverallow children to play with packaging material, Proper Installation--Besure your applianceis properlyinstalled and grounded by a qualified technician in accordancewith the National ElectricalCode ANSlINFPA No. 70 latestedition and local electrical code requirements.Install only perinstallation instructions provided in the literature package for thisrange.Ask your dealer to recommend a qualified technician and anauthorized repair service, Know how to disconnect the power tothe range at the circuit breaker orfuse box in case of an emergency. User servicingiDonot repair or replace any part of theappliance unless specifically recommended in the manuals.All other servicing should be done only by a qualified technician.This may reduce the risk of personal injury and damage to therange. Never modify or alter the constructionof a range by removingleveling legs, panels, wire covers, anti-tip brackets/screws,orany other part of the product.Do not store items of interest to children in thecabinets above a range or on the backguard of a range. Childrenclimbing on the range to reach items could be seriously injured.Never Use Your Appliance Storage in or on Appliance--Flammablematerials should notbe stored in an oven, warmer drawer, near surface units or inthe storage drawer. This includes paper, plastic and cloth items,such as cookbooks, plasticware and towels, as well as flammableliquids. Do not store explosives, such as aerosol cans, on or nearthe range. Do Not Leave Children Alone--Childrenshould not be left !'TAV-'I;I II [L1 TO reduce the risk of tipping,the range must be secured by properly instal ledanti-tip bracket provided with the range, Tocheck if the bracket is installed properly, visuallycheck that rear leveling leg is inserted into andfully secured bythe anti-tip bracket by removinglower panel or storage drawer. For models witha warmer drawer, grasp the top rear edge of therange and carefully attempt to tilt it forward.Refer to the Installation Instructions for properanti-tip bracket installation. Stepping,leaning or sitting on the doors or drawers of this range can result in serious injuries and alsocause damage to the range. Do not allow children to climb or playaround the range. The weight of a child on an open door may causethe range to tip, resulting in serious burns or other injury.F'IVJV'-I:i II [ II Do not use the oven or warmerequipped) for storage,drawerorHeating the Room,All ranges can tip.Injury to persons could result.Install anti-tip device packed with range.See Installation Instructions.F'lVJV-'I:t II [tRfor Warmingalone or unattended in the area where appliance isin use. Theyshould never be allowed to sit or stand on any part of theappliance.DO NOT TOUCH SURFACE UNITS, AREAS NEAR THESEUNITS, HEATING ELEMENTS OR INTERIOR SURFACES OFTHE OVEN. Both surface units and oven heating elements maybe hot even though they are dark in color, Areas near surface unitsmay become hot enough to cause burns. During and after use, donot touch, or let clothing or other flammable materials touch theseareas until they have had sufficient time to cool. Among theseareas are the cook top, su daces facing the cook top, the oven ventopenings and surfaces near these openings, oven door andwindow.Wear Proper AppareliLoose-fittingor hanging garmentsshould never be worn while using the appliance. Do not letclothing or other flammable materials contact hot surfaces,Do Not Use Water or Flou r on Grease FiresiSmotherthe firewith a pan lid, or use baking soda, a dry chemical or foam-typeextinguisher.When heating fat or grease, watch it closely. Fat or grease maycatch fire if allowed to become too hot.Use Only Dry PotholdersiMoistor damp potholderaon hotsurfaces may result in burns from steam. Do not let potholderstouch hot heating elements. Do not use a towel or other bulky clothinstead of a potholder.Do Not Heat Unopened Food ContaineraiBuUdupof pressuremay cause container to burst and result in injury.Remove the oven door from any unused range if it is to bestored or discarded.IMPORTANTiDonot attempt to operate the range during apower failure. If the power falls, always turn off the range, If therange is not turned off and the power resumes, the range will beginto operate again. Once the power resumes, reset the clock andoven function.(if3;S";/
Important Safety InstructionsIMPORTANTCOOKTOPINSTRUCTIONSFOR USING YOURIMPORTANTOVEN Know which knob controls each surface heating unit. Place apan of food on the unit before turning it on, and turn the unit offbefore removing the pan, Use Proper Pan Size--Thisappliance is equipped with one ormore surface units of different sizes, Select utensils having flatbottoms large enough to cover the surface unit heating element.The use of undersized utensils will expose a portion of the heatingelement to direct contact and may result in ignition of clothing.Proper relationship of utensil to element will also improve efficiency. Utensil Handles Should Be Turned Inward and Not Extend OverAdjacent Surface Elements Tereduce the risk of burns, ignitionof flammable materials, and spillage due to unintentional contactwith the utensil, the handle of the utensil should be positioned sothat it is turned inward, and does net extend over adjacent surfaceunits,FOR USING YOUR Use Care When Opening Oven Door or Warmer Drawer (ifequipped)--Standto the side of the range when opening the doorof a hot oven. Let hot air or steam escape before you remove orreplace food in the oven. Keep Oven Vent Ducts Unobstructed.The oven vent is locatedunder the left rear surface element if your model is equipped withcoil elements. The oven vent is located below the backguard formodels equipped with ceramic-glass cook tops. Touching thesurfaces in this area when the oven is operating may causesevere burns. Also, de net place plastic or heat-sensitive items onor near the oven vent. These items could melt or ignite. Placement of Oven Racks. Always place oven racks in desiredlocation while oven is cool. If rack must be moved while oven ishot use extreme caution. Use pethelders and grasp the rack withboth hands to repositien. De not let potholders contact the hotheating elements in the oven. Remove all utensils from the rackbefore moving, Do not use the broiler pan without its insert. The broiler pan andits insert allow dripping fat to drain and be kept away from the highheat of the broiler, Do not cover the broiler insert with alumin am foil. Exposed fatand grease could ignite. Protective Liners--Donot use aluminum foil to line the ovenbottom, Only use aluminum foil as recommended in this manual,Improper installation of these liners may result in risk of electricshock, or fire. Never Leave Surface ElementsUnattendedat High HeatSettings--Boileverscause smoking and greasy spillevers thatmay ignite, or a pan that has boiled dry may melt, Do Not Immerse or Soak RemovableHeating Elements-Heating elements should never be immersed in water. Heatingelements clean themselves during normal operation. Glazed Cooking Utensils--Onlycertain types of glass, glass/ceramic, ceramic, earthenware, or other glazed utensils aresuitable for cook top service without breaking due to the suddenchangein temperature,Checkthemanufacturer'srecommendations for cook top use. When flaming foods under a ventilating hood, turn the fan on.SELF CLEANINGINSTRUCTIONSOVENS Clean in the self-cleaning cycle only the parts listed in this Use & Care Manual. Before self cleaning the oven, remove the broilerpan and any utensils or foods from the oven. Do Not Use Oven Cleaners--Nocommercial oven cleaner or oven liner protective coating of any kind should be used in or aroundany part of the oven. Do Not Clean Door GasketThe door gasket is essential for a good seal. Care should be taken not to rub, damage or move the gasket. The health of some birds is extremely sensitive to the fumes given off during the self-cleaning cycle of any range. Move birds to R CLEANINGYOURRANGE Clean the range regularly to keep all parts free of grease that could catch fire. Pay particular attention to the area underneath eachsurface element. Do not allow grease to accumulate. Kitchen cleaners and aerosols--Alwaysfollow the manufacturer'srecommended directions for use. Be aware that excessresidue from cleaners and aerosols may ignite causing damage and injury, Clean Ventilating Hoods Frequently--Greaseshould not be allowed to accumulateon the hood or filter. Follow manufacturer'sinstructions for cleaning.FOR CERAMIC-GLASSCOOK TOP MODELS Do Not Cook on Broken Cook Top--If cook top should break, cleaning solutions and spillevers may penetrate the broken cook topand create a risk of electric shock, Contact a qualified technician immediately. Clean Cook Top with Caution--Ifa wet sponge or cloth is used to wipe spills on a hot cooking area, be careful to avoid a steam burn.Some cleaners can produce noxious fumes if applied to a hot surface.4
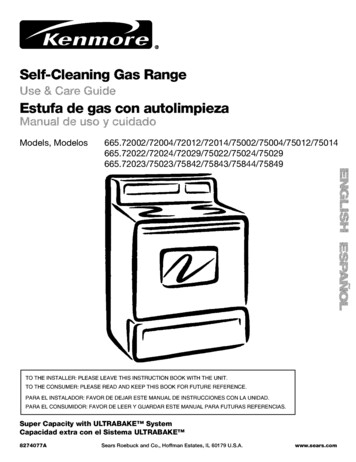
Important Safety InstructionsIMPORTANTSAFETYNOTICEThe California Safe Drinking Water and Toxic Enforcement Act requires the Governor of California to publish a list of substances knownto the state to cause cancer, birth defects or other reproductive harm, and requires businesses to warn customers of potential exposureto such substances.SERIALPLATELOCATION:l:liiYou will find the model and serial numberprinted on a serial plate. This serial plate islocated on the right side of the oven frontframe behind the Warmer Drawer or StorageDrawer compartment.Please see the illustration for exact location.i iiiiiiiiRemember to record the serial number forfuture reference (See page 2, under ProductRecord).Serial plate location.Open the Warmer Drawer(some models) orStorage Drawer(some models).5
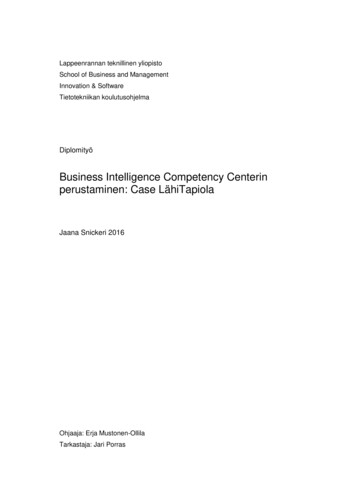
Range FeaturesNote: The featuresof your range will vary according to model.Manual Oven Warm & Ready"Ught SwitchDrawer(some nicOven Controlwith Clock andKitchen"RmerWarm & Ready"Zone and Indicator LightSingle Radiant Element Control;urfaca"lndicatorLightDual RadiantAt a GlanceSa,a RadiantElement Control(some models)Easy to CleanCooktopCeramicAutomatic OvenDoor Li(some models)Interior(1)Broil Pan and(1) Broil Pan InsertSelf-CleanSelf-CleaningOven InteriorLightInteriorOven Rack(s)Large 1 PieceDoor Handle(stylevarieswith model)Oven Door withWindowWarmDraweror Storage DrawerCeramicSmoothtops(stylesand colorvary by model)Warm & Ready ZoneRadiant Element6"SinRadiantElement8 IIRadiantElementLeveling Legs andAnti-tipBracket (included)6"SingleRadiantDualRadiantElement
Before Setting Oven ControlsOVEN VENTOven Vent LocationFor models equipped with ceramic cooktops, the oven vent is located under theleft rear side of the control panel. When the oven is on, warm air is releasedthrough the vent. This venting is necessary for proper air circulation in the ovenand good baking results. DO NOT BLOCK OVEN VENT.IArrangingOven RacksAL WAYS ARRANGE OVEN RACKS WHEN THE OVEN IS COOL (PRIOR TOOPERATING THE OVEN). Always use oven mitts when using the oven.Removing& ReplacingOven RacksTo remove, pull the rack forward until it stops. Lift up front of rack and slide out. To replace, fit the rack onto the guides onthe oven walls. Tilt the front of the rack upward and slide the rack back into place.RackRECOMMENDEDRACK POSITIONS FORBROILING, BAKING & ROASTINGFoodRack PositionBroiling meats, chicken or fish1,2 or 3Cookies, cakes, pies, biscuits & muffinsFrozen pies, angel food cake, yeast, bread,casseroles, small cuts of meat or poultryTurkey, roast or ham3 or 45Roasting shelfShelf(some models)About the CeramicGlass CooktopThe ceramic cooktop has radiant surface elements located below the surface of the glass. The design of the ceramic cooktopoutlines the area of the surface element underneath. Make sure the diameter of the pan matches the diameter of the elementoutline on the cooktop. Heat is transferred u p through the surface of the cooktop to the cookware. Only flat-bottomed caokwareshould be used. The type and size of coakware, the number of surface elements in use and their settings, are all factors thatwill affect the amount of heat that will spread to areas beyond the surface elements. The areas surrounding the elements maybecome hot enough to cause burns.About the RadiantELEMEOFFFWarmer ZoneControl000GN3"The element temperature rises grad ually and evenly. As thetem perature rises, the element will glow red. To maintain theselected setting, the element will cycle on and off. Theheating element retains enough heat to provide a uniformand consistent heat du ring the off cycle. The ceramic fixturethermally insulates the heating element, concentrating heatin the heating zone. For efficient cooking, turn off theelement several minutes before cooking is complete. Thiswill allow residual heat to complete the cooking process.@Single RadiantSurface Control(all models)OOOElementsFJJE ME trOFFEDOeOSurface8H3"Dual RadiantSurface ControlNOTE: Please read detailed instructions for ceramic glass cooktop cleaning in the Care & Cleaning and Before You Callchecklist sections of this Use and Care Guide.NOTE: Radiant elements have a limiter that allows the element to cycle on and off, even at the HI setting. This helps to preventdamage to the ceramic smooth top. Cycling at the HI setting is normal and can occur if the cookware is too small for theradiant element or if the cookware bottom is not fiat.7
Before Setting Oven ControlsElement On and Hot Surface Indicator LightsEMENTO@Your range is eq uipped with two different surface control lights that will glow on your range-- theElement On indicator light and a Hot Surface indicator light. The Element On located on thecontrol panel, will glow when any surface element is turned on. A quick glance at this light aftercooking is an easy check to be sure all surface controls are turned off. The Hot Surface indicatorlight, located on the control panel, will glow as the surface cooking area heats up and will REMAINON until the glass cooktop has cooled to a MODERATE level.Setting Surface ControlsTo OperateHSingle RadiantSurfaceElements1.Place correctly sized cookware on the radiant surface element.2.Push in and turn the surface control knob in either direction to the desired setting. Start mostcooking operations on a higher setting and then turn to a lower setting to finish cooking. Thesurface control knobs do not have to be set exactly on a particular mark. Use the marks as aguide and adjust the control knob as needed. Each surface element provides a constant amou ntof heat at each setting. A glowing red surface heating area extending beyond the bottom edgeof the cookware indicates the cookware is too small for the surface heating area.3.When cooking is completed, turn the surface element off before removing the cookware. Note:the Element On indicator light will glow when one or more elements are turned on. A quick glanceat the indicator light(s) when cooking is finished is an easy check to be sure all control knobsare turned off. The Hot Surface indicator light will continue to glow AFTER the control knob isturned to the "Off" position and will glow until the heating surface area has cooled sufficiently.SURFACE@To OperateSimmer Select SurfaceElement(If equipped)The right side of the control knob allows you to use the Simmer Select element as you would any normal surface element onthe medium to high settings.The left side of the control knob is used to operate the Simmer Select feature. This feature allows the element to heat at a muchlower temperature than when used as a normal surface element. This allows you to precisely simmer delicate foods.You may switch between normal cooking and Simmer Select at any time during the cooking process. Be sure to set the knobindicator between MAX and MIN for simmering or between MED and HI for normal cooking.NOTE: The element will not operate if the knob is positioned in the space between MAX and MED.SIMMER ELEThe suggested settings found in the chart below are based on cooking in medium-weightaluminum pans with lids. Settings may vary when using other types of pans.STANDARD SURFACE ELEMENTSSettingHIGH (HI - 9)MEDIUM HIGH (7 - 8)MEDIUM (5 - 6)L Fr OOOFRONT@ OType of CookingStart most foods, bring water to a boil, pan broilingContinue a rapid boil, fry, deep fat fryMaintain a slow boil, thicken sauces and gravies, steam vegetablesMEDIUM LOW (2 - 4)Keep foods cooking, poach, stewLOW (LO - 1)Keep warm, melt, simmerSIMMER SELECT SURFACEMAXLarger quantitiesMINSmaller quanititesELEMENT(If equipped)of food, stews and soupsSimmer Select Radiant Surfacm Controlof food, delicate foods, meltingchocolateor butterRadiant surface elements may appear to have cooled after they have been turned off. The glass surface maystill be hot and burns may occur if the glass surface is touched before it has cooled sufficiently.Do not place plastic items such as salt and pepper shakers, spoon holders or plastic wrappings on topof the range when it is in use. These items could melt or ignite. Potholders, towels orwooden spoons could catch fire if placedtoo close to the surface elements.8
Setting Surface ControlsB MEPELB MEELTo OperateDual RadiantSurfaceElementsSymbols on the backg uard are used to indicate which coil of the Dual Radiantelement will heat. The symbol indicates the inner coil only. The ) symbolindicates both inner and outer coils will heat. You may switch from either coilsetting at any time during cooking. Push in and turn the control knob in eitherdirection to the desired setting as instructed above.OOOR,G trOOOR,S trSINGLE AND DUAL thbothelementsSettingDual Radiantheatingareason ceramicsmoothtop (shownin black)ELEMENTSType of CookingHiGH (HI - 9)MEDIUM HIGH (7 - 8)MEDIUMSURFACE(5 - 6)Start most foods, bring water to a boil, pan broilingContinuea rapid boil, fry, deep fat fryMaintain a slowvegetablesboil, thickenMEDIUM LOW (2 - 4)Keep foods cooking,LOW (LO - 1)Keep warm, meIt, simmersaucesand gravies,steampoach, stewNote: The size and type of utensil used, and the amount and type of foodbeing cooked will influence the setting needed for best cooking results.Setting the Warmer(Warm & ReadyTM)Zone ControlThe purpose of the Warmer Zone is to keep hot cooked foods at servingtemperature. Always start with hot food. It is not recommended to heat cold foodon the Warmer Zone.All food placed on the Warmer Zone should be covered with a lid or aluminum foilto maintain quality. For best results, when warming pastries or breads, the covershould have an opening to allow moisture to escape. Do not use plastic wrap tocover food. Plastic may melt onto the surface and be very difficult to clean.Use only dishware, utensils and cookware recommended for oven and cooktop useon the Warmer Zone.MEDUnlike the surface elements, the Warmer Zone will not glow redOOO WARMERO O ZONEWarmerZone RecommendedSettings ChartFood ItemBreadslPastriesCasserolesDinner Plates with FoodEggsGraviesMeatsSaucesSoups (cream)StewsVegetablesFried FoodsHot BeveragesSoups (liquid)when it is IAlways use potholders or oven mitts when removing food from thewarm zone as cookware and plates will be hot.Setting the Warmer (Warm & Ready TM ) Zone Control1. To setthe control, push in either direction and turn the knob. The temperaturesare approximate, and are designated by HI, MED and LO. However, the controlcan be set at any position between HI and LO for different levels of heating.2. When done, turn the control to OFF. The Warmer Zone will remain warm untilthe hot surface indicator light goes off.Temperature Selection - Refer to the chart at the side column for recommendedheating levels. If a particular food is not listed, start with the medium level, andadjust as needed. Most foods can be kept at serving temperatures by using themedium level.keepas; chgravies, casseroles, soups, stews, breads, pastries and oven-safe dinner plates. II9 T '
Oven Control FunctionsREAD THE INSTRUCTIONS CAREFULLY BEFORE USING THE OVEN. For satisfactory use of your oven, become familiarwith the various functions of the oven as described below.OFF/CANCELPAD-- Used to clear anyfunction previously entered except the time ofday and minute timer. Push OFF/CANCELtostop cooking. Also the OFF/CANCEL3ad isused to activate oven door lockout settincUP and DOWN ARROW PADS-- Used aIong with thefunction pads to select oven temperature, cook time,stop time (when programming an automatic stop time),time of day, clean time and minute timer.CLOCK SET PAD-Used to set the time ofday.FEATURE\select the bakefunction.BAKEPAD Usedto.,oPAD--J. F o8INDICATORLIGHTS-- These lightto show which featureis in use.\BROIL PAD-Used to select thevariable broilfunction.CLEAN\" MECOOK TIME PAD-- Usedto enter the length of thebaking time (if equipped).oSTOP TIME PAD--Usedto set the desired stoptime for baking. Can beused with COOK TIME toUsed toprogram a delayed bakecycle (if equipped).select the self-cIeaningcycle./OVEN, PREHEAT & DOOR LOCKED LIGHTS -- The "OVEN" light will glow each timethe oven turns on to maintain the set oven temperature. The "PREHEAT"light will glowwhen the oven is first set to operate, or if the desired temperature is reset higher than theactual oven temperature. The "DOOR LOCKED"light will flash when the oven doorlocks and unlocks or when using the self-clean cycle or the oven door lockout mode isactivated. The indicator light will glow constantly after the door locks.The oven can be programmedand set for OVEN LOCKOUT.For a silent controlTIMER ON/OFF PAD-- Used to set orcancel the minute timer. The minutetimer does not start or stop cooking.Also,TIMER ON/OFF pad is used to setthe Continuous Bake feature.to: BAKE, TIME BAKE, BROIL, SELF-CLEAN,CONTINUOUSBAKEpanelWhen choosing a function, a beep will be heard each time a pad is pressed. If desired, the controls can be programmed forsilent operation. Press and hold .After 7 seconds, the control will beep once. This will block the controls from soundingwhen a pad is pressed. To return the sound, press and holdagain for 7 seconds until the control beeps once.Note: The control will return to the audible mode after a power outage.TemperatureconversionThe electronic oven control is set to operate in F (Fahrenheit) when shipped from the factory. The oven can be programmedfor any temperature from 170 F to 550 F (65 C to 287 C).To change the temperature to C (Celsius)"----"or from C to F (control1.Press .2.Press and hold the3.Press and hold Q4.Press the5.Press any control pad to return to normal operating mode.orappears in the display.until "HI" appears in the display.until F or C appears in the display.vto change Fto Cor Cto F.10should not be in a Bake or Clean mode):
Setting Oven ControlsNote: The time of day must first be set in order to operate the oven.To Set the ClockWhen the range is first plugged in, or when the power supply to the range has been interrupted, the display will flash "12:00".1.Press" " "2.Within 5 seconds, press and hold the./or vuntil the correct time of day appears in the display.Note: The clock cannot be changed during any timed bake or self-clean cycle.TO Set the1.Press2.PresstheMinuteATimer:to increase the time in one minute increments. Press and hold the-to increase the time in l 0 minuteincrements. The timer can be set for any amount of time from 1 minute to 11 hours and 59 minutes.Note: If you press thevfirst, the timer will advance to 11 hours and 59 minutes.3.The display shows the timer count down in minutes until one minute remains. Then the display will count down in seconds.4.When the set time has run out, the timer will beep 3 times. It will then continue to beep 3 times every 60 seconds untilis pressed.Note: The minute timer does not start or stop cooking. It serves as an extra timer in the kitchen that will beep when the settime has run out. The minute timer can be used alone or during any of the other oven functions. When the minute timer is inuse with any otherfunction, the minute timer will be shown in the display. To view other functions, press the pad for that function.To Change the Minute Timer while it is in use:While the timer is active and shows in the display, press and hold theTo Cancel the Minute Timer before the set time has run out: Press11/ .orvto increase or decrease the time.
Setting Oven ControlsTo Set or Changethe Temperaturefor BakingThe oven can be programmed to bake at any temperature from 170 F to 550 F (65 C to 287 C).To Set the Controls for Baking:1.Press .2.Within 5 seconds, press thev3."appears, the temperatureAs soon as thetemperature4."I .in the display./ - orV. The display will show"350 F(177 C). '' By pressing and holding the Aorcan then be adjusted in 5 F (1 C) increments.orvis released, the oven will begin heating to the selected temperature. When the displayedreaches the desired baking temperature, the control will beep 3 times.To cancel the baking function, press .To Cha
Even if you don't need repairs, provides an annual Preventive Maintenance Check, at your request, to ensure that your appliance is in proper running condition. Some limitations apply. For more information, call 1-899-827-6655. For information concerning Sears Canada Maintenance Ag reements, call 1-800-361-6665. 2