Transcription
SANITATIONTOILETMasterFlush 7600 SeriesENMacerator ToiletInstallation and Operation Manual. . . . . . . . 2FRCuvette de toilette à pompe dilacératriceManuel d’installation et d’utilisation . . . . . 14WARNINGCancer and Reproductive Harmwww.P65Warnings.ca.govREVISION B Form No. 600347268.000 04/2020 2020 Dometic Corporation
ContentsMasterFlush 7600 Series ToiletService Center & Dealer LocationsVisit: www.dometic.comRead these instructions carefully. These instructionsMUST stay with this product.Contents1Explanation of Symbols and SafetyInstructions . . . . . . . . . . . . . . . . . . . . . . . . . . . . . 21.1Recognize Safety Information. . . . . . . . . . . . . 21.2Understand Signal Words. . . . . . . . . . . . . . . . 21.3Supplemental Directives. . . . . . . . . . . . . . . . . 21.4General Safety Messages. . . . . . . . . . . . . . . . 310 Disposal . . . . . . . . . . . . . . . . . . . . . . . . . . . . . . . 1311 Warranty Information. . . . . . . . . . . . . . . . . . . . 131 Explanation of Symbols andSafety InstructionsThis manual has safety information and instructions tohelp you eliminate or reduce the risk of accidents andinjuries.1.1 Recognize Safety Information 2 General Information. . . . . . . . . . . . . . . . . . . . . . 32.1Model Identification . . . . . . . . . . . . . . . . . . . . 42.2Component Locations. . . . . . . . . . . . . . . . . . . 43 Intended Use. . . . . . . . . . . . . . . . . . . . . . . . . . . . 54 Specifications . . . . . . . . . . . . . . . . . . . . . . . . . . . 54.1Component Materials. . . . . . . . . . . . . . . . . . . 54.2Installation Requirements . . . . . . . . . . . . . . . . 54.3Toilet Dimensions . . . . . . . . . . . . . . . . . . . . . . 64.4Rough-In Dimensions . . . . . . . . . . . . . . . . . . . 65 Wiring Diagram. . . . . . . . . . . . . . . . . . . . . . . . . . 71.2 Understand Signal WordsA signal word will identify safety messages and propertydamage messages, and also will indicate the degree orlevel of hazard seriousness. 6 Installation. . . . . . . . . . . . . . . . . . . . . . . . . . . . . . 76.1Preparing to Install the Toilet . . . . . . . . . . . . . 76.2Removing an Existing Toilet . . . . . . . . . . . . . . 76.3Installing the Toilet . . . . . . . . . . . . . . . . . . . . . 87 Operation. . . . . . . . . . . . . . . . . . . . . . . . . . . . . . 107.1Adding Water to the Bowl. . . . . . . . . . . . . . . . 107.2Flushing the Toilet. . . . . . . . . . . . . . . . . . . . . . 117.3Changing the Flush Settings. . . . . . . . . . . . . . 117.4Understanding the Full Tank Indicator . . . . . . 118 Maintenance . . . . . . . . . . . . . . . . . . . . . . . . . . . 118.1Cleaning . . . . . . . . . . . . . . . . . . . . . . . . . . . . . 118.2Routine Maintenance . . . . . . . . . . . . . . . . . . . 128.3Winterizing . . . . . . . . . . . . . . . . . . . . . . . . . . . 129 Troubleshooting . . . . . . . . . . . . . . . . . . . . . . . . 132This is the safety alert symbol. It is used to alertyou to potential physical injury hazards. Obey allsafety messages that follow this symbol to avoidpossible injury or death. DANGER!Indicates a hazardous situation that, if not avoided,will result in death or serious injury.WARNINGIndicates a hazardous situation that, if not avoided,could result in death or serious injury.CAUTIONIndicates a hazardous situation that, if not avoided,could result in minor or moderate injury.NOTICE: Used to address practices not related tophysical injury.additional information that is not relatedIIIndicatesto physical injury.1.3 Supplemental DirectivesTo reduce the risk of accidents and injuries, pleaseobserve the following directives before proceeding toinstall, operate, or service this appliance: Read and follow all safety information andinstructions.EN
MasterFlush 7600 Series Toilet Read and understand these instructions beforeinstalling,operating, or servicing this product. The installation must comply with all applicable localor national codes, including the latest edition of thefollowing standards:U.S.A.–– ANSI/NFPA70, National Electrical Code (NEC)–– ANSI/NFPA 1192, Recreational Vehicles Code–– ANSI Z21.57, Recreational Vehicles CodeCanada–– CSA C22.1, Parts l & ll, Canadian Electrical Code–– CSA Z240 RV Series, Recreational Vehicles1.4 General Safety Messages WARNING: ELECTRICAL SHOCK, FIRE, AND/OR EXPLOSION HAZARD. Failure to obey thefollowing warnings could result in death orserious injury. Turn the power off before performing any electricalinstallation or maintenance activities. Use care when diagnosing and/or adjustingcomponents on a powered unit.General Information2 General InformationThis section provides information on the tooling andparts for the MasterFlush 7600 Series toilet.images used in this document are for referenceIIThepurposes only. Components and componentlocations may vary according to specific productmodels. Measurements may vary 0.38 in. (10 mm).Included KitsQuantityMounting Hardware Kit(Floor Flange or Remote)1MasterFlush 7600 Series Toilet1Recommended ToolsPliers or Adjustable WrenchDrill7/16 in. (11 mm) WrenchElectrical ConnectionToolsOptional PartsThe MasterFlush 7600 Series toilet can be connectedto one of several Dometic holding tank monitoringsystems to offer accurate, continuous tracking of tankcapacity. Contact the Dometic Customer SupportCenter or www.dometic.com for more information. Use only Dometic replacement parts andcomponents that are specifically approved for usewith the appliance. Avoid improper installation, adjustment, alterations,service, or maintenance of the appliance. Service andmaintenance must be done by a qualified serviceperson only. Do not modify this product in any way. Modificationcan be extremely hazardous. Do not overfill the holding tank. To reduce thispossibility, use the full-tank shut-down circuitry inthe toilet’s electronic control module. An optionalDometic tank monitor system can generate a fulltank signal and disable flushing until the holdingtank is emptied. Overfilling the holding tank cancause serious damage to the sanitation system, suchas rupturing the holding tank and releasing tankcontents into the motorhome.EN3
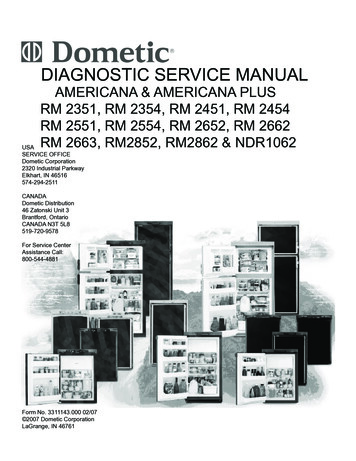
General InformationMasterFlush 7600 Series Toilet2.1 Model Identification2.2 Component LocationsThe toilet model identification label is located on thetoilet base under the water valve. Have this informationready before contacting Dometic for service.This section identifies the toilet components.qwefiModel : SO 1234Item :PNC : 123456789123456789orLoreasm123456789LoreasamSerial :gdt1 Model Identification Exampleufasy2 Component Locationsq Anti-Siphon Valve/o Vacuum Breaker/w Vacuum Breaker Covere Toilet Seatr Toilet Bowlt Toilet Basey Floor Flange Sealu Flush Pedal Assemblyi Discharge Pipe/a Water Valves Floor FlangeUpper Discharge TubeTrap Assembly14Bowl Supply HoseMounting OptionHardware Kit1d Control Modulef Pump/Base Coverg MaceratorPump/MountingAssemblyNot shown: Remote Mounting Option Hardware Kit.EN
MasterFlush 7600 Series ToiletIntended Use3 Intended Use4 SpecificationsThe MasterFlush 7600 Series toilet (hereinafter referredto as “MasterFlush”) is an electric-flush toilet thatmacerates waste and pumps it to a holding tank or othereffluent storage/disposal system. The MasterFlushprovides the following benefits:The following section provides the materials, installationrequirements, and toilet rough-in dimensions.4.1 Component Materials A convenient electronic flush feature adds water orflushes by pressing on the flush pedal.Toilet SeatEnameled WoodToilet BowlVitreous Ceramic Two water consumption flush settings offer flexibility.The normal flush uses 0.8 gal (3 L) and adds waterto the bowl after a flush. The dry bowl uses 0.2 gal(0.8 L) and does not add water to the bowl.Toilet BasePolypropyleneFlush PedalPolypropyleneMacerator Pump BodyGlass-Filled Polypropylene A versatile installation location offers flexibility. Thepowerful macerator pump allows the toilet to belocated up to 40 ft (12.2 m) away from the holdingtank or other discharge line destination (remoteinstallation method).Water ValvePolypropyleneVacuum BreakerABS/PolypropyleneFloor Flange SealNitrile Rubber, Foam The automatic full-tank shut-down safety feature helpsavoid motorhome damage. When connected to aholding tank level indication system, the toilet willnot flush when the holding tank is full and preventsoverfilling the tank.The manufacturer accepts no liability for damage in thefollowing cases: Faulty assembly or connection Damage to the product resulting from mechanicalinfluences and excess voltage4.2 Installation RequirementsThe following tables list the MasterFlush electrical, watersupply, discharge options, and rough-in dimensions.4.2.1 ElectricalPower draw15 A/12 VDCCircuit breaker/fuse20 A/12 VDCWiringRefer to ANSI/RVIA LV andNFPA 70/NEC Standardsfor the recommended wiregauge (USA). Refer to CECI and II Standards for therecommended wire gauge(Canada). Alterations to the product without express permissionfrom the manufacturer Use for purposes other than those described in theoperating manualDometic Corporation reserves the right to modifyappearances and specifications without notice.4.2.3 Water SupplyFitting0.5 in. (13 mm) NPTFlow Rate3–5 gpm (11.4–18.9 lpm)recommended*2 gpm (9.5 lpm) minimumStatic Pressure30–100 PSI (207–690 kPa)*A water supply that exceeds 5 gpm (18.9 lpm) may require a flowrestrictor at the toilet inlet.EN5
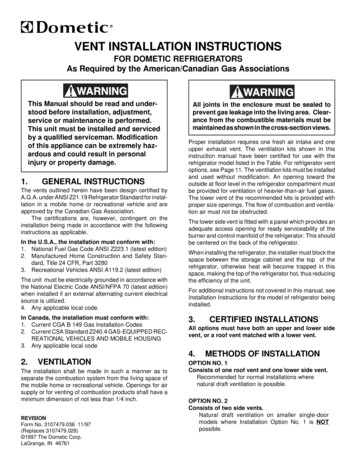
SpecificationsMasterFlush 7600 Series Toilet4.4 Rough-In Dimensions4.2.4 Discharge OptionsFloor Flange OptionRemote Option(not mounted on theflange directly abovethe waste tank)qFloor flange3 in. (76 mm) ID;0.25– 0.4 in. (6–11 mm) thickSanitation hose size1.5 in. (38 mm) or 1 in. (25 mm) IDHorizontal hose run40 ft (12.2 m) maximum**etrw**Check for an adequate discharge flow if the installation nears this distance.Refer to ANSI 1192 and Z240 RV Series standards, where applicable, foradditional RV toilet installation guidelines. Specifications are subject tochange without notice.y4.3 Toilet Dimensionsu4 Rough-In Dimensions and Clearancesq Back wallw Left walle 10 in. (254 mm)r Floor flangequwet Right wally 11 in. (279 mm)u 11 in. (279 mm)yrt3 Toilet Dimensions and Clearancesq 15 in. (381 mm)t 14.8 in. (375 mm)w 33.9 in. (860 mm)y 18.4 in. (467 mm)e 20 in. (508 mm)r 10 in. (254 mm)u 19 in. (483 mm)seat lid upback to front of baseseat heightrough-in6EN
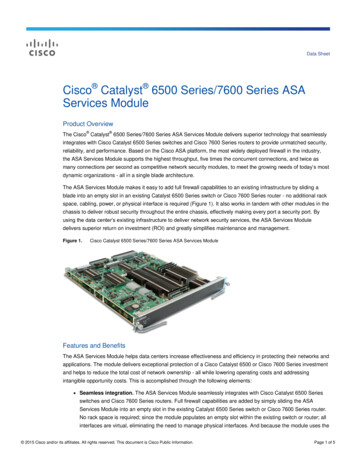
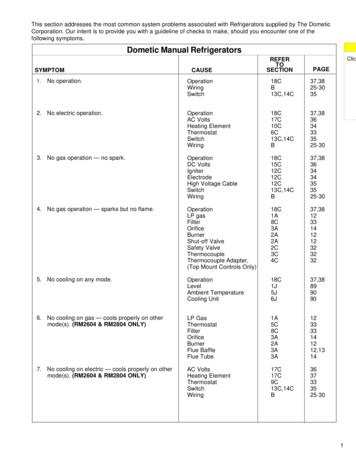
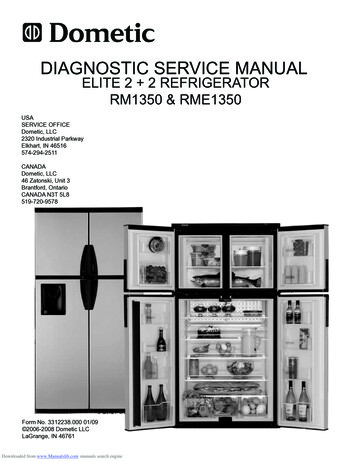
MasterFlush 7600 Series ToiletWiring Diagram5 Wiring DiagramThis section provides the MasterFlush wiring diagram.Toilet- VDC InputInput Power Supply -12 VDC345627OPTIONAL (recommended)YellowFuse or Breaker25 AMP 12 VDC InputBlack1OrangeCircuit Boardwith Internal FuseBrownMotorBrownWater ValveRedFull Tank FloatBlack 12 VDC InputFuse or Breaker0.5 AMPBlackRedBlueDTM01 Panel Option5 Wiring Diagram6 Installation WARNING: ELECTRICAL SHOCK HAZARD.Turn the power off before performing any electricalinstallation or maintenance work. Failure to obeythis warning could result in death or serious injury.NOTICE: Do not install the toilet in a shower. Be sureto follow the recommended installation requirements in“Specifications” on page 5.This section describes the toilet preparation, removal,and installation processes.6.1 Preparing to Install the Toilet1. Verify the location meets all the recommendedclearances for the new model. See Figure 3 &Figure 4.2. Turn off the power to the toilet’s location.NOTICE: Be sure the foot pedal, when depressed, willtouch the same flat surface as the installed toilet.3. Turn off the water supply to the toilet’s location.NOTICE: Do not over-tighten the floor mounting nuts.To prevent any distortion of the base, alternate betweensides when tightening.6.2 Removing an Existing ToiletNOTICE: When reconnecting the water supply line, donot over tighten.ENremoval is unnecessary, skip to “InstallingIIIfthea toiletToilet” on page 8.1. Disconnect the power to the toilet.7
InstallationMasterFlush 7600 Series Toilet2. Disconnect and drain the water supply line.3. Remove the toilet hold-down bolts and screws.4. Remove the toilet from the floor.5. Remove and dispose of the old floor flange seal, thehold-down bolts, and any removal debris.2. Verify the new flange’s toilet mounting holes are atthe correct location. See Figure 4 & Figure 6.3. Secure the floor flange to the floor.4. Insert the two T-bolts into the floor flange slots.6.3 Installing the ToiletThis section describes the two toilet installation options.6.3.1 Floor Flange Installationqinstall the toilet farther from the holding tank,IIToskip to “Remote Installation” on page 9.NOTICE: When lowering the toilet onto the floor flange,the toilet must align so that the outlet at the base fitsinside the floor flange outlet hole.NOTICE: The floor flange must be secured to the floorwith a minimum of four screws (eight is recommended).Complete these steps to perform a floor flange toiletinstallation:1. Verify the top surface of the floor flange is clean andfree of any debris or sealant.wyter7 Installing the Floor Flangeq Floor Flange Sealw Bolt Coverse Floor MountingqweNuts andWashersr Floor Flanget Water Supply Connectory Black Rubber Elbow5. Verify the floor flange seal is installed onto the base ofthe toilet.6. Carefully set the toilet over the floor flange.7. Align the holes in the toilet base with the T-bolts asthe toilet is lowered onto the floor flange.6 Installing the T-Boltsq T-Boltsw Slots8e Floor Flangenot rest the entire toilet base completelyIIDoon the floor at this time. The floor seal must becompressed. Refer to the following steps.EN
MasterFlush 7600 Series ToiletInstallation8. Install the floor mounting nuts and washers onto theT-bolts.9. Carefully torque the nuts to 30–40 in. lb (3.4–4.5 N·m). When tight, the base should be securelyattached and flat against the floor.10. Attach the bolt covers onto the nuts.11. Reconnect the water supply line and torque theconnection to 30–40 in. lb (3.4–4.5 N·m).12. Connect the electrical power to the toilet accordingto the wiring diagram. See “Wiring Diagram” onpage 7.13. Turn on the electrical power to the toilet.6.3.2 Remote Installationinstall with a floor flange, return to “Floor FlangeIIToInstallation” on page 8.Complete these steps to perform a remote toiletinstallation.1. Place the toilet in the location where it will beinstalled.2. Mark the fastener hole locations through the twoholes in the toilet base.3. Drill pilot holes for the two hex screw fastenersprovided in the remote mounting hardware kit.14. Turn on the water supply to the toilet.15. Flush the toilet several times and check for leaks.wwqqe9 Removing the Black Elbow8 Attaching the Coverq Pump/Base Coverw Locking Tabse Screwsq Black Rubber Elboww Check Valve4. Remove the black rubber elbow from the check valveat the back of the toilet.16. Attach the pump/base cover to the base using thescrews at the sides of the toilet base and using thelocking tabs at the sides and the back.EN9
OperationMasterFlush 7600 Series Toilet7 OperationNOTICE: Make sure guests understand the toiletoperation before use. Failure to follow these instructionscould cause clogs or damage to the toilet or the system.This section describes how to operate the toilet and usethe different flush settings.e7.1 Adding Water to the BowlAdding water to an empty bowl helps prevent holdingtank odors from entering the living space. Adding wateris recommended prior to flushing solids and toilet paper.wq10 Routing Hosesq Sanitation Hosew Floor Access Holee Hose Clamps5. Drill access holes for the hoses if necessary.can be routed either above- or belowIIPlumbingfloor as required.6. Route either a 1.5 in. (38 mm) ID flexible sanitationhose or a 1.5 in. (38 mm) ID PVC or ABS pipe fromthe waste tank to the check valve.7. Connect the flexible sanitation hose directly to thecheck valve with hose clamps.q8. Reconnect the water supply line and torque theconnection to 30–40 in. lb (3.4–4.5 N·m).9. Connect the electrical power to the toilet accordingto the wiring diagram. See “Specifications” onpage 5.10. Fasten the toilet to the floor using a hex-head screwon each side of the base.11. Cover the fasteners with the plastic caps.12. Turn on the electrical power to the toilet.13. Turn on the water supply to the toilet.14. Flush the toilet several times and check for leaks.15. Attach the pump/base cover to the base using thescrews at the sides of the toilet base and using thelocking tabs at the sides and the back.1011 Adding Water to the Bowlq Add Water1. To add water to the bowl, press the flush pedalpart‑way down.2. Release the pedal.avoid a possible overflow, the water flow willIITostop automatically if the pedal is pressed too long.EN
MasterFlush 7600 Series ToiletMaintenance7.2 Flushing the Toilet7.3 Changing the Flush SettingsNOTICE: Flush only water, bodily wastes, and rapiddissolving toilet tissue. Do not flush foreign objects. Donot flush wet wipes, sanitary napkins, diapers, papercups, cotton swabs, food, hair, or liquids such as oils orsolvents. Failure to follow these instructions could causeclogging or damage to the toilet or the toilet system.This section describes two flush settings offered to helpmanage water usage and how to apply each setting.7.3.1 Normal Flushnormal flush setting uses 0.8 gal (3 L) per flushIITheand adds water to the bowl after every flush.To change the flush setting from dry bowl to normalflush, press the flush pedal for ten seconds.7.3.2 Dry Bowl Flushdry bowl flush setting uses 0.2 gal. (0.8 L) perIITheflush and does not add water to the bowl.To change the flush setting from normal to dry bowl,press the flush pedal for approximately ten seconds.7.4 Understanding the Full TankIndicatoran optional tank monitor is not installed, skip toIIIf“Maintenance”on page 11.q12 Flushing the Bowlq Flush BowlWhen an optional tank monitor system is installedand operational, a solid red indicator light on the tankmonitor control panel will indicate the holding tank isfull. Flushing will be disabled to prevent overfilling theholding tank.To restore electrical power to the toilet for flushing,empty or discharge the holding tank contents until theindicator is off. Additional features and indicators may beavailable based on the tank monitor model.1. To flush, press the flush pedal down completely.2. Release the pedal.This activates a powerful macerator pump that siphonsthe water and waste from the toilet bowl, and thenmacerates and propels the effluent to the holding tank.water trickle in ceramic bowls: due toIIResidualthe integrated rim of this toilet bowl, water maycontinue to slowly trickle into the toilet bowl forup to 20 minutes after flushing. If the water tricklecontinues after 30 minutes, replace the water valve.EN8 MaintenanceThis section describes recommended cleaning andmaintenance procedures.8.1 CleaningNOTICE: Do not clean the toilet with abrasive cleaners,caustic chemicals, or lubricants and cleaners that containalcohols or petroleum distillates. Using them couldcause damage to internal seals.11
MaintenanceMasterFlush 7600 Series ToiletFor routine cleaning, use Dometic Toilet Bowl Cleaner.If this cleaner cannot be found in your area, contactDometic for your nearest dealer. If the cleaner is notavailable, use almost any non-abrasive bathroom andtoilet bowl cleaner. Follow the label instructions.6. If the system will be subjected to freezingtemperatures, continue with “Winterizing” onpage 12.8.2 Routine MaintenanceNOTICE: This toilet is not intended for use whenexposed to temperatures below freezing.This section describes routine maintenance procedures.8.2.1 MonthlyThis section describes monthly maintenance.1. Inspect the toilet, plumbing, plumbing connections,wires, and wire connections.2. Open and close all plumbing valves.3. Check any in-line water filters for blockage.8.2.2 YearlyThis section describes yearly maintenance.Check the water valve filter.IICheck the water valve filter if the water flow into thetoilet becomes insufficient.8.3 WinterizingNOTICE: Never leave the vehicle unoccupied forextended periods of time with the municipal watersupply or the onboard water pump turned on whenthere is a possibility of freezing temperatures.NOTICE: Never use automotive-type antifreeze(ethylene glycol) in freshwater systems. Use onlynontoxic antifreeze (propylene glycol) designated forpotable water systems. See the vehicle owner’s manual.At the end of each camping season, or when the vehicleis stored for long periods of time when the toilet may beexposed to freezing temperatures, the system should bewinterized by using potable water-safe antifreeze.Complete these steps to winterize the toilet:1. Drain the potable water tank and empty the wasteholding tank.8.2.3 Extended Periods of Non-Use2. Add freshwater antifreeze to the potable water tankaccording to the antifreeze manufacturer instructions.NOTICE: The macerator toilet and sanitation systemshould be protected if the toilet will not be used formore than two weeks, especially in hot weather.3. Flush the toilet several times until the antifreezemixture has flowed completely through the toilet, themacerator pump, and the holding tank.NOTICE: Do not use detergent that contains bleach orenvironmentally harmful substances.4. Turn off the power to the toilet.Complete these steps to protect the toilet beforestorage or before two or more weeks of non-use.installation is different, so the antifreezeIIEachmixture amounts may vary. User discretion isrequired to assure adequate protection.1. Flush the toilet in normal mode and add 4 oz (118 ml)of liquid biodegradable laundry detergent.2. Flush the toilet at least five times.3. Turn off the water supply to the toilet.4. Flush the toilet three times without water.procedure will minimize any remaining water inIIThisthe macerator pump.5. Turn off the power to the toilet.12EN
MasterFlush 7600 Series ToiletTroubleshooting9 TroubleshootingThe following table describes common occurrences thatare not a result of defective workmanship or materials.SymptomThe flush cycle operatescorrectly but the water in thebowl empties slowly or notat all.Possible CauseService InstructionThe discharge piping is pinched or kinked.Check the discharge piping.The trap or the discharge piping is blocked.Plunge the line or squeeze the trap assembly toclear the blockage.The macerator pump is blocked.Clear the blockage.The macerator pump makesunusually loud noise orcontinually trips the breaker.There is foreign material in the pump chamber.Clear the foreign material from the pumpchamber.The flush cycle is notactivated after pressing theflush pedal.Electrical power to the toilet is off or disrupted.Check the wiring and circuit breakers or fuses.The flush pedal is malfunctioning.Replace the switch in the flush pedal.The circuit board is malfunctioning.Replace the circuit board.If an optional tank monitor is installed: theEmpty the holding tank.holding tank is full and the signal from the tankhas shut down the electrical power to the toilet.Insufficient or no waterenters the toilet bowl.The water supply line is pinched or kinked.Check the water supply line.The screen in the water valve is blocked.Clear the blockage at the water valve.The water valve is malfunctioning.Replace the water valve.Water trickles slowly into thetoilet bowl for longer than30 minutes after flushing.The water valve is malfunctioning.Replace the water valve.The anti-siphon valve leakswater.The valve is obstructed, or the valve or valveseat is faulty.Manipulate the valve tab.Pour hot water on the valve to clean it.If unresolved, replace the trap assembly.10 Disposal11 Warranty InformationMMLimited ONE-Year WarrantyPlace the packaging material in the appropriaterecycling waste bins, whenever possible. Consulta local recycling center or specialist dealer fordetails about how to dispose of the product inaccordance with all applicable national and localregulations.LIMITED ONE-YEAR WARRANTY AVAILABLE AT WWW.DOMETIC.COM/WARRANTY.IF YOU HAVE QUESTIONS, OR TO OBTAIN A COPYOF THE LIMITED WARRANTY FREE OF CHARGE,CONTACT:DOMETIC CORPORATIONCUSTOMER SUPPORT CENTER1120 NORTH MAIN STREETELKHART, INDIANA, USA 465141-800-544-4881 OPT 1EN13
SommaireToilette MasterFlush série 7600Liste des centres de service et des revendeursConsultez : www.dometic.comLire attentivement ces instructions. Ces instructionsDOIVENT rester avec ce produit.9 Dépannage . . . . . . . . . . . . . . . . . . . . . . . . . . . . 2610 Élimination. . . . . . . . . . . . . . . . . . . . . . . . . . . . . 2611 Informations de garantie . . . . . . . . . . . . . . . . . 26Sommaire1Explication des symboles et consignes desécurité. . . . . . . . . . . . . . . . . . . . . . . . . . . . . . . . 141.1Reconnaître les consignes de sécurité. . . . . . 141.2Comprendre les mots-indicateurs . . . . . . . . . 141.3Directives supplémentaires. . . . . . . . . . . . . . . 151.4Messages de sécurité d’ordre général. . . . . . 152 Informations générales . . . . . . . . . . . . . . . . . . 152.1Identification du modèle. . . . . . . . . . . . . . . . . 162.2Emplacements des composants. . . . . . . . . . . 161 Explication des symboles etconsignes de sécuritéCe manuel contient des consignes de sécurité et desinstructions pour aider l’utilisateur à éliminer ou réduirele risque d’accidents et de blessures.1.1 Reconnaître les consignes desécurité 3 Indication. . . . . . . . . . . . . . . . . . . . . . . . . . . . . . 174 Caractéristiques techniques . . . . . . . . . . . . . . 174.1Matériaux des composants. . . . . . . . . . . . . . . 174.2Exigences d’installation . . . . . . . . . . . . . . . . . 174.3Dimensions de la cuvette de toilette . . . . . . . 184.4Dimensions approximatives. . . . . . . . . . . . . . 185 Diagramme de câblage . . . . . . . . . . . . . . . . . . 196 Installation. . . . . . . . . . . . . . . . . . . . . . . . . . . . . 196.1Préparation de l’installation de la toilette. . . . 196.2Retrait d’une toilette existante. . . . . . . . . . . . 206.3Installation de la toilette . . . . . . . . . . . . . . . . 207 Fonctionnement . . . . . . . . . . . . . . . . . . . . . . . . 237.1Ajout d’eau dans le bol. . . . . . . . . . . . . . . . . 237.2Tirage de la chasse d’eau . . . . . . . . . . . . . . . 237.3Modification des paramètres de chassed’eau . . . . . . . . . . . . . . . . . . . . . . . . . . . . . . . 247.4Comprendre l’indicateur de réservoir plein. 248 Entretien. . . . . . . . . . . . . . . . . . . . . . . . . . . . . . . 24148.1Nettoyage. . . . . . . . . . . . . . . . . . . . . . . . . . . 248.2Entretien régulier. . . . . . . . . . . . . . . . . . . . . . 248.3Hivérisation . . . . . . . . . . . . . . . . . . . . . . . . . . 25C’est le symbole d’alerte à la sécurité. Il signaledes risques de blessures physiques. Obéir à tous lesmessages de sécurité qui suivent ce symbole pouréviter les risques de blessures ou de mort.1.2 Comprendre les motsindicateursUn mot-indicateur identifie les messages de sécurité etles messages liés aux dégâts matériels, et signale aussi ledegré ou niveau de gravité du danger. DANGER!Indique une situation dangereuse qui, si elle n’estpas évitée, causera la mort ou des blessuresgraves.AVERTISSEMENTIndique une situation dangereuse qui, si elle n’estpas évitée, peut causer la mort ou des blessuresgraves.ATTENTIONIndique une situation dangereuse qui, si elle n’estpas évitée, peut causer des blessures légères oumodérées.AVIS : Utilisé pour signaler des pratiques non liées àune blessure physique.des renseignements additionnels sansIIFournitrapport avec des blessures physiques.FR
Toilette MasterFlush série 76001.3 Directives supplémentairesPour réduire le risque d’accidents et de blessures,observer les directives suivantes avant de continuer àinstaller, utiliser ou entretenir cet appareil : Lire et suivre toutes les consignes de sécurité et lesinstructions. Lire et comprendre ces instructions avantl’installation, l’utilisation ou l’entretien de ce produit. L’installation doit se conformer à tous les codeslocaux ou nationaux applicables, y compris la toutedernière édition des normes suivantes :Informations générales Ne pas modifier ce produit d’une quelconque manière.Une modification peut être extrêmement dangereuse. Ne pas remplir excessivement le réservoir. Afin deréduire le risque de remplissage excessif, utiliser lecircuit d’arrêt pour réservoir plein, situé dans le modulede contrôle électronique de la toilette. Un systèmeoptionnel de surveillance de réservoir Dometic peutgénérer un signal de réservoir plein et désactiverle rinçage jusqu’à ce que le réservoir soit vidé. Unremplissage excessif du réservoir peut causer degraves dommages au système d’assainissement,comme la rupture du réservoir et le déversement ducontenu de celui-ci dans la maison motorisée.États-Unis–– ANSI/NFPA 70, Code national de l’électricité(CNE)–– ANSI/NFPA 1192, Code des véhicules récréatifs–– ANSI Z21.57, Code des véhicules récréatifsCanada–– CSA C22.1, Parties l et ll, Code canadien del’électricité2 Informations généralesCette section fournit des informations sur l’outillage etles pièces pour la toilette MasterFlush série 7600.images utilisées dans ce document sontIILesuniquement fournies à titre de référence. Lescomposants et leur emplacement peuvent varierselon le modèle. Les mesures peuvent varier de 0,38 po (10 mm).–– CSA Z240 RV Series, véhicules récréatifsEnsembles inclus1.4 Messages
This section describes the two toilet installation options. 6 .31 . Floor Flange Installation I To install the toilet farther from the holding tank, skip to "Remote Installation" on page 9. NOTICE: When lowering the toilet onto the floor flange, the toilet must align so that the outlet at the base fits inside the floor flange outlet hole.