Transcription
www.fingertec.comsuppor t@finger tec.comw15-01-01THUTimeLine 100Time Attendance RFID Card SystemUser Guide
CONTENTS3-4Chapter 1 GETTING STARTED175-7Chapter 2 BASICS18Introduction to ProductsOverviewKeypadBatteryDate/TimeVoice ControlSecurity FeaturesCleaning TerminalRestarting and Resetting Terminal19 Chapter 8 RFID CARD FUNCTIONEnrollment of RFID CardDeleting RFID CardChanging Card IDChapter 3 INSTALLATION &COMMUNICATIONS12-1320 Chapter 9 HID CARD FUNCTIONRegistering HID CardDeleting HID Card21 Chapter 10 AUTO TESTWho Should Do The Auto Test?Run All Tests At OnceFLASH TestLCD TestVoice TestFP ReaderKey TestRTC TestChapter 4 USEREnrolling UserVerifying UserAdding User InformationDeleting UserAccess Level/Privilege14-16Chapter 5 SYSTEMGeneral SettingsUpdate FirmwareSystem InformationLog Information (Log Opt)Chapter 7 USBUnderstanding the Need for USB Flash DiskType of USBDownloading Attendance LogsDownloading User DataUploading User Data from USB to TerminalUploading Short Messages8-11InstallationCommunications TCMS V3 Online ActivationInstallation and Setup of TCMS V3Connecting Terminal to TCMS V3Using USB to Download/Upload DataCommunication KeyChapter 6 DATADeleting Transaction LogsDeleting All DataManaging User PrivilegesResetting to Factory SettingsViewing the User Guide in the InternetTerminal Included AccessoriesActivating TerminalRegistering Terminal22TROUBLESHOOTING
1 GETTING STARTEDViewing the User Guide in the InternetThe User Guide is available in the package when you purchased the terminal. The UserGuide is also available online at https://product.fingertec.com/userguide.phpChoose the language that you prefer for your User Guide.Terminal Included Accessoriessuppor t@finger tec.comw15-01-01THUDC 5V Power AdaptorFor supplying power to the terminal.A Packet of BoltsUse the screws to hold the back plate of theterminal against a wall.Siren CableFor connecting the terminal toexternal siren.RFID Cards (5 pieces)For card enrollment and verification.
Activating TerminalEvery FingerTec access control model comes bundled with a unique license key. Tostart using the terminal with TCMS V3, you must connect the terminal to TCMS V3and perform online activation. TCMS V3 reads the serial number of your terminal andsends it for verification at the FingerTec server via Internet.In case you do not have an Internet connection, you would need to do offline activation. Please send the serial number and models of your terminals to your local resellersor support@fingertec.com to request for a product key.Registering TerminalMake sure that you register your terminal’s warranty with us athttp://www.fingertec.com/ver2/english/e warranty.htmfor a 24 month warranty protection.
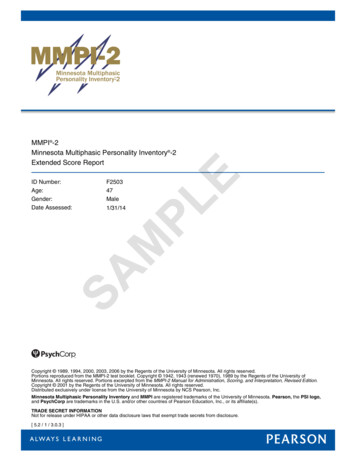
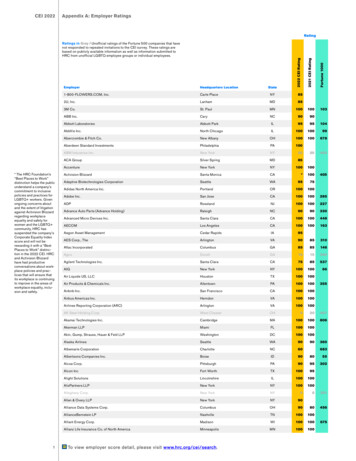
2 BASICSIntroduction to ProductsFingerTec is a renowned brand name for commercial products for door access and timeattendance systems. FingerTec offers a wide range of products to cater to the growingneeds for biometrics products in office/home automation as well as in security industry.FingerTec terminals are loaded with powerful microprocessor that can process biometrics authentication methods for accurate personal identifications and for collection ofprecise data for time attendance. In addition, some fingerprint terminals are made toaccept card verification as an added security measure.This manual covers time attendance models of FingerTec products from TimeLine100model. The terminal acts as a tool to collect attendance data. For a processing of attendance data, FingerTec is providing a powerful time management software, TCMS V3 toprocess data and provide accurate and reliable attendance reports.OverviewLCD ScreenL.E.D DisplaySpeakerRFID CardInduction AreaKeypadITEMFUNCTIONLCD ScreenDisplaying status of terminal, day, date and time.LED DisplayGreen LED – The terminal is working fine and it is in standby mode.Red LED – There is an error at the terminal that requires checking. Forfirst time use, the terminals need to be charged fully to avoid havingthe red light blinking.KeypadTo input instructions into the terminal and to allow configuration.RFID Card Induction Area Area that reads RFID cards.SpeakerFor terminal voice emission.Reset ButtonTo restart the terminal as and when required.
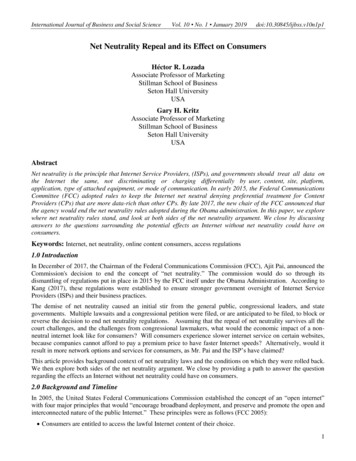
Keypad1234567890MENUESCYou can insert inputs into the terminals through the keypad. It contains numbers from 0-9, power on/off button,an OK button, an ESC/Cancel button, a Scroll up/downbutton, a doorbell button and a Menu button.OKBatteryFingerprint terminals operate using power supply from a standard power outlet.Mini UPS: Mini UPS 5V provides mobile power supply to the terminals.Charge the mini UPS sufficiently for optimum performance.Refer to http://accessory.fingertec.com for more information about accessories.Date/TimeThe terminals display the date and time at the home screen. Choose the date andtime format based on your preference. Press Menu Options Systems Options Date/Time set your time and save.To change the date format: Press Menu Options Systems Options Fmt Determine the date format based on your preference.Voice ControlVoice Control lets you control the level of volume emitted by the terminal.Turn On/OffThe system lets you turn on/off the voice based on your preference. Press Menu Options System Option Adv Option Voice Y/N.Adjust VolumeDefault volume of the terminal’s voice is 67. The volume can go as high as 100 andas low as 0. To sustain the performance of the speaker, it’s recommended to stay atrange 60-70. To adjust the volume Press Menu Options System Option Adv Option Adj VOL (%) adjust accordingly .Security FeaturesSecurity features help protect the information in the terminal from being accessed byunauthorized individuals.
Admin AffirmRegister an administrator to the system by enrolling, fingerprint or password to a userID. Press Menu User Manage Enroll Admin Choose enrollment method Performenrolment and Save. After enrolling an administrator, the main menu can only be accessed by the administrator.Cleaning TerminalCleaning The BodyUse a dry cloth to clean the terminal’s body. Do not use any liquids, household cleaners,aerosol spray, solvents, alcohol, ammonia and abrasive solutions to clean the body ofthe terminal because it could damage it.Restarting and Resetting TerminalIf a feature isn’t functioning as it should, try restarting or resetting the terminalsRestarting the terminalPush the On/Off button or “reset button” on the terminal to restart the terminal. If youcan’t restart the terminal, or if the problem persists, you might want to reset.Resetting the TerminalPress Menu Option System Option Adv Opt Rest terminal. Resetting of the terminal will cause all your settings to return to it’s original factory settings. Make sure thatyou have backed up all data before you proceed.
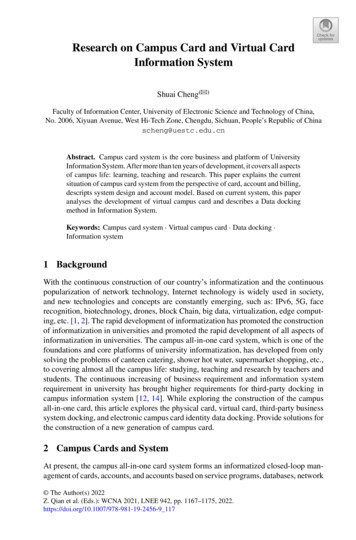
3 INSTALLATIONS & COMMUNICATIONInstallationsFingerTec terminals offer several connections for power and communications. Installations of FingerTec time attendance terminals are simple.Mount On Wall12457890ok3ESC6MENU4 feet / 1.2 meter(recommended)After measuring the height accordingly and make relevant marking on the wall,drill the screws into the wall to secure the back plate.Attach the terminal to the back plate and tighten the screws. Refer to Appendix Ifor dimensions and measurements of installation.
Wiring for Power SupplyConnection points for power and communication are available on top of the terminals.Refer to the following diagrams for the terminals you require.USB PORTTCP/IP PORTPOWER PORTSERIAL PORTUSB PortLinking with USB flash disk for remote data transfer.18TCP/IP PortConnect with CAT 5 cable for LAN connection, one end to this portand another end to the computer’s TCP/IP Port.TOPTCP/IP for Single Connection – Linking the terminal to a single computerusing TCP/IP requires Ethernet 10/100Base-T Crossover Cable. The cable can beused to cascade hubs or to connect Ethernet stations back-to-back without ahub. It works with both 10Base-T and 100Base-TX.FRONT18TCP/IP for Network Connection – Linkingthe terminals to multiple computers using TCP/IPrequires Ethernet 10/100Base-T Straight Thru Cable or “whips”. The cable works with both 10BaseT and 100Base-TX, connecting a network interfacecard to a hub or network outlet.CONNECTOR PINTX TXRX RX-12345678 JOINT 1 PIN JOINT 2 PINTX TXRX RX- 3 6 3 6 1 212CABLE eenWhite/BrownBrownRX RXTX TX-CONNECTOR 12345678TX TXRX RX-Power Supply PortInsert the Power Adapter point to this port for power.
RS232/RS485/Wiegand Connection PortRS232 – Connection to a computer using RS232 cable.RS485 Single Connection - Connection to a single computer using RS485 wire.RS485 Network Connection - Connection to multiple computers using Daisy Chain connection.Wiegand Output – Connecting with third party connector or terminal(s).TCMS V3 Online ActivationTCMS V3 is a genuine software by FingerTec. Every FingerTec time attendance model comes bundled with a unique license key. To start using the terminal with TCMSV3, you must connect the terminal to TCMS V3 and perform an online activation.TCMS V3 reads the serial number of your terminal and sends it for verification at theFingerTec server via the Internet.In case you do not have an Internet connection, you need to do offline activation.Please send the serial number and model of your terminal to your local reseller orsupport@fingertec.com to request for a product key.tInstallation and Setup of TCMS V3Install TCMS V3 in a PC that fulfils the software’s minimum requirements. Refer ales/SUM-TCMSV3-E.pdf forthe TCMS V3 user guide online. Setup Wizard will require you to do online activationbefore any connection is established between TCMS V3 and the terminal(s).Connecting the Terminals to TCMS V3Determining Terminal NumberIdentify the number of your terminals to differentiate them between one another.TCMS V3 can connect up to 999 units of terminal. Press Menu Options CommOpt Dev Num Select the number.Using TCP/IPIP address is important, as it is a unique address of the terminal in LAN. Without theIP address, locating the specific terminal is not possible. To input the IP address ofthe terminal: Press Menu Options Comm Opt IP Addr Key in IP address.Setting Up EthernetIt is important to setup the Ethernet to connect the terminals using TCP/IP connection. Setting up the Ethernet is done by enabling the Ethernet function:Press Menu Options Comm Opt Ethernet Yes.Turn off the terminal after you have set the Ethernet setting to Yes. Now, plug-in thenetwork plug to the Ethernet interface and turn the power on.Determining the Netmask, Gateway and NetSpeed: For TCP/IP connection,10
please configure the netmask, gateway and netspeed for the terminal.Press Menu Options Comm Opt NetMask Insert the numbers.Press Menu Options Comm Opt Gateway Insert the numbers.Press Menu Options Comm Opt NetSpeed Choose the speed of your Ethernetconnection.Using RS232 ConnectionFor connection via RS232,baudrate is the determinant of communication speed between the terminal and the software. The higher the baudrate, the faster the speed is.To turn on RS232 connection and set the baudrate: Press Menu Options Comm Opt RS232 Change the RS232 connection to Y.To change baudrate: Press Menu Options Comm Opt Baudrate Change theBaudrate accordingly.Using RS485 ConnectionFor connection via RS485, baudrate is also the determinant of communication speedbetween the terminal and the software but the speed must be according to the speedof theconverter. Check your converter for the speed.To turn on RS485 connection and set the baudrate: Press Menu Options Comm Opt RS232 Change the RS485 connection to Y.To change baudrate: Press Menu Options Comm Opt Baudrate Change theBaudrate accordingly.Using USB to Download/Upload DataA USB flash disk is useful in cases where the terminal is installed far from a PC or thereis a connection problem. To determine the type of USB flash disks compatible with theterminal, please refer to this link at http://www.fingertec.com/newsletter/HL 74.html using USB Press Menu PenDrive Mgmt Choose the operation that you want to carryout via USB flash disk.Communication KeySince the software is controlled by a product key, set the COMM key to zero. PressMenu Options Comm Opt COMM Key Set to 0.11
4 USEREnrolling UserThe terminals can enroll fingerprint templates, passwords and card information. Thischapter covers all possible user enrollments in the terminals.Caution: Enrollment of supervisor or administrator is important to making sure of theterminals data safety. Prior to enrolling new user, supervisor has to be enrolled first byusing any of methods mentioned below. Select Enroll Admin Choose the PrivilegeLevel either Supervisor or Administrator to proceed.Card EnrollmentThe default card for the terminal with card reading feature is the RFID card. MiFare andHID card systems are available upon request.Enrolling card: Press Menu User Manage Enroll User Reg RFID New Enroll? OK Key in User ID (PIN) Wave the card at the scanning area until the screen displaysthe Card ID (OK) SavePassword EnrollmentThe terminals offer password verification and maximum length of password is 5 digit.Enrolling password: Press Menu User Manage Enroll User Enroll Pwd New Enroll? OK Key in User ID (PIN) OK Input your password LCD showing the ID withminus -P to indicate that the user ID is using password OK (Save)Changing password: Press Menu User Manage Enroll User Enroll Pwd ESC Input User ID OK Change your password LCD showing the ID with minus -P toindicate that the user ID is using password OK (Save)Verifying UserVoice Message12VOICE / MESSAGEWHAT DOES IT MEAN?“Verified”Identity verification is successful, the terminal stores the transactionlogs and opens the door (if connected to door access)“Try again please”Identity verification is failed because card is not available in the terminal or the password is incorrect.“Admin Affirm”You are not an administrator of the system and you cannot accessMenu page“Invalid ID”For 1:1 verification, User ID entered does not match with fingerprint.
Password VerificationPassword can be an option for those who do not prefer to use other verification methods. Toverify using password, insert User ID OK insert password and press OK.Card VerificationPlace the card on the card scanning area and the terminal will read and verify the card.Adding User InformationUser information can be added into FingerTec terminals through the TCMS V3 software.After the information is updated, sync TCMS V3 and the terminal to display the information.Deleting UserOnly an administrator can perform user deletion at the terminal. To delete certainuser(s), press Menu User Manage Delete Input User ID The terminal will tell youthe verification method enrolled by the user ID OK Prompting you to Delete User Press OK Confirmation is required OK as Yes and Esc as NoAccess Level/PrivilegeThe terminal offers various types of access level or privilege.PRIVILEGEUSER ROLESNormal UserOnly use the terminal to verify your identity. You cannot access into the Menuand make changes on settings and systemEnrollerYou are allowed to access into the menu to enroll user only.AdministratorYou are allowed to access into the menu to enroll users only and edit simple setings and system excluding access options and advanced optionsSupervisorYou are allowed to access into the menu to enroll users and edit settings andsystem13
5 SYSTEMGeneral SettingsAdjusting Date/TimeThe function of the terminal is to record time attendance and door access activities ofemployees. Precision in time and date cannot be compromised for the system to workefficiently. Adjust Date/Time according to your time zone. Press Menu Options System Opt Date/Time Select Value OKDate FormatDate format differs based on countries for example in Malaysia the format used is, datemonth-year whereas in America, month comes first. Choose your date format according to your preference. The default format is dd-mm-yy. Press Menu Options SystemOpt Fmt Select Format OKSystem LanguageThe terminals offers various languages to match your local requirements. Maximumof 3 language packs available in one terminal at a time and it’s set according to yourrequest during purchase. Default language is English. Press Menu Options SystemOpt Language Choose your language OKVoiceThe terminal has certain voice commands to guide users during enrolment and to notify users during the identity verification process. Press Menu Options System Opt Adv Option Voice Y/NVolume (%)Voice Control lets you control the level of volume emitted by the terminal.Adjust Volume: Default volume of the terminal’s voice is 65. The volume can go as highas 100 and as low as 0. To sustain the performance of speaker in the terminal it’s recommended to stay at range 60-70. To adjust the volume Press Menu Options SystemOpt Adv Option Adj VOL (%) Set your number OK.User Interface StyleThe terminals offer different user interface style. Select your style based on your preference. Press Menu Options UI Style Select your style OKUpdate FirmwareFingerTec offers update of the terminal regularly through software in a PC. Please always consult your local reseller before you update firmware of the terminal or alternatively you can contact us at support@fingertec.com. Save the latest firmware in aUSB flash disk before attempting this operation. Press Menu Options System Opt Adv Option Upd Firmware OK Plug Pen Drive? Insert the USB Flash Disk intothe slot OK14
System InformationThe terminals keep information of the system and this information is available for viewing by administrators.Number of Users in the Terminal (User Count)Every model of the terminal has different user capacity depending on the number oftemplates a user has in a terminal. For example, if a terminal could contain 3000 fingerprint templates and a user is entitled to 2 templates enrolment, the total user of thesystem would be 1500. To find out how many users are enrolled in a terminal: PressMenu Sys Info User Cnt View the numberQuantity of Fingerprint Templates Stored in the Terminal(FP Count) (This feature is NOT available in TimeLine 100 model.)The terminals contain fingerprint templates and the capacity differs from one model toanother. To find out the number of fingerprint count in the terminal: Press Menu Sys Info FP Cnt View the numberQuantity of Attendance Logs Saved In the Terminal(Att Log)Once verification is completed, an attendance log will be stored in the terminal asrecord. A terminal can contain up to 120,000 logs depending on the models. PressMenu Sys Info AttLogs Cnt View the numberNumber of Administrators Registered in the Terminal(Admin Count)A company can enroll several administrators to manage the system. This function enable the company to check the number of administrator present for a particular terminal. Press Menu Sys Info Admin Cnt View the numberNumber of Password Users Available in the Terminal(Password User)Users can do verification using PIN password and a combination of fingerprint andpassword. To find out how many users are using password: Press Menu Sys Info Password User View the numberNumber of Time Scanners Have Been Used for Verification(S Logs)S logs stands for scanner logs, which means the number of times the scanner has beenused for verification, regardless of whether it is successful or not. To view the scannerlogs: Press Menu Sys Info S Logs View the number of S LogsFree Space Information (Free Space)Find out the information about availability of space in your terminal through this function. Press Menu Sys Info Free Space View the info Information available includesfingerprint count, att log and S logs.Device Information (Dev Info)Find out the information about your terminal through this function. Press Menu SysInfo Dev Info View the info15
Information available includes:AttLog (10k): Showing the number of attendance logs that can be stored in the terminal, for example for AttLog (10k) 12 means 10,000 x 12 120,000S Logs: Showing the number of Scanner Logs available for the terminal.Manufactured Time (Manu Time): The date and time when the terminal was producedis displayed when you press Manu TimeSerial Number of the Terminal (Serial Num): The serial number of the terminal is important to activate the software and to liaise with FingerTec Worldwide in support issues. The Serial number is pasted on the back of the terminal but in case the sticker isdamaged, this is where you can retrieve the serial number.Manufacturer: Get the name of the manufacturer of the terminal here.Device Name: All models have different names. If you don’t know the name of theterminal that you are having, get it here.Algorithm Version: FingerTec Worldwide has already released a few algorithm versions into the market since the year 2000. New algorithm version comes with someimprovements. This is where you can find terminal’s algorithm version.Firmware Version: Support sometimes require firmware version to resolve some support issues. The version and date of the version is released is provided here. For example: Ver 6.20 Aug 19 2009View MAC: This feature is a security feature of the products. Linking Software to the terminal requiring the correct MAC address. Without availability of MAC address, softwarewill not be activated correctly. All products are supplied with the correct MAC addressto ease communication. This is also to hinder people from using software with a different hardware brand. An example of a MAC address is 00:0A:5D F1 BE 57. Menu SysInfo Dev Info View MACMCU Version: An MCU is the Main Controller Unit for the terminals. Version of the MCUdetermines the features and functions the terminal carries. To check the MCU Version:Menu Sys Info Dev Info MCU VersionLog Information (Log Opt)A terminal can only retain certain amount of information before the terminal becomesfull and stops accepting any more data . To maintain the performance of a terminal, youcan set an alarm to alert you when the data reaches a certain warning level.Alarm SuperLogTo instruct terminal to alert user if the transaction storage for administrator login is lessthan as configured. Default value is 99.Alarm AttLogTo instruct terminal to alert user if the transaction storage is less than as configured.Default value is 99Recheck MinTo instruct terminal to update clocking times of all users in a time interval. Default is 10mins.16
6 DATAEvery time an enrollment is performed or a verification is done, a transaction log is created andstored inside the terminal. The data contains created terminal ID, date, time, userID and transaction activity. For example, nal ID01Date (ddmmyy)050210Time (hhmm)0900User ID000000001These logs need to be managed to maintain theeffectiveness of the terminal. It is recommendedto do the housekeeping of data from the software but there are 5 functions available in Dataicon to enable you to manage data in the terminalsTransaction Code00Terminal Activity00Deleting Transaction LogsDelete Attendance Logs: The fingerprint terminal stores every transaction logs of itsuser. Once a user is enrolled and verified, the logs will be kept in the terminal. Sometimeshousekeeping needs to be done to sustain the terminal’s performance. Please be certainbefore performing this operation because once the OK button is pressed, all attendancelogs will be lost. Press Menu Options System Opt Adv Option Del Attlogs OK Delete? OKDeleting All DataClear All Data: The fingerprint terminal contains all user data including User ID, verification methods, fingerprint templates, logs, etc. This operation allows deletion of all datain the terminal. Please be certain before performing this operation because once the OKbutton is pressed, all data will be lost. Press Menu Options System Opt Adv Option Clear All Data OK Delete? OKManaging User PrivilegesClear Admin Privilege: To access system menu, it is recommended to enroll administrator to the system. Once administrator is enrolled, every time someone presses the Menubutton, Admin Affirm message will be displayed. Clear Admin Privilege operation allowsthe current administrator to clear all his/her data to make way for the new administrator’s data. Once the operation is completed, system menu is accessible by all users. PressMenu Options System Opt Adv Option Clr Admin Pri OK Continue? OKResetting to Factory SettingsReset Option: This feature is to restore all settings in the terminal to return to the originalfactory settings. You have to be certain before conducting this operation because oncethe OK button is pressed the terminal will be reset automatically. Press Menu Options System Opt Adv Option Reset Opts OK. Please redo all the settings to suit to yourcompany’s requirements. Press Menu Data icon Restore to Factory Settings Confirmation is required (Yes/No)17
7 USBUnderstanding the Need for USB Flash DiskCommunication between the terminal and a PC is very important to upload and download transaction data for time attendance and door access reports. The terminal offersa few communication options such as LAN and serial cable connections but sometimesthere are scenarios that require USB (Universal Serial Bus) connectivity. USB can connect to the terminal with a computer for download and upload of user information andtransaction logs. In the terminal, the USB Flash Disk function is known as Pen Drive Management.Type of USBThere are various types of USB available in the market. The terminal can only work withUSB flash disks that support minimum Linux Kernel 2.4.x, working fine with Imation,Transcend and Pen Drive (minimum support Linux Kernel 2.4.x) To determine the typeof USB compatible by FingerTec terminal, please refer to this link http://www.fingertec.com/newsletter/HL 74.htmlDownloading Attendance LogsTo download attendance logs from the terminal to the computer: Press Menu PenDrive Mng DwnLoad AttLog The terminal would require you to plug in the USB FlashDisk to proceed. After download process is complete, eject USB Flask Disk from the terminal and connect it to your PC that has been installed with the software. Upload thedata from the USB into software for further processing.Downloading User DataEnrollment of user must be done at the terminal. During enrollment, user data such asname and user ID are entered. To sync the data between the terminal and computer:Press Menu PenDrive Mng DwnLoad User The terminal would require you to plugin the USB Flash Disk to proceed.Uploading User Data from USB to TerminalWhile administrator can input user data from the terminal, the rest of the users information is completed in the software. Get the latest updates of user information from thesoftware to the terminal by using a USB Flash Disk. Press Menu PenDrive Mng UpLoad User The terminal would require you to plug in the USB Flash Disk to proceed.Uploading Short MessagesSome the terminals can display a short messaging system on the LCD. The SMS can beprivate or public. To assign sms to an individual or all staff using USB: Press Menu PenDrive Mng Upload SMS Insert the USB Flash Disk to proceed18
8 RFID CARD FUNCTIONThe fingerprint terminals are versatile and it can accept card verifications. This chapter covers the Radio Frequency Identification or better known as RFID system. Theterminals accept RFID card with specifications of 64-bit, 125kHz.Enrollment of RFID CardRFID can be enrolled alone, with fingerprint or with password. Each RFID card comeswith a unique ID and the terminals will read from the numbers and match it with thecard.Enrollment of RFID is easy. Press Menu User Manage Enroll User/Admin RegRFID OK Do you want to do new enrollment? OK Insert the user ID OK Wave the card to the induction area and the machine will display the card number onthe LCD along with the User ID OK The terminal will display User ID-C meaningthat the ID is enrolled with card OK(Save)Deleting RFID CardRFID card can be used again and again but the information in the card must be deleted first before inserting new information.Press Menu User Manage Delete Input the User ID and wave the card at theinduction area The LCD will ask whether you want to delete the User ID-C Theterminal will ask whether you want to delete User ID And to delete user. Press OKto all.Once the card has been emptied, it can be used again.Changing Card IDPress Menu User Manage Enroll User/Admin Reg RFID ESC Change Card ID Key in Original ID OK Wave new card OK (Save)19
9 HID CARD FUNCTIONThe terminals accept HID card with specifications of 1325, 26-bit, 125kHz. The Prox IIcards support 26-bit and it comes with unique programming information into its contents, which include card reading bits, card number range, facility code, site code, etc.HID cards also applies encryption to the contents o the card to maintain high level ofsecurity and to eliminate duplications.Registering HID CardRegistration of HID card is similar to registration of normal RFID cards. Press Menu User Manage Enroll User/Admin Reg RFID Do you want to do new enrollment? Insert user ID Wave the card to the induction area and the machine will display thecard number along with the user ID on the LCD The terminal will display UserID-Cindicating that the user ID has been enrolled with card OK(Save)Del
This manual covers time attendance models of FingerTec products from TimeLine100 model. The terminal acts as a tool to collect attendance data. For a processing of attend-ance data, FingerTec is providing a powerful time management software, TCMS V3 to process data and provide accurate and reliable attendance reports. Overview ITEM FUNCTION