Transcription
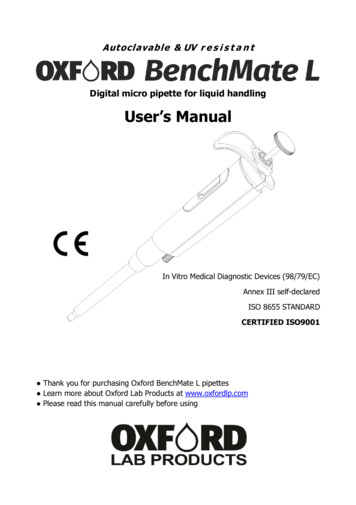
Autoclavabl e & UV r e s i s t a n tDigital micro pipette for liquid handlingUser’s ManualIn Vitro Medical Diagnostic Devices (98/79/EC)Annex III self-declaredISO 8655 STANDARDCERTIFIED ISO9001 Thank you for purchasing Oxford BenchMate L pipettes Learn more about Oxford Lab Products at www.oxfordlp.com Please read this manual carefully before using
Autoclavabl e & UV r e s i s t a n tDigital micro pipette for liquid handlingFeatures Oxford BenchMate L is fully autoclavable at the condition of 121 C for 20 minutes. Oxford BenchMate L is made of UV resistant material which can be used in a clean roomenvironment.(If UV is applied to the Oxford BenchMate L Pipettes for a considerably long time, it maybecome discolored but it will not impact performance.) A new round shape improves friendly handling capability, and mitigates the operator’s fatiguefrom long time use. Sample volume can easily be set by simply rotating the push button. Setting of sample volume can easily be locked with one touch (one-touch lock mechanism). A wide range of sampling volume can be covered by six models from 0.1uL to 1000uL. A patented body construction avoids permeating hand temperature through the body thatprevents inaccuracy of volume measurement. Since PTFE (Fluoroplastic) is used in an airtight chamber, this combination keeps airtight andprecise reproducibility for long hours. A thin nozzle corn can be easily inserted and can reached the bottom of many tubes fordispensing/aspiration. (110mm in depth, 2uL – 1000uL) Tips can be removed without touching them by using the tip ejector. The Easy-Calibration function provides smooth and easy adjustment with an attached adjustment tool.Standard Accessories Three TipsGreaseAn Adjustment ToolUser’s ManualWarranty CardWhen unpacking the box, check to make sure that the above-mentioned items are included.Precautions on Safety Please read the “CAUTION” section on the next page before starting to use Oxford BenchMateL pipettes Contents of “CAUTION” will provide you with information on how to properly handle pipettesto prevent accidents and physical damage. After reading this manual, please keep it in a convenient place nearby for reference.-1-
Please read the following prior to use for your safety and correct usage.CAUTIONBe sure to observe the following instructions for using OxfordBenchMate Pipettes properly and safely.If user misuses “Oxford BenchMate L Pipettes”, or disregards the following instructions, it mayresult in injury to the user or/and other persons or physical damage to the pipette or/and otherequipment.1. Do not use this pipette for any purpose except pipetting/dispensing liquid.2. Do not modify the pipette, because modification may cause an accident.3. Do not use the pipette for pipetting any liquid to be injected into human body.4. Do not expel dispensed liquid towards anybody.5. Do not eject tip towards anybody.6. Do not eject tip with liquid inside.7. Carefully handle the pipette and tip because the tip is sharply pointed.8. If the pipette is contaminated with liquids harmful to a human, immediately takeappropriate disposal steps to clean it safely before continuing to work.9. Do not use the pipette for stirring liquid and so on, otherwise not only may the tip beloose and fall off but the pipette may be soiled with scattered liquid.10. Do not touch filters which may be contaminated by harmful substances.11. Be careful when removing Nozzle filters from the 5000ul and 10000ul pipettes as theNozzle filter remover is sharp.12. Do not touch autoclaved pipette directly right after drying. Touching hot pipettes directlyafter drying may cause injury.13. Components of water used for autoclave may cause pipette malfunction or performance.14. If the pipette cannot be fixed after examining immediately stop using the pipette and askus or our agent to repair it.15. For organic solvents, dense and volatile liquids, contact us for the best liquid handlingsolutions.16. Although this pipette has good chemical-resistance in general, it may be damaged bycertain corrosive chemicals. Please contact us when using strong corrosive chemicals.17. The pipette can be used between 4 C and 40 C, but the specifications may vary.18. Depending on frequency of use, the pipette should be cleaned in a soap solution andairtight chamber should be maintained according to this manual.-2-
NoteUsers are required to strictly observe the following in order for thepipette to keep its excellent precision, reproducibility and originalperformance.1. Do not expose the pipette directly to the sun 2 hours before starting work, otherwise thepipette may lose accuracy. Avoid working with pipettes in a humid and hot place.2. Before starting to work with the pipette, avoid touching the tip and nozzle cylinder. If thenozzle cylinder is impacted by your hand, accuracy may vary.3. For pipetting, follow the forward method (the way it is explained in this manual). If it isperformed in a different way, it may result in inaccurate pipetting.4. Operate the push button very gently. If it is quickly released, it may result in inaccuratepipetting and the liquid aerosols may travel into the pipette’s body. To prevent the pipettefrom malfunction, inaccuracy and contamination, a filter is attached to models OB2-1000,-5000, and -10000. (A filter is supplied at time of purchase.) We also recommend usingfilter tips when performing any sensitive work and/or to avoid contamination. Contact usfor the recommended tips for Oxford Pipettes.5. Do not reuse tips that have been used once. Carefully dispose used tips. If a tip is usedrepeatedly, it may cause inaccurate and impure pipetting and cross contamination (*)among samples.* For example, if previous sample liquid is left inside the tip and it is mixed with a new sampleliquid, the new sample is contaminated by the previous sample. Therefore, pipetting of thenext sample may produce inaccurate results.6. Do not hold the pipette horizontally or upside down when there is liquid inside the tip,otherwise the liquid will get into the main body and the pipette may be contaminated.7. When autoclaving, do not pile pipettes on top of each other in the autoclave or lean pipetteswith a nozzle top facing down. This pipette is made out of an autoclave compatible material,but because of the high temperature in the sterilizer, there is a risk that parts subject toload could be deformed.8. After autoclaving and drying the pipette, leave it until it is completely cooled before usingit again. If the pipette is used when warm, you will experience inaccuracy and imprecision.9. After autoclaving and drying the pipette, assemble the pipette after it is completely cooled,if it is assembled when it is still hot, it may cause deterioration in the pipette such asbreakage of the screw threads.10. When rotating the push button, do not exceed the specified sample volume limit,otherwise the pipette may be damaged.11. Do not perform pipetting with less liquid than set volume. If the quantity of liquid is lessthan the set volume, it may cause the liquid to scatter into the main body and the pipettemay deteriorate in quality.-3-
ContentsOperating Procedure ····· 5Disassembling/Reassembling the Airtight Chamber ·················· 9Autoclaving/Drying the Pipette ·················· 16Specification ··············· 17Volume Setting Procedure ························ 18Troubleshooting ··········· 20Parts List ···················· 21-4-
Operating Procedure1.Volume Setting1) Turn the lock lever to unlocking direction to loosen it (Fig. A)2) Turn the push button to set the digital counter to a desired liquid volume. To increasevolume setting, turn the push button until passing designated volume setting by half ofthe scale, and then set the designated volume. To decrease volume setting, simply turn todesignated volume. When setting the liquid volume, set the counter’s graduation at pointmark (red) appearing in the lower part of counter window. (Fig. B)3) After setting the liquid volume, turn the lock handle toward the locking direction to lock it.(Fig. A)Note: Do not exceed the specified liquid volume limit, otherwise pipette may bedamaged.DecreasePush buttonIncreaseLock leverEjector buttonFig. AVolume indicatorNLT-2NLT-10NLT-20NLT-100NLT-200 NLT-1000Point mark2μL(0. 002)10μL(0. 01)20μL(0. 02)100μL(0. 1)Fig. B-5-200μL 1000μL Minimum scale:uL(0. 2)(1)
2. Aspirating Liquid1) Attach a new tip to the nozzle end. (We recommend that you attach it from the tip rack)Note: It is recommended that tips are directly mounted onto the pipette from thetip rack. Do not twist the pipette when mounting tips. Twisting the pipettemay damage the tip cone and the internal components of the pipette.2) Press push button down to first stop position “b”. (Fig. C)* Don’t aspirate the liquid with the push button pressed at the second stop “c”.3) Hold the pipette vertically and immerse the tip 2mm to 3mm below the surface of theliquid. (Fig. D-①)4) Release the push button slowly and smoothly to aspirate the set volume of the liquid. (Fig.D-②)5) Wait 1 to 2 seconds, then withdraw the pipette vertically and carefully from the surface ofthe liquid. (Fig. D-②)6) Wipe any droplets away from the outside of the tip using a medical wipe and avoid touchingthe tip’s orifice.Note: Do not aspirate when the push button position is at “c”.Note: The push button has to be pushed and released slowly. Otherwise it may causeinaccuracy.①②③④abcEjector buttonFig. C-6-
3. Dispensing Liquid1) Gently place the end of the tip against the inside wall of the recipient vessel just abovethe liquid surface 10 degrees to 45 degrees in angle.2) Press the push button down slowly and smoothly to the first stop “b”. Wait for a fewseconds, then press the push button down to the second stop to expel the last drop of theliquid from the tip. (Fig. D-④, ⑤)3) Release the push button slowly.4) Press the ejector button to remove the tip and dispose of it. (Fig. D-⑥)When using any toxic or harmful liquid to humans, do not touch any used tips.CAUTION①②③abcFig. D-7-④⑤⑥
4. Recommendations for Accurate PipettingIn addition to the above mentioned operations of pipetting, the following procedure maximizesperformance of the pipette.1) Make sure that the tip is firmly attached to the nozzle end.2) Before pipetting, pre-rinse the tip by filling and expelling the liquid from the tip three tofive times. This will increase precision especially when pipetting viscous or vaporous liquids.abcFig. E3) When pipetting volumes under 50ul, the operation should be done very slowly andsmoothly. The air humidity should be as high as possible to reduce the effect of evaporationloss.4) When aspirating high density liquids and viscous solutions, once the liquid has entered thetip, wait 2 to 3 seconds before removing the tip from the surface of the liquid. Whendispensing, wait 2 to 3 seconds at the first stop position before pushing to the second stopposition.-8-
Disassembling/Reassembling the Airtight ChamberIf such symptoms as mentioned in “Troubleshooting” (page 20) occur, disassemble and inspectpipette according to the following procedures.1. Disassembling① Remove an ejector setting screw. Fig. F-(1-1)Turn the ejector setting screw towards the direction of the arrow to remove it, and then pullthe ejector pipe out toward the direction of arrow.(1-1)⑧Ejector setting screw⑦Ejector pipe(1-2)Fig. F⑤Nozzle cylinder② Turn the nozzle cylinder counterclockwise to remove it, as it is screwed into the main body.Fig. F-(1-2)Note: When removing the nozzle cylinder, pay attention to the internal parts assome of them occasionally spring out of the body (for types of 2ul to 1000ulvolume).③Remove internal parts one after another. Fig.H1, H2, H3, H4- 2, 10uL: Fig H1Remove the plunger set, 1st spring, O-ring retainer. The O-ring and seal ring are fixed to thenozzle cylinder and cannot be removed.- 20uL: Fig H2Remove the plunger set, 1st spring, 1st spring holder, seal spring, O-ring retainer from thenozzle cylinder. The O-ring and seal ring are fixed to the nozzle cylinder and cannot beremoved.- 100uL, 200uL: Fig H3, 1000uL: Fig H4Remove the plunger set, 1st spring, 1st spring holder, seal spring, O-ring retainer and O-ringfrom the nozzle cylinder.Note: Shapes of the O-ring retainer are different by size of pipette.Note: Pay attention to small parts as you do not want to lose them duringdisassembly process.-9-
2. Reassembling① Apply grease on plunger set and O-ring if necessary. Refer to Sec. 3 “Grease Up”.② Reassemble nozzle cylinder.- 2, 10uL: Fig H1Firstly, set 1st spring on plunger set, next set O-ring retainer, seal ring and O-ring in this order.Then, insert assembled plunger into the nozzle cylinder and screw it into the body. The Oring and seal ring are fixed to the nozzle cylinder for 2uL and 10uL model.20uL: Fig H2Firstly, set the 1st spring on plunger set, next set 1st spring holder, seal spring, O-ring retainer,seal ring and O-ring in this order. Then insert the assembled plunger into nozzle cylinder andscrew it into the body. The O-ring and seal ring are fixed to the nozzle cylinder for 20uL model.Note: When reassembling, be careful not to put the seal ring and O-ring in the wrongorder. If the order is wrong, it may cause not only leakage but also inaccuracy,failure in extracting liquid, etc.100, 200uL: Fig. H3, 1000uL: Fig. H4First, set the 1st spring on plunge set, next 1st spring holder, seal spring, O-ring retainer, andO-ring in this order. Insert assembled plunger into the nozzle cylinder and screw it into thebody.Note: When screwing into the body, make sure that the nozzle cylinder and the bodyare in vertical direction, and screw the nozzle cylinder into the body verygently. If not, it may cause leakage.③ Fit the ejector pipe to the body.- 2, 10, 20uL: Fig H1, 100, 200uL: Fig. H3, 1000uL: Fig. H4While pressing the ejector button down with your finger so that the metal stay sticks out fromjust under the grip, insert the ejector pipe into the body and fix it with the ejector settingscrew. When ejection needs extra strength, snugly adjust position of the ejector pipe.Note: After reassembling, repeat trial operation several times and inspect that thereis nothing wrong with the pipette.- 10 -
3. Grease up① Remove the old grease from the plunger set and the O-ring.For 2uL, 10uL and 20uL model, the O-ring is fixed in the nozzle cylinder and greaseis to be applied only on the plunger set.② Apply grease on the area of approximately 40mm from the top of the plunger setwhich is indicated in gray in the fig. GNote: Please make sure to use designated grease for Oxford BenchMate L.Warranty for the product may not be applied if the different grease is used.③ Apply a little amount of grease on the O-ring for 100uL, 200uL and 1000uL model.Note:It differs upon usage however; it is recommended to grease these parts atleast every 6 ��】- 11 -
O-ringretainerBodySeal nger set⑧Ejector setting screw②1st spring⑦Ejector pipeFig. H1- 12 -
O-ringretainerBodySeal ringO-ring⑥ 1st spring③1st springholder⑧Ejector setting screw④seal spring⑦Ejector pipe- 13 -
OBL-100/OBL-200O-ringretainer⑥O-ring setBodyO-ring⑤Nozzle cylinder①Plunger set②1st spring③1st springholder⑧Ejector setting screw④seal spring⑦Ejector pipeFig. H3- 14 -
OBL-1000Body⑤Nozzle cylinder①Plunger set②1st spring⑧ Ejector settingscrew③1st springholder④seal spring⑥O-ring set⑦Ejector pipeO-ringretainerO-ringFig. H4- 15 -
AutoclavingThis pipette is autoclavable. When autoclaving, set the autoclave at 121 C for 20 minutesfollowing the procedure mentioned below.① Release the lock lever from the locked position and set the counter graduation to theallowable limit of the liquid volume.② After autoclaving is complete, dry the pipette completely.Note: When autoclaving, do not pile pipettes on top of each other in the autoclaveor lean pipettes with a nozzle top facing down. This pipette is made out of anautoclave compatible material, but because of the high temperature in thesterilizer, there is a risk that parts subject to load could be deformed.Drying the PipetteDry the pipette immediately after autoclaving is complete. It is necessary to dry the pipette witha constant temperature air-drier at 60 C for 60 minutes or longer.①②③④Pull out the ejector pipe, referring to “Disassembling” on page 9.Turn the nozzle cylinder counterclockwise by two and a half turns to loosen it.Put the pipette in a constant temperatures air-drier for drying.After the pipette is dry, wait until it returns room temperature and then fasten the nozzlecylinder and reassemble the ejector pipe into the body.Note: If the pipette is reassembled when it is still warm, it may cause breakdown ordeterioration of the pipette such as breakage of the screw threads, etc. Be sureto reassemble the pipette after it has completely cooled down.If the pipette is used when it is warm, accurate liquid handling cannot be carriedout.CAUTION: Don’t touch the pipette directly right after drying, because it will be veryhot. Touching the hot pipette directly may cause injury. Components of waterused for autoclave may cause pipette malfunction or performance.- 16 -
SpecificationsOxford BenchMate is a high quality pipette. The technical figures given in the Table-1 “OxfordBenchMate Maximum Permissible Errors” were obtained using genuine Oxford tips.Oxford Lab Products declares that Oxford pipettes comply with the requirement of the ISO 8655Standard, by type testing. The adjustment is carried out under strictly defined and monitoredconditions (ISO 8655-6): The basis of adjustment, OB Reference temperature, 20 C-25 C Relative humidity, more than 50% Barometric pressure, 101KPa, Use of distilled water, distilled water Ten measurements for each test volume at three points, nominal volume, 50% ofnominal volume and the minimum or 10% of nominal volume.Table-1: Oxford BenchMate L Maximum Permissible ErrorsPipette types(Code)Volume rangeVolume(uL)Accuracy(systematicerror) AC (%)Precision(random error)CV (%) 12.0* 6.0*0.2 5.0 2.51 3.0 1.02 4.0 3.010.5-10 1.0 1.0OBL-105(uL) 1.0 0.510 5.0 3.022-20 1.0 1.0OBL-2010(uL) 1.0 0.420 2.0 1.01010-100 1.0 0.3OBL-10050(uL) 0.8 0.3100 1.0 0.52020-200 0.8 0.3OBL-200100(uL) 0.8 0.2200 1.0 0.5100100-1000 0.8 0.3OBL-1000500(uL) 0.7 0.21000*Obtained values for accuracy and precision may vary by familiarity of user especially less than0.2uL with OBL-2OBL-20.1-2(uL)* The data given in the table conform to the ISO 8655-6 standard.- 17 -
Volume Setting Procedure* For good volume setting (calibration), volume adjustment should be conducted minimumvolume setting first and then followed by maximum volume setting for each size of pipettes.Loosen the lock lever freely.Insert the adjustment tool’s tabs into the two grooves on the adjustment head. (Fig. L①)Hold the unit in one hand and secure the adjustment tool not to turn. (Fig. L②)Rotate the push button clockwise for dispensing volume increase (the counter displayturns to lower), and counter-clockwise for dispensing volume decrease (the counter displayturns to raise).⑤ Please refer to the “Table-Calibration Guideline” below for approximate rotating scale onthe display.Note: Be sure the lock lever is loosened before adjusting.Note: Rotating directions for volume adjustment are as follows,Dispensing volume increase (counter display turns to lower): clockwiseDispensing volume decrease (counter display turns to raise): counter-clockwise①②③④⑨Adjustment toolClockwise:dispensing volume increaseCounter-clockwise:dispensing volume decrease⑨Adjustment toolFig. LTable-2 Calibration Guideline(Unit: uL)1 scale mark2 scale marks5 scale marks10 scale 791.583.967.91The numerical values (volume) above are for reference only. For actual measurement, pleaseuse a balance which is properly calibrated.- 18 -
Volume MeasurementProcedure① In order to avoid influence from temperature, prepare pipettes for inspection, distilledwater, balances and tips 2 to 3 hours before using where measurement is conducted.* Measurement room should be controlled temperature between 20-25 C, and measurementshould be held where there is no direct wind from air-conditioner.② Pick up a proper tip from tip rack, and aspirate sample water.③ Dispense the sample for measuring with a balance.④ Read volume measurement by the balance, and compute accurate volume by followingthe formula.Vi : Volumemi : Measured volumeVi mi Z⑤ Add all 10-timeZ: Z correction factorVi volumes, and divide the sum by 10 to compute a mean volume.n1V Vi10 i 1⑥ Calculate the systematic errore s of the pipette, where Vs is the selected test volume.es 100 V V sVs⑦ Calculate the coefficient of variation, CV, by formula for standard deviation. VnCV 100 Vii 1 V 2n 1Table-3 Z correction factor for distilled waterTemperature ( 371.00381.0039Air Pressure 0361.00361.00371.00381.00391.00391.00401.0040- 19 371.00381.00391.0040
TroubleshootingSymptomTip cannot be ejected.Possible causeRemedyNozzle cylinder loosensTighten up the nozzle cylindersecurely.Top of the nozzle cylinder isclogged with a foreign object.Clean up the nozzle cylinder orreplace it with a new one.Nozzle cylinder loosens.Tighten up the nozzle cylindersecurely.Seal ring set are assembled in Reset the seal ring and O-ring setPipette fails to aspirate reverse order.according to the manual inliquid.(2, 10, 20uL models only)“Disassembling/Reassembling”.Extracted liquid leaksfrom tip.Push button movesstiffly.CAUTIONSeal ring or/and O-ring setare worn (2, 10, 20uL modelsonly).Replace O-ring set. For 2uL 10uL,20uL model, replace nozzlecylinder set.Grease on plunger set or/andO-ring is gone.Apply grease by following theinstruction on this manual.Seal ring or/and O-ring setare worn (2, 10, 20uL modelsonly).Replace O-ring set. For 2uL 10uL,20uL model, replace nozzlecylinder set.Nozzle cylinder loosens.Tighten up the nozzle cylindersecurely.Nozzle cylinder is worn(stepped wear can bechecked by eye).Replace nozzle cylinder.The O-ring and/or seal ring isworn because the plunger setis damaged or rusted.Replace Plunger set and O-ringset. For 2uL 10uL, 20uL model,replace Plunger set and Nozzlecylinder set.The tip is loosely attached.Firmly attach the tip to the nozzle.Grease on plunger set or/andO-ring is gone.Apply grease by following theinstruction on this manual.A liquid is gone into thenozzle cylinder.Clean up the nozzle cylinder,plunger set and O-ring first.Replace these parts if thesituation is not improved.Grease on plunger set or/andO-ring is gone.Apply grease by following theinstruction on this manual.If the pipette cannot be fixed after examining and conducting the abovementioned procedures, immediately stop using the pipette and ask us or ouragent to repair it.Before bringing the pipette for repair, be sure to check whether it has beencontaminated with microbes or harmful substances.- 20 -
ConsumablesOxford Lab Products offer a wide range of pipettes, tips, plastic consumables, and benchtopequipment. View our complete product offering at www.oxfordlp.comSpare Part listContentType in volumePlunger head/plunger2uL00-OBL-010001000Plunger set 10uLPlunger head/plunger10uL00-OBL-010002000Plunger set 20uLPlunger head/plunger20uL00-OBL-010010000Plunger set 100uLPlunger head/plunger100uL00-OBL-010020000Plunger set 200uLPlunger head/plunger200uL00-OBL-010100000Plunger set 1000uLPlunger head/plunger1000uL② 00-OBL-0200002 First spring 2uL------2uL② 00-OBL-0200010 First spring 10uL------10uL② 00-OBL-0200020 First spring 20uL------20uL② 00-OBL-0200100 First spring 100uL------100uL② 00-OBL-0200200 First spring 200uL------200uL② 00-OBL-0201000 First spring 1000uL------1000uLCodeDescription① 00-OBL-0100002 Plunger set 2uL- 21 -
ContentType in volume③ 00-OBL-2300020 1st spring holder 20uL------20uL③ 00-OBL-2300100 1st spring holder100uL------100uL③ 00-OBL-2300200 1st spring holder 200uL------200uL③ 00-OBL-2301000 1st springholder1000uL------1000uL④ 00-OBL-2200020 Seal spring 20uL------20uL④ 00-OBL-2200100 Seal spring 100uL------100uL④ 00-OBL-2200200 Seal spring 200uL------200uL④ 00-OBL-2201000 Seal spring 1000uL------1000uL⑤ 00-OBL-0400002 Nozzle cylinder set 2uLO-ring/seal ring/O-ringretainer/nozzle cylinder2uL⑤ 00-OBL-0400010 Nozzle cylinder set 10uLO-ring/seal ring/O-ringretainer/nozzle cylinder10uL⑤ 00-OBL-0400020 Nozzle cylinder set 20uLO-ring/seal ring/O-ringretainer/nozzle cylinder20uL⑤ 00-OBL-0400100 Nozzle cylinder 100uL------100uL⑤ 00-OBL-0400200 Nozzle cylinder 200uL------200uL⑤ 00-OBL-0401000 Nozzle cylinder 1000uL------1000uL⑥ 00-OBL-0500100 O-ring set 100uLO-ring/O-ring retainer100uL⑥ 00-OBL-0500200 O-ring set 200uLO-ring/O-ring retainer200uL⑥ 00-OBL-0501000 O-ring set 1000uLO-ring/O-ring retainer1000uL⑦ 00-OBL-0900010 Ejector pipe A------2/10uL⑦ 00-OBL-0900200 Ejector pipe B------20/100/200uL------1000uL⑧ 00-OBL-0801000 Ejector setting screw setSetting screw/springwasher/washer2/10/20/100/200/1000uL⑨ 00-OBL-1600000 Volume adjustment tool------All⑩ 00-OBL-3400000 ctor pipe C- 22 -
For repair, service or information you may contact your local distributor.Manufacturer:Oxford Lab Products offer a wide range of pipettes, tips, plasticconsumables and benchtop equipment. View our complete productoffering at www.oxfordlp.com10360 Sorrento Valley Road, San Diego, CA 92121.Tel – 1-800-243-3232Fax – 858-536-33422016.Ver.1- 23 -
Oxford BenchMate L is fully autoclavable at the condition of 121 C for 20 minutes. Oxford BenchMate L is made of UV resistant material which can be used in a clean room environment. (If UV is applied to the Oxford BenchMate L Pipettes for a considerably long time, it may become discolored but it will not impact performance.)