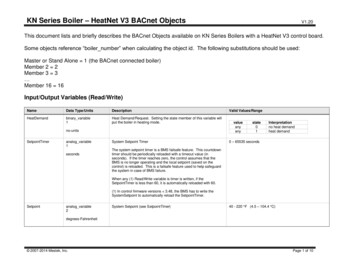
Transcription
KN-2/4-CM2-071442-9452Cast Iron CondensingBoilersModels K N-2 and K N-4HeatNet ManualControl Adjustment and Operation Instructionsfor Mestek Firmware Version 2.8Also read and follow:KN Boiler ManualKN Vent/Air ManualK N-2 onlyThis manual is intended only for use by a qualified heating installer/technician. Read and follow this manual, all supplements and relatedinstructional information provided with the boiler. Install, start and service the boiler only in the sequence and methods given in theseinstructions. Failure to do so can result in severe personal injury, death or substantial property damage.Do not use the boiler during construction. Construction dust and particulate, particularly drywall dust, will cause contamination ofthe burner, resulting in possible severe personal injury, death or substantial property damage. The boiler can only be operated with a dustfree air supply. Follow the instruction manual procedures to duct air to the boiler air intake. If the boiler has been contaminated by operationwith contaminated air, follow the instruction manual guidelines to clean, repair or replace the boiler if necessary.Affix these instructions near to the boiler/water heater. Instruct the building owner to retain the instructions for future use by a qualifiedservice technician, and to follow all guidelines in the User’s Information Manual.
KN USER’S CONTROL MANUALThe KN boiler — HeatNet controlControl overview The KN HeatNet control monitors boiler temperature and limitcircuit inputs, modulating boiler firing rate to meet demand.The control uses microprocessor electronics, watching timeaverage response from the system to anticipate how much heatthe system needs. Coupled with the five-to-one turndown of theKN boiler, this results in maximum possible condensing-modeoperation. The KN boiler will provide unmatched seasonalefficiency. Indoor air reset (IAR)KN’s unique approach to boiler output regulation is its IndoorAir Reset function. The control monitors the demand from upto 8 different zones. Watching the demand duration and responseto supply temperature, averaging over time, the HeatNet controlanticipates system needs. It sets boiler maximum firing rate andadjusts supply water temperature to fine-tune boiler heat output.All that is required to enable IAR is to connect thermostatcircuit wires to the IAR inputs. The HeatNet control can alsobe configured for outdoor reset operation, but IAR providesresponse based on system behavior rather than just looking atoutdoor temperature.The HeatNet platformHeatNet controls are designed to provide an integrated boilermanagement system on every boiler. The platform providesmultiple levels of selectivity. HeatNet electronics can beoperated as a simple single-boiler control, while still providingintelligent regulation of boiler firing rate to match systemdemand. With a few key strokes on the key pad, the HeatNetcontrol can operate as a sophisticated multiple-boiler controller,using simple RJ45 cable interfacing between units. The controlcan even accept external control commands from buildingmanagements systems (Modbus standard, with optional bridgefor BACnet or LonWorks) or 20-milliamp analog input from anexternal controller.The control method used by the HeatNet control is based ondigital communications, which eliminates the need for analogcontrol signals. Analog signal inputs are supported, but a higherlevel of control precision, repeatability and feedback is gainedwith digital communications.The HeatNet control can be versatile, providing for operationin multiple ways: Operation as a stand-alone boiler. Operation as a boiler in a boiler network, using the on-boardHeatNet protocol. Operation as a member boiler in a boiler managementsystem.2 Operation as a member of a remotely-controlled boilernetwork (20-milliamp regulation).Setpoint can be determined by the HeatNet control or by a20-milliamp input signal.Network boilers can be operated by override commandsfor increased versatility.PID responseThe HeatNet control uses proportional-integral-derivativecalculations to determine the response to boiler watertemperature changes. This means it not only looks at how faraway the water temperature is from the setpoint temperature,but how fast the temperature is changing and how it hasresponded over time. This ensures the boiler won’t make suddenunnecessary changes in firing rate.Multiple boiler operationThe HeatNet control easily interfaces with other HeatNetcontrols. Multiple boiler operation using HeatNet protocol onlyrequires RJ45 cables daisy-chained from boiler to boiler and afew key strokes setting up control behavior. The master boiler isautomatically selected by connecting a sensor lead to itsHEADER sensor terminals. The HeatNet control recognizesthe sensor and configures the boiler as the master. Other boilersonly need to have an address assigned.Among the advanced design features of the HeatNet control isthe MOD-MAX setting. This limits the firing rate of all boilers toa pre-set maximum (50% by default). This means all of theboilers will be run at a very efficient level until all boilers are on.Only then can firing rate increase above this setting. Boilerrotation can be first-on/first-off, first-on/last-off, or true rotation(the HeatNet control monitors the total on time of all boilers,and rotates their usage so the total on time is the same for all).Firmware Version 2.5 and greater is now compatible withHeatNet Mixed Boiler Systems. For more information on theoperation of HeatNet Mixed Boiler Systems see the KN6-30HeatNet Control Manual V3.47, which is available at www.knseries.com.External limit monitoring& annunciationIn addition to controlling the boiler, the HeatNet controlmonitors external limits wired into the limit circuit connections.The control shuts down the boiler if a limit opens, and the digitaldisplay shows which limit failed. Monitored limits include highlimit aquastat, flow, ignition control fault, inlet pressure, fluepressure and other optional or user-selectable limits.”
KN USER’S CONTROL MANUALThe KN boiler — HeatNet controlWiring connections1.Power wiring, 120 vac2.Heat demand input3.DHW demand input4.Low fire terminals5.High fire terminals6.To boiler outlet watertemperature sensor7.To optional outdoortemperature sensor8.To optional boiler returnwater temperature sensor9.To optional headertemperature sensor10.To boiler postpurge pump(factory piped and wired)11.To boiler circulator12.Alarm output dry contacts13.To external high limit and/orlow water cutoff if desired14.To flow switch, when used15.Used to activate combustionair damper if desired16.To combustion air damper provingswitch, required when controllingcombustion air damper17.Indoor air reset inputs — connectto up to 8 zone thermostats18.Optional 20 ma control signal input19.Remote enable to start whenoperating on 20 ma input20.Optional HeatNetcommunications board21.Boiler wiring socket to blowerand gas valve22.Boiler wiring socket to pressureswitches and ignition control23.Boiler wiring socket tocontrol panel24.Boiler wiring socket tocontrol panel25.Boiler wiring socket topower switch26.Boiler wiring socket to transformer27.Termination DIP switchescomponents3
KN USER’S CONTROL MANUALContents1 Method 1: HeatNet modulation – control. . . . . .page 5 The KN HeatNet control can control up to (16) KN boilers using built-in software andhardware. Install a RS485 interface on each boiler and connect with RJ45 HeatNet cables(or shielded wires). The header water temperature setpoint can be set by the master boiler or by a 4-20mainput from an external controller. Member boilers can override master boiler control if they receive a contact closure onthe Heat Demand or DHW Demand terminals.2 Method 2: HeatNet modulation – BMS . . . . . page 14 This method uses the KN control’s built-in communications capabilities to acceptModbus protocol inputs from a building management system. The master boiler controlsequences and modulates the boiler network to accomplish the demands from thebuilding management system. Each boiler requires the RS485 interface board and cable, above. Boiler setup is essentially the same as for method 1, with the exception that each boilermust be assigned both a HeatNet network address and an address for the Modbusinterface. An additional bus is required to interface with systems using BACnet or LonWorks protocol. The master boiler will take control and regulate the boiler network if signal from theBMS is lost or times out.3 Method 3: External 4-20ma control . . . . . .page 16 Up to 5 boilers can be controlled by an external control that provides a 4-20ma inputsignal. The external controls must also activate each boiler by closing a contact acrossthe boiler’s 4-20ma Remote Enable contacts. Member boilers can override external boiler control if they receive a contact closure onthe Heat Demand or DHW Demand terminals.4 Failsafe modes . . . . . . . . . . . . . . . . . . . . . . . . . .page 225 Control menus and adjustments . . . . . . . . .page 23HeatNetControl panel Operating parameters and control behaviors are set using the KN control’s display/keypad interface. Refer to this section for the menu structure and explanations of the setting options.6 Troubleshooting . . . . . . . . . . . . . . . . . . . . . . . .page 357 Communication Registers . . . . . . . . . . . . . . .page 404
KN USER’S CONTROL MANUAL1Method 1: HeatNet modulation – local controlFigure 1Electrical connection board (see item 10,page 3 for location — Also see the wiringsummary illustrations on the next pages)Figure 2120VAC power service terminals on electricalconnection board — See Figure 15 for locationof the power terminal stripElectrical shock hazard — Disconnect all electrical powersources to the boiler before making any electrical connections.Label all wires prior to disconnection when servicing controls.Wiring errors can cause improper and dangerous operation!Verify proper operation after servicing.Failure to comply with the above could result in severe personalinjury, death or substantial property damage.The electrical connections to this boiler must be made inaccordance with all applicable local codes and the latestrevision of the National Electrical Code, ANSI /NFPA-70.Installation should also conform to CSA C22.1 CanadianElectrical Code Part I if installed in Canada. Install a separate120 volt 15 amp circuit for the boiler. A properly rated shutoff switch should be located at the boiler. The boiler must begrounded in accordance with the authority having jurisdiction,or if none, the latest revision of the National Electrical Code,ANSI/NFPA-70.Line voltage field wiring of any controls or other devices mustuse copper conductors with a minimum size of #14 awg. Useappropriate wiring materials for units installed outdoors.Overview — control setup sequenceFollow the Boiler manual — Install the boilers according to the KNBoiler manual before attempting to set up the control system.1.2.3.4.5.6.7.8.9.10.Install all boilers per the Boiler manual.Close the external gas valve on every boiler.Wire all boilers following the guidelines in this section.Attach a header sensor to the master boiler ONLY. The KN-2 control automatically configures the boiler with a header sensor as the master.Set the master boiler control parameters using its display/keypad.Set the master boiler’s termination DIP switches.Set the termination DIP switches on the member boilers.Set the member boilers’ control parameters using their display/keypads.Follow the instructions in the Boiler manual to start up each boiler before proceedingfurther.Finish by connecting cables between the communications boards of all of the boilersand verifying network operation.Add communications modules1. Insert a RS485 communications module onto each of the boilers’ electrical connectionpanels, as shown in Figure 1.Power supply (120 VAC)1. See Figure 1 and Figure 2.2. Connect minimum 14awg copper wire to the power connection as shown in Figure 2.3. Install a fused service switch, mounted and installed in accordance with allapplicable codes.5
KN USER’S CONTROL MANUAL1Method 1: HeatNet modulation – local control (cont.)Circulator wiringPostpurge circulator (KN-2 only) Figure 5Circulator wiring terminal strip (see Figure 1for location) — Also see the wiringsummary illustrations on the next pages)The circulator shipped installed with the boilercannot be used for system circulation. It must be usedas supplied from the factory. It circulates water after theboiler stops firing to prevent potential damage from heatpocketing in the top of the heat exchanger.The postpurge circulator is factory-piped and pre-wired. Donot change the usage, the wiring, the location or the piping.Boiler circulator 6See the Boiler manual for circulator piping.Figure 3, Figure 4, and Figure 5 show wiring of the Boilercirculator (or boiler/system circulator) to the terminal stripof the KN-2 electrical connection board.DO NOT directly connect a circulator with a motor largerthan 1/4 hp. For larger motors, install a circulator relay ormotor contactor . Figure 3 and Figure 4 show the correctways to install the boiler circulator using a relay or motorstarter.Figure 3Wiring the boiler circulator using a circulator relay (required for motors over 1/4 hp)Figure 4Wiring the boiler circulator using a relay orstarter (required for motors over 1/4 hp)(KN-2 only)
KN USER’S CONTROL MANUAL1Method 1: HeatNet modulation – local control (cont.)IAR (Indoor Air Reset) wiring, when used Heat Demand terminal connections — The end switch leads from the zone valvesmust connect to the Heat Demand terminals on the electrical connection board asshown in Figure 7.See Figure 6 for typical wiring to the IAR inputs when using 4-wire zone valveswithout a zone controller. For other applications, such as circulator relays or zonecontrollers, see Appendix A in the Boiler manual.Polarity — The connections to the IAR positive terminals (IAR )must be to the same location on the zone valve as the thermostat wire, asshown in Figure A1. The connections to the IAR negative terminals(IAR –) must be from the zone valve terminal connected to the 24VACcommon line, as shown. Connecting the wires incorrectly can cause thetransformer to be shorted out and damaged. Verify the wiring with avoltmeter.Always use a voltmeter to check the leads coming from the end switchesof the zone valves. With the thermostat calling for heat, connect thevoltmeter leads across the wires coming from the end switches. If themeter shows a voltage reading, the zone valve wires are incorrect.Change the wiring and retest. DO NOT connect the wires to the boileruntil you have tested as described. Incorrect wiring can damage theboiler control or other system components.If there is only one transformer feeding all of the zone valves in the system, you canomit the wires to the IAR negative terminals (IAR –) on all but one of the zonevalves. This is because these terminals are jumpered internally on the electricalconnection board. If there is more than one transformer, provide one wire fromeach transformer common side to one of the IAR negative terminals (IAR –).Figure 6Indoor Air Reset wiring to IAR terminals with4-wire zone valves and no zone controller(see Figure 7 for terminal block 6 location)Sensor wiring Header sensor is required — A header sensor must be installed in the systemsupply piping. Connect the header sensor ONLY to the master boiler. Installthe header sensor in an immersion well. Locate the sensor where it will accuratelysense the system water supply temperature. Connect the sensor leads to theelectrical connection board as shown in Figure 8.Outdoor reset application — To operate with outdoor reset, purchase andinstall an outdoor sensor. Mount the sensor such that it is shielded from directsunlight if possible and not likely to be covered by snow drifts or debris. Connectthe outdoor sensor leads to the master boiler’s electrical connection board asshown in Figure 8. (Member boilers could have their own outdoor sensor if theywill be operated in override mode by closing the Heat Demand terminals.)Return water temperature sensor — The return water temperature sensor isoptional, only needed if you want to automatically control the boiler postpurgepump cycle time. Install the sensor in a well in the boiler return piping. Connectthe sensor leads to the electrical connection board as shown in Figure 8, TheReturn water sensor can OPTIONALLY be used as a DHW sensor. The controlwould then regulate to this sensor for DHW demands. When used in this way thesensor must be moved to a position where it will sense the temperature of thewater being supplied to the tank. For more information see the DHW SENSORdescription in Table 8.Sensor wiring, return water temperature sensor —Firmware Version 2.5and greater monitors the temperature differential (Delta T) across the heatexchanger. If the Delta T exceeds the setting, the input to the boiler can beoptionally limited.DHW wiring To operate the boiler for domestic water heating with a storage tank, install and pipethe tank according to the tank manufacturer’s instructions and the recommendedpiping diagrams in this manual. Consult the factory for applications not covered.The circulator used for DHW must be operated by a circulator relay or zonecontroller that is activated when the tank aquastat calls for heat, as shown in(Figure 7 - terminal #2).Connect the tank enable terminals across the DHW DEMAND terminals on themaster boiler’s electrical connection board as shown in Figure 7. (Member boilerscould be connected to tank aquastats if they are piped appropriately and intendedto operate in override mode.)7
KN USER’S CONTROL MANUAL1Figure 7Method 1: HeatNet modulation – local control (cont.)KN wiring summary — wiring to electrical connection boardAlso see Figure 2.Wire Harness 70-2043Factory Wiring — Do Not ChangeJI451Com120V50VA120VACJ9 Control InputsTankAquastatThe boiler is shipped with ajumper across the HEAT DEMANDterminals. Remove this jumperwhen using a thermostat or otherexternal control to start the boiler.DHW RelayRIGNDMaster boiler: Room thermostats,end switches or relay contacts(Connect thermostat, zone valve end switches,or remote start relay contact here. Test when doneto ensure no stray voltage is present on any of thewires. See the Boiler manual for procedure.)Master boiler: Connect override contacts only(Individual boilers, if piped appropriately, can beactivated for override operation, such as DHWheating or emergency space heating.)(Connect remote temperature control 4-20mA input wires herewhen remote setpoint is required. The setpoint temperaturewill be set by the 4-20mA signal. The corresonding setpointvalues can be set in the 4-20mA INPUT menu.)8DHW Pump MotorSupplied, mounted and wired by installer24VAC24VCom
KN USER’S CONTROL MANUAL1Figure 8Method 1: HeatNet modulation – local control (cont.)KN wiring summary — wiring to electrical connection board, continued (see Figure 7 for terminal strip locations)Also see Figure 5.Note: For multiple boilers with a single combustion air damper(KN-2 only)9
KN USER’S CONTROL MANUAL1Method 1: HeatNet modulation – local control (cont.)External interlocksFigure 9Termination DIP switches (see item 7, Figure 7for location)1. Wire external limits and flow switch, when used, as shown in Figure 8.2. If wiring to and from a motorized combustion air damper, follow the guidelinesgiven in Figure 8. Connect only to the master boiler.If any of the member boilers is to operate in override mode, and thesystem is equipped with a combustion air damper, you must providespecial wiring in order to ensure the damper opens and proves whenthe boiler fires. This must be done without compromising the wiringbetween the master boiler and the damper.Overrides — Control priorities3. The KN control can provide override operation for any or all member boilers ina HeatNet network. This requires the boilers be piped with appropriate isolationpiping and controls.4. Override is done by closing a contact across the Heat Demand or DHW Demandterminals of any boiler. These priority inputs override all network controls or4-20mA input controls to the boiler.5. DHW Demand — The DHW Demand closure takes priority for ALL boilers,including the master and all members. When DHW Demand closes, the boileror boilers immediately switch to DHW operation, including setting the watertemperature to the DHW Setpoint.6. Space heating, Heat Demand — If any member boiler sees closure across itsHeat Demand terminals it will begin operation in space heating mode independently of commands from the master boiler or 4-20mA input source.Table 1Termination DIP switch settingsDo not wire boilers for override operation unless the piping designprovides automatic isolation of the overriding boilers. The masterboiler would be unable to properly control system water temperatureif member boilers were to input heat to the system without controlfrom the master. DHW operation, in particular, would raise the supplytemperature from overriding boilers to the DHW Setpoint.MasterOverride operation control setup — Boilers must be set up withoperating parameters necessary during their override operation; i.e.,local setpoint, DHW setpoint, etc.Switch 1:Switch 2:Switch 3:Switch 4:ONONOFFOFFSwitch 1:Switch 2:Switch 3:Switch 4:ONONONONLast memberSwitch 1:Switch 2:Switch 3:Switch 4:ONONOFFOFFSwitch 1:Switch 2:Switch 3:Switch 4:ONONOFFOFFOther membersSwitch 1:Switch 2:Switch 3:Switch 4:OFFOFFOFFOFFSwitch 1:Switch 2:Switch 3:Switch 4:OFFOFFOFFOFFBoilerPriority 2 Heat DemandPriority 3 HeatNet inputSet termination DIP switches1. The HeatNet network needs to recognize the beginning and end of thenetwork. This requires setting the four DIP switches on each boiler’s electricalconnection board.2. See Figure 9 for location of the switches.3. See Table 1 for required settings. The table gives settings for HeatNet modulation— local control and for remote control from a building management system(Modbus protocol).4. DO NOT connect the communications cables (or shielded wires) between boilersuntil all boilers have had parameters set and then been started up following allinstructions in the KN Boiler manual.10Modbus(see note)7. Summary — priority sequence is:Priority 1 DHW DemandHeatNetNote: Modbus setup is for applications controlled by a building management system. Forsystems using BACnet or LonWorks, a bridge board is used to interface with the KN-2control. The switch is “on” when in the down position and “off ” when in the up position.
KN USER’S CONTROL MANUAL1Figure 9AMethod 1: HeatNet modulation – local control (cont.)KN2/KN4 multiple boilers with a single combustion air damper11
KN USER’S CONTROL MANUAL1Method 1: HeatNet modulation – local control (cont.)Table 2Control parametersClose the external manual gas valve on every boiler beforeproceeding. DO NOT open any gas valve, or attempt to fire anyboiler, until the boilers have been set up and verified followingthe instructions in the KN Boiler manual.ParameterFailure to comply could cause a boiler failure, leading to possiblesevere personal injury, death or substantial property damage.HEAT BANDSet control parameters on keypadsBefore turning boilers on to set parameters, disconnect all call for heatwiring at the electrical connection boards. This will prevent the boilerfor attempting to cycle during the setup process.1. See “Control menus and adjustments” for a complete list of control parametersand explanations.2. Carefully read the parameter explanations in Table 8.3. When adjusting the limit band, operating limit (OP LIMIT), local setpoint (LOCSETPOINT) and DHW setpoint, make sure the operating temperature bands donot overlap or cause potential for nuisance cycling.4. Indoor air reset — Use this option whenever possible. The indoor air technologymonitors space heating demand to help the boiler operate at the highest possibleefficiency throughout the season. To operate with IAR, you must wire to the IARinput terminals as described on page 18.5. System clock — Set the system clock on all boilers to ensure the time stamps willbe accurate in the data logs.6. Turn on the power to each boiler and set the on/off switch to ON as you set itsparameters.7. Use the boiler’s keypad to enter the parameters as described on page 23.8. After setting a boiler’s parameters, turn the power off to the boiler until you areready to start the boiler up following the Boiler manual instructions.9. Set the master boiler and each member boiler, following the guidelines given inTable 2.Start up boilers per KN Boiler manual1. Turn off power to all boilers.2. Follow all instructions in the KN Boiler manual to start up each boiler and verifyoperation.Connect network cablesElectrical shock hazard — Turn off power to each boiler beforeattempting to connect the network cables.Before turning boilers on to check network operation, disconnect allcall for heat wiring at the electrical connection boards. This will preventthe boiler for attempting to cycle during the setup process.MasterboilerMemberboiler(see notes)Set on master boiler onlyLOC SETPOI NTSetHD only1SOURCESetHD or DHW only1,2DHW SETPOINTSet if DHW willbe usedDHW only2OP LIMITSetSetLIMIT BANDSetSetIA RESETON if IAR is used,or set to OFFDo not setOA SHUTDOWNSet ON if usedor set to OFFHDOA only3OA SETPOINTSet if usedHDOA only3OA RESETSet if usedHDOA only3OA SETPTSSet if usedHDOA only3DELTA ENABLESet if usedSet if usedDELTA TEMPSet if usedSet if usedPURGE TIMESet if usedSet if usedALWAYS ONSet if usedSet if usedMASTER PUMPSet if usedDo not setNIGHT SETBACKOPTIONS (all)AUX FUNCTIONSSet on master boiler onlySetSetSet on master boiler onlySYSTEM CLOCKSetSetLOCAL ADDAutomaticSet (beginning at 2)CONSOLE ADDAutomaticSet (beginning at 2)MODULAR BOILERSet on master boiler onlyMODULATION PIDSet on master boiler onlyFIRING MODESet on master boiler onlySENSOR #SetHD/HDOA only1,3TYPESetHD/HDOA only1,3CALIBRATE ?On any boiler if requiredPASSWORDSetSetCOMMUNICATIONSSetSetLOAD DEFAULTSOn any boiler if requiredSYSTEMOn any boiler if requiredNotes:1 — HD Only means to set the parameter for a member boiler only if it is wired forHeat Demand override.Master boiler cable2 — DHW Only means to set the parameter for a member boiler only if it is wiredfor DHW Demand override.1. Connect an RJ45 cable to the master boiler H-Link OUT block (item 2, Figure 10)or 3-wire shielded cable to the H-Link terminal strip (item 4, Figure 10). The otherend of this cable will be attached to the first member boiler in following steps.3 — HDOA Only means to set these parameters only if the member boiler will beoperated with outdoor reset when put in override mode with closure across its HeatDemand terminals (requires outdoor sensor connected to boiler).12
KN USER’S CONTROL MANUAL1Method 1: HeatNet modulation – local control (cont.)2. Turn on power to the master boiler and set its on/off switch to ON.3. You should hear at least 2 beeps.4. The control’s firmware version number will display.5.After the control’s timer finishes, the display willshow STANDBY and SYS SET. This verifies thatthe master boiler is setup correctly as the master.The same display will show on member boilers when there is a call for heat fromthe master boiler. When there is no call for heat at a member boiler, the display willshow LOC SET instead.6. If the master is functioning correctly, the yellow LED’s on the H-Link jack portswill blink. The blinking indicates that the master is trying to communicate withmember boilers.7. If a FAULT message is displayed, clear the faults until the STANDBY message isdisplayed. Refer to troubleshooting suggestions at the end of this manual if youcannot resolve the issue.Figure 10RS485 communications boardMember boiler cables1. Begin with the first member boiler.2. Plug the other end of the master boiler’s communications cable to the member boiler’sinput port (Figure 10, item 2 for RJ45 cable or item 4 for 3-wire cable).3. Connect cables to all of the member boilers by cabling from one to the next. Connectincoming cables to item 1 or 4, Figure 10. Connect outgoing cables to item 2 or 4.(Note that shielded cable wires will share terminals when using item 4.)Check the network1. Turn the power on and the on/off switch to ON for all of the member boilers.2. Allow time for each boiler to initialize.3. After about 30 seconds, the master boiler should recognize the member boilers.4.Navigate to the BOILERS menu, then to HEATNET BOILERS display. The master control willshow the boilers it recognizes.5. If the display shows a blank space, such as “123 56789” the control does notdetect the missing boiler (boiler 4). Check the yellow LED on the communicationport of the missing boiler.6. NORMAL connection — LED should flash steadily, about twice per second.7. TERMINATION incorrect — LED will flash rapidly and stay on.8. OPEN connection — LED does not flash at all.9. If a FAULT message is displayed, clear the faults until the STANDBY message isdisplayed. Refer to troubleshooting suggestions at the end of this manual if youcannot resolve the issue.Start the system1.2.3.4.5.Turn off power to all boilers.Connect all call for heat wiring to the boilers.Turn on power to all boilers and turn the on/off switches to ON.The boilers should now operate normally, as described in the Boiler manual.The master boiler will sequence and modulate boilers as necessary to control thewater temperature.6. The master boiler will show the number of boilers firing as well as the temperatureand heat band display. Use the UP/DOWN keys to scroll through the displays towatch the process of starting and stopping boilers.1. RJ45 HeatNet cable IN from master or previousmember2. RJ45 HeatNet cable OUT to next member boiler3. Shielded wire (3-2ire), option to RJ45 cable, HeatNet communications INPUT and connection foradditi
Operation as a boiler in a boiler network, using the on-board HeatNet protocol. Operation as a member boiler in a boiler management system. Operation as a member of a remotely-controlled boiler network (20-milliamp regulation). Setpoint can be determined by the HeatNet control or by a 20-milliamp input signal.