Transcription
Installa on Instruc ons andUse & Care GuideResiden al ElectricWater HeaterRead this manual and the labels on the water heater before you install,operate, or service it. If you have difficulty following the direc ons, oraren’t sure you can safely and properly do any of this work yourself: Call your local plumbing supplies store to have this water heater installed. Professional Installation is available for this product and the work is guaranteed. Schedule an appointment with a qualified person to install your water heater.Call our Technical Assistance Hotline which is listed on the water heater’s warranty sheet. We can help you with installation, operations, troubleshooting, ormaintenance. Before you call, write down the model and serial number fromthe water heater’s data plate.Incorrect installa on, opera on, or service can damage the water heater, your houseand other property, and present risks including fire, scalding, electric shock, andexplosion, causing serious injury or death.AHRI Cer fica on applies to residen al electric water heaters with rated capaci esof 20 to 120 gallon and input ra ngs of 12 kw or less.Table of Contents PageIMPORTANT SAFETY INFORMATION . 3GETTING STARTED . 6INSTALLATION . 7TROUBLESHOOTING . 17MAINTENANCE . 20DIAGRAMS . 24REPAIR PARTS .25LOW LEADCONTENTKeep this manual in the pocket on heater for future reference whenever maintenance, adjustment or service is required.Retain your original receipt as proof of purchase.September, 2020100309797 2000561860 REV B
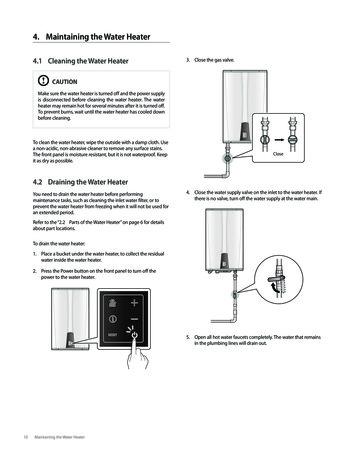
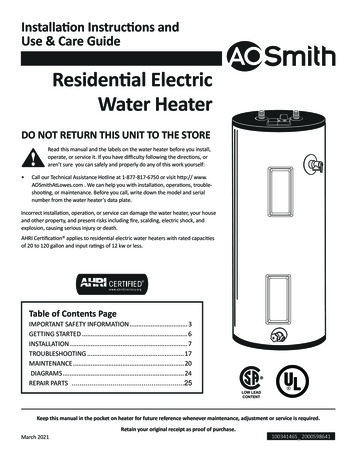
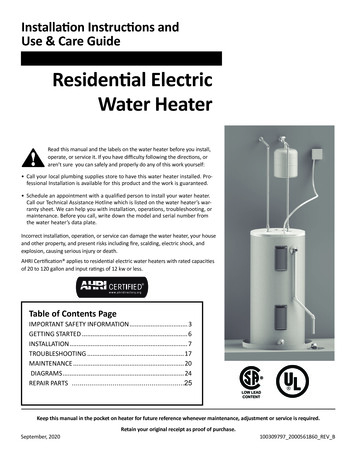
COMPLETED INSTALLATION TYPICALWatershut aljunc onboxT&PreliefvalveUpperElement andThermostataccessECO ResetBu on(on mostmodels)T&PdischargepipeLowerElement andThermostataccessDrain pandischargepipeDrain panDrain valve
Read and follow all safety messages and instruc ons inthis manual.This is the safety alert symbol. It is used to alert you topoten al physical injury hazards. Obey all safety messages that follow this symbol to avoid possible propertydamage, serious injury or death. Do not remove anypermanent instruc ons, labels, or the data plate from either the outside ofthe water heater or on the inside of the access panels. Keep this manualnear the water heater.Important informa on to keepFill out this sec on and keep thismanual in the pocket of the waterheater for reference.Date Purchased:Model number:Serial number:DANGERDANGER indicates hazardoussitua on that, if not avoided, willresult in death or serious injury.WARNINGWARNING indicates a hazardoussitua on that, if not avoided, couldresult in death or serious injury.CAUTIONCAUTION indicates a hazardoussitua on that, if not avoided, couldresult in minor or moderate injury.NOTICEMaintenance performed:*Date:NOTICE indicates prac ces notrelated to physical injury.This product is certified to comply with a maximum weighted average of0.25% lead content as required in some areas.*Drain and flush tank and remove andinspect anode rod a er first six monthsof opera on and at least annuallytherea er. Operate the Temperatureand Pressure Relief Valve (T&P) annuallyand inspect T&P valve every 2-4 years(see the label on the T&P valve formaintenance schedule). If no label isa ached to the T&P Relief Valve, followthe instruc ons in the T&P Relief ValveMaintenance sec on of this manual.See the Maintenance sec on for moreinforma on about maintaining thiswater heater.Residen al Electric Water Heater Use and Care Guide 3SAFETYIMPORTANT SAFETY INFORMATION
SAFETYIMPORTANT SAFETY INFORMATIONTo reduce the risk of propertydamage, serious injury or death,read and follow the precau ons below,all labels on the water heater, andthe safety messages and instruc onsthroughout this manual.RISKS DURING INSTALLATIONAND MAINTENANCEElectric Shock RiskContact with the electricalparts in the junction box andbehind the access doors canresult in severe injury or death fromelectrical shock: Disconnect power by opening thecircuit breaker or removing thefuses before installing or servicing. Use a non-contact circuit tester toconfirm that power is off beforeworking on or near any electricalparts. Replace the junction box cover andaccess doors after servicing.Lifting RiskWARNING! Thewater heater isheavy. Follow theseprecau ons toreduce the risk of property damage,injuries from li ing or impact injuriesfrom dropping the water heater.RISKS DURING OPERATIONScalding RiskThis water heatercan make water hotenough to causesevere burns instantly, resulting insevere injury or death. Feel water before bathing or showering. To reduce the risk of scalding,install Thermostatic Mixing Valves(temperature limiting valves) ateach point-of-use. These valvesautomatically mix hot and coldwater to limit the temperature atthe tap. Mixing valves are availablefrom your local plumbing supplier.Follow manufacturer’s instructionsfor installation and adjustment ofthe valves. The thermostat(s) on this waterheater have been factory set toapproximately 120 F to reduce therisk of scalding. Higher temperatures increase the risk of scalding,but even at 120 F, hot water canscald. If you choose a higher temperature, Thermostatic MixingValves located at each point-of-useare particularly important to helpavoid scalding.Temperature Time to Produce aSerious Burn Use at least two people to lift thewater heater.120 F (49 C)More than 5 minutes125 F (52 C)1½ to 2 minutes Be sure you both have a good gripbefore lifting.130 F (54 C)About 30 seconds135 F (57 C)About 10 seconds Use an appliance dolly or handtruck to move the water heater.140 F (60 C)Less than 5 seconds145 F (63 C)Less than 3 seconds150 F (66 C)About 1½ seconds155 F (68 C)About 1 second4 Residen al Electric Water Heater Use and Care GuideFor informa on about changing thefactory thermostat se ng(s), refer tothe “Adjus ng Temperature” sec on inthis manual (“Step 10” on page 15).Even if you set the water heaterthermostat(s) to a low se ng, highertemperatures may occur in certaincircumstances: In some cases, repeated smalldraws of water can cause thehot and cold water in the tank to“stack” in layers. If this happens,the water can be as much as thirtydegrees hotter than the thermostat setting. This temperature variation is the result of your usage pattern and is not a malfunction. Water temperature will be hotter if someone adjusted thethermostat(s) to a higher setting. Problems with the thermostat(s),or other malfunctions may result inhigher than expected water temperatures. If the water heater is in a hot environment, the water in the tank canbecome as hot as the surroundingair, regardless of the thermostatsetting. If the water supplied to the waterheater is pre-heated (for example,by a solar system) the temperaturein the tank may be higher than thewater heater’s thermostat setting.To reduce the risk of unusually hotwater reaching the fixtures in thehouse, install Thermosta c MixingValves at each point-of-use.If anyone in your home is at par cularrisk of scalding (for example, the elderly, children, or people with disabilies) or if there is a local code or statelaw requiring a certain water temperature at the hot water tap, then these
According to a na onal standardAmerican Society of Sanitary Engineering (ASSE 1070) and most local plumbingcodes, the water heater’s thermostatshould not be used as the sole means toregulate water temperature and avoidscalds.Properly adjusted Thermosta c MixingValves installed at each point-of-use allow you to set the tank temperature toa higher se ng without increasing riskof scalds. A higher temperature se ngallows the tank to provide much morehot water and can help provide properwater temperatures for appliances suchas dishwashers and washing machines.Higher tank temperatures (140 F)also kill bacteria that cause a condion known as “smelly water” and canreduce the levels of bacteria that causewater-borne diseases.Water Contamination RiskDo not use chemicals that could contaminate the potable water supply. Donot use piping that has been treatedwith chromates, boiler seal, or otherchemicals.Fire RiskTo reduce the risk of afire that could destroyyour home and seriously injure or kill people: Do not store things that can burneasily such as paper or clothes nextto the water heater. Be sure the junction box cover andthe access door covers are in place.These covers keep debris fromentering and potentially being ignited, and help keep any internal firesfrom spreading. Keep the water heater from becoming wet. Immediately shut the waterheater off and have it inspected by aqualified person if you find that thewiring, thermostat(s) or surrounding insulation have been exposed towater in any way (e.g., leaks fromplumbing, leaks from the waterheater itself can damage propertyand could cause a fire risk). If thewater heater is subjected to floodconditions or the thermostat(s) havebeen submerged in water, the entirewater heater must be replaced. Make electrical connections properly, according to the instructionson page 14. Use 10 gauge solidcopper wire. Use a UL listed or CSAapproved strain relief. Connectground wire to green ground screw.Explosion RiskHigh temperatures andpressures in the waterheater tank can cause anexplosion resulting in propertydamage, serious injury or death. Anew Temperature and Pressure (T&P)Relief Valve is included with your waterheater to reduce risk of explosion bydischarging hot water. Additionaltemperature and pressure protectiveequipment may be required by localcodes.Maintain the T&P Relief Valve properly. Follow the maintenance instructions provided by the manufacturer ofthe T&P Relief Valve (label attachedto T&P Relief Valve). If no label isattached to the T&P Relief Valve, follow the instructions in the T&P ReliefValve Maintenance section of thismanual.An explosion could occur if the T&PRelief Valve or discharge pipe isblocked. Do not cap or plug the T&PRelief Valve or discharge pipe.Fire and Explosion Risk if Hot Water isNot Used for Two Weeks or MoreCAUTION! Hydrogen gas builds upin a hot water system when it is notused for a long period (two weeksor more). Hydrogen gas is extremelyflammable. If the hot water systemhas not been used for two weeks ormore, open a hot water faucet forseveral minutes at the kitchen sinkbefore using any electrical appliancesconnected to the hot water system.Do not smoke or have an open flameor other ignition source near thefaucet while it is open.A nationally recognized testing laboratory maintains periodic inspection ofthe valve production process and certifies that it meets the requirementsfor Relief Valves for Hot Water SupplySystems, ANSI Z21.22. The T&P ReliefValve’s relief pressure must not exceedthe working pressure rating of the water heater as stated on the rating plate.Residen al Electric Water Heater Use and Care Guide 5SAFETYprecau ons are par cularly important.
GETTING STARTEDReview all of the instruc onsbefore you begin work.Improper installa on candamage the water heater, your homeand other property, and can presentrisks of serious injury or death.GETTING STARTED1Figure 1 - Flexible connectors use compression fittings and do not require soldering.Check with your local andstate authori es for any localor state codes that apply toyour area. In the absence of local andstate codes, follow Na onal FireProtec on Associa on (NFPA-70) andthe current edi ons of the Na onalElectric Code (NEC) and the Internaonal Plumbing Code (IPC). Theinstruc ons in this manual complywith na onal codes, but the installeris responsible for complying with localcodes.2Figure 2 - Use a non-contact circuit testerto insure that the power is off before youwork on a circuit.Figure 3 - Install a Pressure Reducing Valveset to 50 to 60 PSI.Massachuse s code requires thiswater heater to be installed in accordance with Massachuse s 248CMR 2.00 and 248-CMR 5.00: StatePlumbing Code. Other local and stateauthori es may have similar requirements or other codes applicable tothe installa on of this water heater.Before you start, be sure youhave, and know how to use,the following tools andsupplies:3 Plumbing tools and supplies appropriate for the type of water pipes inyour home Threaded connectors (Figure 1) forthe cold and hot water pipes For homes plumbed with plasticpipe, use threaded connectors suitable for the specific type of plasticpipe used: CPVC and PEX (crosslinked polyethylene). Do not usePVC pipe.6 Residen al Electric Water Heater Use and Care Guide For homes with copper pipes,you may purchase connectorkits with compression fittingsthat don’t require soldering(Figure 1). Compression fittingsare easier to install than soldering copper pipes. Thread sealant tape or pipe jointcompound approved for potablewater Tools to make the electrical connections (for example, screwdrivers,wire strippers) Non-Contact circuit tester to checkfor power (Figure 2) Water Pressure Gauge (Figure 4)Recommended Accessories: Suitable drain pan (Figure 6 onpage 8) Automatic leak detection and shutoff device Pressure Reducing Valve (Figure 3on page 6) Thermal Expansion Tank (Figure 5on page 7) Point-of-use Thermostatic MixingValves (Figure 7 on page 8)
INSTALLATION Follow these steps for properinstalla on:Water pressureincrease caused bythermal expansion Verify that yourhome is equippedand up-to-date forproper opera onInstalling a new water heater is theperfect me to examine your home’splumbing system and make sure thesystem is up to current code standards.There have likely been plumbing codechanges since the old water heater wasinstalled. We recommend installing thefollowing accessories and any otherneeded changes to bring your home upto the latest code requirements.Use the checklist below and inspectyour home. Install any devices you needto comply with codes and assure thatyour new water heater performs at itsbest. Check with your local plumbingofficial for more informa on. Water pressureWe recommend checking yourhome’s water pressure with a pressuregauge (Figure 4.) Most codes allow amaximum incoming water pressure of80 psi. We recommend a working pressure no higher than 50-60 psi.HOW: Purchase an inexpensive waterpressure gauge available at your localplumbing supplier. Connect the WaterPressure Gauge to an outside faucetand measure the maximum waterpressure experienced throughout theday (highest water pressures o en occur at night).Figure 4 - Use a Water Pressure Gauge tomake sure your home’s water pressure isnot too high.To limit your home’s water pressure:Locate your home’s Pressure Reducing Valve (PRV) on the main incoming(cold) water supply line and adjust thewater pressure control to between 50and 60 psi. If your home does not havea Pressure Reducing Valve, install aPRV on the home’s main water supplyline and set it to between 50 and 60psi. Pressure Reducing Valves are available at your local plumbing supplier.BACKGROUND: Over the years, manyu li es have increased water supply pressures so they can serve morehomes. In some homes today, pressures exceed 100 psi. High waterpressures can damage water heaters,causing premature leaks. If you havereplaced toilet valves, had a waterheater leak, or had to repair appliances connected to the plumbing system,pay par cular a en on to your home’swater pressure. When purchasing aPRV, make sure the PRV has a built-inbypass.Verify that you have a properly sizedThermal Expansion Tank (Figure 5). Werecommend installing an expansiontank if your home does not have one.Codes require a properly pressurized,properly sized Thermal Expansion Tankin almost all homes. (See photo oninside front cover.)Figure 5 - A Thermal Expansion Tank helpsprotect the home’s plumbing system frompressure spikes.HOW: Connect the Thermal ExpansionTank (available at your local plumbingsupplier) to the cold water supply linenear the water heater. The expansiontank contains a bladder and an aircharge. To work properly, the ThermalExpansion Tank must be sized according to the water heater’s tank capacityand pressurized to match the home’sincoming water pressure. Refer to theinstalla on instruc ons provided withthe Thermal Expansion Tank for installa on details.Residen al Electric Water Heater Use and Care Guide 7INSTALLATIONStep 1:
INSTALLATIONINSTALLATIONBACKGROUND: Water expands whenheated, and the increased volumeof water must have a place to go, orthermal expansion will cause largeincreases in water pressure (despitethe use of a Pressure Reducing Valveon the home’s main water supplyline). The Safe Drinking Water Act of1974 requires the use of backflowpreventers and check valves to restrictwater from your home reenteringthe public water system. Backflowpreventers are o en installed in watermeters and may not be readily visible.As a result, most all plumbing systemstoday are now “closed,” and almost allhomes now need a Thermal Expansion Tank.A Thermal Expansion Tank is a prac cal and inexpensive way to help avoiddamage to the water heater, washingmachine, dishwasher, ice maker andeven toilet valves. If your toilet occasionally runs for no apparent reason(usually briefly at night), that may bedue to thermal expansion increasingthe water pressure temporarily.Figure 6 - A suitable drain pan piped to anadequate drain can help protect flooringfrom leaks and drips. Install a suitable drain pan (available at your local plumbing supplier) under the water heater (Figure6) to catch condensation or leaksin the piping connections or tank.Most codes require, and we recommend, installing the water heaterin a drain pan that is piped to anadequate drain. The drain pan mustbe at least two inches wider thanthe diameter of the water heater.Install the drain pan so the waterlevel would be limited to a maximum depth of 1-3/4”. Water temperature regula onWater pipe and tankleaksLeaks from plumbing pipes or fromthe water heater itself can damageproperty and could cause a fire risk. Install an automatic leak detection and shutoff device (availableat your local plumbing supplier).These devices can detect waterleaks and can shut off the waterheater’s water supply if a leakoccurs.Figure 7 - Thermostatic Mixing Valvesinstalled at each point -of-use can helpprevent scalds.Install Thermosta c Mixing Valves(Figure 7) to regulate the temperatureof the water supplied to each pointof-use (for example, kitchen sink,8 Residen al Electric Water Heater Use and Care Guidebathroom sink, bath, shower). Consult the valve manufacturer’s instrucons or a qualified person.WARNING! Even if the water heaterthermostat is set to a rela vely lowtemperature, hot water can scald.Install Thermosta c Mixing Valves ateach point-of-use to reduce the risk ofscalding (page 4).BACKGROUND: A Thermosta c Mixing Valve, installed at each pointof-use, mixes hot water from thewater heater with cold water to moreprecisely regulate the temperature ofhot water supplied to fixtures. If youaren’t sure if your plumbing systemis equipped with properly installedand adjusted Thermosta c MixingValves at each point where hot wateris used, contact a qualified person formore informa on.
INSTALLATION5The loca on is not prone tophysical damage by vehicles,flooding, or other risks.Before installing your water heater,ensure that:1 In an area that will not freeze In an area that is suitable for installing the water heater vertically2The loca on has adequatespace (clearances) for periodicservicing.3The floor can support theweight of a full water heater.Your area is not prone toearthquakes. If it is, usespecial straps as required bylocal building codes.NOTICE: The state of California requires bracing, anchoring, or strappingthe water heater to avoid its movingduring an earthquake. Contact localu li es for code requirements in yourarea, visit h p://www.dsa.dgs.ca.gov,or call 1-916-445-8100 and requestinstruc ons. Other loca ons may havesimilar requirements. Check with yourlocal and state authori es.43VehicleStopThe water heater will be: Installed indoors close tothe center of the plumbingsystem. In a suitable drain pan piped to anadequate floor drain or externalto the building (Figure 6 on page8).Locate the water heater’scircuit breaker and turn it OFF(or remove the circuit’sfuses).On the old water heater,remove the electricaljunction box access panel.Using a non-contact circuit tester,check the wiring to make certain thepower is OFF.2DrainPanDrainFigure 8 - In a garage, install a vehicle stopto avoid water heater damage.Avoid loca ons such as a cs,upper floors, or where a leakmight damage the structureor furnishings. Due to the normalcorrosive ac on of water, the tank willeventually leak. To minimize propertydamage from leaks, inspect andmaintain your water heater in accordance with this manual’s instruc ons.Install a suitable drain pan under thewater heater piped to an adequatedrain. Inspect the drain pan, pipes, andsurrounding area regularly and fix anyleaks found. Drain pans are available atyour local plumbing supplier. Leaks arefrequently in the plumbing systemitself and not the water heater.6Step 3:Removing the old waterheaterRead each installa on stepand decide if you have thenecessary skills to install thewater heater. Only proceed if you cansafely perform the work. If you are notcomfortable, have a qualified personperform the installa on.1WARNING! Working on an energizedcircuit can result in severe injury ordeath from electrical shock.Disconnect the electricalwires.4Open a hot water faucet andlet the hot water run un l it iscool (This may take 10minutes or longer).5Figure 9 - Let the hot water run until it is cool.WARNING! Be sure the water runscool before draining the tank to reducethe risk of scalding.Connect a garden hose to thedrain valve and place theother end of the hose in adrain, outside, or a bucket. (Note thatsediment in the bo om of the tankmay clog the valve and prevent itfrom draining. If you can’t get thetank to drain, contact a qualifiedperson.)6Residen al Electric Water Heater Use and Care Guide 9INSTALLATIONStep 2:Verify that the loca onis appropriate
INSTALLATION7Turn the cold water supplyvalve OFF.8Open the drain valve on thewater heater.Disconnect the water pipes.Many water pipes areconnected by a threadedunion which can be disconnected withwrenches. If you must cut the waterpipes, cut the pipes close to the waterheater’s inlet and outlet connec ons,leaving the water pipes as long aspossible. If necessary, you can makethem shorter later when you installthe new water heater.1112Remove the old water heater.Figure 10 - Draining the old water heater.Also open a hot water faucetto help the water in the tankdrain faster.When the tank is empty,disconnect the Temperature &Pressure (T&P) Relief Valvedischarge pipe. You may be able toreuse the discharge pipe, but do notreuse the old T&P Relief Valve. A newT&P Relief Valve comes installed onyour water heater (or on some models,is in the carton with the water heater).INSTALLATION910Figure 11 - Removing the T&P Relief Valvedischarge pipe.WARNING! Use two or more peopleto remove or install water heater.Failure to do so can result in back orother injury.Step 4:Installing the newwater heaterCompletely read all instrucons before beginning. If youare not sure if you cancomplete the installa on, DO NOTRETURN THIS UNIT TO THE STORE.Seek assistance from any of thefollowing sources: Schedule an appointment witha qualified person to install yourwater heater.1 Call our Technical Assistance Hotline which is listed on the waterheater’s warranty sheet.10 Residen al Electric Water Heater Use and Care Guide23Install a suitable drain panthat is piped to an adequatedrain.Set the water heater in placetaking care not to damagethe drain pan.NOTICE: Most codes require se ngthe water heater in a suitable drainpan piped to an adequate drain. Thedrain pan helps avoid property damage which may occur from condensaon or leaks in the piping connec onsor tank. The drain pan must be atleast two inches wider than the diameter of the water heater. Install thedrain pan so the water level is limitedto a maximum depth of 1-3/4”.Verify that the water heateris properly set in place. Checkthat: The T&P Relief Valve will not be incontact with any electrical parts.4 There is adequate space to installthe T&P Relief Valve discharge pipeand that it can be piped to a separate drain (and not into the drainpan, unless otherwise allowed bystate and local codes). There is adequate access and spacearound the water heater for futuremaintenance.
INSTALLATIONDO NOT CONNECT ELECTRICALWIRING UNTIL YOU AREINSTRUCTED TO DO SO.only copper or CPVC pipe. Do notuse any other type of pipe, such asPVC, iron, flexible plas c pipe, or anytype of hose.NOTICE: Connec ng electrical powerto the tank before it is completelyfull of water (water must run FULLSTREAM from a hot water tap for a fullthree minutes) will cause the upperhea ng element to burn out.Relief Valve. Do not cap, block, plug,or insert any valve between the T&PRelief Valve and the end of the discharge pipe. Do not insert or installany reducer in the discharge pipe.Step 5:Most T&P Relief Valves are pre-installedat the factory. In some cases, they areshipped in the carton and must beinstalled in the opening marked andprovided for this purpose and accordingto local codes.WARNING! To avoid serious injuryor death from explosion, install a T&PRelief Valve according to the followinginstruc ons:If your water heater does nothave a factory installed T&PRelief Valve, install the newT&P Relief Valve that came with yourwater heater. Do not reuse an old T&PRelief Valve. Install a T&P Relief Valvedischarge pipe according to local codesand the following guidelines:1 The discharge pipe should be at least3/4” inside diameter and sloped forproper drainage. Install it to allowcomplete drainage of both the T&PRelief Valve and the discharge pipe. The discharge pipe must withstand250 F (121 C) without distor on. UseFigure 12 - The T&P Relief Valve dischargepipe must be installed properly and piped toan adequate drain. Terminate the discharge pipe a maximum of six inches above a floor drainor outside the building. Do not drainthe discharge pipe into the drainpan; instead pipe it separately toan adequate drain. In cold climates,terminate the discharge pipe insidethe building to an adequate drain.Outside drains could freeze andobstruct the drain line. Protect thedrain from freezing.DISCHARGEPIPEDRAINPIPEFigure 13 - The end of the T&P Relief Valvedischarge pipe must stop no more thansix inches above a floor drain or terminateoutside the building. Do not place any valve or other restric on between the tank and T&PResiden al Electric Water Heater Use and Care Guide 11INSTALLATIONConnect the Temperature and Pressure (T&P)Relief Valve/Pipe
INSTALLATIONStep 6:Install shutoff andtempering valvesIf one is not already installed,install a manual shutoff valvein the cold water line thatsupplies the water heater. Install theshutoff valve near the water heater sothat it is readily accessible. Only usevalves that are compa ble withpotable water. Use only full-flow ballor gate valves. Other types of valvesmay cause excessive restric on to thewater flow.1Install a Thermosta c MixingValve at each point-of-use(for example, kitchen sink,bathroom sink, bath, shower).Consult the valve manufacturer’sinstruc ons or a qualified person.INSTALLATION2system (or any other pre-hea ngsystem), always install a Thermosta cMixing Valve or other temperaturelimi ng device in the inlet water supplyline to limit water supply inlettemperature to 120 F. Solar waterhea ng systems can supply water withtemperatures exceeding 170 F andmay result in water heatermalfunc on.WARNING! Hot water providedby solar hea ng systems can causesevere burns instantly, resul ng insevere injury or death (page 4).WARNING! Even if the waterheater’s thermostat(s) are set to arela vely low temperature, hot watercan scald. Install Thermosta c MixingValves at each point-of-use to reducethe risk of scalding. (page 4.)3For water heaters that are fedby a solar water hea ngIf your home has copper waterpipes, you can solder the waterpipe connec ons or use compression fi ngs which don’t requiresoldering. Compression fi ngsare easier to install than solderingpipe. Check with local plumbingofficials to determine what typesof pipe materials are suitable foryour loca on. Do not use leadbased solder.Step 7:1Connect the watersupplyDetermine the type of water pipes inyour home. Most homes use copperwater pipes, but some use CPVC orcross-linked polyethylene (PEX). Usefi ngs appropriate for the type of pipein your home. Do not use iron or PVCpipe – they are not suitable for potablewater.Connect the cold watersupply using 3/4 inchNa onal Pipe Thread “NPT”to the cold water inlet nipple.For ease of removing the water heaterfor service or replacement, connect the water pipes with a couplingcalled a union. We recommend usinga dielectric-type union (available atyour local plumbing supplier). Dielectric unions can help prevent corrosion caused by ny electric currentscommon in copper water pipes andcan help extend the life of the waterheater.2Figure 14 - Install Thermostatic MixingValves at each point where hot water willbe used.IF YOU HAVE COPPERPIPES:12 Residen al Electric Water Heater Use and Care GuideNOTICE: Do not solder pipes whilethey are a ached to the waterheater. The water heater’s inletand outlet connec ons containnon-metallic parts which could bedamaged. The proper way to connect the water heater to copperwater pipes is as follows: Solder a short length of pipe(about a foot or so) to athreaded adapter using only95/5 n-an mony or equivalents
water heater is heavy. Follow these precau ons to reduce the risk of property damage, injuries from li L ing or impact injuries from dropping the water heater. Use at least two people to lift the water heater. Be sure you both have a good grip before lifting. U se an appliance dolly or hand truck to move the water heater.