Transcription
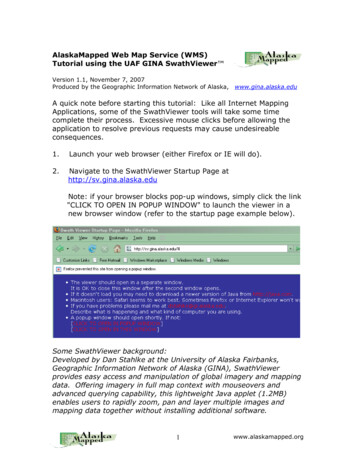
Using the AlaskaMapped Web Map Service(WMS) in ESRI ArcGIS 9.2Version 1.2, November 6, 2007Produced by the Geographic Information Network of Alaska,www.gina.alaska.eduThere are several ways to bring a Web Map Service (WMS) intoArcGIS. This tutorial will cover adding a connection to a wms url usingArcCatalog, ArcMap and via downloadable ArcGIS layer files.The second and optional section of this tutorial covers incorporating aWeb Feature Service (WFS) in ArcGIS using the Data InteroperabilityExtension. The WFS can be used to discover metadata pertaining toortho imagery being served through the AlaskaMapped BDL (Best DataLayer) WMS.First, we’ll add a connection to a wms using ArcCatalog.Back to the Top1. Launch ArcCatalog and scroll to the bottom of the catalog treeon the left hand side of the application window.2. Expand GIS Servers and double-click on Add WMS Server tolaunch the Add WMS Server dialog.1www.alaskamapped.org
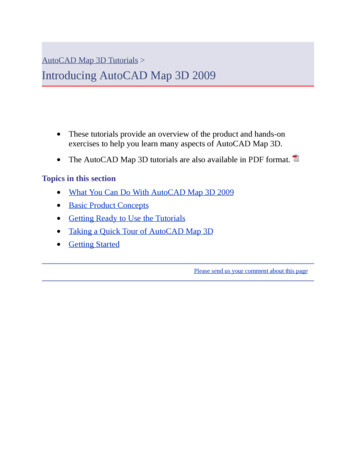
3. Type the URL for the Best Data Layer Web Map Service (BDLWMS) in the URL: window, then click the Get Layers button.The BDL WMS url is http://wms.alaskamapped.org/bdlOnce the wms is found, all available layers maintained by theservice will be listed in the Server Layers window of the Add WMSServer dialog. Click OK to add the WMS to your ArcGIS workingenvironment. The service will be listed in the ArcCatalog tree untilyou manually remove it, as well as be accessible to ArcMap usingthe Add Data button, which we will cover in the next few steps.2www.alaskamapped.org
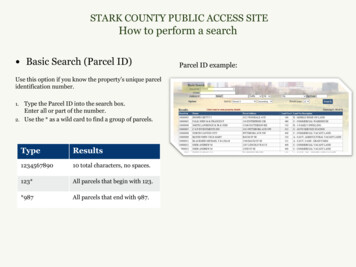
Example of the BDL WMS after adding to ArcCatalogSome background about the BDL WMS:The BDL (Best Data Layer) is the repository for the AlaskaStatewide Digital Mapping Initiative (SDMI). More informationabout SDMI can be found at http://www.alaskamapped.org. Thegoal of BDL WMS is to provide open access to the most current,publicly available orthorectified imagery anywhere across theentire State of Alaska. The WMS format is an open sourceprotocol defined by the Open Geospatial Consortium (OGC,http://www.opengeospatial.org) and can be implemented in avariety of mapping software platforms, not just ESRI ArcGIS.Currently, there are two additional WMS available throughAlaskaMapped; one named Extras containing a variety of rasterdatasets that are in frequent demand among end-users ofgeospatial information (i.e. USGS Digital Raster Graphics, USGSNational Elevation Dataset Shaded Relief, etc ), and anothernamed Charts containing the full listing of NOAA Nautical Chartsfor the State of Alaska (not suitable for navigation). These are atthe following URLs:Extras: http://wms.alaskamapped.org/extrasCharts: http://wms.alaskamapped.org/charts andhttp://wms.alaskamapped.org/charts nc (nc not cropped)3www.alaskamapped.org
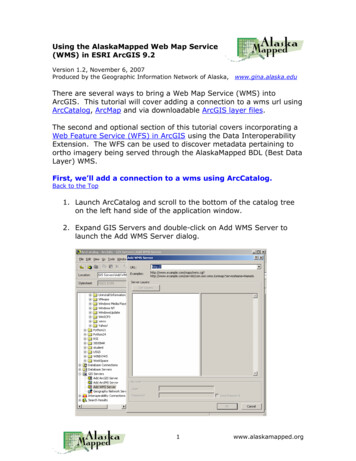
4. Launch ArcMap and click the Add Data buttonin: pull-down to GIS Servers. Set the Look5. Double-click the BDL WMS on wms.alaskamapped.orgconnection that you established in the previous step to displayits contents. Next, select BDL WMS then click the Add buttonto load the BDL WMS grouped layer into ArcMap.4www.alaskamapped.org
Example of the BDL WMS after adding to ArcMap6. Note: If the BDL WMS is the firstlayer you’ve added to your ArcMapsession, it will be read by ArcMap inthe Geographic WGS84 spatialreference. This can easily bechanged using either the CoordinateSystem tab of the Data FrameProperties, or the ChangeCoordinate System commandlocated on the BDL WMS layercontext menu. The BDL WMSsupports a wide range of coordinatesystems commonly used in Alaska.We will use the layer context menu to set our spatial referenceto Alaska Albers Equal Area Conic, NAD 83 Datum, Map UnitsMeters.First, right-click on the BDL WMS layer name in the Table ofContents and select the Change Coordinate System command tolaunch the Change Coordinate System dialog. Next, click on thepull-down arrow under the “all layers in the currently selected5www.alaskamapped.org
WMS service: option to view the list of coordinate systemscurrently supported by the BDL WMS.Select the desired coordinate system,Alaska Albers Equal Area Conic for the purpose of this tutorial,click Apply, then click OK (or just click OK which performs theApply task and dismisses the dialog at the same time).Click the Yes button when theWarning dialog informs you that thecoordinate system you have chosenvaries from data sources in the Map.6www.alaskamapped.org
Use the Zoom In toolto click and drag a box around theState of Alaska. When the display refreshes, your view shouldresemble the example below (note that your scale may varydepending on the pixel resolution of your monitor and the sizeof your ArcMap application window).7. Take a moment toexpand and scrollthrough the Table ofContents (TOC, locatedon the left side of theArcMap applicationwindow by default).Notice the differentlevels of resolutionavailable in the BDLWMS. Also notice thatscale dependency hasNote: A gray checkbox like this isbeen built into the BDLthe symbol for a scale dependentlayer not yet visible at the currentWMS, meaning thatdisplay scale.layers will be madevisible only atappropriate scales. Inthis example, the Low Resolution Natural Color layer is the only7www.alaskamapped.org
appropriate layer for display when viewing the entire State ofAlaska.8. Again using the Zoom In tool,click and drag a box around theInterior region of Alaska (similar tothe box shown in the example tothe right). When the displayrefreshes, it should lookcomparable to the example below.The current display scale is now such that the BDL WMS rendersthe High Resolution Natural Color Overview, but not the MidResolution. This is intentional and designed to flag the user tothe fact that more data is available at higher resolutions. Thisalso visually identifies for the user the extent of higherresolution data holdings available through AlaskaMapped andthe SDMI.8www.alaskamapped.org
9. Using the Zoom In toolonce again, click anddrag another boxaround the City ofFairbanks similar to theexample on the right. Ifyou don’t get the zoomquite right the first time,feel free to use theZoom Out tool or theZoom to Previous tooland try again. For thepurpose of this tutorial,you should try toachieve about the samedisplay extent as isshown in the examplebelow (centered onFairbanks International Airport). When you finish the tutorial,we encourage you to explore not only all of the data maintainedin the BDL WMS, but the Extras and Charts WMS as well.9www.alaskamapped.org
10. Now would be a good time to save the map document. Underthe File menu, select the Save As command. Navigate to theC:/student/AlaskaMapped/TutorialData directory, name the mapdocument AlaskaMapped Tutorial.mxd and click the Savebutton.11. Click the Save buttonto save the map document.Now we’ll create a connection to a wms using ArcMap.Back to the Top12. Next we’ll add theAlaskaMapped ExtrasWMS directly fromArcMap. Click the AddData button and set theLook in: pull-down to GISServers. Notice that theBDLWMS onwms.alaskamapped.org isstill listed. Double-clickon Add WMS Server tolaunch the Add WMSServer dialog from ArcMap.Type the URL for the ExtrasWMS into the URL:window, then click the GetLayers button to displaythe available layersmaintained in the ExtrasWMS (shown in theexample tot the right).Click the OK button to addthe connection to theArcMap Add Data dialog,then double-click on BDLWMS Extras onwms.alaskamapped.org inthe Add Data dialog, selectBDL WMS Extras and clickthe Add button to load the10www.alaskamapped.org
BDL WMS Extras group layer to your ArcMap document.13. If you haven’t changed the scale of your map document, theExtras WMS should now be displaying the USGS 1:63,360topographic quad map of Fairbanks. Expand the BDL WMSExtras layer in the ArcMap Table of Contents to view the dataavailable in this WMS.11www.alaskamapped.org
Download and add an ArcGIS layer file that references a WMSBack to the Top14. The easiest method to bring any or all of the AlaskaMappedWMS into ArcMap is to simply download the ArcGIS Layer Filefor the WMS (BDL, Extras, Charts, or Charts NC) and Add it toArcMap using the Add Data button. We will demonstrate thismethod using the Charts WMS that we described earlier in thistutorial. First, download the AlaskaMapped NOAA Charts WMSlayer file (www.alaskamapped.org/lyr/noaa charts.lyr) and saveit to the directory of your choice.15. Using the Add Data button in ArcMap, browse to theAlaskaMapped NOAA Charts.lyr file you just downloaded andadd it to ArcMap. Zooming in on the Airport in Nome, Alaska ata scale of 12,000 should render a map display similar to theexample below.Use the following links to download layer files for each of theAlaskaMapped WMS:www.alaskamapped.org/public docs/lyr/bdl.lyrwww.alaskamapped.org/public docs/lyr/extras.lyrwww.alaskamapped.org/public docs/lyr/noaa charts.lyrwww.alaskamapped.org/public docs/lyr/noaa charts nc.lyr12www.alaskamapped.org
16. This concludes the AlaskaMapped WMS ArcGIS Tutorial.You may continue on optional WFS Tutorial using the DataInteroperability Extension to ArcGIS 9.2.Using the AlaskaMapped Web Feature Service (WFS)in ArcGISBack to the TopThe following (optional) AlaskaMapped Web Feature Service (WFS)portion of this tutorial requires the ESRI Data InteroperabilityExtension. Please keep your ArcMap document open if you arecontinuing on to the next section.17. Launch ArcCatalog if you don’t still have it running.18. In ArcCatalog, scroll down to the Interoperability Connectionsentry towards the bottom of the catalog tree. ExpandInteroperability Connections and double-click on AddInteroperability Connection to launch the InteroperabilityConnection dialog.19. Click the ellipsisnext to the Format: window on theInteroperability Connection dialog to launch the Formats Galleryof the Data Interoperability extension. Select the Web FeatureService entry and click the OK button.13www.alaskamapped.org
TType the URL for the AlaskaMapped WFShttp://wfs.alaskamapped.org/inventoryinto the Dataset: window as is shown in the example above,then click the Settings button.20. Click the ellipsis next to the TableList: window under the Constraints:section of the Web Feature Service(WFS) dialog.This may take some time, but theWeb Feature Service (WFS) TableList will eventually load.14www.alaskamapped.org
21. Check the Selected box to the left of the SDMI Inventory itemas in the example above, then click the OK button.22. Ensure that the SDMI Inventory isloaded into the Table List of theSettings dialog, then click OK.23. The coordinate system for the AlaskaMapped WFS is built intothe service. It will NOT function correctly if you specify thecoordinate system in the Interoperability Connection dialog.Note: Leave the Coordinate System: window of theInteroperability Connection dialog intentionally set toUnknown. Your dialog should look exactly like the examplebelow.Click OK to complete the connection to the AlaskaMapped WFSInventory. It will be added to the ArcCatalog tree underInteroperability Connections as Connection (1) – WFS.15www.alaskamapped.org
24. Expand Connection (1) – WFS in the ArcCatalog tree to view itscontents.25. Minimize the ArcCatalog application window and return toArcMap. If you closed ArcMap earlier, launch a new ArcMapdocument and open ed Tutorial.mxd mapdocument you savedearlier.26. In ArcMap, under the Toolsmenu, select theExtensions command tolaunch the Extensionsdialog. Ensure that theData Interoperabilityextension is checked, thenclick Close to dismiss theExtensions dialog.16www.alaskamapped.org
27. Uncheck the visibility for both the fnsb road centerline.shplayer and the BDL WMS Extras layer in the ArcMap Table ofContents.28. Using the Data Frame Scale combo-box on the ArcMap Standard, or theToolbar (circled below), or the Zoom Out toolnavigation tool of your choice, zoom out to an appropriate scaleat which you can once again view the entire State of Alaska.29. Click the Add Data button and set the Look in: window toInteroperability Connections. Double-click the entry forConnection(1) – WFS.fdl, select the SDMI Inventory Polygonlayer and click the Add button (refer to the example above).17www.alaskamapped.org
30. Click Close on the Geographic Coordinate System Warning,again because the difference between WGS84 and NAD83 isnegligible enough that we don’t need to apply a geographictransformation in ArcGIS.The SDMI Inventory Polygon layer contains a footprint (outline)polygon for all othro image tiles maintained in theAlaskaMapped BDL WMS, as well as minimum metadata storedin the form of the attributes of each polygon which pertain toeach ortho image tile being referenced by an Inventory polygon.These data are a live connection to the database server hostingthe BDL WMS and are created on-the-fly from the boundingcoordinates of every image tile that has been ingested into theservice.31. Double-click on the SDMI Inventory Polygon layer name in theTable of Contents to launch its Layer Properties dialog, then goto the Display tab. Set the Transparent: setting to 40%, thencheck the Support Hyperlinks using field: option and set thepull-down to the url option. Finally, click the URL radio button inthe Hyerplinks section of the Layer Properties dialog (see theexample below).18www.alaskamapped.org
Click the OK button to apply these properties and dismiss thedialog.32. Using the Zoom In tool, click and drag a box around the seriesof Inventory polygons on Kodiak Island (see the example on theright).33. Using the Identify tool on the Tools toolbar, click on any of theInventory polygons in the display area. In left hand side of theIdentify window, all available image tiles beneath your mouseclick are listed (only one in this example). If there had beenmore than one, selecting one of these records would flash thepolygon related to the selected record on the map display.19www.alaskamapped.org
Notice that a minimum set of metadata has been built into theInventory WFS pertinent to the BDL WMS ortho imageunderlying the Inventory footprint polygon (i.e. contact,license type, etc.). Pay special attention to the downloadablefield. If the value for this field is the letter t, the original orthoimagery being referenced by that inventory polygon anddisplayed by the BDL WMS is freely downloadable from thebrowse.alaskamapped.org website.34. If necessary, scroll down on the Identify window until the urlfield is visible. Notice the hyperlink lightning bolt icon to theright of the url value.35. Click on the lightning bolt to launch thebrowse.alaskamapped.org download page specific to the orthoimage represented by that Inventory polygon.20www.alaskamapped.org
Clicking on the Download button on this webpage will execute adownload of the original ortho image in the original format in which itwas received by GINA prior to ingestion into the AlaskaMapped BDLWMS. You do not have to actually download the imagery for thistutorial, just keep in mind that this is how you can do it if you everhave the need to.This concludes the AlaskaMapped Inventory WFS ArcGIS Tutorial.You should now have an understanding of how to connect to theAlaskaMapped WMS and WFS using either ArcCatalog or ArcMap, andhow to use the Inventory WFS to view metadata for imagery heldwithin the BDL WMS as well as use the WFS Inventory polygons tohyperlink to the download page for the image to which they refer.Thank you Back to the TopPlease email the GINA staff at wms@alaskamapped.org if you have further questions or comments.Author: Peter J. Hickman21www.alaskamapped.org
There are several ways to bring a Web Map Service (WMS) into ArcGIS. This tutorial will cover adding a connection to a wms url using ArcCatalog, ArcMap and via downloadable ArcGIS layer files. The second and optional section of this tutorial covers incorporating a Web Feature Service (WFS) in ArcGIS using the Data Interoperability .