Transcription
ManualVersion Release 03.04.01May 2021
. 4. 5Access GPAS . 5Create and Login to GPAS Account . 6First-Time Login . 8Subsequent Logins . 9Manage User Profile . 11Manage Addresses . 13The GPAS Interface . 14Review Permit Details and Status . 16. 17Search for Access Permits . 17Grid Search . 17Map Search. 20Filter Permits . 36Sort Permits . 39. 41Submit an Access Permit Application . 427410 – Special Encroachment . 437410A – Limited Landscape. 547412 – Commercial Driveway . 657414 – Temporary Conditions . 767416 – Bus Shelter Bench Encroachment . 87Revision/Addendum . 98
. 106Initial GDOT Review . 106Submit Electronic Signature (DocuSign) . 107Final GDOT Review . 109Final Approval . 110
This manual discusses how external applicants can use the Georgia Permit Application System(GPAS) to manage access permit requests. This manual will introduce the following GPAS topics:Access, Create and Login to GPAS AccountThe GPAS InterfaceManage User Profile and AddressesSearch / Sort / Filter PermitsSubmit New Access Permit Requestso 7410 – Special Encroachmento 7410A – Limited Landscapeo 7412 – Commercial Drivewayo 7414 – Temporary Conditionso 7416 – Bus Shelter – Bench EncroachmentReview Application Statuso Initial GDOT Reviewo Submit Electronic Signature (DocuSign)o Final GDOT Review and ApprovalSubmit a Revision / AddendumHow to Use this ManualThroughout the manual, you will see callouts that contain notes, pro tips, and important information tohelp you use GPAS efficiently and boost productivity. Look out for these callouts to quickly become asuper user!These callouts containsupplementary notes thatwill help you choose theappropriate settings andprovide background info.These callouts contain techtips, productivity tips, andother useful nuggets ofinformation that will makeyou more efficient.These callouts containinformation that willprevent errors fromoccurring and help youtroubleshoot issues.NotePro TipImportantAbout this Manual4
Access GPAS1. To access GPAS, go tohttp://www.dot.ga.gov/PS/and navigate toBusiness & Government Permits Georgia Permit ApplicationSystem (GPAS)2. The GPAS login page will appear.If this is your first time accessingGPAS, you must first create anaccount and setup your profile.Getting Started5
Create and Login to GPAS Account1. To create a GPAS account, selectCREATE YOUR GPASACCOUNT.2. Enter your Email Address, FirstName, Last Name, and Phonenumber.Getting Started6
3. When adding a phone number,indicate whether this is a Mobileor Land Line phone.4. When adding a Mobile phone,you are presented with the optionto Send verification code viamobile texts.Select the checkbox to authorizeGDOT to send you verificationcodes via text message.5. Select the checkbox to confirmthat the email you entered is theofficial email for you or yourcompany.Getting Started7
6. Select REGISTER to continue.You will receive an email to theregistered email address withinstructions to login to theapplication.A verification code will be includedin the registration email.Each subsequent login mustrequest a new verification code.NoteFirst-Time Login1. After receiving your verificationcode, return to the login screen.From the login screen:a. Enter the Email addressthat you entered onregistration.b. Enter the VerificationCode that was sent to youremail address (or mobiledevice).c. Select LOGIN.2. You will now be logged in to theGeorgia Permit ApplicationSystem.The verification code is a one-time use code that will only be active for 60 minutes.If you attempt to login after 60 minutes, or if you login once using the code, you willneed to request a new verification code for subsequent logins.ImportantGetting Started8
Subsequent Logins1. From the login screen:a. Enter the Email addressthat you entered onregistration.b. Select SENDVERIFICATION CODE.2. From the pop-up window, selecthow you would like to receive theverification code and selectSEND.To receive verification codes viatext message, you must haveselected Mobile as the phone typeduring registration.NoteThe verification code is a one-time use code that will only be active for 60 minutes.If you attempt to login after 60 minutes, or if you login once using the code, you willneed to request a new verification code for subsequent logins.ImportantGetting Started9
3. After receiving your verificationcode, return to the login screen.From the login screen:a. Enter your Email address.b. Enter the VerificationCode that was sent to youremail address (or mobiledevice).c. Select LOGIN.4. You will now be logged in to theGeorgia Permit ApplicationSystem.After ten unsuccessful login attempts, your account will be locked.To unlock your account or to get help with any GPAS issues, contact the SolutionsCenter at SolutionsCenter@dot.ga.gov.ImportantGetting Started10
Manage User ProfileThe first time you login to GPAS, you will be prompted to update your user profile.1. Click OK.2. You will be directed to the MYPROFILE page.3. Choose the Applicant Type.Getting Started11
4. The field to the right of ApplicantType will change depending onthe Applicant Type selected.For example, if Company wasselected as the Applicant Type,enter the Company Name in thefield to the right.5. Continue completing the requiredfields listed:a. First Nameb. Last Namec. Emaild. Phonee. Phone Type6. If you selected the checkbox toreceive verification codes viamobile text during registration, thecheckbox on this page will bechecked.7. Select UPDATE PROFILE tocontinue.Getting Started12
Manage Addresses1. If you are not already in the MyProfile section, select My Profilefrom the upper right corner.2. Select ADD NEW ADDRESS.3. Expand Address Type from thedrop-down list.4. Select Address Type.5. Enter Address.6. Select UPDATE.Getting Started13
The GPAS InterfaceThe GPAS Home page shows: DRAFT PERMITS SUBMITTED SIGNALPERMITS SUBMITTED ACCESSPERMITSFrom here you can view thedetails of submitted permits.From the top left of the Homepage, you can access three ofthe main sections, which are:a. Home – This will bringyou back to the GPAShomepage.b. Permits – From thismenu, you have thefollowing options:i.Apply for AccessPermitii.Apply for SignalPermitc. Search – Here you cansearch for Draft orSubmitted permits.Getting Started:14
From the top right of the Homepage, you can access thefollowing:d. My Profile – Update youruser profile.e. Logout – Logout ofGPAS.f. Help – Access helpdocuments for GPAS.You can filter the lists of permits, by selecting the Filter () icon next to any of the columns. Youcan also sort by selecting the column headings in ascending or descending order.You can move from one page of permits records to the next by selecting the page number or thearrows next to it at the bottom of each section.You can change the number of items per page byselecting the down arrow in any of the sections.Getting Started15
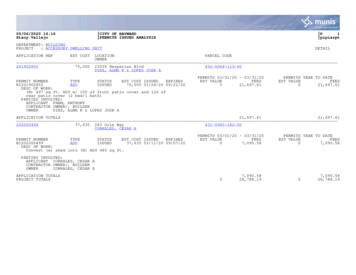
Review Permit Details and Status1. You can review the permit details and status by selecting the arrow on the left side of thePermit ID.You will see where in the approval process your permit is, when it was assigned and thestatus.2. By selecting the Reference ID/Permit ID link, you will see the details of your permit as it wassubmitted.Getting Started16
Search for Access PermitsGrid Search1. Select Search.2. Select Permit Type.3. Select Access Permit from the dropdown list.4. Select as many search criteria as you need to narrow your results.5. Select SEARCH.Search / Sort / Filter Permits17
6. The system validates and displays available records on the results grid along with the details.7. Notice that the system shows 10 out of 57,372 records.8. Select the desired Permit ID to show permit details.Search / Sort / Filter Permits18
9. The view of the permit is read only. To close this page and return to the search page, selectCLOSE at the bottom of the window.Search / Sort / Filter Permits19
Map SearchYou can also search by using the map. There are several tools in the map area that can aid in yourpermit search.The tools are:Default ExtentResets the map to display all the districts in the stateof Georgia.Zoom OutZooms out the view of the map.Zoom InZooms in the view of the map.Show Hide Data LayersShows or hides data layers on the map.Switch BasemapChanges the display of the base map.LegendDisplays the definition of the symbols on the map.Tri ViewDisplays the location on online mapping.Search by Drawing aAllows you to search a region on the map by drawingRectangle on the Mapa rectangle around it.Search / Sort / Filter Permits20
Default ExtentWhen you open the search tab, the map shows all the districts in the state of Georgia. You can goback to the default view by selecting Default Extent ().Zoom OutTo zoom out the map view, select Zoom Out (scaled view.Search / Sort / Filter Permits) as many times as needed to achieve the desire21
If you are working on a computer, and yourcomputer mouse has a wheel, you can rolldown the wheel to zoom out.Pro TipZoom InTo zoom into the map view, select Zoom In (scaled view.) as many times as needed to achieve the desireIf you are working on a computer, and yourcomputer mouse has a wheel, you can rollup the wheel to zoom in.Pro TipSearch / Sort / Filter Permits22
Show Hide Data LayersUse the Show Hide Data Layers () icon to show or hide data layers at any time.1. Select Show Hide Data Layers.2. Select the right arrow to display thelayers.3. By default, the Counties and the GDOT District layers are visible.Search / Sort / Filter Permits23
If you deselect the GDOT District layer, you will be left with only the Counties layer.If you deselect instead the Counties layer, you will be left with only the GDOT Districts layer.Search / Sort / Filter Permits24
If you have conducted a search and you display the Show Hide Data Layers, then the layer dataof your search will be added to the display. In this example you see the Access Permit layer isalso checked. Notice the Access Permits locations on the map.If you select the US Route layer, the system will highlight any US Routes visible on the map.Search / Sort / Filter Permits25
If you select the Traffic Signal Installed layer, the system will highlight any Traffic SignalsInstalled which are visible on the map.Switch BasemapUse the Switch Basemap () icon to change the display of the base map for easier viewing.1. Select Switch Basemap. By default, the Streets type is visible.Search / Sort / Filter Permits26
If you select the Imagery base map type, the display changes as shown below.If you select the Imagery with labels base map type, the display changes as shown below.Search / Sort / Filter Permits27
If you select the Topographic base map type, the display changes as shown below.If you select the Dark Gray Canvas base map type, the display changes as shown below.Search / Sort / Filter Permits28
If you select the Light Gray Canvas base map type, the display changes as shown below.If you select the National base map type, the display changes as shown below.Search / Sort / Filter Permits29
If you select the OpenStreetMap base map type, the display changes as shown below.If you select the USGS National base map type, the display changes as shown below.Search / Sort / Filter Permits30
And if you select the USA Topo Maps base map type, the display changes as shown below.LegendUse the Legend () icon to have the color-coded symbols that appear on the map defined for you.1. Select Legend.2. If necessary, scroll down to see all theitems on the legend.Make sure the AccessPermit layer is checked on.ImportantSearch / Sort / Filter Permits31
Tri ViewThe Tri View () icon helps you to visualize a specific location on the map.1. Zoom into the general area you would like to conduct your search.2. Select Tri View.3. Select the desired location on the map to open Tri View.The Tri View only worksin the Permit Location tabas part of the permitapplication process.Important4. Select View Map.Search / Sort / Filter Permits32
5. The program displays 3 windows, all the same area in different formats.6. Use the tools on the map to familiarize yourself with the area.Search / Sort / Filter Permits33
Search by Drawing a Rectangle on the MapAnother option for searching GPAS records is to use the Search by Drawing a Rectangle on theMap () icon.1. Zoom into the general area you would like to conduct your search.2. Select Search by Drawing a Rectangle on the Map.3. At the top left of the region you want to select, press and hold the left-button on the mouse.Search / Sort / Filter Permits34
4. Drag the mouse diagonally across the desired area.5. Release the mouse button to complete drawing the rectangle on the map.6. The search results are displayed below the marked map.Search / Sort / Filter Permits35
Filter PermitsTo narrow down the results of any search, you can apply column filters.To apply a column filter:1. Select the filter () button next to the column header.2. When you select the filter button, a filterdialog box appears.3. If necessary, expand the Show itemswith value that: drop-down list.4. Select the most relevant option for yoursearch.Search / Sort / Filter Permits36
5. Enter a filter criterion in the field.6. You may add a secondary filter criterionin the extra field.7. Select FILTER.8. Notice that the system shows 10 out of 22 records.Search / Sort / Filter Permits37
9. You can continue applying filters as needed. In this example the Status filter set to Send forCorrections was used. Now we have only 3 records in the list.To remove the filter:1. Select the filter icon.2. Select CLEAR.Search / Sort / Filter Permits38
Sort PermitsAnother way to display the records is to sort the results.To sort the list:1. Display the records that you want to sort.Search / Sort / Filter Permits39
2. Select a column header. Select once, it sorts in ascending order, which is indicated by thearrow pointing up ( ).3. Select it again, it sorts in descending order, which is indicated by the arrow pointing down( ).4. Select it again, to no longer sort the list of records.Search / Sort / Filter Permits40
The Access Permit application is a process that has a clear start and end. In general, the applicationprocess can be visualized as below.StartSubmissionGDOT ReviewApplicant (DocuSign)GDOT ApprovalGDOT (DocuSign)Post Approval (if applicable)Permit ReleaseEndAs soon as a permit application is submitted, its status becomes Pending. The status will change to:Send for Corrections, Approved or Rejected depending on where it is in the approval process.Access Permits Application Process41
Submit an Access Permit ApplicationOnce an access permit application has been submitted, it enters the initial GDOT review process.The applicant will be required to submit an electronic signature using the DocuSign software, followedby final GDOT review and approval. The process can be visualized as below.Submission ApplicationSubmissionGDOT IntialApplicationReviewApplicant(DocuSign) ApplicantElectronicSignatures (linkfrom email)GDOT ApplicationReviewGDOT(DocuSign) Final ApprovalThe instructions and requirements differ slightly depending on the type of access permit you arerequesting. Select your requested Access Permit type and continue with the steps found in thatsection.Types of Access Permits are: 7410 – Special Encroachment7410A – Limited Landscape7412 – Commercial Driveway7414 – Temporary Conditions7416 – Bus Shelter Bench EncroachmentRevision/AddendumAccess Permits Application Process42
7410 – Special EncroachmentBefore you begin, make sure you have the following information:Applicant/Main Information Applicant Type:o Individual/ Property Ownero Company Company Nameo Local Government Requestor Nameo Metropolitan Transit AuthoritySelect:o Non Limited Accesso Limited AccessApplicant Information:o First Name (required)o Last Name (required)o Email (required)o Phone (required)o Address (required)o Title (optional) Permit Location District County (required)CityUS RouteState Route #Side of the Road: (required)o Easto Northo Northeasto Northwesto Southo Southeasto Southwesto Westo BothNearest Named Street (required)Beginning Number of Feet (required)Total Frontage (required)Beginning Mile PostEnding Mile PostLatitude (auto-populated)Longitude (auto-populated)Work Description (required)Access Permits Application ProcessDirection (required)o Easto Northo Northeasto Northwesto Southo Southeasto Southwesto WestFurther Direction: (required)o Easto Northo Northeasto Northwesto Southo Southeasto Southwesto Westo Back Westo Back Southeasto Back Southwesto Back Southo Back Northwesto Back Northeasto Back Northo Back EastAdditional Information Require Replacement ofUtility Easements or ELA: Y/NSpeed LimitRequire Relocation orAdjustment to Any Utility: Y/NComply with AmericanDisabilities Act (ADH): Y/NExisting Signal? Y/NLandscaping? Y/NDeceleration Lanes? Y/NCenter Left Turn Lane? Y/NRequire Donation ofAdditional Row Y/No Donation Comment:New Signal or SignalRevision Required? Y/No Date Signal Study tobe Submitted Hydro Study Required? Y/No Date Hydro Study to beSubmittedUtility Letters Required? Y/No Date Utility Letters to beSubmittedBond Type: Blanket Bond, Letterof Escrow or Performance BondBond AmountAdditional Information -Cont. Radius Drive? Y/NSpecial RequirementsAttachments Letter of Request (Required)Plans (Required)CAP for Monitoring WellsCounty or City DevelopmentReview CommentsDrainage/Hydrology StudyIntersection Control EvalIrrigation PlansLandscape PlansMiscellaneousProperty DeedProperty Zoning StipulationsRedline PlanTraffic StudyTree Survey43
To submit a 7410 – Special Encroachment access permit request:1. Select Permits.2. Select Apply for Access Permit.You will be taken to the ApplicantMain Information tab.Applicant / Main Information Tab1. If you are the applicant, check the box next to Are you the Applicant. If you are submittingthe permit request on behalf of someone else, leave this unchecked and you will be requiredto enter the applicant information.2. Select the Applicant Type drop-down list.3. Select the Applicant Type.4. If you select Company as the Applicant Type, enter the Company Name.Access Permits Application Process44
5. Select the Access Type drop-down and choose 7410 - Special Encroachment from the list.6. For 7410 – Special Encroachment, youwill need to select from the following twooptions: Non Limited Access orLimited Access.7. Enter the applicant’s contact information.8. Select NEXT to navigate to the Permit Location tab.You can select CANCEL to cancel the permit application.Access Permits Application Process45
Permit Location Tab1. Select the county for the permit location from the Select County drop-down list.2. Use the mouse or the - / buttons to zoom into the permit location on the map at the streetlevel.3. Select(Draw Access Permit Lines) icon to draw a line on the map.4. Select once to begin drawing the line.Access Permits Application Process46
When marking the location,the line should touch a grayline, indicating the neareststate route or main road toyour development project.Important5. Move the mouse to draw the line and double-click to end the line.6. The system will populate most of the location fields with the available information. Enter allthe mandatory data marked with an asterisk.7. There is a short description of the Proposed Work Site. Enter Description Of Work.Access Permits Application Process47
8. Select NEXT to save the application and navigate to the Additional Information tab. Youcan also save the application by selecting SAVE.The system will allow you to save the permitapplication as a draft, only upon successfullycompleting the Permit Location tab.The system will generate a PermitReference ID only upon successfullycompleting the Permit Location tab.NoteNoteAccess Permits Application Process48
Additional Information Tab1. Read the instructions.2. Select all options that apply to your permit application.3. Select NEXT to save the application and navigate to the Attachments tab.Access Permits Application Process49
Attachments TabThe next step in the permit application process is to upload all required documents and any you deemrelevant. The required documents (*) will change depending on the type of permit.The only file type you may upload is a PDF file.Attachments are limited to 100 MB per file.You may only upload one document for each type (except in the Miscellaneous section).You may upload the same file more than once to create multiple versions of the file.Upload one document at a time.Note1. Select PDF Only to the right of the document type you wish to upload.Access Permits Application Process50
2. Select the file.3. Select Open.4. Wait while the system uploads the file.Access Permits Application Process51
5. The system will display a document link next to the file once it has been uploadedsuccessfully.6. You may upload several files under the Miscellaneous section.7. Select REVIEW & SUBMIT.Access Permits Application Process52
Review / Edit Access Permit Request1. Review carefully all the information in the permit form.2. If you need to make any changes, select Edit ()for the section and make the appropriatechanges.3. Once permit form is correct select the check box to acknowledge that you are authorized tosubmit the permit request on behalf of the property owner, leaser or an official representingthe company, organization or group which owns or leases the property.4. Select Submit.Access Permits Application Process53
7410A – Limited LandscapeBefore you begin, make sure you have the following information:Applicant/Main Information Applicant Type:o Individual/ Property Ownero Company Company Nameo Local Government Requestor Nameo Metropolitan Transit AuthorityApplicant Information:o First Name (required)o Last Name (required)o Email (required)o Phone (required)o Address (required)o Title (optional) Permit Location District County (required)CityUS RouteState Route #Side of the Road: (required)o Easto Northo Northeasto Northwesto Southo Southeasto Southwesto Westo BothNearest Named Street (required)Beginning Number of Feet (required)Total Frontage (required)Beginning Mile PostEnding Mile PostLatitude (auto-populated)Longitude (auto-populated)Work Description (required)Additional Information Access Permits Application ProcessDirection (required)o Easto Northo Northeasto Northwesto Southo Southeasto Southwesto WestFurther Direction: (required)o Easto Northo Northeasto Northwesto Southo Southeasto Southwesto Westo Back Westo Back Southeasto Back Southwesto Back Southo Back Northwesto Back Northeasto Back Northo Back EastRequire Replacement ofUtility Easements or ELA:Y/NSpeed LimitRequire Relocation orAdjustment to Any Utility:Y/NComply with AmericanDisabilities Act (ADH): Y/NExisting Signal? Y/NLandscaping? Y/NDeceleration Lanes? Y/NCenter Left Turn Lane? Y/NBond Type: Blanket Bond,Letter of Escrow orPerformance BondBond AmountRadius Drive? Y/N Require Donation of AdditionalRow Y/No Donation Comment:New Signal or Signal RevisionRequired? Y/No Date Signal Study to beSubmittedHydro Study Required? Y/No Date Hydro Study to beSubmittedUtility Letters Required? Y/No Date Utility Letters to beSubmittedSpecial RequirementsAttachments Letter of Request (Required)Plans (Required)CAP for Monitoring WellsDrainage/Hydrology StudyIntersection Control EvalIrrigation PlansLandscape PlansMiscellaneousProperty DeedRedline PlanTraffic StudyTree Survey54
To submit a 7410A – Limited Landscape access permit request:1. Select Permits.2. Select Apply for Access Permit.You will be taken to the ApplicantMain Information tab.Applicant / Main Information Tab1. If you are the applicant, check the box next to Are you the Applicant. If you are submittingthe permit request on behalf of someone else, leave this unchecked and you will be requiredto enter the applicant information.2. Select the Applicant Type drop-down list.3. Select the Applicant Type.4. If you select Company as the Applicant Type, enter the Company Name.Access Permits Application Process55
5. Select the Access Type drop-down and choose 7410A – Limited Landscape from the list.6. Enter the applicant’s contact information.7. Select NEXT to navigate to the Permit Location tab.You can select CANCEL to cancel the permit application.Access Permits Application Process56
Permit Location Tab1. Select the county for the permit location from the Select County drop-down list.2. Use the mouse or the - / buttons to zoom into the permit location on the map at the streetlevel.3. Select(Draw Access Permit Lines) icon to draw a line on the map.4. Select once to begin drawing the line.Access Permits Application Process57
When marking the location,the line should touch a grayline, indicating the neareststate route or main road toyour development project.Important5. Move the mouse to draw the line and double-click to end the line.6. The system will populate most of the location fields with the available information. Enter allthe mandatory data marked with an asterisk.7. There is a short description of the Proposed Work Site. Enter Description Of Work.Access Permits Application Process58
8. Select NEXT to save the application and navigate to the Additional Information tab. Youcan also save the application by selecting SAVE.The system will allow you to save the permitapplication as a draft, only upon successfullycompleting the Permit Location tab.The system will generate a PermitReference ID only upon successfullycompleting the Permit Location tab.NoteNoteAccess Permits Application Process59
Additional Information Tab1. Read the instructions.2. Select all options that apply to your permit application.3. Select NEXT to save the application and navigate to the Attachments tab.Access Permits Application Process60
Attachments TabThe next step in the permit application process is to upload all required documents and any you deemrelevant. The required documents (*) will change depending on the type of permit.The only file type you may upload is a PDF file.Attachments are limited to 100 MB per file.You may only upload one document for each type (except in the Miscellaneous section).You may upload the same file more than once to create multiple versions of the file.Upload one document at a time.Note1. Select PDF Only to the right of the document type you wish to upload.Access Permits Application Process61
2. Select the file.3. Select Open.4. Wait while the system uploads the file.Access Permits Application Process62
5. T
Default Extent Resets the map to display all the districts in the state of Georgia. Zoom Out Zooms out the view of the map. Zoom In Zooms in the view of the map. Show Hide Data Layers Shows or hides data layers on the map. Switch Basemap Changes the display of the base map. Legend Displays the definition of the symbols on the map.