Transcription
HP Fortify Jenkins PluginInstallation , Configuration, and UseThe HP Fortify Jenkins Plugin (Jenkins plugin) is used in conjunction with HP FortifySoftware Security Center (SSC), a collaborative system for reviewing and auditing securityanalysis results. If you use a Fortify plugin such as maven to scan your source code aftereach build, the Jenkins plugin automatically uploads the Fortify project results (in an FPRfile) to an SSC server and enables you to view the details within Jenkins. It also providesmetrics for each build and an overview of the results, without having to connect to SSC.This document provides instructions on how to prepare SSC to work with the Jenkinsplugin, and how to install, configure, and use the plugin. For information about Jenkins,see the Jenkins web site (http://jenkins-ci.org).Preparing Software Security Center to Work withthe Jenkins PluginTo prepare SSC to work with the Jenkins plugin, you create a new token type, and thenuse the fortifyclient utility to generate a token of that type. The following topics provideinstructions on how to perform these two tasks.Creating a Jenkins Token TypeThe Jenkins plugin communicates with HP Fortify Software Security Center (SSC) inseveral ways. Since SSC web services are access-controlled, you must define a newauthentication token type that authorizes the various web service requests that the pluginuses.To create this token type:1. From your Software Security Center installation directory, navigate to ternal directory, and thenopen the serviceContext.xml file in a text editor.2. Add the following block of text to the file: bean id "jenkinsToken"class enSpec" property name "key" value "JenkinsToken"/ property name "maxDaysToLive" value "365"/ property name "actionPermitted" list value-type "java.lang.String" value AddProjectRequest /value value AddProjectVersionRequest /value value AddProjectAndVersionRequest /value HP Fortify SoftwareHP Fortify Jenkins Plugin1
value GetAuthenticationTokenRequest /value value ProjectListRequest /value value ActiveProjectVersionListRequest /value value ProjectVersionListRequest /value value ProjectTemplateListRequest /value value FPRUploadRequest /value value AuditViewRequest /value value PerformAuditActionRequest /value value IssueListRequest /value value GetProjectVersionIdentifiersRequest /value value ProjectMetaDataDefinitionsListRequest /value value AddProjectMetaDataDefinitionRequest /value value UpdateProjectMetaDataDefinitionRequest /value value ProjectMetaDataValuesListRequest /value value ProjectMetaDataValueRequest /value value GetSingleUseFPRUploadTokenRequest /value value CreateAuditSessionRequest /value value InvalidateAuditSessionRequest /value value GroupingValuesRequest /value /list /property property name "terminalActions" list value-type "java.lang.String" value InvalidateTokenRequest /value /list /property /bean 3. Save and close the serviceContext.xml file.Generating an SSC Authorization TokenAfter you define a Jenkins token type, you must use the fortifyclient command-lineutility to generate a token instance.To generate an SSC authorization token:1. From the ssc install /Deployment/fortifyclient/bin directory, run thefollowing:fortifyclient token -gettoken JenkinsToken -daysToLive 365 -url ssc url /ssc -user user with appropriate credentials where JenkinsToken is the case-sensitive fortifyclient upload token specifier.Notes: The Software Security Center URL passed to fortifyclient must include both theport number and the context path /ssc/. The correct format for the SSC URL is asfollows:http://nnn.nnn.nnn.nnn:8080/ssc/ The ability of fortifyclient to use the token to read or write information to or fromSSC depends on the account privileges of the SSC user account specified bythe -user parameter.HP Fortify SoftwareHP Fortify Jenkins Plugin2
The fortifyclient utility prompts for a password.2. Type the password for account name .The fortifyclient utility returns a token of the general form cb79c492-0a78-44e3b26c-65c14df52e86.3. Copy the returned token into a text file.For detailed information about the fortifyclient command-line utility, see the HPFortify Software Security Center Installation and Configuration Guide.About Jenkins InstallationIf you do not have Jenkins installed, download version 1.4.30 or later fromhttp://mirrors.jenkins-ci.org/war. The Jenkins plugin works with Jenkins 1.4.30 and laterversions.For more information about how to install and start Jenkins, see the following web Installing /Starting and Accessing JenkinsInstalling the Jenkins PluginTo install the Jenkins plugin, you must have Jenkins installed on your system.To install the Jenkins plugin:1. Open a browser window and navigate to http:// jenkins server url :8080/. (Tostart Jenkins locally, run java -Xmx1024m -XX:MaxPermSize 512m -jar jenkins.war file path .)2. From the Jenkins user interface, select Manage Jenkins, and then select ManagePlugins.3. On the Plugin Manager page, click the Advanced tab.4. In the Upload Plugin section, click Browse, and then locate and select thefortifyJenkins.hpi file.5. Click Upload.6. Restart Jenkins. (If you started Jenkins locally, press CTRL C in the command linewindow to restart it.)HP Fortify SoftwareHP Fortify Jenkins Plugin3
Verifying Plugin InstallationTo verify that the Jenkins plugin is installed:1. Open a browser window and navigate to http:// jenkins server url :8080/.2. From the Jenkins user interface, select Manage Jenkins, and then select ManagePlugins.3. On the Plugin Manager page, click the Installed tab.4. Check to make sure that HP Fortify Jenkins Plugin version 1.4.30 is listed in the tableof installed plugins.For more information about how to install Jenkins plugins, see the Jenkins Plugin lugins#Plugins-Howtoinstallplugins).Configuring the Jenkins PluginTo configure the Jenkins plugin for use with SSC:1. Open a browser window and navigate to http:// jenkins server url :8080/.2. From the Jenkins user interface, select Manage Jenkins, and then select ConfigureSystem.3. In the HP Fortify Assessment section, do the following:a. In the URL box, type the URL for the SSC server for which you configured theJenkins token type. (The correct format for the Software Security Center URL ishttp://nnn.nnn.nnn.nnn:8080/ssc/.)b. In the Authentication Token box, enter the authentication token generated for theSSC server.4. Click Advanced, and then click Test Connection.The Project Template list is now populated with available SSC project templates. SSCuses the selected project template when it creates new projects.New projects are always of the ‘Basic Remediation Project’ type. So, you must choose aproject template. The project template optimizes the categorization, summarization,and reporting of the project version data.5. From the Project Template list, select the appropriate project template for yourproject.6. Click Save.Note: There is no need to specify a value in the Issue breakdown page size box at this time.You can always change this setting later. This setting controls the Issue Breakdown tableview. The default is 50 issues per page.HP Fortify SoftwareHP Fortify Jenkins Plugin4
Configuring the Build Step to Use for the Jenkins PluginTo configure the build step to use Jenkins plugin:1. From the Jenkins user interface, select the job to view or create a new job.2. On the job page, select Configure.3. On the configuration page that opens for the job, in the Post-build Actions section,select the HP Fortify Assessment check box.4. In the HP Fortify Assessment section, provide or change values for the properties andactions listed in the following table.Note: To see a description of an action or property, click the helpicon to its right.Action orPropertyDescriptionFPR FilenameFPR basename to be published (for example, audit.fpr). If novalue is specified, Jenkins searches "./**/*.fpr" files in theworkspace with the latest modified date.FilterSetFilter set to be used when reading the FPR. If no value isspecified, the default filter is used.SSC, by default, has two filter sets: Security Auditor View andQuick View. Quick View is the default filter set. However, theexact filter set configuration is determined by the projecttemplate used to create the project.Fail condition and NVS calculation depend on the issuesfiltered by the filter set. For example, if some “CriticalExposure” filter is applied to the project issues (and issuesquantity shows 0), then fail condition “sees” no reason to setthis build as “unstable” and NVS is set to 0. The graphsummary also shows 0.Fail ConditionA build is considered unstable if the fail condition is met.To get the unstable build where there is an SQL injection issuein the Hot folder, use the following search string:[fortify priority order]:high category:SQL InjectionThis search string syntax is the same as that used for the SSCsearch and filter functionalities. So, there are some limitationsHP Fortify SoftwareHP Fortify Jenkins Plugin5
Action orPropertyDescriptioncompared to AWB applications. For example, using a regularexpression for a search is not supported.Project NameProject name to be used when uploading FPRs to SSC. Leavingthis field blank disables the upload.Project Version is always used in conjunction with ProjectName.To upload an FPR file to SSC: Project Version and Project Name must be specified. SSC URL and the authentication token must be correctlyspecified.Note: If a project with the specified project name does notexist on SSC, SSC creates it upon the successful build.Enable this plugin and save the configuration. The next timeyou visit this configuration page, a menu populated with allthe available project names is displayed.Alternatively, run the following command to list all availableprojects and their corresponding project IDs:# fortifyclient listprojects -url ssc url /ssc -user your login Project VersionProject version to be used when uploading to SSC. Leaving thisfield blank disables the upload.Project Version is always used in conjunction with ProjectName.To upload an FPR file to SSC:Upload WaitTimeHP Fortify Software Project Version and Project Name must be specified. SSC URL and the authentication token must be correctlyspecified.Because the FPR upload process to SSC is asynchronous, theWebService function call is returned while SSC is stillprocessing the upload request. Therefore, the plugin waits forHP Fortify Jenkins Plugin6
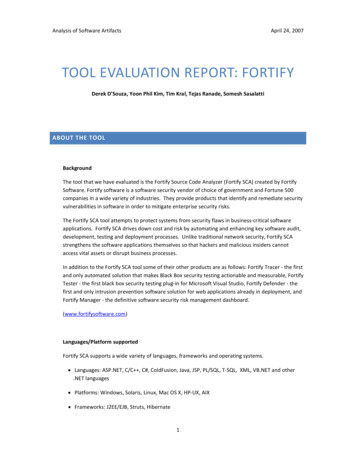
Action orPropertyDescriptiona specified number of minutes before running the NormalizedVulnerability Scope (NVS) calculation.Valid values are 0-60.5. Click Save.Using the Jenkins Plugin with Continuous BuildsTo use the Jenkins plugin with continuous builds:1. Place the FPR resulting from a source code scan into the workspace directory for thejob. (On Windows systems, the default directory isC:\Users\ username \.jenkins\jobs\ project name \workspace.)Note: Configure your build procedure to do this automatically. You can specify thepath to your FPR file with the FPR Filename setting on the Job Configuration page, seeConfiguring the Build Step to Use for the Jenkins Plugin2. From the Jenkins user interface, select Build Now.3. To read progress messages from the Jenkins plugin, in the Build History box, select thebuild link, and then, on the build number page, select Console Output.4. After the build is completed (after you see the “Finished: SUCCESS” message), returnto the project page.The project page displays the Normalized Vulnerability Score (NVS) graph. NVS is anormalized score that gives you a rough idea of how good (or how bad) yourapplication is. The plugin calculates the NVS using the following formula:𝑁𝑉𝑆 ((𝐶𝐹𝑃𝑂 10) (𝐻𝐹𝑃𝑂 5) (𝑀𝐹𝑃𝑂 1) (𝐿𝐹𝑃𝑂 0.1)) 0.5 ((𝑃1 2) (𝑃2 4) (𝑃3 16) (𝑃𝐴𝐵𝑂𝑉𝐸 64)) �𝐶1000where:CFPO Number of critical vulnerabilities (unless marked as “Not an Issue”)HFPO Number of high vulnerabilities (unless marked as “Not an Issue”)MFPO Number of medium vulnerabilities (unless marked as “Not an Issue”)LFPO Number of low vulnerabilities (unless marked as “Not an Issue”)And:PABOVE ExploitableP3 SuspiciousP2 Bad practiceHP Fortify SoftwareHP Fortify Jenkins Plugin7
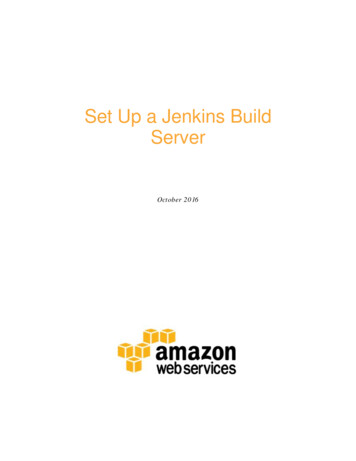
P1 Reliability issueThe total issues count is not very useful. For example, if application A has 0 criticalissues and 10 low issues, the total issues value is 10. If application B has fivecritical issues and no low issues, the total issues value is 5. These values maymislead you to think that application B is better than A, when it is not.The NVS calculated for the two applications present a different picture (simplifiedequation):application “A” NVS 0*10 10*0.1 1application “B” NVS 5*10 0*0.1 505. Select the HP Fortify Assessment link in the column of project options on the left.The interactive List of HP Fortify SSC issues page displays the Summary and Issuebreakdown by Priority Order tables.HP Fortify SoftwareHP Fortify Jenkins Plugin8
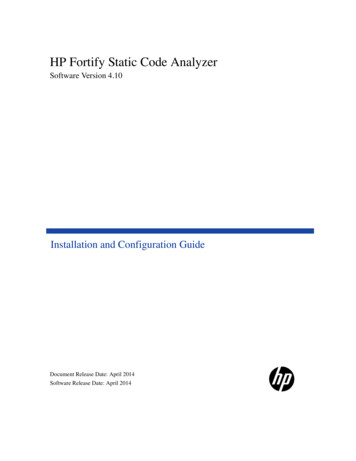
The Summary table shows the difference in the number of issues in different categoriesbetween the two most recent builds. A blue arrow next to a value indicates that thenumber in that category has decreased, and a red arrow indicates that the number in thatcategory has increased.The Issues breakdown by Priority Order table shows detailed information about the issuesfor the specified location and category in each priority folder. Please wait for the table toload. If the data load takes too long, you may need to refresh the browser window (F5).By default you will see the critical issues first. To see all issues, select the All tab.Note: The more issues a page shows, the longer it takes to load. Fortify recommends thatyou not use the All setting for large projects.Viewing IssuesTo see only those issues that were introduced in the latest build of your code, click theShow New Issues link at the top of the table.The first and the second columns show the file name and a line number of the finding andthe full path to this file. The last column displays the category of each vulnerability.By default, issues are sorted by primary location. To organize them by category, click theCategory column header.To see more details about or to audit a specific issue, click its file name in the first column.The link takes you directly to the details of that issue on the SSC server. If you are notlogged in to SSC, you are prompted to log in.Configuring the Number of Issues Displayed on a PageThe page displays 50 findings by default. To navigate to all findings, use Next and Previous on the top and bottom of the table. To increase the number of issues to 100 perpage, from the 50 100 All section at the bottom of the page, select 100.To control the number of the issues shown on a page from the Configure System page: In the HP Fortify Assessment section, click Advanced, and then change the value in theIssue breakdown page size box.HP Fortify SoftwareHP Fortify Jenkins Plugin9
HP Fortify Software HP Fortify Jenkins Plugin 5 Configuring the Build Step to Use for the Jenkins Plugin To configure the build step to use Jenkins plugin: 1. From the Jenkins user interface, select the job to view or create a new job. 2. On the job page, select Configure. 3.