Transcription
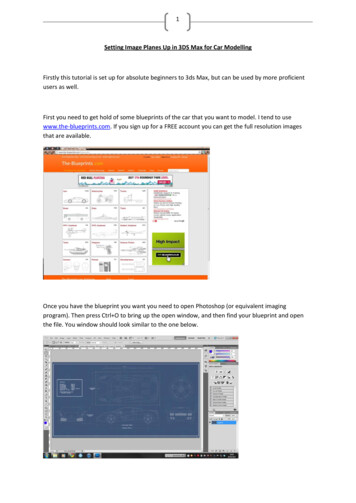
1Setting Image Planes Up in 3DS Max for Car ModellingFirstly this tutorial is set up for absolute beginners to 3ds Max, but can be used by more proficientusers as well.First you need to get hold of some blueprints of the car that you want to model. I tend to usewww.the-blueprints.com. If you sign up for a FREE account you can get the full resolution imagesthat are available.Once you have the blueprint you want you need to open Photoshop (or equivalent imagingprogram). Then press Ctrl O to bring up the open window, and then find your blueprint and openthe file. You window should look similar to the one below.
2Next using the marquee tool (shortcut M) create a selection box around the top view of your chosencar. (See above image)Once select press Ctrl C to copy the selection then Ctrl N to open a new document (A window willpop up all you have to do is click OK). Now paste the selection into this new document. So youshould have something similar to the image below.Now you have done this we will move onto the next view, which is going to be the side view. To dothis simply move the existing selection box to the bottom of the wheels, and then right click (RMB)and choose the option “Transform Selection Tool”. Now move the top of the box down so that it isjust above the top of the car then press enter to confirm the change. Copy the selection and paste isto the same document as the top view you did earlier. Usingthis method, do the same for the Front and Rear views also.
3Now that you have all four views in a single document as individual layers we are going to save themas Individual JPG files. To do this hide the side, front and rear views so that all you can see is the topview. Press Ctrl Shift S to open the save document. BEFORE YOU SAVE make sure you change thefile type to JPEG and call it something like “Top” or “Top View”.Do this for all four views making sure thatyou can only see one image at a time.After you have saved them as individual image you should save them as a PSD (Photoshop’s nativefile type) file as well. Press Ctrl S and call it “Blueprints” or similar.Now open 3Ds Max.
4We will start by creating the planes. In the top viewport create a plane of any size. In the modifypanel change the size of the plane to match the size (In pixels) of the top view fo the car. My imagesize is 2662x1386. (Note: in 3ds Max the length value is the second number you would see in theexplorer window. In my case length is 1386 and my width value is 2662)
5Now you have your first plane we need to create 3 more. There is more than one way of doing thisbut I find this way to be the quickest. Press the snap rotation button (Circled in the image below)then press the “select and rotate” button (Shortcut E).Holding Shift rotate the plane on the X-axis (the red one) you will heed to rotate 90 degrees.
6Continue to do this until you have 4 planes that look similar to the image below.Now we have the 4 planes set up, we want to add the blueprints tothem. Open the Materials window (Shortcut M). Click the small boxnext to diffuse (right) this will open a new window (below). Doubleclick on “Bitmap” to take you to an “Open file” window. Navigatethrough your file and find you blueprints then double click on one ofthem.
7Now you have your blueprints in 3ds Max change thename of the material (for the front image call thematerial “Front” or “Front View” and change the SelfIllumination to 100 (see left). Repeat this for each ofthe views.
8Once you have all four images in 3ds Max make sure the “Visible in Viewport” (Right: Right Circle) isclicked on. Choose the plane you want to add the image to (In my example I used the top view) andclick “Add Material to Selected”. Your screen should look similar to the one below.Do this for all four planes. Once this is done you need to select all four planes and right click, thenchoose “Object Properties” to open a new window. Then uncheck “Show Frozen in Gray” and“Renderable”. Next check “Backface Cull” (this will make the back of the planes invisible)
9Now convert all four planes to editable poly.Once you have done this select one plane (front, side or rear) and check the“Preserve UVs” box (right). This will allow you to move edges of the planewithout affecting the image.
10Now go to sub-object mode and select Edge (box with a picture of a triangle). On the side view of thecar select the top (or bottom) edge and move it down (or up) until no white remains. Be careful notto cut off the top of the car. Then repeat the process for the other views, getting rid of any whiteparts.Once your planes have no white borders it’s time to move them into position. Using the “Select andMove” tool move the side view back to the edge of the top view. The front and back views should goto either end of the top view. (Note: Front view should be positioned at the rear end of the car andthe rear view at the front end). Now move the top view down to the bottom of the side view (Seebelow).
11Now select all planes, right click and select “Freeze Selection”.Now save the file and start modelling your car.Hope this helped. Send me a message to let me know what you think.Luke
Setting Image Planes Up in 3DS Max for Car Modelling Firstly this tutorial is set up for absolute beginners to 3ds Max, but can be used by more proficient users as well. First you need to get hold of some blueprints of the car that