Transcription
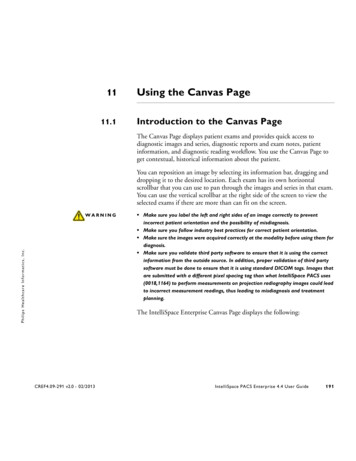
1111.1Using the Canvas PageIntroduction to the Canvas PageThe Canvas Page displays patient exams and provides quick access todiagnostic images and series, diagnostic reports and exam notes, patientinformation, and diagnostic reading workflow. You use the Canvas Page toget contextual, historical information about the patient.You can reposition an image by selecting its information bar, dragging anddropping it to the desired location. Each exam has its own horizontalscrollbar that you can use to pan through the images and series in that exam.You can use the vertical scrollbar at the right side of the screen to view theselected exams if there are more than can fit on the screen.WARNING Make sure you label the left and right sides of an image correctly to preventincorrect patient orientation and the possibility of misdiagnosis. Make sure you follow industry best practices for correct patient orientation. Make sure the images were acquired correctly at the modality before using them forPhilips Healthcare Informatics, Inc.diagnosis. Make sure you validate third party software to ensure that it is using the correctinformation from the outside source. In addition, proper validation of third partysoftware must be done to ensure that it is using standard DICOM tags. Images thatare submitted with a different pixel spacing tag than what IntelliSpace PACS uses(0018,1164) to perform measurements on projection radiography images could leadto incorrect measurement readings, thus leading to misdiagnosis and treatmentplanning.The IntelliSpace Enterprise Canvas Page displays the following:CREF4.09-291 v2.0 - 02/2013IntelliSpace PACS Enterprise 4.4 User Guide191
11Using the Canvas Page1. Patient Information Area2. Image Thumbnail3. Timeline4. Exam Rack5. Exam Margin1. Patient Information Area: Displays general information about thepatient whose exams you are viewing, including the patient’s name, sex, dateof birth, MRN, and referring physician. It also displays a Patient Class entry,which designates the type of patient, typically Inpatient (I), Outpatient (O),Emergency (E), and so forth. This information comes from the HIS/RIS.2. Image Thumbnail: Displays thumbnail images and/or image series of anexam. Each image or series has an information bar below it. Double-clickinga thumbnail image or series opens an image popup window. Right-clicking athumbnail image displays a menu with various options. See ‘Using ImagePopup Windows’ (see page 204) and ‘Using Thumbnail Images’ (seepage 202).3. Patient History Timeline: Displays a chronological listing of all of thepatient's exams on the IntelliSpace PACS server. See ‘Using the PatientHistory Timeline’ (see page 193).192IntelliSpace PACS Enterprise 4.4 User GuideCREF4.09-291 v2.0 - 02/2013Philips Healthcare Informatics, Inc.Figure 11.1 IntelliSpace PACS Enterprise Canvas Page
Using the Canvas Page114. Exam Rack: A horizontal or vertical display of the thumbnail images forthe exam.5. Exam Margin: Displays various icons if they are available for the image.Right-clicking in the Exam Margin displays a menu with various options. See‘Using the Exam Margin’ (see page 199).11.2Using the Patient History TimelineThe Patient History Timeline is a fast and intuitive way to view andnavigate through a patient's clinical history of diagnostic exams and reports.Exams on the IntelliSpace PACS server are listed chronologically, with themost recent exam dates displayed on the left and the older exam datesdisplayed on the right.Philips Healthcare Informatics, Inc.Exams loaded in Exam Rack have gray backgroundExams with no reports are displayed in green; exams with reports are displayed in blueYears are separated with dashed vertical linesExam info displayed when you hover mouse over exam in TimelineFigure 11.2 IntelliSpace PACS Enterprise Patient History TimelineFor each exam, there is an icon (small square box) displayed in the timelinethat displays, from top to bottom: Modality type First four characters of the body part (from the dictionary) Either a straight line, an “A” or an “X.” A straight line indicates that thereare images and the exam status is Scheduled, or the conditions fordisplaying an “A” have not been not met. An "A" indicates that the examCREF4.09-291 v2.0 - 02/2013IntelliSpace PACS Enterprise 4.4 User Guide193
11Using the Canvas Pagemay exist on a separate archive. An “X" indicates that an exam exists butimages are not available. Blue text indicates that a report should beavailable. Date (month/day)If you click on an exam in the Patient History Timeline that displays an “X”and does not have a Scheduled status, the iQuery dialog box displays underthe following conditions to initiate a DICOM query from another DICOMdevice: iQuery is configured You have the proper privileges to run iQuery There is at least one DICOM QRP Source configured.Otherwise, the exam does not load and no action is performed when youclick on the exam in the timeline.Exams that are present in your institution's archive but are not loaded on theIntelliSpace PACS Server are displayed with an “A” under the followingconditions: The system preference Allow DICOM Query to Display in Timeline isenabled iQuery has been configured with at least one DICOM QRP source The IntelliSpace PACS user has iQuery access privileges The exam has no images and the exam status is neither Scheduled norNon-Reportable.Left-clicking on an exam in the Patient History Timeline displays that examin the Exam Rack. Right-clicking on an exam in the Patient HistoryTimeline displays a menu with the following options, depending on theexam: Open/Close Exam: See ‘Opening or Closing an Exam’ (see page 199) Add Exam to Folder: See ‘Adding Exams to Folders’ (see page 55)194IntelliSpace PACS Enterprise 4.4 User GuideCREF4.09-291 v2.0 - 02/2013Philips Healthcare Informatics, Inc. The exam date and time is older than 48 hours
Using the Canvas Page11 Show Report: See ‘Displaying and Printing the Current Report’ (seepage 145) View Exam Notes: See ‘Viewing Exam Notes’ (see page 133) Export via DICOM: See ‘iExport for DICOM Export’ (see page 297) Cache Exam: See ‘Local Exam Caching’ (see page 123)11.2.1Federation and the Patient History TimelineWhen viewing the Patient History Timeline, there are some differences whenremote (Federation) exams are displayed.Philips Healthcare Informatics, Inc.Figure 11.3 View of the Patient History Timeline with remote exams displayedRemote exams are displayed on the timeline with an initial C, R, or T belowthe exam. These initials specify the state the exam is in as follows:- C: the remote exam is already cached locally- R: a remote exam has been identified in the federation- T: exam is in the process of being transferred from the federation to thelocal cacheIn addition, when the F icon in the Control Strip is amber (one or moreremote locations missing), an X appears in the far right of the Patient HistoryTimeline to indicate that the timeline may be incomplete because one ormore remote locations are missing.CREF4.09-291 v2.0 - 02/2013IntelliSpace PACS Enterprise 4.4 User Guide195
11Using the Canvas PageIf an exam is present local (either cached locally or in a local PACS), themodality and body part displays on the timeline as green, while remoteexams that are either still remote or are in the process of transferring displayas blue on the timeline.Click Fetch Exams and the transfer process for the remote exam begins,displaying the T marker in the timeline, as the exam is being transferred.Once the exam has transferred and has been cached locally (displays the Cmarker in the timeline), you can click the exam and open it in the CanvasPage.196IntelliSpace PACS Enterprise 4.4 User GuideCREF4.09-291 v2.0 - 02/2013Philips Healthcare Informatics, Inc.If you right-click a remote exam (displaying the R marker) on the PatientHistory Timeline, Fetch Exams displays.
Using the Canvas Page11Philips Healthcare Informatics, Inc.In addition, a new icon displays in the exam margin to show that the remoteexam is cached, and the exam information text and background color ischanged (dark blue and gray, respectively.Figure 11.4 View of Exam Margin showing remote exam icon (circled) and the changedexam information text and backgroundBesides the different colors of the text and background, there are otherchanges for cached exams:CREF4.09-291 v2.0 - 02/2013IntelliSpace PACS Enterprise 4.4 User Guide197
11Using the Canvas Page The exam information summary displays the name of the remote location,the size of the exam (in KB), the timestamp of the cached exam, and awarning “Limited options are available for remote exams.” You have limited access to the HL7 information displayed in the examinformation summary. Cached exams can only be opened as a prior and not opened as a mainexam, which means they cannot be marked read. You cannot view the Clinical Information dialog for cached exams, so youcannot view the Exam notes for a cached exam. Diagnostic reports for remote/cached exams show only the text of thereport, and not the other tabs normally displayed in the ClinicalInformation dialog. You cannot create a conference presentation state for the main exam whilethe cached exam is open. Right-click options for a cached exam are limited. You can load an existingpresentation state, but you cannot- create/edit/save a new presentation state- export DICOM11.3Accessing Exams that are not on theIntelliSpace PACS Server Double-click an exam with an “A” in the timeline. IntelliSpace PACSqueries the available archives to retrieve the exam in question. An emptyexam rack loads in the Canvas Page while the exam is being retrieved. TheModality, Accession Number, Referring Physician, and Status aredisplayed, as well as an estimate of how much time remains before theexam is retrieved and a display of the images being requested. ClickCancel to stop the archive retrieval.198IntelliSpace PACS Enterprise 4.4 User GuideCREF4.09-291 v2.0 - 02/2013Philips Healthcare Informatics, Inc.- assign a new SUID
Using the Canvas Page11.411Opening or Closing an ExamYou can have up to 30 exams open at a time. If IntelliSpace PACS cannotopen an exam because of low memory usage, a message is displayedindicating that the exam cannot be opened. Also, if an exam in a prior ExamRack cannot open because of low memory, a memory error is displayed onthe Exam Rack with a Retry/Close button. This allows you to either closethe Exam Rack or try opening the prior again after closing some other examsto free some memory. Either left-click on an exam in the timeline, or right-click on an exam inthe timeline and select Open Exam from the menu. If an exam is alreadyloaded into the Exam Rack and you want to unload it, right-click on theexam in the timeline and from the menu, select Close Exam.NOTEPhilips Healthcare Informatics, Inc.11.5If an exam cannot open because of low memory and no other exams are open, anunexpected low memory error is displayed. It is highly recommended that after youclick OK to close the message, you should restart the IntelliSpace PACS client. Theresults of future actions will be unpredictable and crashes may occur if the client is notrestarted.Ordering of Images in the Exam RackNote how the following conditions affect how images are ordered in theExam Rack: When an exam is opened from the worklist and there is a presentationstate that will be loaded, the order of the images on the Exam Rack isbased on the order defined by the presentation state.11.6Using the Exam MarginThe Exam Margin displays icons relevant to the exam, such as a Report iconif there is a diagnostic report for the exam. In addition, an icon now displaysin the Exam Margin when new images have been added to a study loadedonto that Exam Rack. Hovering over the icon displays the tooltip "Newimages or other DICOM was received for this exam and has been loaded."CREF4.09-291 v2.0 - 02/2013IntelliSpace PACS Enterprise 4.4 User Guide199
11Using the Canvas PageIcons in the Exam Margin indicate the following:IconDescriptionA diagnostic report is availableAn exam note is availableA critical exam note is availableNot all images for this exam may be available.New images have arrivedThis study has been cached from a remote siteAdd a comment for an anonymous exam (similar to an exam note). This icondisplays only if the anonymized exam is opened from an anonymized personalfolder.Indicates that the GSPS has loaded successfully.Indicates that the GSPS has not loaded successfully.Indicates that the studies contain a SOP instance that cannot be displayed. Seethe IntelliSpace PACS DICOM Conformance Statement for information on the SOPclasses that are for storage only (no display) and those that are for storage anddisplay.Right-clicking in the Exam Margin displays a menu with the followingoptions:200IntelliSpace PACS Enterprise 4.4 User GuideCREF4.09-291 v2.0 - 02/2013Philips Healthcare Informatics, Inc.A presentation state has been loaded
Using the Canvas Page11 Presentation States: See ‘Using Presentation States’ (see page 210) Recover Deleted Image(s): See ‘Recovering Deleted Images’ (seepage 325) Minimizing Images: See ‘Minimizing Images’ (see page 247) Add Exam to Folder: See ‘Adding Exams to Folders’ (see page 55) Exam Information: See ‘Displaying Exam Information’ (see page 202) Export via DICOM: See ‘iExport for DICOM Export’ (see page 297) Horizontal/Vertical Rack: See ‘Configuring Horizontal or Vertical Racks’(see page 201) Exam View: See ‘Philips IntelliSpace Clinical Applications’ (see page 275)Resizing an Exam Rack Height11.7Philips Healthcare Informatics, Inc.There are two heights available for Exam Racks: small and normal.11.81.Place the cursor on the bottom border of the Exam Rack you want to resize.The normal pointer changes to a resize pointer.2.Click and drag the pointer to change the height of the Exam Rack. Whenyou double the height of a normal Exam Rack, IntelliSpace PACSautomatically changes the size of the images and series in that Exam Rack.You can also resize normal-sized Exam Racks by right-clicking in the ExamMargin and selecting Minimize Images.Configuring Horizontal or Vertical RacksYou set whether Exam Racks are initially displayed horizontally or verticallyin the User preferences. See ‘Setting General Preferences’ (see page 332). Right-click in the Exam Margin and from the menu, select HorizontalRack or Vertical Rack.CREF4.09-291 v2.0 - 02/2013IntelliSpace PACS Enterprise 4.4 User Guide201
11Using the Canvas PageDisplaying Exam Information11.91.Right-click in the Exam Margin and from the menu, select ExamInformation. The Exam Information dialog box displays and displays HIS/RIS and DICOM metadata about the selected exam.2.11.10Review the information and click OK. You return to the Canvas Page.Using Thumbnail ImagesThumbnail images are the small images displayed in the Exam Rack. You candouble-click a thumbnail image to display it in an image popup window. Youcan also right-click a thumbnail image and select Create Popup from themenu. See ‘Using Image Popup Windows’ (see page 204).Right-clicking on a thumbnail image displays a menu with the followingoptions, depending on the modality and whether the series is single-image ormulti-sliced.or brightness, if you have enabled this in the General user preferences. See‘Setting General Preferences’ (see page 332) and ‘Enhanced MouseScheme’ (see page 395) Window Width and Level (WW/WL): See ‘Setting the Window Width/Level’ (see page 225) Image Processing: See ‘Image Processing’ (see page 230) Scout Line Mode (for CT, MR, PT): See ‘Using the Scout Tool’ (seepage 237) Localizer Mode (for CT, MR, PT): See ‘Using the Localizer Tool’ (seepage 238) Create Popup: Displays the image in a separate window. Key Image: See ‘Using Key Images’ (see page 215) Measurements: See ‘Using the Measurement Palette’ (see page 255) Annotations: ‘Annotating Images’ (see page 269)202IntelliSpace PACS Enterprise 4.4 User GuideCREF4.09-291 v2.0 - 02/2013Philips Healthcare Informatics, Inc. Interaction: Allows you to select an enhanced cursor for zoom, pan, scroll,
Using the Canvas Page11 Delete All Measurements and Annotations: ‘Using the MeasurementPalette’ (see page 255) VOI LUT (for CR, DX, and MG): See ‘Value of Interest LUT (VOILUT)’ (see page 228) Clone: See ‘Using Clone Windows’ (see page 207) Remove Clone: See‘Removing Clones’ (see page 207) Zoom Presets: Allows you to select a preset zoom factor of Fit toWindow, 100% (Original Size), 200%, 300%, or 400%. Export: Allows you to select Export via DICOM, Export Image viaDICOM, or Anonymous Export via DICOM. See ‘iExport for DICOMExport’ (see page 297) Clone Window with Preset: See ‘Using Clone Windows’ (see page 207) Play Cine Loop (for multi-sliced series): Allows you to scroll through thePhilips Healthcare Informatics, Inc.slices in a series either one-by-one (Cine mode) or rapidly (Fast Cine). Fora frame-by-frame review, slowly scroll the mouse-wheel. For rapid review,double-click the mouse-wheel and drag the mouse forward or backward.For Coarse Fast Cine mode in Standard mouse mode, click the middlemouse button while dragging the mouse up or down past the point inwhich you placed your cursor. In Enhanced mouse mode, left-click whiledragging the mouse down past the point in which you placed your cursor. New Link: See ‘Linking Image Series’ (see page 218) Link All Axials/Sagittals/Coronals/Obliques (for multi-sliced series):‘Linking Image Series’ (see page 218) Join Link (if link type exists): Joins series to the existing link. Leave Link (if series is linked): Removes the series from the link. Link Selected Images: Links selected windows that are of the same type. Unlink All: See ‘Unlinking Images’ (see page 220) Activate/Deactivate Link: See ‘Activating and Deactivating Links’ (seepage 220) Save: Saves the image.CREF4.09-291 v2.0 - 02/2013IntelliSpace PACS Enterprise 4.4 User Guide203
11Using the Canvas PageWARNINGUse caution when saving an image to the clipboard and copying it to anotherapplication. The image may contain confidential patient information. Paper: See ‘Printing to Paper’ (see page 296) Flip/Rotate/Sort/Split: See ‘Flipping an Image’ (see page 247) Delete: See ‘Deleting Studies and Images’ (see page 323) Assign New Unique Study UID: See ‘Manually Assigning New UniqueStudy Instance UIDs’ (see page 318) Detach Study from Exam (for exams having two or more studies): See‘Detaching Individual Studies from Exams’ (see page 207)11.11Using Image Popup WindowsImage popup windows provide additional image manipulation functionalitynot available for thumbnail images. You can arrange these windows bydragging them to the desired location on the Canvas Page and resizing them.You can display an image popup window by doing one of the following: Right-clicking an image and selecting Create Popup from the menu.You can minimize popup windows by double-clicking on the window's topmargin. To re-enlarge the window, double-click the image margin.204IntelliSpace PACS Enterprise 4.4 User GuideCREF4.09-291 v2.0 - 02/2013Philips Healthcare Informatics, Inc. Double-clicking a thumbnail image
Using the Canvas Page11Figure 11.5 Window ShadesPhilips Healthcare Informatics, Inc.Right-clicking in an image popup window displays a menu with thefollowing options, depending on the modality and whether the series issingle-image or multi-sliced: Interaction: Allows you to select an enhanced cursor for zoom, pan, scroll,or brightness, if you have enabled this in the General user preferences. See‘Setting General Preferences’ (see page 332) and ‘Enhanced MouseScheme’ (see page 395) Window Width/Level (WW/WL): See ‘Setting the Window Width/Level’ (see page 225). Measurements: See ‘Using the Measurement Palette’ (see page 255) Annotations: See ‘Annotating Images’ (see page 269) Delete All Measurements and Annotations (if there are annotations):See ‘Clearing Measurements and Annotations’ (see page 256) Image Processing: See ‘Image Processing’ (see page 230)CREF4.09-291 v2.0 - 02/2013IntelliSpace PACS Enterprise 4.4 User Guide205
11Using the Canvas Page Scout Line Mode (for CT, MR, and PT): See ‘Using the Scout Tool’ (seepage 237) Localizer Mode (for CT, MR, and PT): See ‘Using the Localizer Tool’ (seepage 238) Multi-Image Mode (for stack images): Allows you to split a series windowso that multiple slices can be displayed in a single image window. Key Image: See ‘Using Key Images’ (see page 215) Play Cine Loop (for multi-sliced series): Allows you to scroll through theslices in a series either one-by-one (Cine mode) or rapidly (Fast Cine). Fora frame-by-frame review, slowly scroll the mouse-wheel. For rapid review,double-click the mouse-wheel and drag the mouse forward or backward.For Coarse Fast Cine mode in Standard mouse mode, click the middlemouse button while dragging the mouse up or down past the point inwhich you placed your cursor. In Enhanced mouse mode, left-click whiledragging the mouse down past the point in which you placed your cursor. New Link: See ‘Linking Image Series’ (see page 218) Link All Axials/Sagittals/Coronals/Obliques (for multi-sliced series): Clone: See ‘Using Clone Windows’ (see page 207) Clone Window with Preset: ‘Using Clone Windows’ (see page 207) Save: Saves the image. To Paper Printer: See ‘Printing to Paper’ (see page 296) Flip/Rotate/Sort/Split: See ‘Flipping an Image’ (see page 247) Zoom Presets: Allows you to select a preset zoom factor of Fit toWindow, 100% (Original Size), 200%, 300%, or 400%. Magnifying Glass: See ‘Using the Magnifying Glass Tool’ (see page 242)206IntelliSpace PACS Enterprise 4.4 User GuideCREF4.09-291 v2.0 - 02/2013Philips Healthcare Informatics, Inc.‘Linking Image Series’ (see page 218)
11 Using the Canvas Page Philips Healthcare Informatics, Inc. 192 IntelliSpace PACS Enterprise 4.4 User Guide CREF4.09-291 v2.0 - 02/2013 Figure 11.1 IntelliSpace PACS Enterprise Canvas Page 1. Patient Information Area: Displays general information about the patient whose exams you are viewing, including the patient's name, sex, date