Transcription
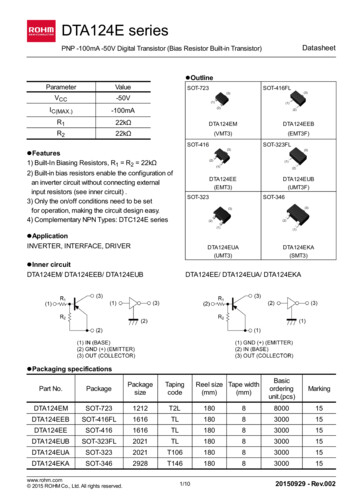
Built-In Electric Single and Double Ovens Control GuideParts and FeaturesThis manual covers several models. Your model may have some or all of the items listed. Refer to this manual or the Frequently AskedQuestions (FAQs) section of our website at www.jennair.com for more detailed instructions. In Canada, refer to the Customer Servicesection at www.jennair.ca.A.B.C.D.E.F.Electronic oven controlOven ventBroil elementsGasketBottom ventBottom Vent Shield (on somemodels)G. Lower oven (on double ovenmodels)H.I.J.K.L.M.Hidden bake elementConvection element and fanOven lights (left side, not shown)Temperature probe jackOven door lock latchModel and serial number plate (on righthand side underneath the control panel)N. Oven light switchParts and Features not shownTemperature probeRacks1
FEATURE GUIDEThis manual covers several models. Your model may have some or all of the items listed. Refer to this manual or Frequently AskedQuestions (FAQs) section of our website at www.jennair.com for more detailed instructions. In Canada, refer to the Customer Servicesection at www.jennair.ca.Single Oven:A.B.C.D.PowerKitchen timerToolsDisplayE.F.G.H.Self cleanOven lightOven cancelStartF.G.H.I.Lower ovenLower lightLower cancelCleanDouble Oven:A.B.C.D.E.PowerUpper cancelUpper lightUpper h the Power keypad to turn the oven display on and off.OVEN LIGHTUPPER LIGHTLOWER LIGHTOven cavitylightThe desired oven light is controlled by a touch keypad on the oven control panel. Whilethe oven door is closed, touch the desired Oven Light keypad to turn the oven lights onand off. When the oven door is opened, the oven lights will automatically come on for thecorresponding oven.KITCHEN TIMER(On some models)TimerThe Kitchen Timer can be set in hours, minutes, or seconds up to 23 hours,59 minutes, and 59 seconds.The Kitchen Timer does not start or stop the oven(s).OVEN CANCELUPPER CANCELLOWER CANCEL(On some models)Oven functionThe Lower Cancel, Upper Cancel, and Cancel keypads stop their respective ovenfunctions except for the Clock, Kitchen Timer, and Button Lock. The oven cooling fan(s)may continue to operate even after an oven function has been canceled or completed,depending on the oven temperature.START(On some models)Mode StartThe Start keypad begins some oven functions. If Start is not touched within 2 minutesafter touching a keypad, the function is canceled, and the time of day is displayed.CLEANSELF CLEAN(On some models)Self-CleaningcycleSee the “Self-Clean Cycle” section in the Owner's Manual.2
KEYPADFEATUREINSTRUCTIONSTOOLS(On some models)Oven usefunctionThe Tools keypad enables you to personalize the oven operation to suit your needs. Seethe “Tools” section.UPPER OVENLOWER OVEN(On some models)OvenSelectionThe Upper and Lower Oven keypads enable you to select which oven you want to use.Touch PanelThe touch panel houses the control menu and function controls.The touch pads are very sensitive and require only a light touch toactivate.For more information about the individual controls, see theirrespective sections in this manual.Welcome GuideThis appears on your display the first time the oven is powered up.The Welcome Guide allows you to set up your new oven.After every selection, a tone will sound.1. Select your language.2. Select the clock by scrolling to the correct time in the hoursand minutes column. You can then select AM/PM or 24 hourclock (military time).3. Choose to have daylight savings time AUTO SYNC (turn on),or DO NOT ADJUST (turn off).4. Enter current date (MM/DD/YYYY) by scrolling to the columnto set the MONTH, DAY, and YEAR. Touch SAVE.5. Select the units of temperature. You can choose Fahrenheit orCelsius. Touch SAVE.6. Select the Clock Theme by scrolling to the desired setting.Touch SAVE.NOTE: This is the background for the center touch display.Menu DemonstrationsWARNINGFood Poisoning HazardDo not let food sit for more than one hour before or aftercooking.Doing so can result in food poisoning or sickness.In double oven models, touch the corresponding oven keypad toshow the cooking modes and temperatures for the desired oven.NOTE: A line will appear above the corresponding oven.In single oven models, the display will show cooking modes andtemperatures when the oven is turned on.Bake DemonstrationDisplayThe display is for both the menu and oven function controls. Thetouchscreen allows you to scroll through the oven menus. Thedisplay is very sensitive and requires only a light touch to activateand control.When an oven is in use, the display will show the clock, mode,oven temperature, kitchen timer, and oven timer, if set. If the oventimer is not set, you can set it from this screen.After approximately 2 minutes of inactivity, the display will go intosleep mode and the display will dim. When the oven is inoperation, the display will remain bright.During use, the display will show menus and the appropriateselections for the options being chosen.Display NavigationA. Modes columnB. Temperature column1. Confirm the Bake mode is selected.2. In the temperature column, scroll to the desired temperature.The temperature must be between 170 F and 550 F (77 Cand 288 C).3. Touch START to begin preheating.Drop-down Message DemonstrationIf the oven is off, touch the Power keypad to activate the menu.From the home screen, all automatic cooking programs can beactivated, all manual cooking programs can be set, options can beadjusted, and instructions, preparation, and tips can be accessed.There are some menus that prompt a drop-down message toappear. Once the message is read, you can dismiss the menu bytouching the directional arrow and swiping up.3
Cook Time Demonstration (Optional)NOTE: In some cooking modes the user can set the cooking timewhile other modes have fixed times.To set a cooking time, follow these instructions.1. To set a cook time, touch OVEN TIMER once the cyclebegins. Use the time columns or number keypads to enter thecooking length.2. Touch START to begin the timer.NOTE: The Oven Timer is only visible once a cooking cyclehas been activated.orSelect oven action when the timer expires. The default actionis Hold Temp.To change the default oven end of cycle action, touch HOLDTEMP, then select the desired oven action. Touch SET whencompleted or touch Back to return to the oven timer screen.Keep Warm setting will reduce the oven temperature to170 F (77 C) after the cook time ends. Hold Temp will keepthe set oven temperature after the cook time ends. Oven Offwill turn the oven off when the cook time ends.Delay Start Demonstration (Optional)1. To set a delayed start and end time, touch DELAY.NOTE: The cooking start time always begins on the nearestquarter hour (0:00, 0:15, 0:30 and 0:45). The cooking timeincludes oven preheating time. Adjust the start and end timesaccordingly.A. Start time columnB. End time column2. Touch or scroll to the desired cooking start time in the StartTime column on the left-hand side. The oven cannot bedelayed more than 11 hours and 45 minutes.3. Touch or scroll to the desired cooking end time in the EndTime column on the right-hand side. The cook time cannot belonger than 12 hours.4. Touch BACK to return to the Cooking Mode menu or TouchSET when done. The oven will start preheating when the StartTime is reached. Once the end time is reached, the oven willgo in to Keep Warm mode by default.5. Touch START NOW to start the oven from the Delay screen.NOTE: Do not use Delay Start for items that require apreheated oven, such as cakes, cookies, and breads. If foodis in the oven during preheat, it may become overcooked.6. To change a cooking mode or temperature while the oven ispreheating or in a Delay Start, touch the cooking mode key,make the new selection, and then touch SET.7. Touch OVEN CANCEL, UPPER CANCEL, or LOWERCANCEL to turn off the desired oven.Cooking ModesThe previous steps can be used for the following cooking t FrozenPizza300 F–500 F(149 C–260 C)375 F(191 C)Convect Pastry170 F–550 F(77 C-288 C)325 F(163 C)Convect SlowRoast 12hrs190 F–225 F(88 C–107 C)200 F(93 C)Convect SlowRoast 8hrs200 F–250 F(93 C–121 C)225 F(107 C)Convect SlowRoast 4hrs250 F–300 F(121 C–149 C)275 F(135 C)Convect Roast170 F–550 F(77 C–288 C)350 F(177 C)Convect Broil450 F–550 F(232 C–288 C)550 F(288 C)Convect Bake170 F–550 F(77 C–288 C)325 F(163 C)Convect Bake –Rapid Preheat170 F–550 F(77 C–288 C)325 F(163 C)Bake170 F–550 F(77 C–288 C)350 F(177 C)Broil450 F–550 F(232 C–288 C)550 F(288 C)Keep Warm150 F–200 F(66 C–93 C)170 F(77 C)Rapid Proof110 F(43 C)110 F(43 C)Proof100 F(38 C)100 F(38 C)Convert RecipeFor ConvectionProbe CookMy Creations4
Kitchen TimerMODEAVAILABLE SELECTIONSThe Kitchen Timer can be set in hours, minutes, and seconds.NOTE: The Kitchen Timer does not start or stop the oven.Time & Date Self Clean Starts the Self Clean CycleButton Lock Press Lock to lock controlsNumber Entry Number Pad Scroll (Default)Probe Use for Probe Cooking ModeTemp Calib. 35 F to -35 F 20 C to -20 CTouch Calib. Use to calibrate touch screenService Info. Model Number and Serial NumberLegal Info. License InformationRestore Defaults Restores Factory DefaultsTones/SoundsTones are audible signals, indicating the following: Valid keypad touch Function has been entered Preheat cycle has been completed Invalid keypad touch End of a cooking cycle When timer reaches zero Includes using the Kitchen Timer for functions other thancooking. First oven element activation in a cooking mode.ToolsThe Tools selection key allows you access to functions andcustomization options within the Electronic Oven Control. Thesetools allow you to set the clock, change the oven temperaturebetween Fahrenheit and Celsius, turn the audible signals andprompts on and off, and adjust the oven calibration, change thelanguage, and more. The Sabbath mode is also set using theTools selection key.MODEAVAILABLE SELECTIONSSabbath Sets Sabbath modeDemo Mode On Off (Default)Temp Units Celsius Fahrenheit (Default)Language Français English (Default)Display On/Off Display Off Display Dimmed (Default)Clock On/Off Clock Off Clock On (Default)Brightness MaxHighMed (Default)LowDimSound Key Press Timer & Alert (Default) Power On & OffClock Theme TexturesCelebrationCulinaryClock OnlyAnimation (Default)SpringSummerFallWinterDaylight SavingClock StyleSet Clock (Default)Set DateButton LockThe Button Lock shuts down the control panel keypads to avoidunintended use of the oven(s). The Button Lock will remain setafter a power failure if it was set before the power failure occurs.When the control is locked, only the Power keypad will function.The Button Lock is preset unlocked but can be locked.To Activate the Button Lock:1. From the Tools menu, touch BUTTON LOCK.2. Touch LOCK to activate the Button Lock mode.NOTE: The touch screen will return to idle mode and a controllocked message will be displayed.To Deactivate the Button Lock:1. Touch the Power keypad, and then follow the on-screendirections.NOTE: The oven will generate a random sequence of shapesthat must be touched in the order prompted on the screen.Oven Temperature ControlIMPORTANT: Do not use a thermometer to measure the oventemperature. Elements will cycle on and off as needed to maintaina consistent temperature but may run slightly hot or cool at anypoint in time due to this cycling. Opening the oven door will affectcycling of the elements and impact the temperature.The oven provides accurate temperatures and has beenthoroughly tested at the factory. However, it may cook faster orslower than your previous oven, causing baking or browningdifferences. If necessary, the temperature calibration can beadjusted in either Fahrenheit or Celsius.On double ovens, the upper oven and the lower oven can each becalibrated independently.A minus sign means the oven will be cooler by the displayedamount. The absence of a minus sign means the oven will bewarmer by the displayed amount. Use the following chart as aguide.NOTE: The oven display will continue to show the original settemperature and will not reflect the calibration offset. For example,if set to 350 (177 C) and calibrated to -20, the display willcontinue to show 350 (177 C).5
Delayed Sabbath Bake:ADJUSTMENT F(AUTOMATIC C CHANGE)COOKS FOOD10 F (6 C).a little more20 F (12 C).moderately more30 F (18 C).much more0 F (0 C).default setting-10 F (-6 C).a little less-20 F (-12 C).moderately lessFor double ovens, the upper and lower oven temperatures andcook timers can be set independently.-30 F (-18 C).much lessIf a cook timer is set, the countdown will not appear. The timer willappear frozen at the set time.Sabbath ModeThe Sabbath mode sets the oven(s) to remain on in a bake settinguntil turned off. A timed Sabbath Mode can also be set to keep theoven on for only part of the Sabbath.When the Sabbath mode is set, the allowed keypads are thePower keypad and the Cancel keypads.When the oven door is opened or closed, the oven light will notturn on or off, and the heating elements will not turn on or offimmediately.If a power failure less than 1 second occurs when the Sabbathmode is set, the oven(s) will remain in Sabbath mode andcontinue cooking.For a power failure that lasts greater than a few seconds, theoven(s) will return to an idle state and Sabbath mode will nolonger be active. For double ovens, the upper and lower oventemperatures and cook timers can be set independently. If a cooktimer is set, the countdown will not appear. The timer will appearfrozen at the set time.To Activate:1. Touch the Power keypad, and then touch TOOLS.2. From the Mode menu, select “Sabbath” and touch NEXT.3. Touch ON, and then touch SETUP.NOTE: The programmed status of the oven(s) will bedisplayed.4. Touch CHANGE.5. For single ovens, go to Step 6. For double ovens, select thedesired oven, and then touch NEXT.6. Select the desired oven temperature and touch NEXT.7. (Optional) Set Bake Time (00:00) and touch SET.orTouch SKIP TIMER.8. For single ovens, touch START. For double ovens, touchSTART to begin Sabbath mode, or touch CHANGE to edit thecurrent programming or to program the other oven.To Deactivate:Sabbath mode can be deactivated on all cavities, once activated,by touching the Power keypad.For single ovens, Sabbath mode can also be deactivated bytouching Cancel.For double ovens, if both ovens are running, touching Cancel forone oven will turn off Sabbath mode for both ovens and will turnoff the selected oven. The other oven will return to a regular Bakemode.WARNINGFood Poisoning HazardDo not let food sit for more than one hour before or aftercooking.Doing so can result in food poisoning or sickness.To Activate:1. Touch the Power keypad, and then touch TOOLS.2. From the Mode menu, select “Sabbath” and touch NEXT.3. Touch ON, and then touch SETUP.NOTE: The programmed status of the oven(s) will bedisplayed.4. Touch CHANGE.5. For single ovens, go to Step 6. For double ovens, select thedesired oven, and then touch NEXT.6. Select the desired oven temperature and touch NEXT.7. (Optional) Set Bake Time (00:00) and touch SET.orTouch SKIP TIMER.8. Touch DELAY and set both the “Cooking Starts at” time.NOTE: If a bake time is set in the previous steps, the “Cookingends at” will be calculated based on the bake time. If the timeris not set, the Sabbath Mode will continue until canceled.9. Touch SET.10. Review the settings and touch START to begin the bakingcycle.NOTE: Once the timer ends; opening and closing the ovendoor will deactivate the Sabbath mode.Change TemperatureThe oven temperatures can be changed while running SabbathMode by touching the -25 F (-5 C) or 25 F ( 5 C). Touchingthese buttons will not result in any changes to the screen and nosound will play.As an example, touching the 25 F ( 5 C) button 3 times willresult in an oven cavity temperature increase of 75 F ( 15 C);however, the initial oven cavity set temperature will remain on thescreen.NOTE: On double oven models, the oven cavity temperature maybe set individually.Oven UseOdors and smoke are normal when the oven is used the first fewtimes or when it is heavily soiled.During oven use, the heating elements will not remain on but willcycle on and off throughout oven operation.IMPORTANT: The health of some birds is extremely sensitive tothe fumes given off. Exposure to the fumes may result in death tocertain birds. Always move birds to another closed and wellventilated room.If the oven door is opened during a cooking mode and left open forapproximately 60 seconds, the cooling fan will switch to a higherspeed. You may experience higher noise during this time. Whenthe oven door is closed, the fan will switch back to its lower speedafter approximately 60 seconds.6
Aluminum FoilConvection CookingIMPORTANT: To avoid permanent damage to the oven bottomfinish, do not line the oven bottom with any type of foil or liner. For best cooking results, do not cover entire rack with foilbecause air must be able to move freely. To catch spills, place foil on rack below dish. Make sure foil isat least 1/2" (1.3 cm) larger than the dish and that it is turnedup at the edges.Position Racks and BakewareIMPORTANT: To avoid permanent damage to the porcelain finish,do not place food or bakeware directly on the oven door orbottom.Racks Position racks before turning on the oven. Do not position racks with bakeware on them. Make sure racks are level.To move a rack, pull it out to the stop position, raise the front edge,and lift out. Use the following illustration and charts as guides.OVEN SETTINGNUMBER OFRACKS USEDRACK POSITION(S)Rapid PreheatBake13Rapid PreheatConvection Bake13Convection Bake11, 2 or 3Convection Bake22 and 5Convection Bake31, 3 and 5Convection Roast11 and 2Convection Broil14, 5 and 6Baking Cakes on 2 RacksFor best results when baking cakes on 2 racks, use the Bakefunction and racks in positions 2 and 5. Place the cakes on theracks as shown. Keep at least 2" (5 cm) of space between thefront of the racks and the front of the cakes.Rack and Bakeware PositionsRack Positions – Upper and Lower OvenBroilingBaking Cookies on 2 RacksFOODRACK POSITIONFor best results when baking cookies on 2 racks, use the ConvectBake function and place racks in positions 2 and 5.Most broiling6BakewareFor hamburger patties to have a well-seared exterior and a rareinterior, use a flat rack in position 6. Side 1 should cook forapproximately 3 minutes. Side 2 should cook for approximately 3to 4 minutes. Expect a moderate degree of smoke when broiling.Traditional CookingFOODRACK POSITIONLarge roasts, turkeys, angelfood cakes, bundt cakes,quick breads, pies1 or 2Yeast breads, casseroles,meat, poultry2Cookies, biscuits, muffins,cakes2 or 3 when single-rackbaking; 2 and 5 when multirack bakingTo cook food evenly, hot air must be able to circulate. For bestresults, allow 2" (5 cm) of space around bakeware and oven walls.Use the following chart as a guide.NUMBER OF PAN(S)POSITION ON RACK1Center of rack2Side by side or slightlystaggered3 or 4See the rack position graphicsin this section for panplacement recommendations.7
Roll-Out Extension Rack3. Pull the rack and the sliding shelf out.The roll-out extension rack allows easy access to position food inthe oven, and remove food from the oven. It can be used in rackpositions 1 through 6.To Replace Roll-Out Extension Rack:Open Position1. Using 2 hands, grasp the front of the closed rack and thesliding shelf. Place the closed rack and the sliding shelf on therack guide.2. Using 2 hands, lift up on the front edge of the rack and thesliding shelf together.3. Slowly push the rack and the sliding shelf to the back of theoven until the back edge of the rack pulls over the end of therack guide.To avoid damage to the sliding shelves, do not place more than25 lbs (11.4 kg) on the rack.Do not clean the roll-out extension rack in a dishwasher. It mayremove the rack’s lubricant and affect its ability to slide.See the “General Cleaning” section from Owner's Manual formore information.BakewareA. Roll-out extension rackB. Sliding shelfClosed and Engaged PositionA. Roll-out extension rackB. Sliding shelfTo Remove Roll-Out Extension Rack:1. Slide the rack in completely so that it is closed and engagedwith the sliding shelf.2. Using 2 hands, lift up on the front edge of the rack and pushthe sliding shelf to the back wall of the oven so that the frontedge of the sliding shelf sits on the rack guides. The frontedge of the rack and the sliding shelf should be higher thanthe back edge.The bakeware material affects cooking results. Followmanufacturer’s recommendations and use the bakeware sizerecommended in the recipe. Use the following chart as a guide.BAKEWARE/RESULTSRECOMMENDATIONSLight-colored aluminum Light golden crusts Even browning Use temperature and timerecommended in recipe.Dark aluminum and otherbakeware with dark, dulland/or nonstick finish Brown, crisp crusts May need to reduce bakingtemperatures slightly. Use suggested bakingtime. For pies, breads, andcasseroles, usetemperaturerecommended in recipe. Place rack in center ofoven.Insulated cookie sheets orbaking pans Little or no bottombrowning Follow rackrecommendations in the“Position Racks andBakeware” section. May need to increasebaking time.Stainless steel Light, golden crusts Uneven browning May need to increasebaking time.Stoneware/Baking stone Crisp crusts Follow manufacturer’sinstructions.Ovenproof glassware orceramic Brown, crisp crusts May need to reduce bakingtemperatures slightly.A. Sliding shelfB. Rack guideC. Roll-out extension rack8
Baking and RoastingOven VentsIMPORTANT: The convection fan and convection element mayoperate during the Bake function to enhance performance andheat distribution.The oven will take approximately 12 to 18 minutes to reach 350 F(177 C) with all oven racks inside the oven cavity. The preheatcycle rapidly increases the temperature inside the oven cavity.Higher temperatures will take longer to preheat. Factors thatimpact preheat times include room temperature, oventemperature, and the number of racks. Unused oven racks can beremoved prior to preheating your oven to help reduce preheattime. The actual oven temperature will go above the settemperature to offset the heat lost when the oven door is openedto insert food. This ensures that the oven will begin at the propertemperature when you place food in the oven. Insert food whenthe preheat tone sounds. Do not open the door during preheatuntil the tone sounds.During baking or roasting, the bake and broil elements will cycleon and off in intervals to maintain the oven temperature.Depending on the model, if the oven door is opened during bakingor roasting, the heating elements (bake and broil) will turn offapproximately 30 seconds after the door is opened. They will turnon again approximately 30 seconds after the door is closed.BroilingBroiling uses direct radiant heat to cook food.Single and Double OvenDouble OvenA. Control panelB. Oven ventC. Single oven or upper doubleovenD.E.F.G.Upper ovenOven ventLower ovenBottom ventThe oven vents should not be blocked or covered since they allowthe inlet of fresh air into the cooling system and allows the ventingof heated air. Blocking or covering vents will cause poor aircirculation, affecting cooking, cleaning, and cooling results.Preheating and Oven TemperaturePreheatingWhen beginning a Bake or Convect Bake cycle, the oven beginspreheating after Start is pressed. The oven will take approximately12 to 18 minutes to reach 350 F (177 C) with all of the oven racksprovided with your oven inside the oven cavity. Highertemperatures will take longer to preheat. The preheat cycle rapidlyincreases the oven temperature. The actual oven temperature willgo above your set temperature to offset the heat lost when youroven door is opened to insert food. This ensures that when youplace your food in the oven, the oven will begin at the propertemperature. Insert your food when the preheat tone sounds. Donot open the door during preheat until the tone sounds.NOTE: If the cook timer is set and the oven door is opened duringpreheating, the timer will automatically start.Oven TemperatureWhile in use, the oven elements will cycle on and off as needed tomaintain a consistent temperature. They may run slightly hot orcool at any point in time due to this cycling. Opening the oven doorwhile in use will release the hot air and cool the oven which couldimpact the cooking time and performance. It is recommended touse the oven light to monitor cooking progress.The element cycles on and off in intervals to maintain the oventemperature.NOTE: No preheating is required for the Broiling function.IMPORTANT: Close the door to ensure proper broilingtemperature.If the oven door is opened during broiling, the broil element willturn off in approximately 30 seconds. When the oven door isclosed, the element will come back on approximately 30 secondslater. For best results, use a broiler pan and grid. It is designed todrain juices and help avoid spatter and smoke. For proper draining, do not cover the grid with foil. The bottomof the broiler pan may be lined with aluminum foil for easiercleaning. Trim excess fat to reduce spattering. Slit the remaining fat onthe edges to avoid curling. Pull out oven rack to stop position before turning or removingfood. Use tongs to turn food to avoid the loss of juices. Verythin cuts of fish, poultry or meat may not need to be turned. After broiling, remove the pan from the oven when removingthe food. Drippings will bake on the pan if left in the heatedoven, making cleaning more difficult.ConvectionIn a convection oven, the fan-circulated hot air distributes heatmore evenly. This movement of hot air helps maintain a consistenttemperature throughout the oven, cooking foods more evenly,while sealing in moisture.Most foods, using convect baking mode, can be cooked bylowering cooking temperatures 25 F (14 C). The cooking time canbe shortened significantly when using Convect Roast, especiallyfor large turkeys and roasts. It is important not to cover foods with lids or aluminum foil sothat surface areas remain exposed to the circulating air,allowing browning and crisping. Keep heat loss to a minimum by opening the oven door onlywhen necessary. It is recommended to use the oven light tomonitor progress.9
Choose cookie sheets without sides and roasting pans withlower sides to allow air to move freely around the food. Test baked goods for doneness a few minutes before theminimum cooking time using a method such as a toothpick. Use a meat thermometer or the temperature probe todetermine the doneness of meats and poultry. Check thetemperature of pork and poultry in 2 or 3 places.If the oven door is opened during convection broiling, the fan turnsoff immediately and turns on as soon as the door is closed. Broilelements will turn off approximately 30 seconds after the door isopened. They will turn on again approximately 30 seconds afterthe door is closed.NOTE: It is normal for the convection fan to run during nonconvection cycles as well as during preheat.Convection BakeTo Convection Broil:The convection element is hidden in the rear panel of the ovencavity and, assisted by the convection fan, provides balanced,efficient heating.For ideal performance allow the oven to preheat for 5 minutes (nopreheat tone will sound). Position food on the unheated grid onthe broiler pan, and then place it in the center of the oven rackwith the longest side parallel to the door.Convection baking can be used for baking delicate cakes andpastries, as well as foods on multiple racks. It is helpful to staggeritems on the racks to allow a more even flow of heat. If the oven isfull, extra cooking time may be needed.Proofing BreadWhen cooking an oven meal with several different types of foods,be sure to select recipes that require similar temperatures.Cookware should sit in the oven with at least 2" (5 cm) of spacebetween the cookware and the sides of the oven.To Proof:During convection baking preheat, the convection, bake, and broilelements all heat the oven cavity. After preheat, these elementswill cycle on and off in intervals to maintain oven temperature,while the fan circulates the hot air.If the oven door is opened during convection baking, the fan turnsoff immediately and turns on as soon as the door is closed.Convection, bake, and broil elements will turn off approximately30 seconds after the door is opened. They will turn on againapproximately 30 seconds after the door is closed.NOTE: It is normal for the convection fan to run during nonconvection cycles as well as during preheat. Reduce recipe temperature 25 F (14 C). The cook time mayneed to be reduced also.To Convection Bake:Before convection baking, position racks according to the“Positioning Racks and Bakeware” section.Convection RoastConvection roasting can be used for roasting meats and poultry.During convection roasting, the bake, broil, and convectionelements will cycle on and off in intervals to maintain oventemperature, while the fan circulates the hot air.If the oven door is opened during convection roasting, the fanturns off immediately and turns on as soon as the door is closed.The bake, broil, and convection elements will turn offapproximately 30 seconds after the door is opened. They will turnon again approximately 30 seconds after the door is closed.NOTE: It is normal for the convection fan to run during nonconvection cycles as well as during preheat.To Convection Roast:Before convection roasting, position racks according to the“Positioning Racks and Bakeware” section. It is not necessary towait for the oven to preheat before putting food in, unlessrecommended in the recipe.Convection BroilDuring convection broiling, the broil element will cycle on and offin intervals to maintain oven temperature, while the fan circulatesthe hot air.Proof
rack guide. 2. Using 2 hands, lift up on the front edge of the rack and the sliding shelf together. 3. Slowly push the rack and the sliding shelf to the back of the oven until the back edge of the rack pulls over the end of the rack guide. To avoid damage to the sliding shelves, do not place more than 25 lbs (11.4 kg) on the rack.