Transcription
User Guide
Table of ContentsGet Started . 1Your Phone at a Glance . 1Set Up Your Phone . 5Insert the Battery . 5Charge the Battery. 6Replace the SIM Card . 7Replace the microSD Card . 8Turn Your Phone On and Off . 8Set Up Voicemail . 9Set Up Voicemail . 9Checking Voicemail . 9Phone Basics .10Your Home Screen .10Home Screen Overview .10Home Screen Icons .11Navigate Through the Menus .14Select Menu Items .14Back Up Within a Menu .14Navigation Key Shortcuts.14Enter Text .15Select a Text Input Mode .15Enter Text Using XT9 Word .15Enter Text Using Abc/ABC Mode .16Phone Calls .17Make Phone Calls .17Call Using the Phone keypad .17Call from Recent Calls .17Call from Contacts .17Call Using a Speed Dial Number .18Call a Phone Number With Pauses.18TOCi
Call Emergency Numbers .18Receive Phone Calls.19End Phone Calls .20Phone Call Options .20In-call Options.20Caller Name ID .21Call Waiting .213-Way Calling .21Call Forwarding .22Recent Calls .23Call Settings .24Answer Options .24Auto Retry .24TTY Mode .24One Touch Dial.25Voice Privacy .25DTMF Tones.26Assisted Dialing .26Hearing Aid .26Contacts.27Get Started with Contacts .27Add a Contact .28Save a Phone Number .28Edit a Contact .29Backup Assistant .30Add a Group Contact .31Edit a Group Contact .31Set Up Speed Dialing.32ICE (In Case of Emergency) Contacts .33My Name Card.34Messaging .35Send a Message .35Access Messages .36TOCii
Messages Folder .36Inbox Folder.37Sent Folder .38Drafts Folder .39Messaging Settings.39Emergency Alerts .40Voicemail .41Voicemail Notification .41New Voicemail Message Alerts.41Retrieve Your Voicemail Messages .41Mobile Web Email .42Social Networks .42Apps and Entertainment.44Media Center .44Apps .44Internet .44Music & Tones .45Picture & Video .46VZ Navigator .48Web and Data .49Launch a Web Connection.49Data Connection Status and Indicators .49Browser .50Learn to Navigate the Web .50Camera and Video .52Take Pictures .52Take a Picture .52Camera Mode Options .53Record Videos .54Record a Video .54Video Mode Options .55Send Pictures and Videos .55Send Pictures and Videos Using the Messaging Feature.55TOCiii
Send Pictures and Videos Using the Bluetooth Feature .56Tools .57Voice Commands .57Activate the Voice Commands .57Voice Commands Settings.59Calculator .61Unit Converter.61Tip Calculator.62Calendar .63Add an Event to the Calendar .63View Calendar Events .64Erase Calendar Events .64Alarm Clock .65Stopwatch .66Countdown Timer .66World Clock .67Notepad .67USB Mass Storage .68Flashlight .68Settings & Tools .70My Verizon .70Volume Settings.70Adjust the Maser Volume .70All Sounds Off.70Bluetooth .71Turn Bluetooth On or Off.71Bluetooth Settings Menu .71Pair Bluetooth Devices .71Send Items via Bluetooth .72Accessibility .73Easy Set-up .73Readout .73Language .74TOCiv
Speech Rate .74Speech Volume .74Contrast .74Sounds Settings.75Easy Set-up .75Call Sounds .75Alert Sounds .75Keypad Volume .76Service Alerts .76Escalate Ringtone.77Display Settings .77Easy Set-up .77Banner .77Backlight .78Wallpaper .78Display Themes .79Main Menu Settings .79Font Size .80Clock Format .80Power Save Mode .81Phone Settings .81Airplane Mode .81Set Shortcuts .81External Key Lock .82Voice Commands Settings.83Time & Date.83Location .83Current Country .84Security .84SIM Security .86Global Data Roaming .87System Select.87NAM Selection .88TOCv
Call Settings .88Memory.88USB Mode .89Phone Info .90Set-up Wizard .90Notes .91Copyright & Trademarks .92Index .93TOCvi
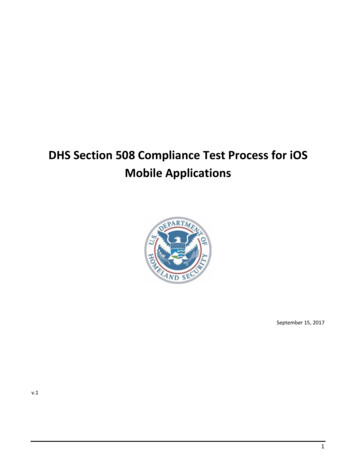
Get StartedThe following topics give you all the information you need to set up your phone and Verizonservice the first time.Your Phone at a GlanceThe following illustration outlines your phone’s primary external features and keys.Phone Basics1
Key Functions Smart Sonic Receiver (internal) lets you hear the caller and automated prompts. Placeyour ear around the internal receiver and adjust the position of the phone to find the besthearing point depending on the surrounding environment.Note: Do not cover the microphones during a call. Do not apply any sheet or sticker to thedisplay area as it may compromise the hearing quality.Phone Basics2
Main Screen displays all the information needed to operate your phone, such as the callstatus, the Contacts list, the date and time, and the signal and battery strength. Soft Keys ( / ) let you select key actions or menu items corresponding to thebottom left and right lines on the main screen while the phone is open. Navigation Key lets you scroll through the phone’s menu options. MENU/OK Key () lets you access the phone’s menus and selects the highlightedchoice when navigating through a menu. CAMERA Key () lets you activate the camera or video mode and take pictures andvideos with the phone open.Note: The Camera feature is not available on all models. SEND Key () allows you to place or receive calls, answer Call Waiting, or use 3-Way Calling. CLR Key () deletes characters from the display in text input mode. When in a menu,pressing it returns you to the previous menu. This key also allows you to return to theprevious screen in a data session or activate Voice Commands. SPEAKER Key () lets you place or receive calls in speakerphone mode. When youreceive an incoming call, press and hold to answer the call in speakerphone mode.During a call, press to switch the speakerphone on or off. END/PWR Key () lets you turn the phone on or off, end a call, or cancel your inputand return to standby mode. Keypad lets you enter numbers, letters, and characters, and perform functions. External Speaker Key lets you place or receive calls in speakerphone mode, turn thespeakerphone on and off during a call, activate Voice Commands, or unlock thekeyguard. Call List Key lets you display the recent call history or end a call. Speaker lets you hear the different ringtones and sounds. The speaker also lets youhear the caller’s voice in speakerphone mode. Camera Lens lets you take pictures and videos.Note: The Camera feature is not available on all models. Secondary Microphone suppresses background noise improving audio quality for theother party during voice calls except in speakerphone mode.Phone Basics3
Flash helps illuminate subjects in low-light environments when taking a picture orrecording a video. It can also work as a flashlight. See Flashlight. Outer Screen displays the information such as the call status, the date and time, andthe signal and battery strength. Primary Microphone transmits your voice and ambient sound during voice calls, voicerecordings and videos. Internal Antenna facilitates reception and transmission. To maximize performance, donot obstruct while using the phone. microSD Card Slot (internal) allows you to insert a microSD card to support externalmemory. The microSD compartment is behind the battery. See Replace the microSDCard.Note: Your phone comes with a microSD card already installed. SIM Card Slot (internal) allows you to insert a SIM card. The SIM compartment isbehind the battery. See Replace the SIM Card.Note: Your phone comes with the SIM card already installed. Battery Cover Screw opens the battery cover to replace the battery.Note: The battery cover screw is permanently mounted on the cover and cannot be removed. Volume Key allows you to adjust the ringtone volume in standby mode or the voicevolume during a call. USB/Charging Port allows you to connect the phone and the USB cable for use withthe charger adapter or other compatible accessories. Headset Jack allows you to plug in an optional headset for convenient, hands-freeconversations.CAUTION!Phone BasicsInserting an accessory into the incorrect jack may damage the phone.4
Set Up Your PhoneYou must first install and charge the battery to begin setting up your phone.Insert the Battery1. Use a coin to turn the battery cover screw on the back of the phone counter-clockwiseseveral times to unlock the back cover.Note: The battery cover screw is permanently mounted on the cover and cannot be removed.2. Insert your fingernail into the slot at the bottom of the back cover and gently lift thebattery cover.3. Insert the battery, contacts end first, and gently press the battery into place.Phone Basics5
4. Replace the battery cover, making sure all the tabs are secure and there are no gapsaround the cover.5. Using a coin, turn the battery cover screw clockwise until the cover locks.Charge the BatteryFully charge the battery before powering on the phone.Important: Unplug the charger from the electrical outlet when not in use to reduce theenvironmental impact of charging1. Open the USB/Charging port cover on left side of the phone.2. Plug the smaller end of the USB cable into the phone’s USB/Charging port.3. Plug the other end of the USB cable into the charger, and then plug the charger into anelectrical outlet. Be sure to use the charger that came with your phone.4. When charging is complete, remove the cable from the port and close the cover. Pressaround the edges of the cover to ensure that it is securely closed.Warning:Phone BasicsPlease use only an approved charger to charge your phone. Improper handlingof the charging port, as well as the use of an incompatible charger, may causedamage to your device and void the warranty.6
Replace the SIM CardYour phone comes with the SIM card already installed. If you need to replace your SIM card,follow these steps.1. Remove the battery cover and the battery.2. Slide the SIM card holder in the direction of the arrow to unlock it (1).3. Raise the SIM card holder with your finger and remove the original SIM card (2).4. Insert the new SIM card with the Verizon logo facing up and the cut off corner on thebottom right (3).5. Close the SIM card holder and slide the holder into the locked position.6. Place the battery back into its compartment and replace the battery cover.Warning:Phone BasicsBe sure all ports and covers are properly sealed to maintain the phone'swaterproof capability.7
Replace the microSD CardYour phone comes with a 4 GB microSD card already installed. If you need to replace yourmicroSD card, follow these steps.1. Remove the battery cover and the battery.2. Slide the microSD card holder in the direction of the arrow to unlock it (1).3. Raise the microSD card holder with your finger and remove the original microSD card(2).4. Insert the new microSD card into the holder with the gold contacts facing toward you (3).5. Gently close the card holder and then slide the holder into the locked position.6. Place the battery back into its compartment and replace the battery cover.Note: You can easily damage the microSD card by improper operation. Please be careful wheninserting, removing, or handling the microSD card.Turn Your Phone On and OffThe instructions below explain how to turn your phone on and off.Turn Your Phone On Open the phone and press and hold the END/PWR keyuntil the screen lights up.Turn Your Phone Off Open the phone and press and hold the END/PWR keyPhone Basics8until the display turns off.
Set Up VoicemailYou should set up your Voicemail and personal greeting as soon as your phone is activated.Always use a password to protect against unauthorized access. Your phone automaticallytransfers all unanswered calls to your Voicemail, even if your phone is in use or turned off.Set Up Voicemail1. From the Home screen, press and hold.-orFrom the Home screen, dial *86 and press2. When you hear the greeting, press.to interrupt.3. Follow the instructions to set up your new password and record a greeting.Checking VoicemailFrom your phone1. From the Home screen, press and hold.2. Follow the instructions to listen to and manage your voicemail messages.From other phone:1. Dial your wireless number.2. When you hear the greeting, press # to interrupt.3. Follow the instructions to listen to and manage your voicemail messages.Note: Voice mailboxes not set up within 45 days will be canceled. Your voice mailbox is notpassword
The following topics give you all the information you need to set up your phone and Verizon service the first time. Your Phone at a Glance The following illustration outlines your phone's primary external features and keys. Phone Basics 2 Key Functions