Transcription
Infra-red flicker detector IRD 1020.1Flame detection device foroil and gas flamesINTRODUCTIONThe IRD 1020.1 detector is used to supervise gas or oilflames. This flame monitoring device should be connectedto a Satronic oil burner control box. Monitoring is based onthe infra-red flicker principle, in other words, the flickeringinfra-red light of the flame is detected. The steady radiationfrom, for example, the glowing refractory layer on the insideof the boiler, has no effect on the detector. The IRD 1020.1replaces the IRD 1020 and 920.When exchanging the IRD 1020, care must be taken that thecorresponding IRD 1020.1 with the same imprint (blue orwhite) is used (see page 3 and 4).When exchanging the IRD 920, care must be taken to wirethe sensor correctly (see page 3), and the existing holdermust be exchanged with the magnetic holder M93.For replacement of the IRD 920 with IRD 1020.1 is thesensor cable also needed.TECHNICAL DATASupply voltageorNominal current inputPower consumptionAmbient temperatureInsulation standardMounting attitudeWeightFlame viewing attitudeSpectral response(with daylight filter)Frequency rangeSensitivity adjustment rangeSwitch-on delay(after connectingoperating voltage)Response timeCut-out timeApproved ambient parameter- for operation- for storageBuild-up of ice, penetration ofwater and condensing water areApprovals accordingto European standardsThe infra-red flicker detector can be used with any one of thefollowing control boxes:IRD 1020.1DKG 972DLG 974, 976DMG 970, 971, 972, 973TFI 812.2MMI 810, 811, 812, 815, 816, 962TMG 740-2, 740-3SGU 930, 930iIRD 1020.1 D DVI 980, 982MMG 810, 811FFW 930DKG 972DLG 974, 976DMG 970, 971, 972, 973TFI 812.2MMI 810, 811, 812, 815, 816, 962TMG 740-2, 740-3SGU 930, 930iEN1C-0118SZ20 R1005CONSTRUCTIONAL FEATURESThe infra-red sensor and the pre-amplifier are hermeticallysealed in glass and along with the electronics form anintegrated unit in the flame detector. Wiring is by way of aplug connection. The sensitivity control and two LED’s forindication of the flame signal are situated on the rear of theflicker detector.1220 / 240 V (-15. 10%)50 Hz (50 - 60 Hz)110/120 V (-15. 10%)50 - 60 Hz ( 5%)approx. 4 mA1 VA-20 C to 60 CIP 41any40 gside-on or end-on accordingto type800 - 1100 nmmaximum 950 nm15 Hz. 250 Hz (-12 dB)approx. 1 : 20 (26 dB) 3.5 sec. 0.1 sec. 1 sec.max. 95% at 30 C-20 C. 60 C-20 C. 80 CinadmissibleEN 298, as well as all otherrelevant Directives andstandards
TECHNICAL FEATURESCOMMISSIONING AND MAINTENANCE1. Flame detectionDuring commissioning and after servicing, the flamemonitoring system should be checked for faultless operationas follows:1. Check that the detector is connected properly. Wrongconnections are a risk to safety, and could cause damageto the detector unit or burner system.2. Adjust to maximum sensitivity and start the burner: If theLED indicator is lit after the start impulse, carefully adjustthe sensitivity control until LED 1 extinguishes. No LEDshould light up during the pre-purge phase.3. When the burner is operating normally, carefully turnback the sensitivity control until LED 1 begins to flicker.Increase the setting again by one or two increments untilboth LED’s are lit. If LED 1 does not flicker even atposition 1: Leave potentiometer at position 1-2. Thisadjustment should be carried out when the flame signalcurrent is weakest (at a cold-start, shortly after flameestablishment or after stabilisation).4. The flame detection device requires no maintenance ofany kind, and as it is classed as safety equipment, noattempt should be made to open the housing.5. Because the nature of the flame can change in time dueto the accumulation of dirt, the indicators on the detectorshould be checked periodically.- Yellow- as well as blue-burning oil- and gas flames can bemonitored.- The flame detector is suitable for operation where theambient temperature is within the range -20 to 60 C.- The flickering detector IRD 1020.1 becomes active notbefore a minimum threshold-level of steady light isexceeded. That guarantees that neither electromagneticnor ignition-spark noise are affecting the IRD.- Sensitivity is adjustable.- LED 1 is a warning indicator for the pre-purge phase aswell as normal operation. LED 2 indicates the actual statusof the detector: On or off.- During pre-purge, LED 1 indicates possible stray light,which may be produced either by a flickering or bya steady light source, before the detector switches on(LED 2).- When the burner is operating normally, LED 1 acts as awarning indication of the flame signal current sensitivitybeing set too low - it begins to flicker or extinguishesbefore the detector switches off.- The compact size makes it possible to mount the detectoron any burner. For this reason the IRD mounting flangeM93 has the same dimensions and fixing holes as the FZflange M74. This magnetic flange provides the switch-offfacility specified in the European standard. The IRD 1020.1therefore only functions with the M93 flange.Please note:Burner operating normally both LED’s onBurner in pre-purge phase both LED’s offFor safety reasons the sensitivity must not be sethigher than necessary.2. Installation instructions- The detector probe should be fitted so that it receives thelight which pulsates most strongly. This can be achievedby positioning the detector as close as possible to theflame or by directing it at a particular zone of the flame (e.g.by using a sighting tube).- No stray light must be allowed to fall on the detector (e.g.through cracks or from a sight glass). Pulsating stray light(e.g. from fluorescent lighting or light bulbs) could causethe system to switch to lockout. Due to the very highsensitivity of the detector, it should not be exposeddirectly or indirectly (reflections) to the ignition spark.- The infra-red flicker detector should be fitted in such a waythat the ambient temperature cannot under anycircumstances rise above 60 C. At higher temperatures,there is a risk of incorrect operation and the life expectancyof the unit could be reduced. In addition, care should betaken that the detector is not subjected to unusually harshvibration and receives no hard knocks.- It is necessary for the magnetic IRD M93 flange to bemounted on a flat surface to avoid any mechanical stresswhich could otherwise damage it.Safety Checks:1. Shut off the fuel supply when the burner is in the "run"position. The indicator LEDs should extinguish and thecontrol box go to lockout.2. Start the burner with the fuel supply shut off. The controlbox must go to lockout at the end of the safety time dueto absence of flame.3. Remove the detector from its mounting flange during apause, fit onto it a second flange M93. Start the burnerwith straylight on the detector (e.g. by a cigarette-lighter,bulb or a neonlight. Daylight or a torch is not suitable).The control box must go to lockout due to stray lighteither immediately or at the end of the pre-purge,depending on the model.Test switch-off facility:IRD 1020.11. Remove the detector durning the "run" position from itsspecial M93 flange. The control box must go to lockoutdue to the activated switch-off facility.2
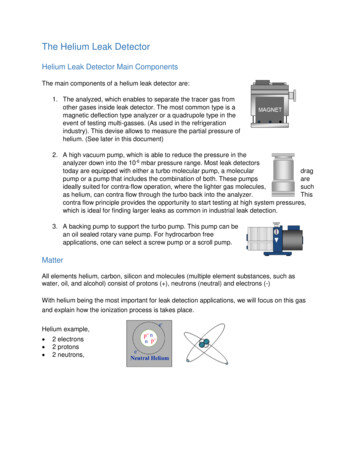
Possible faultsIRD 1020.1 TERMINALS1. LED’s light up during the pre-purge phase (controlbox switches to lockout):a) Sensitivity set too highb) Stray lightc) Ignition spark visible to detector (directly or reflection).Correct by preventing direct sight of ignition spark.d) Interference from ignition cable (lay cables somedistance apart, or possibly screen the detector).435261712. No indication from LED’s after establishment of flame:a) Incorrect or faulty wiringb) Sensitivity set too lowc) Detector positioned wrongly (receives no light)d) Detector or viewing window dirtye) Defective detectorf) IRD flange M93 defective (cracks or other mechanicaldefects)g) wrong IRD flange, special magnetic IRD flange M93is need
of the boiler, has no effect on the detector. The IRD 1020.1 replaces the IRD 1020 and 920. When exchanging the IRD 1020, care must be taken that the corresponding IRD 1020.1 with the same imprint (blue or white) is used (see page 3 and 4). When exchanging the IRD 920, care must be taken to wire the sensor correctly (see page 3), and the .