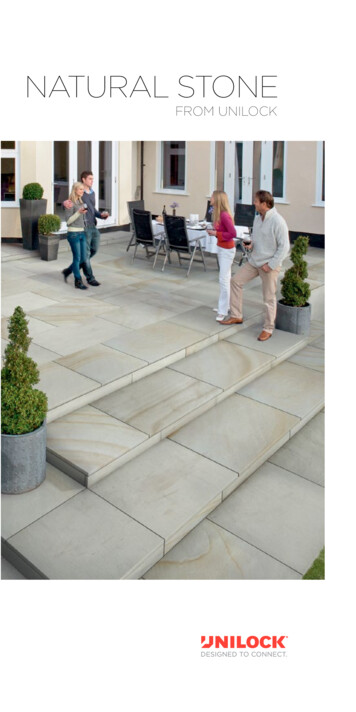
Transcription
OUTDOOR KITCHEN
HOW-TO BUILDOUTDOOR KITCHENThere are THREE ways to build an outdoor kitchen.TRADITIONAL GRILL ISLAND CONSTRUCTIONBuild using Unilock wall blocks.U-CARA MODULAR SYSTEMBuild with Fascia panel on Unilock modular aluminum frame system.U-CARA WALL MOUNT SYSTEMBuild your own custom cabinet and mount U-Cara panels to the face using the U-Cara Wall Mount System.This guide will take you throughthe TRADITIONAL GRILL ISLANDCONSTRUCTION method which will allowyou to construct a grill island with severalwall systems from Unilock.The instructions in this guide are basedupon Unilock Brussels Dimensional , butcan be applied to several Unilock wallsystems such as Lineo , Pisa2 , ConcordWall , Olde Quarry , and Estate Wall .The key is to use a wall system that is nomore than 9 or 10" deep (front to back) sothat there is minimal loss of internal space.2
HOW-TO BUILDOUTDOOR KITCHENTools and Equipment. . . . . . . . . . . . . . . . . . . . . . . . . . . 4Construction Supplies. . . . . . . . . . . . . . . . . . . . . . . . . . 5Before Starting. . . . . . . . . . . . . . . . . . . . . . . . . . . . . . . . 6Planning the Size . . . . . . . . . . . . . . . . . . . . . . . . . . . . . . . 7Planning Utilities . . . . . . . . . . . . . . . . . . . . . . . . . . . . . . 8Forming and Pouring the Base Pad . . . . . . . . . . . . . . . 9Installing the First Row . . . . . . . . . . . . . . . . . . . . . . . . . 10Installing the Second Row and Corners. . . . . . . . . . . . 11Installing a Foot Rest/Accent. . . . . . . . . . . . . . . . . . . . 12Appliance Templates. . . . . . . . . . . . . . . . . . . . . . . . . . . 13Fourth Row . . . . . . . . . . . . . . . . . . . . . . . . . . . . . . . . . . . 14Installing Subsequent Rows (5-7). . . . . . . . . . . . . . . . . 15Using Lintels to Support Appliances. . . . . . . . . . 16 - 17Installing the Final Rows (8-9). . . . . . . . . . . . . . . . . . . . 18Installing the Countertop. . . . . . . . . . . . . . . . . . . . . . . . 19Bar Counter Extension. . . . . . . . . . . . . . . . . . . . . . . . . 20Adding a Backsplash . . . . . . . . . . . . . . . . . . . . . . . . . . . 21Installing Backsplash Coping . . . . . . . . . . . . . . . . . . . 22Installing the Appliances. . . . . . . . . . . . . . . . . . . . . . . 233
HOW-TO BUILDOUTDOOR KITCHENTools and EquipmentRubberMalletTapeMeasureSquareand LevelCaulkingGunRakeScreedingBarFluorescentString LineWheelbarrowPost onal)ShovelImpactCompactor
HOW-TO BUILDOUTDOOR KITCHENConstruction SuppliesUnilock WallBlockSonotubes½” Rebar forreinforcementRedi-Mixconcrete /baggedconcrete mix2 x 6 FramingLumber andStakesDuct TapeAluminum2 x 2 AngleConcreteAdhesiveUtilityConduit(⅛”or ¼” lintel)5(42” Long x 8” Diameter)
HOW-TO BUILDOUTDOOR KITCHENBefore StartingCHECKLISTChoose and order Unilock Wall ProductPre-ordering componentsand arranging requiredtechnicians early will helpyour project go smoothlyDraw a basic design indicating position of all componentsOrder your grill head and componentsPre-arrange licensed gas fitter, electrician and plumberDecide on a counter-top product and incorporate into estimated timelineArrange a utilities “locate” before excavationGrill HeadPlumbingHardwareBar FridgeDrawersAccess Doors6
HOW-TO BUILDOUTDOOR KITCHENPlanning the SizeOnce you’ve selected a Unilock product, reduce cutting by using theunit dimensions to determine the optimal size for your island.Proper size planning can reduce cutting by up to 90%.Plot your design on a computer or graph paper to fine tune the dimensions prior to building the foundation.Block Layout no Cuts7
HOW-TO BUILDOUTDOOR KITCHENPlanning UtilitiesOnce you’ve selected a Unilock product, you can begin to plan out the size and layout of theisland. Consider where utilities will run to and from before you begin excavation.PowerGasHot/ColdWaterWastewaterNOTE: All utilities mustbe in appropriate conduitsand buried as per your localbuilding codes.8
HOW-TO BUILDOUTDOOR KITCHENForming and Pouring the Base PadExcavate and fill areawith compacted freedraining gravel (min 6”below bottom of pad).Install utility conduitsto approximatelocation in island.Construct pad onconcrete supports(Sonotubes ).Construct the base padon concrete supports(Sonotubes) and createreinforcements with rebarand/or mesh.Build a form with 2 x 6 lumber using the wall unitsizes to determine the optimal size. Be sure toposition the form precisely, perpendicular or parallelto the house, or in accordance with your overallproject plan. The form must be perfectly level.2 x 6 Framing Lumber1/2" Rebar8" diameterconcrete form tubes9
HOW-TO BUILDOUTDOOR KITCHENInstalling the First RowConcrete must be cured for at least 72 hours before starting construction.Unpackage all grillisland componentsto ensure the correctitem and size wasdelivered.Apply two ¼” beadsof concrete adhesivebetween blocks andbase pad.While placing your firstrow of units aroundperimeter, leave anyappliance openings asper your plan.Use a string line oraluminum screedingbar to maintainalignment and square.Unilock Wall UnitElectricalConduitConcrete PadWater UtilitiesOpening for Bar FridgeIt is strongly recommended toconstruct a wood frame equalto size of the grill doors to useas rough opening guide.10ConcreteAdhesiveNOTE: Use concreteadhesive between alllayers of stone.
HOW-TO BUILDOUTDOOR KITCHENInstalling the Second Row and CornersInstalling the second row is much thesame as the first row except that you will“lap” or “log cabin” the inside and outsidecorners as shown below.Lap cornersand securewith adhesiveNOTE: Use concrete adhesive between all layers of stone.11Always use adhesive between every row of units.Using your carpenter’s square, level, tape measure andscreeding bar, carefully ensure that all units are in bothvertical and horizontal alignment with the first rowbefore the adhesive sets.
HOW-TO BUILDOUTDOOR KITCHENInstalling a Foot Rest/AccentDetermine which course is appropriatefor the foot rest in order to optimizecomfort and visual appeal. Typicallythis is the third or fourth course,depending on product unit heights.2" OverhangRecommendedFoot Rest (Optional)A foot rest is recommendedfor comfort and overallappearance. Consider usinga different color and/ortexture as an accent.12In this illustration, the foot rest ismade from a thinner material suchas coping. Coping should overhangapproximately 2" beyond the faceof the island.
HOW-TO BUILDOUTDOOR KITCHENAppliance TemplateCreate appliance templates using 2 x 4 lumber to use asa fitting guide while constructing the island to protectappliances from damage during construction.Appliance Template(2 x 4 Construction)13
HOW-TO BUILDOUTDOOR KITCHENFourth RowEnsure the adhesive on previous rowsis completely set/cured. You may needto pause between rows to ensurethis is the case. Do not begin this rowbefore the previous rows are set.NOTE: Use concreteadhesive between alllayers of stone.14Resume the bond offsetthat was established inthe first two rows whenplacing this row, for apleasing appearance.Double and triple check units toensure they have not gone out ofalignment before the adhesive sets.Keep corners and small pieces inplace using duct tape if required.Offset units tocoincide with Row 1
HOW-TO BUILDOUTDOOR KITCHENInstalling Subsequent Rows (5-7)Once the glue has set, youcan continue with rows5, 6, and 7 making sure thatthe glue sets between rows.Be sure to double and triplecheck as you build thatthe horizontal and verticalalignment has not shifted.Use the appliance template to helpyou stay on track with size andposition. Remove the template asneeded when installing the lintels.ApplianceSupport LintelsAlways Offset UnitsNOTE: Use concreteadhesive between alllayers of stone.15
HOW-TO BUILDOUTDOOR KITCHENUsing Lintels to Support AppliancesAlways follow theappliance manufacturer’srecommendations forbracing and supportingthe appliances.Bracing should be done withAluminum lintels. Steel canbe used, but over time it canrust and sometimes bleedthrough the face.To ensure the lintels sit flush,notching of the wall units may berequired. A small grinder is bestfor this. Glue the lintels in placewith concrete adhesive.Notch out units for LintelsSecure Lintels in with concrete adhesive16
HOW-TO BUILDOUTDOOR KITCHENAluminum Lintelframes should bepre-fabricatedBolt or notchLintels in place17
HOW-TO BUILDOUTDOOR KITCHENInstalling the Final Rows (8-9)The final rows present an opportunity to introduce a contrasting color or texture by insertinga row of accent pavers or using a different color of the wall product you have chosen.Accent rows shouldcoordinate with foot restWoodenappliancetemplatesFoot rest should coordinatewith accent row18
HOW-TO BUILDOUTDOOR KITCHENInstalling the CountertopWhen planning a countertop, ensure that it extends 2" beyond the face of the island. Toaccommodate seating on the bar side of a counter, increase this to 12" from the face of the island.Your countertop manufacturer will provide guidance regarding segmentation and electrical portscan be drilled after the counter is in place.Poured concrete can be constructed on site but should contain expansion joints.Electrical PortsSink and FaucetCountertop Segments19
HOW-TO BUILDOUTDOOR KITCHENBracing the Bar Counter ExtensionYour countertop manufacturer can advise how many braces are required andthe best materials and fasteners to use based on your design. Never use steelas it will rust and negatively impact the appearance of your project over time.However, regardless of the materials used, it is not recommended to extend acounter beyond 12" from the face of the island.Countertop supports forbar extension20
HOW-TO BUILDOUTDOOR KITCHENAdding a BacksplashMinimal glue is required to adhere row 1 of thebacksplash to the countertop. The maximumheight of a backsplash is 10-12" and it is oftenconstructed using the same material as therest of the island.Backsplash21Recessed Receptacle OptionSeveral blocks may be notched to accommodatea recessed receptacle and provision for electricalcan be made by drilling through the counter.However, surface mounting receptacles is oftenan easier option.Surface mountedweatherproofelectrical outlets
HOW-TO BUILDOUTDOOR KITCHENInstalling Backsplash CopingUsing the samematerial as thecountertop looksthe best.Adhere usingconcrete adhesive.Add under countertop and backsplashcoping lighting if desired. Drill holesthrough the countertop and blocksto run low voltage wiring and adhereLED lights.Backsplash CopingNOTE: Use concrete adhesivebetween all layers of stone.22
HOW-TO BUILDOUTDOOR KITCHENInstalling the AppliancesInstall all appliances inaccordance to manufacturer’srequirements. Always observelocal building codes.23Access doors and drawers mayrequire drilling for screws intothe concrete into the concreteto secure the unit.Install the bar fridge last, asthis is typically the easiestitem to install and can provideyou access to other hookups.
HOW-TO BUILDOUTDOOR KITCHENCongratulations - your outdoor kitchen is complete!For more help designing and building outdoor kitchens, contactyour local Unilock Territory Manager (1-800-UNILOCK) to arrangea phone consultation or site visit.Completed GrillIsland and Bar24
Hardscape Education CenterLooking for more productspecific information?The Unilock Hardscape Education Centercontains a robust library of over 1,500.Cross SectionsInstructional VideosSeminar RecordingsCatalog DownloadsCertificate CoursesYou can access all this and more in thecontractor section of Unilock.com.25
Wall , Olde Quarry , and Estate Wall . The key is to use a wall system that is no more than 9 or 10" deep (front to back) so that there is minimal loss of internal space. There are THREE ways to build an outdoor kitchen. U-CARA MODULAR SYSTEM Build with Fascia panel on Unilock modular aluminum frame system. U-CARA WALL MOUNT SYSTEM