Transcription
UHC-PUHC-P 4-slotInstallation, Operation ManualUHC-P Narrow2,4-Slot and Narrow ModelsCovers Palm and Symbol-brand PDA’sUHC-P 2-slotSoftware to operate a UHC-Pis available for Palm OS andSymbol-brand WindowsPocket PC-based PDA’s. Notall PDA’s, however, willcommunicate with the cabinet.The Palm Zire 22, TungstenE2 and the Symbol brandPocket PC-based PDA’s arerecommended.Frymaster, a member of the Commercial Food Equipment Service Association, recommendsusing CFESA Certified Technicians.*8196002*24-Hour Service Hotline 1-800-551-8633Email: service@frymaster.comPrice: 6.00819-6002MAR 09
NOTICEIF, DURING THE WARRANTY PERIOD, THE CUSTOMER USES A PART FOR THIS ENODISEQUIPMENT OTHER THAN AN UNMODIFIED NEW OR RECYCLED PART PURCHASED DIRECTLYFROM FRYMASTER/DEAN, OR ANY OF ITS AUTHORIZED SERVICE CENTERS, AND/OR THEPART BEING USED IS MODIFIED FROM ITS ORIGINAL CONFIGURATION, THIS WARRANTY WILLBE VOID. FURTHER, FRYMASTER/DEAN AND ITS AFFILIATES WILL NOT BE LIABLE FOR ANYCLAIMS, DAMAGES OR EXPENSES INCURRED BY THE CUSTOMER WHICH ARISE DIRECTLYOR INDIRECTLY, IN WHOLE OR IN PART, DUE TO THE INSTALLATION OF ANY MODIFIED PARTAND/OR PART RECEIVED FROM AN UNAUTHORIZED SERVICE CENTER.THE UHC-P IS NOT SUITABLE FOR OUTDOOR USE. WHEN OPERATING THIS UNIT, ITMUST BE PLACED ON A HORIZONTAL SURFACE.THE UHC-P IS NOT SUITABLE FOR INSTALLATION IN AN AREA WHERE A WATER JET CANBE USED. THIS APPLIANCE MUST NOT BE CLEANED WITH A WATER JET.FOR YOUR SAFETYDO NOT STORE OR USE GASOLINE OR OTHER FLAMMABLE VAPORS AND LIQUIDS INTHE VICINITY OF THIS OR ANY OTHER APPLIANCE.DO NOT OPERATE OR SERVICE THE UHC-P WITHOUT FIRST READING THIS MANUAL.DO NOT OPERATE THE UHC-P UNLESS IT HAS BEEN PROPERLY INSTALLED ANDCHECKED.DO NOT OPERATE THE UHC-P UNLESS ALL SERVICE AND ACCESS PANELS ARE INPLACE AND PROPERLY SECURED.DO NOT ATTEMPT TO REPAIR OR REPLACE ANY COMPONENT OF THE UHC-P UNLESSALL POWER TO THE UNIT HAS BEEN DISCONNECTED.USE CAUTION WHEN SETTING UP, OPERATING, OR CLEANING THE UHC-P TO AVOIDCONTACT WITH HEATED SURFACES.
Table of ContentsInstallation, Warranty, Parts1-1Power Up2-1Operational OverviewProgramming Overview3-13-4ProgrammingChanging from 4 to 2-Slot OperationMoving Products from Food Library to MenusSetting up Cabinet on Palm4-14-24-24-2Entering Passwords/ Menu Items5-1Configuring Presets/Saving CabinetsLoading Presets6-16-2Language/Temperature Display7-1Uploading Cabinet Configurations and Daily Activity to Palm8-1Acquiring, Loading Software for the PalmChecking Palm Operating System Version NumberDownloading UHC-P Software from InternetLoading Software on PalmBeaming Software between Palms9-19-19-29-39-6Acquiring, Loading Software for the Symbol10-1Food Item Default SettingsCleaning and Preventive Maintenance11-111-2Typical Setups11-6
UHC-P1 Universal Holding CabinetThe Frymaster Universal Holding Cabinet-P (UHC-P) developed and manufactured exclusively forMcDonald’s, is a short-term holding device to extend the freshness of a wide variety of cookedproducts. The UHC-P meets all McDonald’s standards for safety, efficiency, and cleanliness.1.1 Warranty StatementA. Frymaster L.L.C. makes the following limited warranties to the original purchaser only forthis equipment and replacement parts:1.1.1 Warranty Provisions – Universal Holding CabinetA. Frymaster L.L.C. warrants all components against defects in material and workmanship for aperiod of two years.B. All parts, with the exception of fuses, are warranted for two years after installation date ofcabinetC. If any parts, except fuses, become defective during the first two years after installation date,Frymaster will also pay straight-time labor costs to replace the part, plus up to 100 miles/160km of travel (50 miles/80 km each way).1.1.2 Parts ReturnA. All defective in-warranty parts must be returned to a Frymaster Authorized Factory ServiceCenter within 60 days for credit. After 60 days, no credit will be allowed.1.2.3 Warranty Exclusions This warranty does not cover equipment which has been damaged due to misuse, abuse,alteration, or accident such as:Improper or unauthorized repair;Failure to follow proper installation instructions and/or scheduled maintenanceprocedures as prescribed in your MRC cards;Improper maintenance;Damage in shipment;Abnormal use;Removal, alteration, or obliteration of the rating plate;This warranty also does not cover: Transportation or travel over 100 miles/160 km (50 miles/80 km each way), or traveltime over two hours;Overtime or holiday charges;Consequential damages (the cost of repairing or replacing other property that isdamaged), loss of time, profits, use or any other incidental damages of any kind.1-1
UHC-PThere are no implied warranties or merchantability or fitness for any particular use of purpose.For international warranty, the above procedures apply, except that the customer is responsible forfreight and duty charges.PARTS ORDERING AND SERVICE INFORMATIONParts orders may be placed directly with your local Frymaster Factory Authorized Service Center(FASC)/Distributor. A list of Frymaster FASC/Distributors was included with the cabinet whenshipped from the factory. If you do not have access to this list, please contact the Frymaster ServiceDepartment at 1-800-24-FRYER or 1-318-865-1711.Please note that orders for wire/plastic trays, stacking kits, carts and casters should be placedwith your local Kitchen Equipment Supplier (KES). Frymaster does not supply theseaccessory items.To speed up your order, the following information is required:Model NumberSerial NumberVoltageItem Part NumberQuantity NeededService may be obtained by contacting your local Frymaster Authorized Service Center/Distributor.Service information may be obtained by calling the Frymaster Service Department. The followinginformation will be needed in order to assist you quickly and efficiently:Model NumberSerial NumberNature of theProblemAlso any other information which may be helpful in solving your service problem.RETAIN AND STORE THIS MANUAL IN A SAFE PLACE FOR FUTURE USE.1-2
UHC-P1.2 Product TraysThere are 3 product tray sizes. See Appendices A and C for specific product volumes andrecommended holding sizes and times. Use the tray that is designed for the specific productdescribed below:A. 1/3-size plastic tray – Holds meat and egg products that are grilled (hamburger patties,bacon, eggs, sausage, etc.) There are two important procedures to remember when storinggrilled products: The product should not be drained when picked up from the grill.The product is stacked when placed in the proper tray. 10-1 and sausage patties can bestacked up to six high. Eggs (except scrambled), grilled chicken and 4-1 patties can bestacked up to three high.B. 1/2-size wire tray – holds fried products (McNuggets, McChicken, Filet-O-Fish, etc.)Remember this important procedure when storing fried products: Fried products are to be placed on the wire rack. The rack should be placed on a crumbtray. No tray liners are required for these trays.C. Full-size plastic tray – holds baked products (biscuits, muffins, etc.) Follow theseprocedures for baked products: After the biscuits have been removed from the biscuit oven, remove the wrapper andopen the cardboard box.Put a tray liner in the tray and slide the biscuits onto the liner. The biscuit trays can holdup to 30 frozen biscuits, 20 scratch biscuits or 20 muffins.Important Operational TipsWhen placing a tray into the cabinet, make sure the slot line on the tray handle lines up with the edgeof the slot.Discard cracked or damaged trays.When removing portions from a tray, slide the tray only as far as needed, then quickly return the trayto the slot line.1-3
UHC-P1.3 Install Grill ClipThe grill clip is shipped in the accessory package and isdesigned to hold the 1/3-size grill tray. It attaches to thegrill to make transfer from the grill to the UHC faster andsafer. Position the front of the grill clip under the lipof the grill.Lower the back of the clip until the grooves restover the grill bar. The grill clip should firmlyseat on the front of the grill. If the clip doesn’tfit snuggly, simply loosen the four nuts underthe clip and slide it in or out as needed to tightenagainst the bar. Tighten the nuts after the clip isproperly adjusted.The grill clip attaches to the grill and holdsgrilled product in a UHC-P tray, makingtransfer to the holding cabinet easier.1.4 Installation of 4” LegsCAUTIONUse caution when handling the cabinet or tilting the unit to/from the floor to installthe legs. Maneuvering the cabinet should be accomplished by at least two people.A. Carefully place the Universal Holding Cabinet on its right side (direction is determined withyou facing the front of the unit), exposing the base of the cabinet.B. Mount the leg pads to the bottom of the base using the 16-¼"-20 x ½" long screws andlockwashers provided.C. Screw the leg into the mounted leg pad until fully tight.D. Carefully turn the UHC upright until the unit stands on its legs. Perform Step 2, Power Up.IF THE UHC-P IS INSTALLED WITH THE COUNTERTOP OPTION, ENSURE THEAREA WHERE THE UHC-P BASE AND COUNTERTOP MEET IS PROPERLYSEALED WITH A FOOD GRADE TYPE SEALANT.1-4
UHC-P2 Power UpALL ELECTRICALLY OPERATED APPLIANCES MUST BE ELECTRICALLYGROUNDED IN ACCORDANCE WITH LOCAL CODES, OR IN THE ABSENCE OFLOCAL CODES, WITH NATIONAL ELECTRIC CODE, ANSI/NFPA NO. 70-1990.A. Power Requirements: Voltage – 208/240 VAC 2620 Watts @ 208V – 3420 Watts @ 240V Frequency – 50/60 Hertz Single Phase 20 amp ServiceTHIS APPLIANCE IS EQUIPPED WITH A THREE-PRONG GROUNDING PLUG FORYOUR PROTECTION AGAINST SHOCK HAZARD AND MUST BE PLUGGED INTO APROPERLY GROUNDED THREE-PRONG RECEPTACLE. DO NOT CUT OR REMOVETHE GROUNDING PRONG FROM THIS PLUG.ALL UNITS (CORD CONNECTED OR PERMANENTLY CONNECTED) SHOULD BECONNECTED TO A GROUNDED POWER SUPPLY SYSTEM.B. Plug the Universal Holding Cabinet-P into the power source.C. Place the power switch in the ON position. All control displays will illuminate greenapproximately 2 seconds after the power switch is activated.D. Monitor the temperature of the slots. The time it takes the slot(s) to heat from ambient (room)temperature to a 155 F (68 C) setpoint should be approximately 15 minutes. It should takeapproximately 25 minutes to reach a 200 F (93 C) setpoint. If setpoint is not consistentlyachieved within these limits, call your local Factory Authorized Service Center for repair.2-1
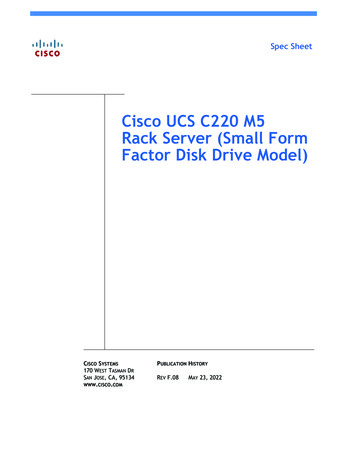
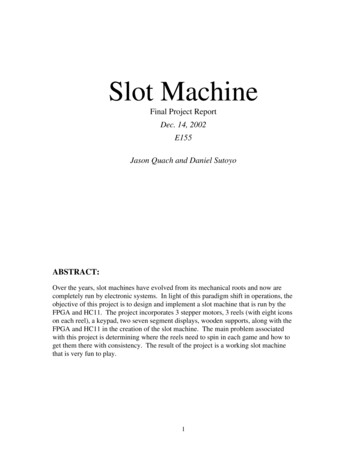
UHC-P3 Operational OverviewThe Universal Holding Cabinet-P (UHC-P) has four slots, which hold up to three trays of product ortwo slots, which hold three trays each. The narrow model has four slots, which hold one tray each.Each slot has a controller, which indicates product and holding time for each tray position.Figure 13-1
UHC-PBreakfast SetupLunch SetupDefault SettingsLeftCenterDefault -1Slot 1Slot 1ROUNROUNCBACGRCK4-14-1Slot 2Slot 2SCRAFOLDCBACNUGGNONENUGGSlot 3Slot 3SCRABISCNONEMcCKNONEFISHSlot 4Slot 4The UHC-P is ready for operation out of the box, with the slots set for the breakfast and lunch menusillustrated in the graphic above.3.1 Cabinet Operation1. Turn the power switch ON.2. The displays will light and show LOW TEMP.3. Press the Menu key to scroll to the desired menu, release the key and immediately press theTemperature key. The chosen menu is locked in. NOTE: All temperature and hold-time settingsare to McDonald’s specifications. Menu or other setting changes require a Personal DigitalAssistant (PDA), a hand-held computer and related software. Programming the cabinet with aPDA is covered in Chapter 4.3.2 Timer OperationPress the timer key adjacent to the desired slot. The timer counts down from a preset value. Thedisplay alternates between the product name and the remaining hold time. If more than one slot isholding the same product, the location with the least remaining holding time is indicated by abrighter display and illuminated dots.Stopping the TimerPress the timer key next to the slot position to turn a timer off. The timer stops and the displaydims, indicating inactivity. The use-first indicator moves to the next appropriate slot.3-2
UHC-P3.3 Cook More PromptsThe Cook More prompt sounds at a preset time prior to the expiration of the last tray of a specificproduct. No acknowledgement is necessary. The three-second audible alarm and the display of COOKMORE serve as a reminder to cook more of the needed product.3.4 Using Clean ModePress the Menu key repeatedly until CLEAN MODE is displayed on the screen. Release the key andimmediately press the Temperature key. Upload Palm will display. (This is a prompt to upload datacaptured by the cabinet during the day’s operation. Instructions for uploading data to the PDA areprovided in Chapter 8.) Press the Temperature key again to display SLOT CLN MODE. This changesthe setpoint for all slots to 125 F (52 C). The display will alternate between SLOT CLN MODE and NOTSAFE YET until the temperature of the slots reaches 125 F (52 C). The display then dims.Exit Clean Mode by pressing the Menu key until the desired menu choice appears. Release the keyand immediately press the Temperature key; the choice is locked in. This must be done for each slot.The display will show SLOT TEMP LOW until it reaches the setpoint for the chosen product.3.4 Turning Slots OFFPress the Menu key on a slot until SLOT OFF is displayed. Release the key and immediately press theTemperature key; the choice is locked in.3.5 Temperature DisplayPress the Temperature key four times and the temperatures and setpoints will be displayed in thissequence: Top plate temperatureBottom plate temperatureTop plate setpointBottom plate setpoint3.6 Temperature AlarmsThere are five temperature alarms: High TemperatureLow TemperatureFDASensorRise Time3-3NOTE: Narrow modeldisplays only the actualtemperature.
UHC-PIf an alarm condition occurs, an audible alarm sounds and the display alternates between the productselection and the alarm message. Timers cannot be started if a slot is displaying an alarm message.3.6.1 High and Low-Temperature AlarmsIf the slot temperature is above or below the limits for the product selected, the display willshow SLOT TEMP HIGH or SLOT TEMP LOW. An alarm will sound. Press a timer key to turn offthe audible alarm. The audible alarm does not sound during initial cabinet startup.3.6.2 Food and Drug Administration (FDA) AlarmThe FDA alarm indicates the slot temperature is below the preset limit to hold a product. Anaudible alarm sounds and the alarm message reads TEMP UNDER FDA. Press a timer key to turnoff the audible alarm. The message remains until the slot temperature is within limits. Pressthe timer key to clear the FDA alarm.3.6.3 Sensor-Range AlarmThe Sensor Fail alarm indicates a sensor temperature value above or below the 90-250 F (32121 C) range of the slot. An audible alarm sounds. The displayed message is SENS ALRM.Press a timer key to end the audible alarm. Service is required to correct the sensor alarm.3.6.4 Rise-Time AlarmA rise-time alarm indicates the slot temperature failed to reach operating temperature withina preset time after start up. The displayed message is SLOT RISE RATE. An audible alarmsounds. Press a timer key to turn off the audible alarm. Service is required to correct a risetime alarm.3.6.5 Additional Out of Tolerance DisplaysHHH in the display indicates a sensor error. Service is required.LLLL indicates a sensor error or a slot below 50 F (10 C). Allow the slot to operate for 10minutes. If LLLL remains, call for service.3-4
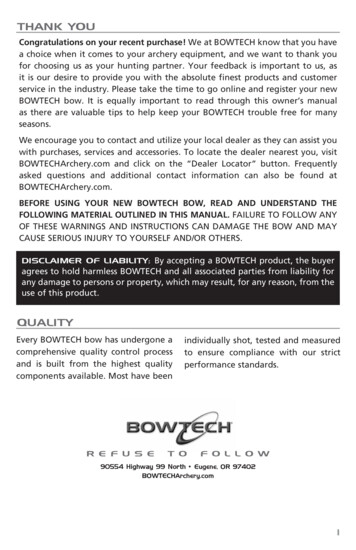
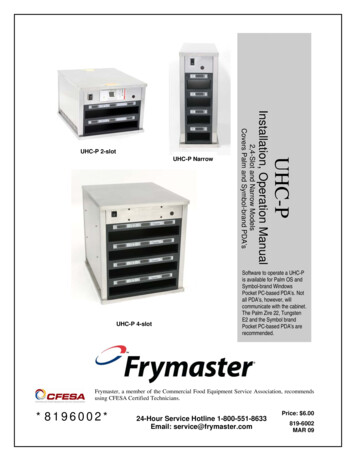
UHC-P3.7 Programming OverviewA Palm Pilot loaded with the UHC-P software is available from Frymaster. All programming ofthe cabinet, except initial default settings, is first entered into a PDA then beamed into the UHC-P.Below is an annotated look at the main UHC-P screens on a Palm Pilot. The appearance of thescreen varies with software versions and PDA’s*. Programming and use are covered in Section 47. PDA software should be loaded onto a computer accessible to the store manager for use inacquiring and loading UHC-P software. Loading and acquiring software are described in Chapters10, 11. See the PDA manual for a description of its operation.Menu barAccessed by tapping onSetup in top left of display.EditAccesses featureswithin the Palmsoftware.Food LibraryContains holdingparameters forexisting items andspecial itemscreated by the user.Items are storedhere and copied to amenu when needed.The items arepermanently storedin the Library unlesserased by the user.ViewAccesses featureswithin the UHC-Psoftware.MenusAccesses cabinetconfigurations forbreakfast, lunch andspecials.InfoAccesses version ofUHC-P software.MenuProducts are movedhere from the FoodLibrary. Tapping Menureveals a display todelete menus andcreate new menus. Fiveis the maximum. Apassword is required.See Chapter 5.Breakfast, LunchSpecialEditFood items arestored in a specificmenu: breakfast,lunch or a special.The menu for a fooditem is selectedhere.This function, whichrequires a password toopen, allows the holdingparameters of a food itemto be changed. SeeChapter 5 for passwords.AddRemoveUsed to create newfood items. A passwordis required. SeeChapter 5.Used to removeitems from a menu.LanguageUsed to change thelanguage displayedand changetemperature displayfrom Fahrenheit toCelsius. A passwordis required. SeeChapter 5.LogsShows cabinetactivity.abc123Used to access akeyboard, whichallows text entry andediting of menuitems.Used to access anumber keyboard,which allowsnumerical entry.Figure 13-5NOTE: Button location andscreen appearance differbetween the Palm andSymbol units. The screensshown are of a Palm. TheSymbol screen has similargraphics and the samebuttons.
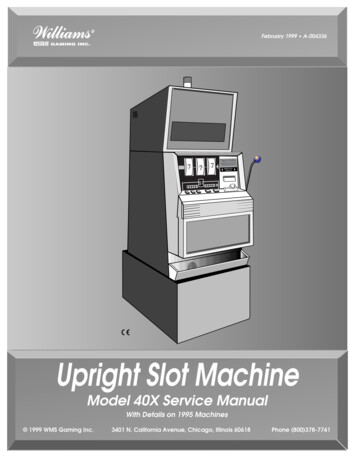
UHC-PLunchIndicates menucabinet is configuredfor. Breakfast andSpecials aresimilarly displayed.Cabinet DisplayShown anytime amenu is chosen fromthe Menu pull-downin the top rightcorner. Food itemsfor slot positions arechosen by tappingon the triangle ineach slot window.iThis is the preseticon and is tapped togain access tostored cabinetconfigurations.ReceiveThis is used todownloadconfigurations andlogs of daily cabinetactivity.TransferUsed to transmit or“beam” cabinetconfigurations fromthe PDA to the UHCP cabinet.Abc*123*Used to access akeyboard, whichallows text entry andediting of menuitems.Used to access anumber keyboard,which allowsnumerical entry.* The letter and numerickeyboards are accessedwith a keyboard icon inthe bottom right of aSymbol display.Figure 23-6NOTE: Button location andscreen appearance differsbetween the Palm andSymbol units. The screensshown are of a Palm. TheSymbol screen has similargraphics and the samebuttons.
UHC-P4 Programming the UHC-PA PDA with UHC-P software installedmust be used to alter or add to themenu items stored in the UHC-Pcabinet. A Palm Pilot with thesoftware loaded is available for theUHC-P. Other Palm models can beused, however, they must have version4.0 or later of the Palm operatingsystem. Software for a Symbol-brandPDA, which runs on a Pocket PCoperating system, is also available.Figure 1: Palm Pilot with UHCP software displayed.Figure 2A PDA is not necessary to initiallyoperate the UHC-P. A default menu isloaded at the factory.A PDA and its UHC-P software,however, make setups for promotionalitems and special configurations easy tobuild and repeat. Cabinet activity can betransmitted from the UHC-P to a PDA.NOTE: Rechargeable PDA’smust be recharged frequently.Battery-powered PDA’s musthave the batteries regularlyreplaced. Some PDA’s willlose user-installed software ifleft with a dead battery for anextended period.With the proper security clearance, menu items can be created and edited in the software. See Figure 1.The new items, along with existing products, are stored in the FoodLibrary, where they can be moved to the Menu and beamed into theUHC-P cabinet. The configurations established in a PDA are beamed intothe UHC-P cabinet’s lens. See figure 2.4.1 Opening the UHC-P SoftwareNOTE: Button location andscreen appearance differbetween the Palm andSymbol units. The screensshown are of a Palm. TheSymbol screen has similargraphics and the samebuttons.Turn the PDA ON and navigate tothe screen holding the programicons.The UHC-P icon shows on thescreen. Tap it.The Setup screen is displayed. Seefigure 4.Figure 3: Tap the UHC-Psoftware icon on the Palm orSymbol’s program screen.Figure 4: UHC-P softwareallows items in the Food Libraryto be moved into the currentmenu.4-1
UHC-P4.2 Setting the UHC-P Software for 2 or 4-Slot OperationStep 1: Tap the setup iconin the top left corner of thescreen to reveal the menubar and tap View and thenchoose Cabinet.Step 2: In the CabinetConfiguration screen’s pulldown menu, set the numberof slots the unit has andcheck the UHC-N box if thecabinet to be programmedis a narrow model. Thenumber of seconds thecabinet displays the productname and the remaininghold time can also beadjusted here in version2.10 of the software. Seefigure 3-5 for accessing akeypad for numeric entry.Step 3: Tap quit and the cabinetgraphic reflects the change.4.3 Moving Products from the Food Library to the MenuStep 1:NOTE: A passwordis required to alter themenu. See Chapter 5 forpassword entry. Tap Menuand a pull-down isdisplayed. Highlight amenu location by tapping it.In this example Breakfast ischosen. A breakfast item isbeing moved from theLibrary to the Breakfastmenu. The sameprocedure is followed forlunch and special menuitems.Step 2: Highlight the menuitem in the Food Library bytapping on it once.4-2Step 3: Tap the Copybutton once and the item iscopied into the Menuwindow and is available forloading into the UHC-Pcabinet. The item alsoremains in the FoodLibrary.
UHC-P4.4 Setting Up the Cabinet on a Palm PilotStep 1: Tap Menu in the topright corner. The Setup menu isdisplayed. Choose Breakfast oranother selection by tapping onthe word. In this example, aBreakfast menu is configured.Note: These steps should berepeated to configure thecabinet for each menu. All fiveof the menu configurations aretransferred to the cabinet eachtime menu changes arebeamed into the UHC-Pcabinet.Step 4: Choose a product foreach slot. All the products in aslot must have compatiblesetpoints.Step 2: A graphic of the UHC-Pcabinet is displayedNote: Graphics used in theseinstructions reflect the full-size4-slot cabinet. Programming a2-slot or narrow cabinet isidentical, however, the graphicon the PDA screen, with thechanges shown in section 4.2,will reflect the cabinet beingprogrammed.Step 5: The cabinet should nowbe configured for all five menus.Repeat these steps to configurethe cabinet for each menu.Step 3: Tap on a leftmost slot andfrom the drop-down menu select amenu item. Note: The leftmostslot positions establish the setpointfor that slot. Items withincompatible setpoints cannot beselected for adjacent positions.Step 6: Ensure the receivinglens on the front of the UHC-Pcabinet is clean. Hold the PDAparallel with the floor and aimit at the lens from no morethan one foot away.Tap the Transfer button.Tap the TxirDa button.NOTE: All five of the menuconfigurations are transferred tothe cabinet each time menuchanges are beamed into theUHC-P cabinet.The cabinet will beep and thePalm Pilot will display amessage, indicating asuccessful transfer. All fivemenus established on thePalm are now accessible withthe menu key on the UHC-Pcabinet.4-3
UHC-P5 Password Access5.1 Entering A PasswordAdding, editing or removing items in the Food Library andchanging the language or temperature display require a password.Tap the Key icon in the top center of the UHC-P software. Upperarrow in Figure 1. On a Symbol device, tap the word login in themenu bar. The Security Manager screen appears.Tap the abc or keyboard icon on the bottom of the screen. Showon Palm at left in Figure 1. Symbol units have a keyboard iconat the bottom right.Figure 1: Entering a passwordallows new products to be addedand existing products to beedited.Use the keyboard to enter the required password (manager) andtap OK.The Security Manager screen reappears with the password inplace. Tap OK.A Current Security screen appears. Click OK.With the proper password entered, menu items can be entered andedited. The password must be changed back to cook, the defaultsetting, to lockout access to the Food Library, language andtemperature displays.Exit the UHC-P software by tapping the House icon on the Palmscreen, which will cause it to default to the Cook password settingupon restart.5.2 Entering A New ProductStep 1: (Enter password asshown in section 5.1.) Menuitems are added by clickingthe add button in the FoodLibrary window. See arrow.Step 2: NewO appearshighlighted in the FoodLibrary window. With theNewO item highlighted, tapthe Edit button.5-1Step 3: The Edit Food Item menuappears. It allows the product tobe named and holdingtemperatures, times and CookMore prompts to be entered.
UHC-PStep 4: Tap on the line next tothe abbreviated name. Thentap on the keyboard icon* inthe corner of the PDA window(see arrow).Step 7*: Use the vertical slider onthe right side of the screen toaccess four more options andadjust them for the new product.Step 5: Use the backspacekey to eliminate the NewOtext. Tap on the keys to enteran all-capital, 4-letterabbreviated name for theproduct. Hit Done. Repeatthese steps to enter adescription.*NOTE: In the SymbolPDA, the number andletter keyboards areaccessed from the letterkeyboard icon in the rightcorner of the screen.*NOTE: Holdingtemperatures, timesand other parametersassociated with addingproducts to a menu willbe distributed byMcDonald’s officials.Tap OK and the new item isstored in the Food Library andcan be moved to a men fortransfer to the UHC-P.5-2Step 6: Tap next to the underlinedtemperature settings and then tapon the number icon in the bottomright of the *PDA display. Anumeric keypad is displayed. Use it— just as the keyboard is used insteps 4 and 5 — to enter setpointtemperatures, set hold time, cookmore time and countdown lights.The horizontal sliders can also beused to adjust temperatures andtimes.
UHC-P5.3 Changing Menu Name/Deleting MenusStep 1: Go to the menuwindow by clicking theMenu button in the rightcolumn of the display. Seearrow.Step 2: The MenuConfiguration screen isdisplayed. Highlight amenu to be deleted bytapping on it. Tap theDelete button to eliminatethe highlighted menu.Use the New button tocreate a new menu. Tapon the Abbr: field and thentap the keyboard icon toaccess the keyboard toenter a name for the newmenu item. Repeat toenter a menu name anddescription.Tap the Save button tosave the new menu.NOTE: The new menu willhave to be populated bymoving items from thefood library to the newmenu, a process describedin section 4.3.5-3
UHC-P6 PresetsThe Preset Manager or Saved Cabinet feature in later software allowscabinet configurations to be loaded and stored permanently in thePDA. These configurations, reflecting daily, weekend and specialmenu setups of all five of the menus retained in the UHC-P cabinet,can be recalled and beamed into multiple UHC-P cabinets. Thisfeature was enhanced with version 2.10 of the software. Its operation,called Saving Cabinets, is covered in section 6.3.This feature is useful to retain cabinet configurations for differentstores and specials.The cabinet configuration displayed on the Palm must be changed when setting up specialconfigurations for saving as Presets. To name and save as a Preset the existing cabinet configurationsin your Palm, go to Step 3 below.Follow the steps below to enter the Preset Manager and create and store cabinet configurations.6.1 Configuring Presets (used with pre-2.10 versions of the software)Step 1: Go to setup andchoose a menu. In thisexample, we have startedwith Breakfast.Step 4: Tap the Newbutton in the bottom left ofthe Present Managerwindow.Step 2: Configure the items inthe cabinet for that menu,lunch and all special menusyou want to store in thispreset.Step 5: Tap the keyboard iconand use the keyboard toeliminate the New Preset textand enter a new ID anddescription .Tap Done.6-1Step 3: Tap on thePreset icon to displaythe Preset Manager.See arrow.Step 6: Tap the Savebutton and theconfiguration entered isstored.
UHC-P6.2 Loading Presets (used with pre-2.10 versions of the software)Figure 1: In the menu window, tapthe Preset icon.Step 2: Highlight the desiredPreset by tapping on it in thePreset Manager. Tap on Load.Step 3: All the menusestablished for the preset areloaded into the Palm and areready to be beamed into theUHC-P.6.3 Saving Cabinets with Software Version 2.10 or laterStep 2: Clicking on the i icondisplays the Saved Cabinets dialogStep 1: When changes are made tobox. The buttons are describedthe layout of the cabinet on thedisplayed graphic, the text by the i icon below.changes to modified. (Modified doesn’t Open: Loads highlighted cabinetappear on the Symbol’s screen.) Seeconfiguration.arrow. This serves as a prompt that the Delete: Eliminates highlightedlayout has been changed and it iscabinet configurations.possible to save the new configuration. Save: Saves new cabinetconfigurations to the saved cabinetbox. Hit only after cabinetconfiguration has been named.New: Starts process of savingcabinet.Cancel: Exits program or abortssaving cabinet operation.6-2Step 3: Clicking New produces adate in the Name field and in thebox, which stores named cabinets.NOTE: Button location andscreen appearance differbetween the Palm andSymbol units. The screensshown are of a Palm. TheSymbol screen has similargraphics and the samebuttons.
UHC-PStep 4: Click in the desiredfield on the dialog box andclick on the keyboard icon atthe bottom (see arrow) todisplay a keyboard for nameand description entry.Step 5: Use the keyboardto enter a name. Indicatein the name if the savedconfiguration is for aNarrow or 2-slot cabinetwhen appropriate. ClickDone when complete.Repeat the process toenter a descrip
UHC-P 1-1 1 Universal Holding Cabinet The Frymaster Universal Holding Cabinet-P (UHC-P) developed and manufactured exclusively for McDonald's, is a short-term holding device to extend the freshness of a wide variety of cooked products. The UHC-P meets all McDonald's standards for safety, efficiency, and cleanliness. 1.1 Warranty Statement